09 netty的序列化算法扩展和参数配置
 1)可扩展性代码的思路
2)使用netty需要关注的网络参数
1)可扩展性代码的思路
2)使用netty需要关注的网络参数
1 序列化算法
序列化算法要求:序列化算法能够实现对象 => 字节数组 => 字节数组的转化。
- 序列化时,需要将 Java 对象变为要传输的数据(可以是 byte[],或 json 等,最终都需要变成 byte[])
- 反序列化时,需要将传入的正文数据还原成 Java 对象,便于处理
如何实现序列化算法的可扩展性======?
可以定义一个序列化接口,该接口规范了序列化和反序列化方法,此外可以在该接口内部通过Enum实现序列接口,从而对外提供不同的序列化算法
需求:实现接口能够支持以下序列化算法,并且能够支持进一步扩展
| 序列化实现 |
|---|
| JDK自带的序列化算法 |
| JSON(gson) |
- 实际测试时会发现采用json进行序列化产生的byte数组字节数目要明显少于JDK默认的序列化算法
接口实现:
package extension.rpcFramework.protocol;

import com.google.gson.*;

import java.io.*;
import java.lang.reflect.Type;
import java.nio.charset.StandardCharsets;

public interface Serializer {
    // 反序列化方法: 字节数组 => 对象
    /*
        反序列化算法中有的需要提前知道class类型信息,
        JDK的反序列化算法不需要该信息,原因在于类型信息包含在字节数组中
        Class<T>是class对象的泛型
        <T>用于告诉编译器该方法时泛型方法
     */
    <T> T deserialize(Class<T> clazz, byte[] bytes);
    // 序列化方法:  对象 => 字节数组
    <T> byte[] serialize(T object);

    int ordinal();

    // JDK方法实现序列化
    enum Algorithm implements Serializer{
        Java{
            @Override
            public <T> T deserialize(Class<T> clazz, byte[] bytes) {
                T message = null;
                try {
                    ObjectInputStream ois = new ObjectInputStream(new ByteArrayInputStream(bytes));
                    message = (T)ois.readObject();
                } catch (IOException | ClassNotFoundException e) {
                    throw new RuntimeException("反序列化错误",e);
                }
                return message;
            }

            @Override
            public <T> byte[] serialize(T object) {
                //objectOutputStream:把对象转成字节数据的输出到文件中保存,对象的输出过程称为序列化,可实现对象的持久存储
                ByteArrayOutputStream bos = new ByteArrayOutputStream();
                ObjectOutputStream oos = null;
                try {
                    oos = new ObjectOutputStream(bos);
                    oos.writeObject(object);
                    return bos.toByteArray();
                } catch (IOException e) {
                    throw new RuntimeException("序列化错误",e);
                }
            }
        },
        Json{
            @Override
            public <T> T deserialize(Class<T> clazz, byte[] bytes) {
                Gson gson = new GsonBuilder().registerTypeAdapter(Class.class,new Serializer.ClassCodec()).create();
                String json = new String(bytes,StandardCharsets.UTF_8);  // bytes数组=>json字符串
                // return new Gson().fromJson(json,clazz);
                return gson.fromJson(json,clazz);
            }

            @Override
            public <T> byte[] serialize(T object) {
                Gson gson = new GsonBuilder().registerTypeAdapter(Class.class,new Serializer.ClassCodec()).create();
                //String json = new Gson().toJson(object);      // 对象 => json字符串
                String json = gson.toJson(object);
                return json.getBytes(StandardCharsets.UTF_8); // 注意:序列化和反序列化的编码方式要保持一致
            }
        }
    }
    // 让GSON支持String Class类型的序列化和反序列化,FastJson不存在这种问题
    class ClassCodec implements JsonSerializer<Class<?>>, JsonDeserializer<Class<?>> {
        @Override
        public Class<?> deserialize(JsonElement jsonElement, Type type, JsonDeserializationContext jsonDeserializationContext) throws JsonParseException {
            String str = jsonElement.getAsString();
            Class<?> res = null;
            try {
                res =  Class.forName(str);
            } catch (ClassNotFoundException e) {
                e.printStackTrace();
            }
            return res;
        }

        @Override
        public JsonElement serialize(Class<?> aClass, Type type, JsonSerializationContext jsonSerializationContext) {
            return new JsonPrimitive(aClass.getName());
        }
    }
}
- 上述方法通过枚举的方式支持两种序列化算法
package extension.rpcFramework.protocol;

import extension.rpcFramework.config.Config;
import extension.rpcFramework.message.Message;
import io.netty.buffer.ByteBuf;
import io.netty.channel.ChannelHandler;
import io.netty.channel.ChannelHandlerContext;
import io.netty.handler.codec.MessageToMessageCodec;
import lombok.extern.slf4j.Slf4j;
import java.util.List;

/*
    该处理的前置handler必须是LengthFieldBasedDecoder
 */
@Slf4j
@ChannelHandler.Sharable
public class MessageCodecSharable extends MessageToMessageCodec<ByteBuf, Message> {
    static byte[] magicNum = {'l','u','c','k'};
    @Override
    protected void encode(ChannelHandlerContext ctx, Message msg, List<Object> outList) {
        try{
            ByteBuf out = ctx.alloc().buffer();
            // 1字节的协议版本
            Byte version = 1;
            // 1字节的序列化方式: 0表示JDK,1表示json(通过配置类确定)

            int serialWay = algorithm.ordinal();  // 获取该枚举类的序数写入协议中

            // 总字节数目 = 16(如果不是2的幂可以填充)
            out.writeBytes(magicNum);             // 4字节的协议魔数
            out.writeByte(version);                // 1字节的协议版本
            out.writeByte(serialWay);              // 1字节的序列化方式: 0表示JDK,1表示json
            out.writeByte(msg.getMessageType());   //  1字节指令类型
            out.writeInt(msg.getSequenceId());     // 4字节序列号

            //objectOutputStream:把对象转成字节数据的输出到文件中保存,对象的输出过程称为序列化,可实现对象的持久存储
            byte[] content = algorithm.serialize(msg);
            out.writeInt(content.length);              // 写入对象序列化的后的字节数组长度
            out.writeByte(0xff);                       //  填充字符,凑满2的幂为16
            out.writeBytes(content);                   // 写入对象序列化数组
            outList.add(out);
        }catch (Exception e){
            e.printStackTrace();
        }

    }

    @Override
    protected void decode(ChannelHandlerContext ctx, ByteBuf in, List<Object> out){
        try{
            int magicNum = in.readInt();
            byte version = in.readByte();
            // serialType 和 messageType会在反序列化过程中确定算法类型和class类型 !!!!
            byte serialType = in.readByte();
            byte messageType = in.readByte();
            int sequenceId = in.readInt();
            int length = in.readInt();
            byte padding = in.readByte();
            byte[] arr = new byte[length];
            in.readBytes(arr,0,length);
            Serializer algorithm = Serializer.Algorithm.values()[serialType];                  // 确定序列化算法
            Message message = algorithm.deserialize(Message.getMessageClass(messageType),arr);
            out.add(message);
        }catch (Exception e){
            e.printStackTrace();
        }

    }
}
- 序列化时通过Serializer algorithm = Config.getSerializerAlgorithm()这个配置类确定序列化算法
- 反序列化时通过自定义协议中的序列化算法字段确定序列化算法
2 网络连接的部分关键参数
Java中SocketChannel和ServerSocketChannel的理解:服务端必须建立ServerSocketChannel后监听端口后,客户端才能够请求服务端建立SocketChannel,服务端接受到客户端的请求后,为客户端创建socketChannel实现双方通信。SocketChannel可以有多种实现,Java网络通信通常采用NioServerSocketChannel。
ServerSocketChannel的作用:监听新的TCP连接,创建Socket Channel,没有传输数据的能力。
| 参数 | 参数设置对象 | 备注 |
|---|---|---|
| CONNECT_TIMEOUT_MILLIS | SocketChannel,ServerSocketChannel | 设置请求连接建立请求的超时时间 |
| SO_BACKLOG | ServerSocketChannel | |
| TCP_NODELAY | SocketChannel | 开启/关闭 naggle算法,默认是开启的 |
| SO_SNDBUF | SocketChannel | TCP发送窗口大小 |
| SO_RCVBUF | SocketChannel,ServerSocketChannal | TCP接受窗口大小 |
| ALLOCATOR | SocketChannel | 该分配器用于分配用户主动需要的buffer,调用ctx.alloc方法分配 |
| RCVBUF_ALLOCATOR | SocketChannel | 该分配器用于分配存放入站数据的buffer,分配的buffer大小能够自适应调整,使用直接内存 |
- SO_SNDBUF ,SO_RCVBUF通常不用配置,现代操作系统支持自动调节传输层缓冲区大小

2-1 连接超时时间
设置方式
需求:客户端与服务端建立channel连接时
package extension.chatRoom.client;
import extension.chatRoom.protocol.ProtocolFrameDecoder;
import io.netty.bootstrap.Bootstrap;
import io.netty.channel.*;
import io.netty.channel.nio.NioEventLoopGroup;
import io.netty.channel.socket.SocketChannel;
import io.netty.channel.socket.nio.NioSocketChannel;
import io.netty.handler.logging.LoggingHandler;
import lombok.extern.slf4j.Slf4j;

@Slf4j
public class TestConnectionTimeOut {
    /*
       客户端超时配置:
       1) 通过bootstrap.option()配置SocketChannel连接超时时间

       服务端连接超时配置
       1) new ServerBootstrap().option(ChannelOption.CONNECT_TIMEOUT_MILLIS,100)
       2) new ServerBootstrap().childOption(ChannelOption.CONNECT_TIMEOUT_MILLIS,100)
       服务端可以通过option和childOption配置超时时间,二者配置的对象不同,一个是ServerSocketChannel
       另外一个是SocketChannel
     */
    public static void main(String[] args) {
        NioEventLoopGroup g = new NioEventLoopGroup();
        LoggingHandler LOGIN_HANDLER = new LoggingHandler();
        try{
            Bootstrap bootstrap = new Bootstrap();
            bootstrap.channel(NioSocketChannel.class);
            // 设置超时时间为300ms
            bootstrap.option(ChannelOption.CONNECT_TIMEOUT_MILLIS,300);
            bootstrap.group(g);
            bootstrap.handler(new ChannelInitializer<SocketChannel>() {
                @Override
                protected void initChannel(SocketChannel ch) throws Exception {
                    ch.pipeline().addLast(LOGIN_HANDLER);
                }
            });
            Channel channel = bootstrap.connect("localhost", 8080).sync().channel();
            channel.closeFuture().sync();
        }catch (Exception e){
            log.debug("client error",e);
        }finally {
            g.shutdownGracefully();
        }
    }
}
不启动服务器,运行上述代码,当超时时间设置为300ms,日志输出
16:09:38 [DEBUG] [nioEventLoopGroup-2-1] i.n.h.l.LoggingHandler - [id: 0xfa647f23] REGISTERED
16:09:38 [DEBUG] [nioEventLoopGroup-2-1] i.n.h.l.LoggingHandler - [id: 0xfa647f23] CONNECT: localhost/127.0.0.1:8080
16:09:38 [DEBUG] [nioEventLoopGroup-2-1] i.n.h.l.LoggingHandler - [id: 0xfa647f23] CLOSE
16:09:38 [DEBUG] [nioEventLoopGroup-2-1] i.n.h.l.LoggingHandler - [id: 0xfa647f23] UNREGISTERED
16:09:38 [DEBUG] [main] e.c.c.TestConnectionTimeOut - client error
io.netty.channel.ConnectTimeoutException: connection timed out: localhost/127.0.0.1:8080
	at io.netty.channel.nio.AbstractNioChannel$AbstractNioUnsafe$1.run(AbstractNioChannel.java:263)
	at io.netty.util.concurrent.PromiseTask$RunnableAdapter.call(PromiseTask.java:38)
	at io.netty.util.concurrent.ScheduledFutureTask.run(ScheduledFutureTask.java:127)
	at io.netty.util.concurrent.AbstractEventExecutor.safeExecute(AbstractEventExecutor.java:163)
	at io.netty.util.concurrent.SingleThreadEventExecutor.runAllTasks(SingleThreadEventExecutor.java:416)
	at io.netty.channel.nio.NioEventLoop.run(NioEventLoop.java:515)
	at io.netty.util.concurrent.SingleThreadEventExecutor$5.run(SingleThreadEventExecutor.java:918)
	at io.netty.util.internal.ThreadExecutorMap$2.run(ThreadExecutorMap.java:74)
	at io.netty.util.concurrent.FastThreadLocalRunnable.run(FastThreadLocalRunnable.java:30)
	at java.lang.Thread.run(Thread.java:748)
超时时间设置为5s
16:11:05 [DEBUG] [nioEventLoopGroup-2-1] i.n.h.l.LoggingHandler - [id: 0x99d830bc] REGISTERED
16:11:05 [DEBUG] [nioEventLoopGroup-2-1] i.n.h.l.LoggingHandler - [id: 0x99d830bc] CONNECT: localhost/127.0.0.1:8080
16:11:07 [DEBUG] [nioEventLoopGroup-2-1] i.n.h.l.LoggingHandler - [id: 0x99d830bc] CLOSE
16:11:07 [DEBUG] [nioEventLoopGroup-2-1] i.n.h.l.LoggingHandler - [id: 0x99d830bc] UNREGISTERED
16:11:07 [DEBUG] [main] e.c.c.TestConnectionTimeOut - client error
io.netty.channel.AbstractChannel$AnnotatedConnectException: Connection refused: no further information: localhost/127.0.0.1:8080
Caused by: java.net.ConnectException: Connection refused: no further information
	at sun.nio.ch.SocketChannelImpl.checkConnect(Native Method)
	at sun.nio.ch.SocketChannelImpl.finishConnect(SocketChannelImpl.java:717)
	at io.netty.channel.socket.nio.NioSocketChannel.doFinishConnect(NioSocketChannel.java:327)
	at io.netty.channel.nio.AbstractNioChannel$AbstractNioUnsafe.finishConnect(AbstractNioChannel.java:336)
	at io.netty.channel.nio.NioEventLoop.processSelectedKey(NioEventLoop.java:685)
	at io.netty.channel.nio.NioEventLoop.processSelectedKeysOptimized(NioEventLoop.java:632)
	at io.netty.channel.nio.NioEventLoop.processSelectedKeys(NioEventLoop.java:549)
	at io.netty.channel.nio.NioEventLoop.run(NioEventLoop.java:511)
	at io.netty.util.concurrent.SingleThreadEventExecutor$5.run(SingleThreadEventExecutor.java:918)
	at io.netty.util.internal.ThreadExecutorMap$2.run(ThreadExecutorMap.java:74)
	at io.netty.util.concurrent.FastThreadLocalRunnable.run(FastThreadLocalRunnable.java:30)
	at java.lang.Thread.run(Thread.java:748)
总结:代码中设置的是netty的超时时间,如果该超时时间过长,当连接无法建立时,底层也会抛出连接异常。
超时异常源码
背景:客户端中主线程调用connect方法后会发起NIO线程与服务端建立连接,此时主线程可以采用
- 1)sync()方法同步等待连接建立结果
- 2)不进行等待,让NIO线程得到连接建立结果后调用主线程提供的回调函数,
这里以第1种情况为例,分析主线程如果获取NIO线程连接超时的结果:
step1:客户端首先执行connect方法
ChannelFuture cfu = bootstrap.connect("localhost", 8080).sync();
step2:抛出连接超时异常,查看方法AbstractNioChannel.java:263行代码块
io.netty.channel.nio.AbstractNioChannel$AbstractNioUnsafe$1.run(AbstractNioChannel.java:263)
	at io.netty.util.concurrent.PromiseTask$RunnableAdapter.call(PromiseTask.java:38)
	at io.netty.util.concurrent.ScheduledFutureTask.run(ScheduledFutureTask.java:127)
	at io.netty.util.concurrent.AbstractEventExecutor.safeExecute(AbstractEventExecutor.java:163)
	at io.netty.util.concurrent.SingleThreadEventExecutor.runAllTasks(SingleThreadEventExecutor.java:416)
	at io.netty.channel.nio.NioEventLoop.run(NioEventLoop.java:515)
	at io.netty.util.concurrent.SingleThreadEventExecutor$5.run(SingleThreadEventExecutor.java:918)
	at io.netty.util.internal.ThreadExecutorMap$2.run(ThreadExecutorMap.java:74)
	at io.netty.util.concurrent.FastThreadLocalRunnable.run(FastThreadLocalRunnable.java:30)
	at java.lang.Thread.run(Thread.java:748)
					connectPromise = promise;
                    requestedRemoteAddress = remoteAddress;
                    // Schedule connect timeout.
                    // 获取设置的连接超时时间
                    int connectTimeoutMillis = config().getConnectTimeoutMillis();
                    if (connectTimeoutMillis > 0) {
                        // eventLoop线程池提交定时任务,定时时间就是设置的超时时间
                        connectTimeoutFuture = eventLoop().schedule(new Runnable() {
                            @Override
                            public void run() {
                                ChannelPromise connectPromise = AbstractNioChannel.this.connectPromise;
                                ConnectTimeoutException cause =
                                        new ConnectTimeoutException("connection timed out: " + remoteAddress);
                                if (connectPromise != null && connectPromise.tryFailure(cause)) {
                                    close(voidPromise());
                                }
                            }
                        }, connectTimeoutMillis, TimeUnit.MILLISECONDS);
                    }
从上述源码中可以总结出以下信息:
- 当设置超时时间后,连接超时检测是通过向EventLoop线程池提交定时任务实现的
eventLoop().schedule(new Runnable() ....
- 当定时任务执行时,通过Promise容器在线程间传递连接超时异常
connectPromise.tryFailure(cause):tryFailure方法会mark失败并将cause通知所有的listeners
2-2 backlog参数的意义
netty中,backlog是服务端连接建立时需要设置的参数,该参数用于设置全连接队列的大小。
背景:
- 第一次握手,client 发送 SYN 到 server,状态修改为 SYN_SEND,server 收到,状态改变为 SYN_REVD,并将该请求放入sync queue 队列(半连接队列)
- 第二次握手,server 回复 SYN + ACK 给 client,client 收到,状态改变为 ESTABLISHED,并发送 ACK 给 server
- 第三次握手,server 收到 ACK,状态改变为 ESTABLISHED,将该请求从 sync queue 放入 accept queue(全连接队列)
上述方案中每个连接建立请求会先后经过两个队列,这两个队列中的请求本质上不同在于处于三次握手的不同阶段,状态不一样。实际上我们也可以通过一个队列维护两个状态的请求,现有的Linux(2.2后)是采用两个队列。
Linux设置方式:在linux中,可以通过指定backlog的数值设置上述队列的大小。
| 队列类型 | Linux设置方式 | Netty设置 |
|---|---|---|
| sync queue - 半连接队列 | 通过/proc/sys/net/ipv4/tcp_max_syn_backlog来设置 | |
| accept queue - 全连接队列 | 全连接队列大小取决于backlog 和somaxconn 的最小值,也就是 min(backlog,somaxconn) | ChannelOption.SO_BACKLOG设置大小 |
- Linux中somaxconn 是Linux内核参数,默认128,可通过/proc/sys/net/core/somaxconn进行配置,backlog是 listen(int sockfd,int backlog)函数中的参数backlog。
- 如果全连接队列(accpet queue )满了,server 发送拒绝连接的错误信息到 client
netty设置全连接队列大小代码
package extension.chatRoom.client;
import io.netty.bootstrap.ServerBootstrap;
import io.netty.channel.Channel;
import io.netty.channel.ChannelInitializer;
import io.netty.channel.ChannelOption;
import io.netty.channel.nio.NioEventLoopGroup;
import io.netty.channel.socket.SocketChannel;
import io.netty.channel.socket.nio.NioServerSocketChannel;
import lombok.extern.slf4j.Slf4j;
import java.util.ArrayList;
import java.util.List;
@Slf4j
public class TestBackLogServer {
    public static void main(String[] args) {
        List<Integer> list = new ArrayList<>();
        NioEventLoopGroup boss = new NioEventLoopGroup();
        NioEventLoopGroup worker = new NioEventLoopGroup();
        try {
            ServerBootstrap serverBootstrap = new ServerBootstrap();
            serverBootstrap.channel(NioServerSocketChannel.class);
            // 设置netty的ServerSocketChannel的全连接队列大小为2,
            serverBootstrap.option(ChannelOption.SO_BACKLOG,2);
            serverBootstrap.group(boss, worker);
            serverBootstrap.childHandler(new ChannelInitializer<SocketChannel>() {
                @Override
                protected void initChannel(SocketChannel ch) throws Exception {

                }
            });
            Channel channel = serverBootstrap.bind(8080).sync().channel();
            channel.closeFuture().sync();
        } catch (Exception e) {
            log.error("server error", e);
            e.printStackTrace();
        } finally {
            boss.shutdownGracefully();
            worker.shutdownGracefully();
        }
    }
}
netty中backlog参数的默认配置
a)netty源码中 abstract class ServerSocketChannel中bind方法会有backlog参数:
    public abstract ServerSocketChannel bind(SocketAddress local, int backlog)
        throws IOException;
b) 搜索调用bind方法的源码位置
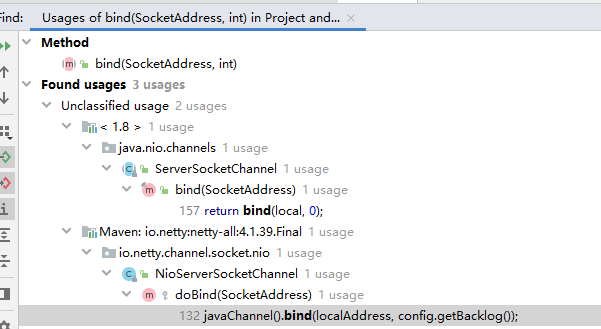
- 可以看到nio.channels和netty.channel.socket.nio中都调用了bind函数
c) 查看netty的调用位置
    @Override
    protected void doBind(SocketAddress localAddress) throws Exception {
        if (PlatformDependent.javaVersion() >= 7) {
            javaChannel().bind(localAddress, config.getBacklog());
        } else {
            javaChannel().socket().bind(localAddress, config.getBacklog());
        }
    }
d) 查看默认初始化的backlog
public class DefaultServerSocketChannelConfig extends DefaultChannelConfig
                                              implements ServerSocketChannelConfig {

    protected final ServerSocket javaSocket;
    private volatile int backlog = NetUtil.SOMAXCONN;

    @Override
    public int getBacklog() {
        return backlog;
    }
// As a SecurityManager may prevent reading the somaxconn file we wrap this in a privileged block.
        //
        // See https://github.com/netty/netty/issues/3680
        SOMAXCONN = AccessController.doPrivileged(new PrivilegedAction<Integer>() {
            @Override
            public Integer run() {
                // Determine the default somaxconn (server socket backlog) value of the platform.
                // The known defaults:
                // - Windows NT Server 4.0+: 200
                // - Linux and Mac OS X: 128
                int somaxconn = PlatformDependent.isWindows() ? 200 : 128;
                File file = new File("/proc/sys/net/core/somaxconn");
                BufferedReader in = null;
                try {
                    // file.exists() may throw a SecurityException if a SecurityManager is used, so execute it in the
                    // try / catch block.
                    // See https://github.com/netty/netty/issues/4936
                    if (file.exists()) {
                        in = new BufferedReader(new FileReader(file));
                        somaxconn = Integer.parseInt(in.readLine());
                        if (logger.isDebugEnabled()) {
                            logger.debug("{}: {}", file, somaxconn);
                        }
                    } else {
                        // Try to get from sysctl
                        Integer tmp = null;
                        if (SystemPropertyUtil.getBoolean("io.netty.net.somaxconn.trySysctl", false)) {
                            tmp = sysctlGetInt("kern.ipc.somaxconn");
                            if (tmp == null) {
                                tmp = sysctlGetInt("kern.ipc.soacceptqueue");
                                if (tmp != null) {
                                    somaxconn = tmp;
                                }
                            } else {
                                somaxconn = tmp;
                            }
                        }

                        if (tmp == null) {
                            logger.debug("Failed to get SOMAXCONN from sysctl and file {}. Default: {}", file,
                                         somaxconn);
                        }
                    }
                } catch (Exception e) {
                    logger.debug("Failed to get SOMAXCONN from sysctl and file {}. Default: {}", file, somaxconn, e);
                } finally {
                    if (in != null) {
                        try {
                            in.close();
                        } catch (Exception e) {
                            // Ignored.
                        }
                    }
                }
                return somaxconn;
            }
        });
- 上面源码上规定了backlog默认配置大小
2-3 文件描述符打开限制
ulimit -n // Linux服务器启动脚本中设置每个进程打开的文件描述符数量,属于操作系统参数
2-4 Bytebuf的配置

 serverBootstrap.childHandler(new ChannelInitializer<SocketChannel>() {
                @Override
                protected void initChannel(SocketChannel ch) throws Exception {
                    ch.pipeline().addLast(new ChannelInboundHandlerAdapter(){

                        @Override
                        public void channelRead(ChannelHandlerContext ctx, Object msg) throws Exception {
                            ByteBuf buffer = ctx.alloc().buffer();
                        }
                    });
                }
            });
需求:指定上述代码中分配的buffer类型是非池化的堆内存( ByteBuf buffer = ctx.alloc().buffer();)
| 配置项 | VM配置项目 | 配置值 |
|---|---|---|
| 是否首选分配直接内存 | -Dio.netty.allocator.type= | unpooled/pooled |
| 是否开启内存池化 | -Dio.netty.noPreferDirect= | true/false |

上述配置让netty使用的ByteBuf为非池化并且使用堆内存
netty源码中判定是否使用直接内存
        ByteBufAllocator alloc;
        if ("unpooled".equals(allocType)) {
            alloc = UnpooledByteBufAllocator.DEFAULT;
            logger.debug("-Dio.netty.allocator.type: {}", allocType);
        } else if ("pooled".equals(allocType)) {
            alloc = PooledByteBufAllocator.DEFAULT;
            logger.debug("-Dio.netty.allocator.type: {}", allocType);
        } else {
            alloc = PooledByteBufAllocator.DEFAULT;
            logger.debug("-Dio.netty.allocator.type: pooled (unknown: {})", allocType);
        }

        DEFAULT_ALLOCATOR = alloc;
netty源码中判定是否使用内存池化
 // We should always prefer direct buffers by default if we can use a Cleaner to release direct buffers.
        DIRECT_BUFFER_PREFERRED = CLEANER != NOOP
                                  && !SystemPropertyUtil.getBoolean("io.netty.noPreferDirect", false);
        if (logger.isDebugEnabled()) {
            logger.debug("-Dio.netty.noPreferDirect: {}", !DIRECT_BUFFER_PREFERRED);
        }

 浙公网安备 33010602011771号