01 Java的NIO三大组件以及buffer的原理以及应用
一、Java的NIO(non-blocking IO:非阻塞IO)的常识
1-1 NIO相关的三大组件
三大组件:channel,buffer以及selector
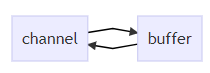
- channel:读写数据的双向通道,配合buffer一起使用
- buffer: 就是存储数据的缓冲区,配合buffer一起使用,即从 channel 将数据读入 buffer,也可以将 buffer 的数据写入 channel
- selector:选择器,配合线程来管理多个 channel,获取这些 channel 上发生的事件
channel的类型
| 名称 | 作用 | 备注 |
|---|---|---|
| FileChannel | 文件数据传输通道 | |
| DatagramChannel | UDP网络编程网络传输通道 | |
| SocketChannel | TCP网络传输通道 | 客户端/服务端都可以用 |
| ServerSocketChannel | TCP网络传输通道 | 服务器专用 |
buffer的类型
| 名称 | 作用 | ||
|---|---|---|---|
| ByteBuffer(抽象类) | 字节为单位缓冲数据 | MappedByteBuffer, DirectByteBuffer, HeapByteBuffer是bytebuffer的实现类 | 最常用 |
其他:ShortBuffer,IntBuffer,LongBuffer,FloatBuffer,DoubleBuffer,CharBuffer
1-2 三大组件之selector的概述
服务器设计架构的发展历史(selector的由来)
发展1:早期服务器处理客户端连接
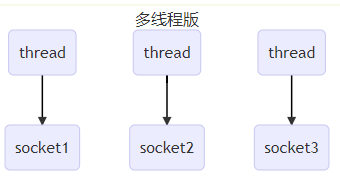
特点
- 每个客户端的socket连接都会分配一个线程进行处理
缺陷
- 内存占用高(每个线程占用几M内存)
- 线程上下文切换成本高(对CPU要求高)
- 只适合连接数少的场景
发展2:采用线程池处理客户端连接(线程池可以控制最大线程数,从而控制线程资源开销)
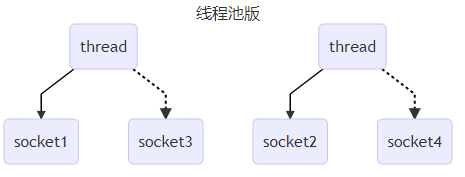
特点:
- 每个线程同一时间只能处理一个客户端连接,
缺陷
- 阻塞模式下,线程只能处理一个sokcet连接,即使这个连接没有任何数据读取,也要干等,线程利用率低。
- 仅适合短连接场景(短连接的目的是为了充分利用线程资源,每个线程单位时间段能够处理多个请求)
发展3:selector 版的服务器设计处理客户端连接请求
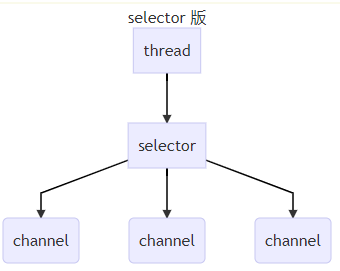
特点:selector 的作用就是配合线程来管理多个 channel,获取这些 channel 上发生的事件,
- 这些 channel 工作在非阻塞模式下,线程不会死等channel的数据。适合连接数特别多,但流量低的场景(low traffic)
- 当有读写事件发生的时候,selector就去处理并分配线程去处理,读写事件结束,线程会被释放去处理其他连接,这样让线程能够只处理读写,不会出现空等的现象。
二、缓冲区(buffer)的原理与使用方法
重点理解bytebuffer读写模式的设计思路。
2-1 bytebuffer使用的简单实例
代码
package part1;
import lombok.extern.slf4j.Slf4j;
import java.io.FileInputStream;
import java.io.IOException;
import java.nio.ByteBuffer;
import java.nio.channels.FileChannel;
@Slf4j
public class test1 {
    public static void main(String[] args){

        try(FileChannel channel = new FileInputStream("data.txt").getChannel())          {
            ByteBuffer buffer = ByteBuffer.allocate(10);
            int num = 1;
            while(true){
                /*channel与buffer配合使用:将channel中的数据读取到buffer当中*/
                int len = channel.read(buffer);
                log.warn("the {} time to access and read {} bytes!",num++,len);
                /*通过返回结果是否为-1判断buffer是否读取完毕*/
                if(len == -1)
                    break;
                buffer.flip();     /*切换读模式*/
                while(buffer.hasRemaining()){
                    byte b = buffer.get();
                    System.out.printf("%c ",b);
                }
                System.out.printf("\n");
                buffer.clear();   /*切换写模式*/
            }
        } catch (IOException e) {
            e.printStackTrace();
        }
    }
}
执行结果
设置buffer的大小为10个字节,那么从channel中获取的数据最多为10个字节。上面的实例中,
14个字节分2次读取。当数据读取完毕,channel.read(buffer)会返回-1.
10:01:57.776 [main] WARN part1.test1 - the 1 time to access and read 10 bytes!
w o y a o s h a n g
10:01:57.785 [main] WARN part1.test1 - the 2 time to access and read 4 bytes!
g a n g
10:01:57.785 [main] WARN part1.test1 - the 3 time to access and read -1 bytes!
bytebuffer的使用规范
- bytebuffer同一时刻要么读要么写,不能读写同时进行(半双工模式,类似于管道)
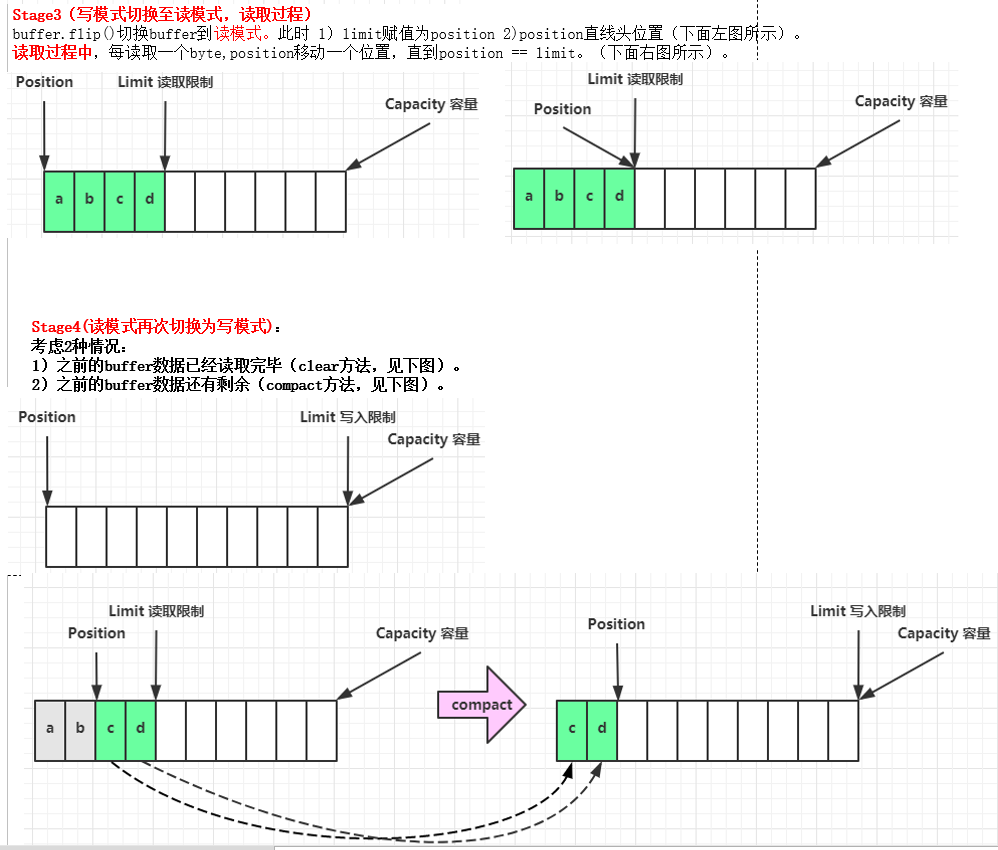
- 特别注意读写模式的切换
1. 向 buffer 写入数据,例如调用 channel.read(buffer)
2. 调用 flip() 切换至读模式
3. 从 buffer 读取数据,例如调用 buffer.get()
4. 调用 clear() 或 compact() 切换至写模式
5. 重复 1~4 步骤
2-2 bytebuffer的内部结构刨析
bytebuffer的部分源码
public abstract class ByteBuffer
    extends Buffer
    implements Comparable<ByteBuffer>
{

    // These fields are declared here rather than in Heap-X-Buffer in order to
    // reduce the number of virtual method invocations needed to access these
    // values, which is especially costly when coding small buffers.
    //
    final byte[] hb;                  // Non-null only for heap buffers
    final int offset;
    boolean isReadOnly;                 // Valid only for heap buffers
    // Creates a new buffer with the given mark, position, limit, capacity,
    // backing array, and array offset
    //
    ByteBuffer(int mark, int pos, int lim, int cap,   // package-private
                 byte[] hb, int offset)
    {
        super(mark, pos, lim, cap);
        this.hb = hb;
        this.offset = offset;
    }
    ......
}
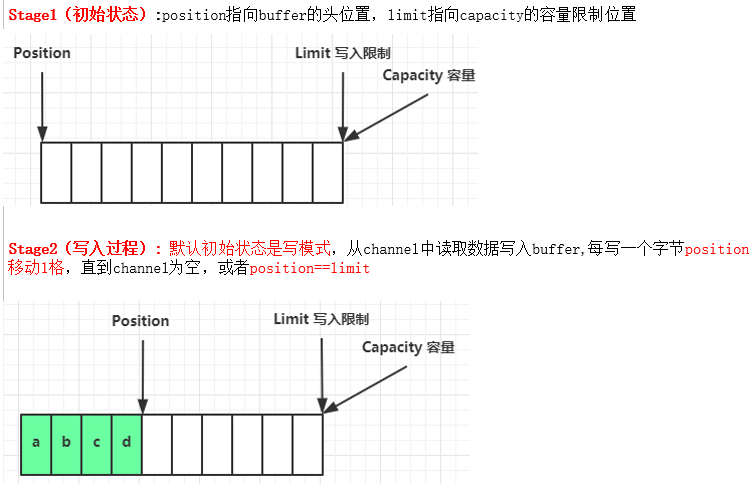
重要的属性
capacity      // 容量
position      // 位置
limit         // 限制
bytebuffer的读写模式实现原理图解(重要)
基本思想:双指针策略
2-3 bytebuffer的常用API使用方法
2-3-1 空间分配的API
Bytebuffer buf = ByteBuffer.allocate(16);         // 分配堆内存用于buffer
Bytebuffer buf = ByteBuffer.allocateDirect(16)    // 分配直接内存用于buffer
Java的buffer的空间分配注意点
- 堆内存受垃圾回收器管理,数据的读写效率不如直接内存,需要拷贝2次数据
- 直接内存由操作系统分配,分配的代价大,但是读写效率比较高。只需要拷贝一次数据,不受GC管理。
import java.nio.ByteBuffer;
public class test2 {
    public static void main(String[] args) {
        System.out.println(ByteBuffer.allocate(16).getClass());       // class java.nio.HeapByteBuffer
        System.out.println(ByteBuffer.allocateDirect(16).getClass()); // class java.nio.DirectByteBuffer
    }
}
2-3-2 buffer的写入数据API
方式1:利用channel的方法写入数据,从channel中读取数据写入buffer
int readBytes = channel.read(buf);
方式2:使用put方法写入数据
buf.put((byte)127);
2-3-3 buffer 的读取数据的API
方式1:利用channel的方法读取数据,利用channel将数据从buffer中读出然后放入channel
int writeBytes = channel.write(buf);
方式2:使用buffer.get方法读取数据
byte b = buf.get();
get 方法会让 position 读指针向后走,如果想重复读取数据
- 可以调用 rewind 方法将 position 重新置为 0
- 或者调用 get(int i) 方法获取索引 i 的内容,它不会移动读指针
2-4-4 buffer的mark和 reset方法(成对使用)
使用场景:mark 在读取时做一个标记,即使 position 改变,只要调用 reset 就能回到 mark 的位置
注意点:rewind 和 flip 都会清除 mark 位置
2-4-5 字符串与 ByteBuffer 转化三种方式
实例
import java.nio.ByteBuffer;
import java.nio.charset.StandardCharsets;

public class test3 {
    public static void main(String[] args) {
        /*将字符串写入到bytebuffer中*/
        // ========================方式1:使用getBytes然后通过put写入===================================
        ByteBuffer buffer = ByteBuffer.allocate(16);
        // getBytes将字符串转换为byte数组写入到bytebuffer中
        buffer.put("hello".getBytes());                                    // 注意当前buffer模式还是写模式
        buffer.flip();
        String str = StandardCharsets.UTF_8.decode(buffer).toString();    // 将bytebuffer中的数据再转换为字符串
        System.out.println(str);

        // ========================方式2:使用nio的charset直接进行转换===================================
        ByteBuffer buffer2 = StandardCharsets.UTF_8.encode("hello");  //当前buffer模式是读模式
        String str1 = StandardCharsets.UTF_8.decode(buffer2).toString();
        System.out.println(str1);

        // ========================方式3:使用wrap方法结合byte[]数组=====================================
        ByteBuffer buffer3 = ByteBuffer.wrap("hello".getBytes());         // 当前buffer是读模式
        String str2 = StandardCharsets.UTF_8.decode(buffer3).toString();
        System.out.println(str2);
    }
}
执行结果
hello
hello
hello
2-4-6 Scatter Reads/Writes(分散读取,集中写入的思想理解)
作用:将数据分区间读取到不同的buffer/将不同buffer的数组合并放入到同一个文件中。
好处:分散读,集中写有助于减少数据在buffer之间的拷贝。
文本文件:words.txt
onetwothree
分散读取测试代码:将数据读取到多个buffer
package part1;
import java.io.IOException;
import java.io.RandomAccessFile;
import java.nio.ByteBuffer;
import java.nio.channels.FileChannel;
import java.nio.charset.StandardCharsets;
public class test4 {
    public static void main(String[] args) {
        try (RandomAccessFile file = new RandomAccessFile("words.txt", "rw")) {
            FileChannel channel = file.getChannel();
            /*分配3个byte buffer,并默认设置为写模式,同一个数据源中将数据分配到3个byte buffer*/
            ByteBuffer a = ByteBuffer.allocate(3);
            ByteBuffer b = ByteBuffer.allocate(3);
            ByteBuffer c = ByteBuffer.allocate(5);
            /*关键:传入bytebuffer数组进行分散读取,将数据读取到多个bytebuffer中*/
            channel.read(new ByteBuffer[]{a, b, c});
            a.flip();
            printBytebuffer(a);
            b.flip();
            printBytebuffer(b);
            c.flip();
            printBytebuffer(c);
        } catch (IOException e) {
            e.printStackTrace();
        }
    }
    static void printBytebuffer(ByteBuffer tmp){      // 注意:传入的bytebuffer必须时写模式
        System.out.println(StandardCharsets.UTF_8.decode(tmp).toString());
    }
}
执行结果
one
two
three
分散写入测试代码:将数据从多个buffer写入到同一个文件中(避免多余的拷贝)
package part1;
import java.io.FileNotFoundException;
import java.io.IOException;
import java.io.RandomAccessFile;
import java.nio.ByteBuffer;
import java.nio.channels.FileChannel;
import java.nio.charset.StandardCharsets;
public class test5 {
    public static void main(String[] args){
        try (RandomAccessFile file = new RandomAccessFile("words.txt", "rw")) {
            FileChannel channel = file.getChannel();
            ByteBuffer d = ByteBuffer.allocate(4);
            d.put(new byte[]{'f', 'o', 'u', 'r'});
            d.flip();
            ByteBuffer e = ByteBuffer.allocate(4);
            e.put(new byte[]{'f', 'i', 'v', 'e'});
            e.flip();
            channel.position(11);
            channel.write(new ByteBuffer[]{d, e});
        } catch (IOException e) {
            e.printStackTrace();
        }
    }
    static void printBytebuffer(ByteBuffer tmp){           // 打印buffer内容,注意buffer必须是读模式
        System.out.println(StandardCharsets.UTF_8.decode(tmp).toString());
    }
}
words.txt结果
onetwothreefourfive
三 应用bytebuffer的API简单处理黏包与半包问题
3-1 黏包与半包问题概述
情景:网络上客户端有多条数据发送给服务端,数据之间使用 \n 进行分隔,比如传输前可能分三次调用传输:
第一次:Hello,world\n
第二次:I'm zhangsan\n
第三次:How are you?\n
实际服务端可能收到了2个数据包:
数据包1:Hello,world\nI'm zhangsan\nHo
数据包2:w are you?\n
黏包(数据包1就是黏包):应用层数据在传输过程中多条记录合并到一个数据包中。
- 黏包的原因主要是为了提高传输效率,将多条小的记录直接放入一个包发送。
半包(数据包2就是半包):应用层单条数据记录在传输过程中被分到多个包中。
- 半包的主要是由于接受方buffer的大小有限或者应用层单条数据记录确实比较大
3-2 使用buffer的API模拟解决这个问题
实例代码
package part1;
import java.nio.ByteBuffer;
import java.nio.charset.StandardCharsets;

public class test6 {
    public static void main(String[] args) {
        ByteBuffer source = ByteBuffer.allocate(32);

        source.put("Hello,world\nI'm zhangsan\nHo".getBytes());    // 数据包1
        split(source);
        source.put("w are you?\nhaha!\n".getBytes());              // 数据包2
        split(source);
    }
    // 基本思想:按照应用层分割符读取读取数据,如果buffer中最终数据不是以\n结尾,
    // 保留这个数据直到倒数第一个\n不进行读取,将其compact后,再一个数据包数据读入之后再处理。
    private static void split(ByteBuffer source) {
        source.flip();                                 // step1: 转换为读模式
        int oldLimit = source.limit();
        for (int i = 0; i < oldLimit; i++) {           // step2:按照分隔符读取数据记录,没有分隔符的数据留在buffer中
            if (source.get(i) == '\n') {
                //分配用于读取的bytebuffer接受传输过来的一条数据记录,当前记录大小 = 当前位置+1-position
                ByteBuffer target = ByteBuffer.allocate(i + 1 - source.position());
                source.limit(i + 1);                   // 0 ~ limit
                target.put(source);                    // 从source 读,向 target 写
                target.flip();
                printBytebuffer(target);
                source.limit(oldLimit);
            }
        }
        source.compact();                             // step3: 对buffer中没有读完的数据进行处理,移动到开头,转换为写模式
    }
    static void printBytebuffer(ByteBuffer tmp){
        // 打印buffer内容,注意buffer必须是读模式
        System.out.print(StandardCharsets.UTF_8.decode(tmp).toString());
    }
}
执行结果:实现数据记录的分隔
Hello,world
I'm zhangsan
How are you?
haha!
注意点:
- 上面代码中逐个找分隔符,数据的处理效率不高,有其他更加高效的方式
- 黏包/半包问题属于较为底层的问题,实际开发中,netty会帮助我们处理黏包/半包问题

 浙公网安备 33010602011771号