实战linux虚拟化技术KVM-3-镜像-快照
实战linux虚拟化技术KVM-3-镜像-快照
一、虚拟机常用镜像格式
二、快照的常规管理
一、虚拟机常用镜像格式
目前有两些些常见的格式呢:
cow ,qcow ,qcow2 ,raw ,vmdk
cow,qcow被淘汰了,centos 6 默认版本是用raw,
这些格式也可以相互转换,
qcow2 转为 vmdk 方法是: qcow2 转为 raw ,然后把raw转为vmdk 。也可以直接qcow2 转为 vmdk
注:
1.centos7以上默认使用的镜像格式是qcow2 。
2、raw 不支持snapshot快照。
3、qcow2格式支持snapshot,可以在镜像上做N多个快照,具有以下优点:
更小的存储空间
支持zlib的磁盘压缩
支持创建image镜像
支持多个snapshot,对历史snapshot进行管理
支持AES的加密
4、vmdk是VMware的格式,整体性能最好,VMware的企业级虚拟化Esxi
(2) 镜像格式的转换
qcow2格式转换成raw
qemu-img 的参数 -f 源镜像的格式 -O 目标镜像的格式
[root@localhost windows-xp]# qemu-img info /root/windows12/images/windows-xp/centos7.0.img
image: /root/windows12/images/windows-xp/centos7.0.img

[root@localhost windows-xp]# qemu-img convert -f qcow2 -O raw centos7.0.img centos7.0.raw
[root@localhost windows-xp]# qemu-img info /root/windows12/images/windows-xp/centos7.0.raw

扩展:如果vmdk转换为qcow2
qemu-img convert -f vmdk -O qcow2 student.vmdk student-user.qcow2
将qcow2转换为vmdk
qemu-img convert -f qcow2 -O vmdk student-user.qcow2 student.vmdk
二、KVM虚拟机快照功能
kvm的快照作用:
(1)、备份作用,平常叫的热备(2)、回滚到建立快照前。(3)、恢复功能
快照分为:1、分区为lvm,可以利用LVM进行KVM的快照 备份
2、使用qcow2格式的镜像创建快照。
例 :(1)查询
[root@localhost ~]# qemu-img info /root/windows12/images/windows-xp/centos7.0.img

[root@localhost ~]# qemu-img info /root/windows12/images/windows-xp/winxp.qcow2

(2)虚拟机创建快照
1、1 语法: virsh snapshot-create 虚拟机的名字
[root@localhost windows-xp]# virsh snapshot-create winxp
error: unsupported configuration: internal snapshot for disk hda unsupported for storage type raw
[root@localhost windows-xp]# virsh snapshot-create centos7.0
Domain snapshot 1574746228 created
root@localhost windows-xp]# virsh list --all
Id Name State
----------------------------------------------------
81 centos7.0 running
83 centos7.0-kvm running
- winxp shut off
1.2语法:virsh snapshot-create-as KVM虚拟机名 快照名
[root@localhost windows-xp]# virsh snapshot-create-as centos7.0 centos7.0-base
(3)查看虚拟机镜像快照列表
[root@localhost windows-xp]# virsh snapshot-list centos7.0
Name Creation Time State
------------------------------------------------------------
1574746228 2019-11-26 13:30:28 +0800 running
centos7.0-base 2019-11-26 13:33:11 +0800 running
查看虚拟主机最新的快照版本

快照 的配置文件存放的位置
[root@localhost windows-xp]# ll -h /var/lib/libvirt/qemu/snapshot/centos7.0/
total 16K
-rw-------. 1 root root 5.2K Nov 26 13:33 1574746228.xml
-rw-------. 1 root root 5.3K Nov 26 13:33 centos7.0-base.xml
(4)恢复虚拟机快照

[root@localhost windows-xp]# virsh domstate centos7.0 #查看虚拟主机的状态
running
[root@localhost windows-xp]# virsh snapshot-revert centos7.0 centos7.0-base #恢复快照
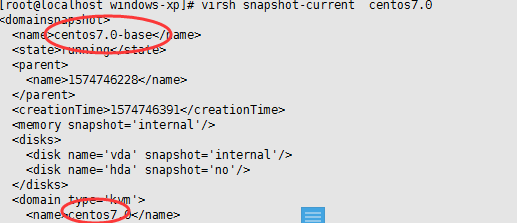
[root@localhost windows-xp]# virsh snapshot-current centos7.0 | more #查看恢复的状态
(5)删除快照
删除前

[root@localhost windows-xp]# virsh snapshot-delete centos7.0 centos7.0-base
Domain snapshot centos7.0-base deleted
删除后

(6) 开机状态下创建快照:
[root@localhost windows-xp]# virsh snapshot-create-as centos7.0 centos-2
Domain snapshot centos-2 created
(7)虚拟机常用的一些命令
[root@localhost windows-xp]# virsh autostart centos7.0 #开机 自启动
Domain centos7.0 marked as autostarted
[root@localhost windows-xp]# virsh autostart --disable centos7.0 #取消开机自启动
Domain centos7.0 unmarked as autostarted
[root@localhost windows-xp]# virsh suspend centos7.0 #挂起
Domain centos7.0 suspended
[root@localhost windows-xp]# virsh resume centos7.0 #恢复
Domain centos7.0 resumed
[root@localhost windows-xp]# virsh console centos7.0 #控制台
[root@localhost bbb]# virsh destroy centos7.0-kvm #强制关机
Domain centos7.0-kvm destroyed
[root@localhost qemu]# virsh dumpxml winxp > /root/windxpdum.xml #备份配置文件xml
[root@localhost qemu]# virsh undefine winxp
[root@localhost qemu]# virsh define /root/windxpdum.xml #恢复winxp
Domain winxp defined from /root/windxpdum.xml

# virsh list //查看已打开虚拟机列表
# virsh list --all //查看所有虚拟机列表
# virsh version //查看virsh版本号
# virsh start xuegod63-kvm2 //启动xuegod63-kvm2虚拟机
# virsh shutdown xuegod63-kvm2 //关机xuegod63-kvm2虚拟机
# virsh dumpxml xuegod63-kvm2 > xuegod63-kvm2.xml //导出xuegod63-kvm2虚拟机


 浙公网安备 33010602011771号