API
小程序开发框架提供丰富的微信原生API,可以方便的调起微信停供的能力,如网络要求,用户信息获取,本地存储,支付功能等
异步API大多数API都是异步API,如wx.request,wx.login等
同步API以Sync结尾的API ,如 wx.setStorageSync
wx.request网络请求-API
我们在本地打开服务

可以看到对应的数据
我们在小程序中查看数据,index.js
// index.js
// 获取应用实例
const app = getApp()
Page({
/*** 页面的初始数据*/
  data: {
    lists:[],
  },
/*** 生命周期函数--监听页面加载*/
  onLoad: function (options) {
    wx.request({
      url: 'http://127.0.0.1:3000/lists',
      data: {
      },
      header: {
        'content-type': 'application/json'
      },
      success (res) {
        console.log(res.data)
      }
    })
  },
/*** 生命周期函数--监听页面初次渲染完成*/
  onReady: function () {},
/*** 生命周期函数--监听页面显示*/
  onShow: function () {},
/*** 生命周期函数--监听页面隐藏*/
  onHide: function () {},
/*** 生命周期函数--监听页面卸载*/
  onUnload: function () { },
/*** 页面相关事件处理函数--监听用户下拉动作*/
  onPullDownRefresh: function () {},
/*** 页面上拉触底事件的处理函数*/
  onReachBottom: function () {},
/*** 用户点击右上角分享*/
  onShareAppMessage: function () {}
})
可以看到输出了50条数据

wx.login登陆-API
调用接口获取登录凭证(code)。通过凭证进而换取用户登录态信息,包括用户在当前小程序的唯一标识(openid)、微信开放平台帐号下的唯一标识(unionid,若当前小程序已绑定到微信开放平台帐号)及本次登录的会话密钥(session_key)等。用户数据的加解密通讯需要依赖会话密钥完成。
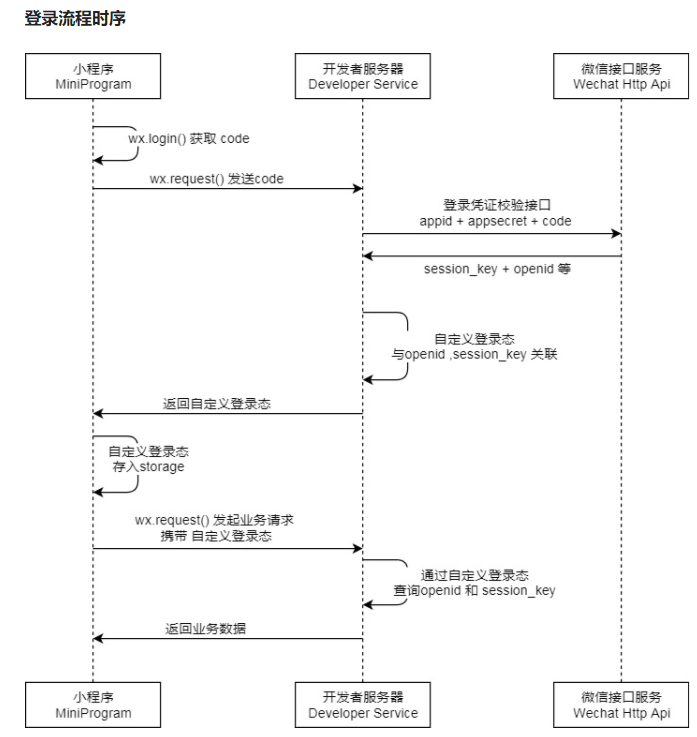
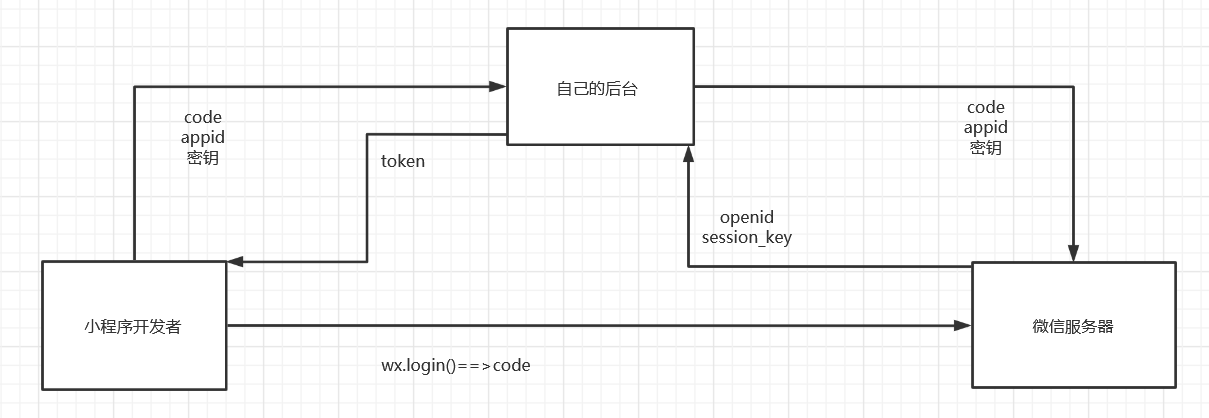
我们在App.js文件中查看这个信息,返回一个code和一个login状态
// app.js
App({
  onLaunch() {
    // 展示本地存储能力
    const logs = wx.getStorageSync('logs') || []
    logs.unshift(Date.now())
    wx.setStorageSync('logs', logs)
    // 登录
    wx.login({
      success: res => {
        console.log(res)
        // 发送 res.code 到后台换取 openId, sessionKey, unionId
      }
    })
  },
  globalData: {
    userInfo: null
  }
})

wx.authorize授权-API
提前向用户发起授权请求。调用后会立刻弹窗询问用户是否同意授权小程序使用某项功能或获取用户的某些数据,但不会实际调用对应接口。如果用户之前已经同意授权,则不会出现弹窗,直接返回成功。
用户登录小程序之后,处于对用户信息的保护,小程序仅仅得到的是一个登录状态,但是很多权限,用户并没有给小程序,这就需要小程序去获取用户授权的信息。
通过API wx.authorize()向用户发起授权请求,调用后会立即弹窗询问是否同意授权小程序使用某项功能或获取用户的某些数据,但不会实际调用对应接口,如果之前用户已经授权,则不会出现弹窗,直接返回结果。
参数
| 属性 | 类型 | 默认值 | 必填 | 说明 |
|---|---|---|---|---|
| scope | string | 是 | 需要获取权限的 scope,详见 scope 列表 | |
| success | function | 否 | 接口调用成功的回调函数 | |
| fail | function | 否 | 接口调用失败的回调函数 | |
| complete | function | 否 | 接口调用结束的回调函数(调用成功、失败都会执行) |
<!--pages/shouquan/shouquan.wxml-->
<button class="button" type="primary" open-type="getUserInfo" lang="zh_CN" bindgetuserinfo="bindGetUserInfo"></button>
授权登录</button>


// pages/shouquan/shouquan.js
Page({
  bindGetUserInfo:function(){
    //获取用户信息
    wx.authorize({
      //询问授权的属性,
      scope:"scope.userInfo",
      success:function(res){
        console.log(res)
      }
    })
  },
})
授权之前要先清理一下授权数据,不清理的话可能在点击授权的时候没有弹窗提示

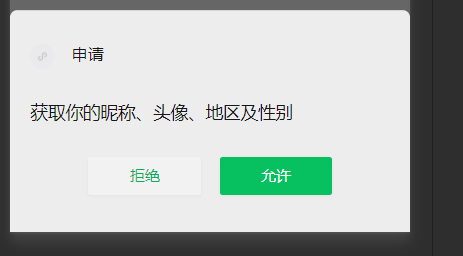
我们点击允许之后查看一下授权信息,代表已授权

wx.getSetting获取授权信息-API
获取用户的当前设置。返回值中只会出现小程序已经向用户请求过的权限
参数
| 属性 | 类型 | 默认值 | 必填 | 说明 | 最低版本 |
|---|---|---|---|---|---|
| withSubscriptions | Boolean | false | 否 | 是否同时获取用户订阅消息的订阅状态,默认不获取。注意:withSubscriptions 只返回用户勾选过订阅面板中的“总是保持以上选择,不再询问”的订阅消息。 | 2.10.1 |
| success | function | 否 | 接口调用成功的回调函数 | ||
| fail | function | 否 | 接口调用失败的回调函数 | ||
| complete | function | 否 | 接口调用结束的回调函数(调用成功、失败都会执行) |
- authSeting
案例
wx.getSetting({
  success (res) {
    console.log(res.authSetting)
    // res.authSetting = {
    //   "scope.userInfo": true,
    //   "scope.userLocation": true
    // }
  }
})
返回值中的authSetting属性,表示用户授权的设置信息
- scope.userInfo是否授权用户信息,值为布尔
- scope.userLocation是否授权地理位置
wx.openSetting({})调起客户端小程序设置界面,返回用户设置的操作结果,设置界面只会出现小程序已经向用户请求过的权限
<!--pages/shouquan/shouquan.wxml-->

<button
class="button"
type="primary"
open-type="getUserInfo"
lang="zh_CN"
bindgetuserinfo="bindGetUserInfo"
>
授权登录</button>


// pages/shouquan/shouquan.js
Page({
  bindGetUserInfo:function(){
    wx.getSetting({
      success:function(res){
        //用户授权的状态,res.authSetting['scope.userInfo']
        console.log(res)
      }
    })
  },
})
在控制台中查看用户授权的信息

我们也可以通过这种方法来实现用户是否授权,如果授权就跳转到主页,没有授权,在进行授权
// pages/shouquan/shouquan.js
Page({
  bindGetUserInfo:function(){
    wx.getSetting({
      success:function(res){
        if(res.authSetting['scope.userInfo']){
          wx.redirectTo({
            url: '../index/index',
          })
        }else{
          wx.authorize({
            //询问授权的属性,
            scope:"scope.userInfo",
            success:function(res){
              console.log(res)
            }
          })
        }
      }
    })
  },
})

wx.getUserInfo获取用户信息-API
在小程序插件中使用时,需要在用户信息功能页中获得用户授权之后调用。否则将返回 fail
参数
| 属性 | 类型 | 默认值 | 必填 | 说明 |
|---|---|---|---|---|
| withCredentials | boolean | 否 | 是否带上登录态信息。当 withCredentials 为 true 时,要求此前有调用过 wx.login 且登录态尚未过期,此时返回的数据会包含 encryptedData, iv 等敏感信息;当 withCredentials 为 false 时,不要求有登录态,返回的数据不包含 encryptedData, iv 等敏感信息。 | |
| lang | string | en | 否 | 显示用户信息的语言 |
| success | function | 否 | 接口调用成功的回调函数 | |
| fail | function | 否 | 接口调用失败的回调函数 | |
| complete | function | 否 | 接口调用结束的回调函数(调用成功、失败都会执行) |
案例
// 必须是在用户已经授权的情况下调用
wx.getUserInfo({
  success: function(res) {
    var userInfo = res.userInfo
    var nickName = userInfo.nickName
    var avatarUrl = userInfo.avatarUrl
    var gender = userInfo.gender //性别 0:未知、1:男、2:女
    var province = userInfo.province
    var city = userInfo.city
    var country = userInfo.country
  }
})

案例
<!--pages/getuserinfo/getuserinfo.wxml-->
<text>pages/getuserinfo/getuserinfo.wxml</text>
<button type="primary" bindgetuserinfo="getuserinfo" open-type="getUserInfo" >获取信息</button>


// pages/getuserinfo/getuserinfo.js
Page({
  getuserinfo:function(res){
    console.log(res)
  },
})
此时我们在控制台可以看到信息

我们看下面的案例
// pages/getuserinfo/getuserinfo.js
Page({
  getuserinfo:function(res){
   wx.getSetting({
     success:function(res){
      if(res.authSetting["scope.userInfo"]){
        //用户将用户信息权限给予了小程序
        wx.getUserInfo({
          //这个接口是获取用户信息
          success:function(res){
            console.log(res)
          }
        })
      }else{
        //用户没有给予小程序获取用户信息的权限
        wx.authorize({
          scope:"scope.userInfo",
          success:function(res){
              console.log(res)
          }
        })
      }
     }
   })
  },
})

注意:使用该方法的前提是用户给予了小程序获取用户信息的权限
rawData中的数据:
- nickName:微信名称
- gender:性别
- language:语言
- city:城市
- province:省份
- country:国家
- avatarUrl:图片地址
wx.createAnimation动画-API
需要使用wx.createAnimation({})创建一个动画实例animation调用方法来描述动画,最后通过动画实例的export方法导出动画数据传递给组件的animation属性
大部分的动画实例上的方法都是设置动画样式,他们返回的还是动画实例对象本身,所以我们可以采用链式写法,需要注意大量animation.step()和animation.export()两个方法。
- step()表示一组动画完成,可以在一组动画中调用多个动画方法,一组动画中的所有动画会同时开始,一组动画完成后才会进行下一组动画
- export()导出动画队列,export方法每次调用后会清掉之前的动画操作
参数
| 属性 | 类型 | 默认值 | 必填 | 说明 |
|---|---|---|---|---|
| duration | number | 400 | 否 | 动画持续时间,单位 ms |
| timingFunction | string | 'linear' | 否 | 动画的效果 |
| delay | number | 0 | 否 | 动画延迟时间,单位 ms |
| transformOrigin | string | '50% 50% 0' | 否 |
我们新建一个案例查看属性
<!--pages/animat/animat.wxml-->
<view id="hello">hello</view>

// pages/animat/animat.js
const app=getApp()
Page({
/*** 生命周期函数--监听页面加载*/
  onLoad: function (options) {
    //创建一个动画实例
      var animation=wx.createAnimation({
        duration:1000,
        delay: 0,
      })
      console.log(animation)
  },
})
控制台中输出了这个动画包含的所有属性

此时我们定义了一个动画,但是并没有生效,我们看一下打印出来的是什么
// pages/animat/animat.js
const app=getApp()
Page({
/*** 生命周期函数--监听页面加载*/
  onLoad: function (options) {
    //创建一个动画实例
      var animation=wx.createAnimation({
        duration:1000,
        delay: 0,
      })
      //表示动画放大2倍
     var scal= animation.scale(2)
      console.log(scal)
  },
})
控制台输出的内容与animation输出的内容是一样的,都具备这些方法,也就是说都是同一个的实例对象,这里没有动画的原因是主要我们注意的两个函数,step和export,只有我们添加step方法后才表示这组动画完成,否则表示这组动画一直处于挂起的状态,我们在这个动画后面添加step
var scal= animation.scale(2).step()
此时我们看到这个动画依然没有起到效果,
我们在看一下animation.export()这个方法,会导出一个动画队列,我们用一个变量来接收输出一下
var arr=animation.export()
此时我们可以看到我们定义的这个动画此时
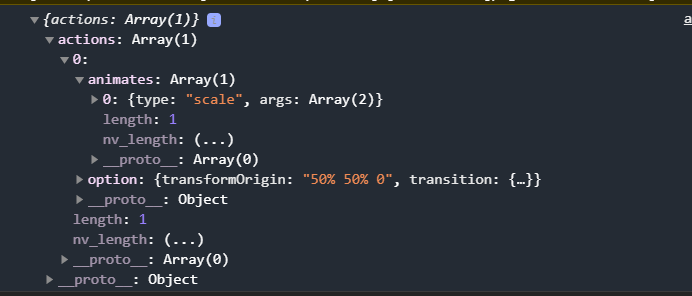
注意:创建一个动画实例 animation。调用实例的方法来描述动画。最后通过动画实例的 export 方法导出动画数据传递给组件的 animation 属性,
所以我们定义一个变量存储这个animation的值 ,在组件中添加这个属性的时候采用插值表达式
此时我们需要将导出的动画数据传送给我们刚才定义的变量
此时就可以实现动画
<!--pages/animat/animat.wxml-->
<view id="hello" animation="{{myanimation}}">hello</view>


// pages/animat/animat.js
const app=getApp()
Page({
/*** 生命周期函数--监听页面加载*/
data:{
  myanimation:null
},
  onLoad: function (options) {
    //创建一个动画实例
      var animation=wx.createAnimation({
        duration:1000,
        delay: 0,
      })
      //表示动画放大2倍,.step()表示一组动画结束,如果不加就不会有任何效果
     var scal= animation.scale(2).step()
     var arr=animation.export()
     this.setData({
       myanimation:arr
     })
  },
})
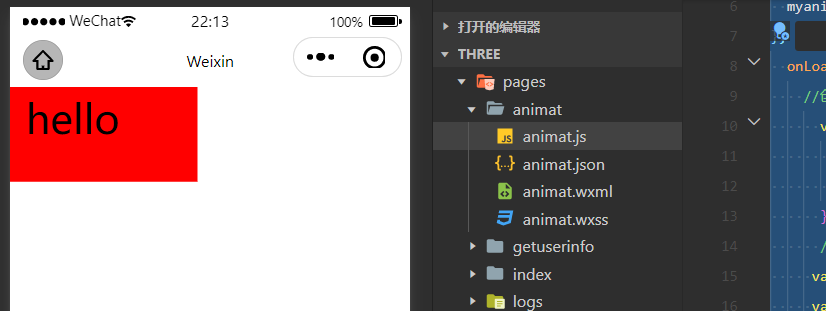
总结实现动画的过程:
1>创建一个动画实例
2>我们需要一个动画的添加样式,添加样式的过程中注意:一定要在每个动画的结尾处加上.step()的方法,添加这个属性之后表示一组动画,如果不加就不会有任何效果
3>我们需要导出对应的动画数据
4>将动画数据赋值给对应组件的animation属性
onShareAppMessage转发
在小程序中,分享主要分为两种形式:
- 右上角的menu分享
- 按钮点击分享
这两种点击在点击得时候都会触发Page.onShareAppMessage()函数的执行
页面内发起转发
通过给 button 组件设置属性 open-type="share",可以在用户点击按钮后触发 Page.onShareAppMessage 事件,相关组件:button。
实现button按钮转发效果:
在button组件上设置属性open-type="share",点击的时候会自动触发onShareAppMessage()函数的执行

我们可以看一下这个函数输出的内容
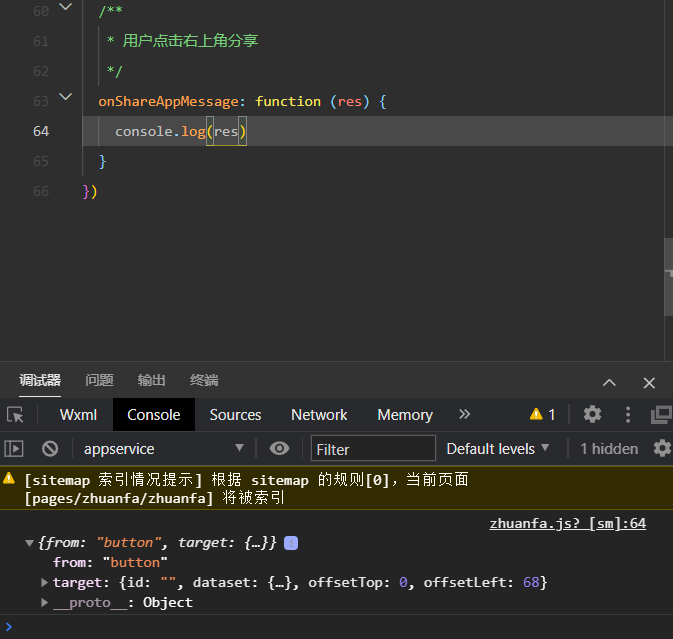
onShareAppMessage的内部结构
- 此事件处理函数需要 return 一个 Object,用于自定义转发内容,返回内容如下:
| 字段 | 说明 | 默认值 | 最低版本 |
|---|---|---|---|
| title | 转发标题 | 当前小程序名称 | |
| path | 转发路径 | 当前页面 path ,必须是以 / 开头的完整路径 | |
| imageUrl | 自定义图片路径,可以是本地文件路径、代码包文件路径或者网络图片路径。支持PNG及JPG。显示图片长宽比是 5:4。 | 使用默认截图 | 1.5.0 |
| promise | 如果该参数存在,则以 resolve 结果为准,如果三秒内不 resolve,分享会使用上面传入的默认参数 | 2.12.0 |
// pages/zhuanfa/zhuanfa.js
Page({
  onShareAppMessage: function (res) {
    //console.log(res)
    return{
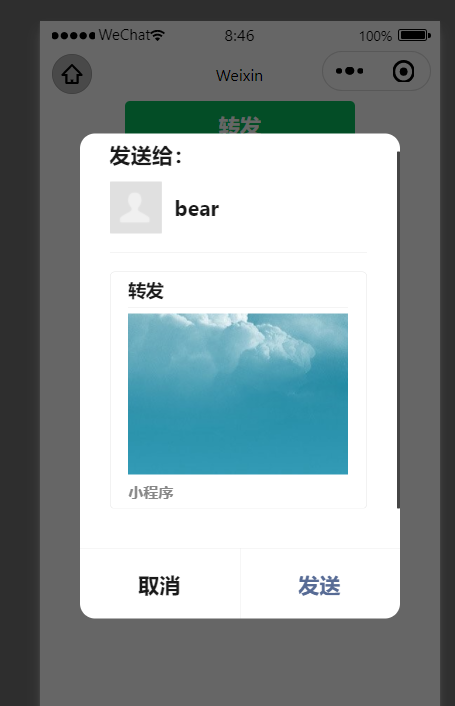
      title:'转发',
      path:"/pages/zhuanfa/zhuanfa",
      imageUrl:"../image/123456789.png"
    }
  }
})
我们可以看到转发的标题和图片
location-API小程序定位
https://developers.weixin.qq.com/miniprogram/dev/reference/configuration/app.html#permission
使用小程序定位的流程:
1>在App.json文件中配置permission
permission
小程序接口权限相关设置。字段类型为 Object,结构为:
| 属性 | 类型 | 必填 | 默认值 | 描述 |
|---|---|---|---|---|
|
scope.userLocation |
PermissionObject | 否 | 位置相关权限声明 |
PermissionObject 结构
| 属性 | 类型 | 必填 | 默认值 | 说明 |
|---|---|---|---|---|
| desc | string | 是 | 小程序获取权限时展示的接口用途说明。最长 30 个字符 |
如:
{
  "pages": ["pages/index/index"],
  "permission": {
    "scope.userLocation": {
      "desc": "你的位置信息将用于小程序位置接口的效果展示" // 高速公路行驶持续后台定位
    }
  }
}

2>得到用户授权方可使用定位的API,如果没有这个权限,,API会自动以弹窗的形式询问授权只有授权之后才会调用API
wx.getLocation
以 Promise 风格 调用:支持
用户授权:需要 scope.userLocation
小程序插件:支持,需要小程序基础库版本不低于 1.9.6
获取当前的地理位置、速度。当用户离开小程序后,此接口无法调用。开启高精度定位,接口耗时会增加,可指定 highAccuracyExpireTime 作为超时时间。地图相关使用的坐标格式应为 gcj02。高频率调用会导致耗电,如有需要可使用持续定位接口 wx.onLocationChange。基础库 2.17.0 版本起 wx.getLocation 增加调用频率限制。
// pages/location/location.js
Page({
  onLoad: function (options) {
    wx.getLocation({
      type: 'gcj02',
      success (res) {
        console.log(res)
        const latitude = res.latitude
        const longitude = res.longitude
        const speed = res.speed
        const accuracy = res.accuracy
      }
     })
  },
})
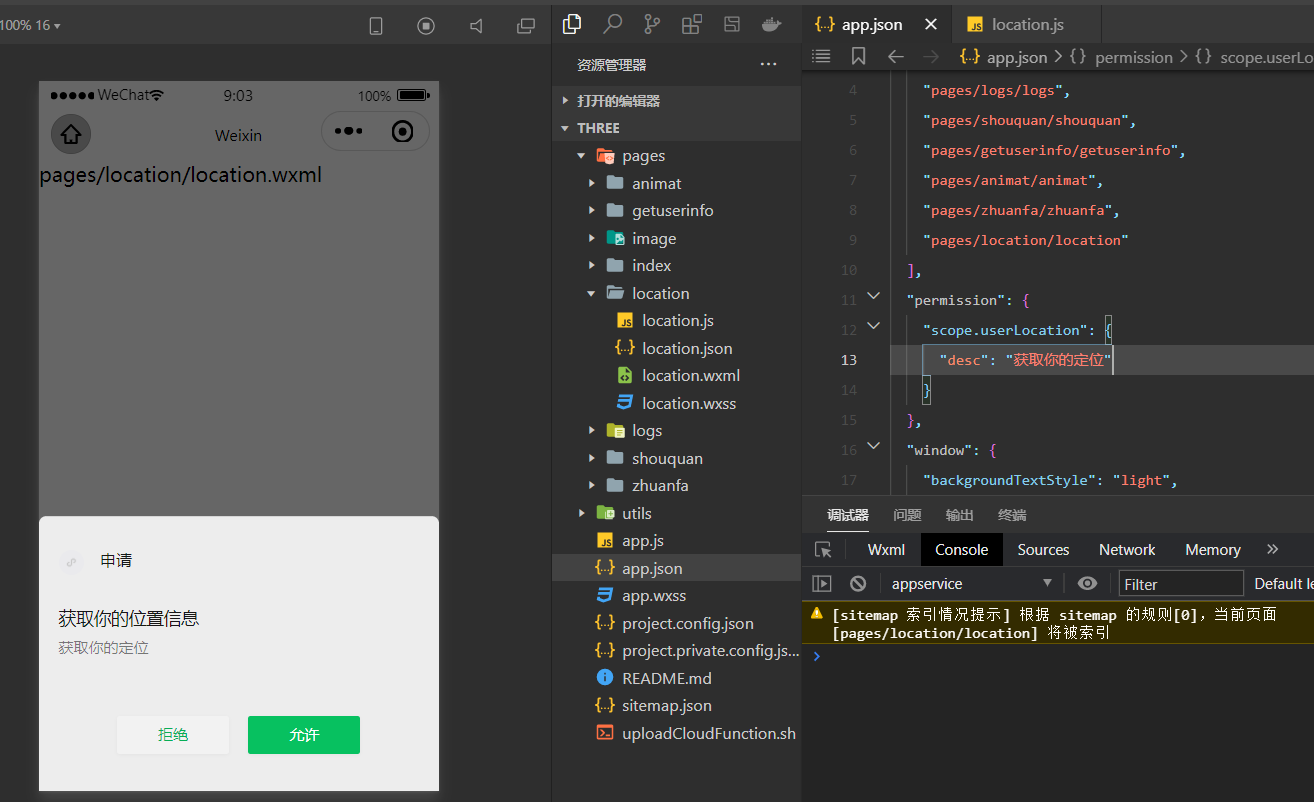
我们点击允许,可以在控制台中看到

3>wx.openLocation调用微信内置地图查看位置
wx.openLocation
以 Promise 风格 调用:支持
小程序插件:支持,需要小程序基础库版本不低于 1.9.6
使用微信内置地图查看位置
// pages/location/location.js
Page({
  onLoad: function (options) {
    wx.getLocation({
      type: 'gcj02',
      success (res) {
        console.log(res)
        const latitude = res.latitude
        const longitude = res.longitude
        const speed = res.speed
        const accuracy = res.accuracy
        wx.openLocation({
          latitude,
          longitude,
          scale: 18
        })
      }
     })
  },
})

注意
2.17.0 起wx.getLocation` 增加调用频率限制- 工具中定位模拟使用IP定位,可能会有一定误差。且工具目前仅支持 gcj02 坐标。
- 使用第三方服务进行逆地址解析时,请确认第三方服务默认的坐标系,正确进行坐标转换。
video视频-API
组件:https://developers.weixin.qq.com/miniprogram/dev/component/video.html
API:https://developers.weixin.qq.com/miniprogram/dev/api/media/video/wx.saveVideoToPhotosAlbum.html
我们看官方提供的案例:
//video.wxml
<view class="page-body" >
  <view class="page-section tc">
    <video
      id="myVideo"
      src="http://wxsnsdy.tc.qq.com/105/20210/snsdyvideodownload?filekey=30280201010421301f0201690402534804102ca905ce620b1241b726bc41dcff44e00204012882540400&bizid=1023&hy=SH&fileparam=302c020101042530230204136ffd93020457e3c4ff02024ef202031e8d7f02030f42400204045a320a0201000400"
      binderror="videoErrorCallback"
      danmu-list="{{danmuList}}"
      enable-danmu
      danmu-btn
      show-center-play-btn='{{false}}'
      show-play-btn="{{true}}"
      controls
      picture-in-picture-mode="{{['push', 'pop']}}"
      bindenterpictureinpicture='bindVideoEnterPictureInPicture'
      bindleavepictureinpicture='bindVideoLeavePictureInPicture'
    ></video>
    <view style="margin: 30rpx auto" class="weui-label">弹幕内容</view>
    <input bindblur="bindInputBlur" class="weui-input" type="text" placeholder="在此处输入弹幕内容" />
    <button style="margin: 30rpx auto"  bindtap="bindSendDanmu" class="page-body-button" type="primary" formType="submit">发送弹幕</button>
    <navigator style="margin: 30rpx auto"  url="picture-in-picture" hover-class="other-navigator-hover">
      <button type="primary" class="page-body-button" bindtap="bindPlayVideo">小窗模式</button>
    </navigator>
  </view>
</view>
//video.js
function getRandomColor() {
  const rgb = []
  for (let i = 0; i < 3; ++i) {
    let color = Math.floor(Math.random() * 256).toString(16)
    color = color.length === 1 ? '0' + color : color
    rgb.push(color)
  }
  return '#' + rgb.join('')
}

Page({
  onShareAppMessage() {
    return {
      title: 'video',
      path: 'page/component/pages/video/video'
    }
  },

  onReady() {
    this.videoContext = wx.createVideoContext('myVideo')
  },

  onHide() {

  },

  inputValue: '',
  data: {
    src: '',
    danmuList:
    [{
      text: '第 1s 出现的弹幕',
      color: '#ff0000',
      time: 1
    }, {
      text: '第 3s 出现的弹幕',
      color: '#ff00ff',
      time: 3
    }],
  },

  bindInputBlur(e) {
    this.inputValue = e.detail.value
  },

  bindButtonTap() {
    const that = this
    wx.chooseVideo({
      sourceType: ['album', 'camera'],
      maxDuration: 60,
      camera: ['front', 'back'],
      success(res) {
        that.setData({
          src: res.tempFilePath
        })
      }
    })
  },

  bindVideoEnterPictureInPicture() {
    console.log('进入小窗模式')
  },

  bindVideoLeavePictureInPicture() {
    console.log('退出小窗模式')
  },

  bindPlayVideo() {
    console.log('1')
    this.videoContext.play()
  },
  bindSendDanmu() {
    this.videoContext.sendDanmu({
      text: this.inputValue,
      color: getRandomColor()
    })
  },

  videoErrorCallback(e) {
    console.log('视频错误信息:')
    console.log(e.detail.errMsg)
  }
})


