


thymeleaf模板引擎是什么?请点击我查看
文章目录
代码
该实例代码延续thymeleaf模板引擎
提示:以下是本篇文章正文内容,下面案例可供参考
一、语法一
1.首先引入约束
<html lang="en" xmlns:th="http://www.thymeleaf.org">
2.Controller书写
@Controller
public class HelloController {

    @RequestMapping("/success")
    public String success(Map<String,Object> map){
        map.put("hao","真棒!");
        return "success";
    }
}
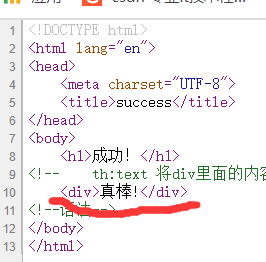
3.success.html
<!DOCTYPE html>
<html lang="en" xmlns:th="http://www.thymeleaf.org">
<head>
    <meta charset="UTF-8">
    <title>success</title>
</head>
<body>
    <h1>成功!</h1>
<!--    th:text 将div里面的内容设置为我们指定的值-->
    <div th:text="${hao}">请输入text</div>
</body>
</html>
4.启动访问http://localhost:8080/success,如下图所示
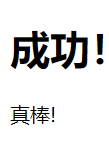
5.查看源代码
我们发现已经将标签体中的内容覆盖了
二、修改success.html中的内容
<!DOCTYPE html>
<html lang="en" xmlns:th="http://www.thymeleaf.org">
<head>
    <meta charset="UTF-8">
    <title>success</title>
</head>
<body>
    <h1>成功!</h1>
<!--    th:text 将div里面的内容设置为我们指定的值-->
    <div id="div1" class="class1" th:id="${hao}" th:class="${hao}" th:text="${hao}">输入</div>
<!--语法-->
</body>
</html>
再次运行
访问localhost:8080/success,查看源代码

自此我们就知道th的作用了
总结
其他具体请查看thymeleaf文档

 浙公网安备 33010602011771号