iOS---UINavigationController
1、UINavigationController导航控制器
导航控制器可以认为是管理控制器的控制器,主要管理有层次关系的控制器。
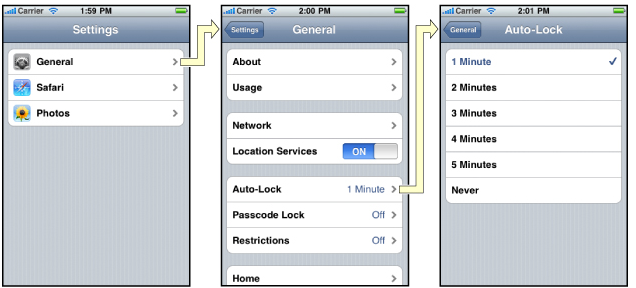
下 面的图显示了导航控制器的流程。最左侧是根视图,当用户点击其中的General项时 ,General视图会滑入屏幕;当用户继续点击Auto-Lock项时,Auto-Lock视图将滑入屏幕。相应地,在对象管理上,导航控制器使用了导 航堆栈。根视图控制器在堆栈最底层,接下来入栈的是General视图控制器和Auto-Lock视图控制器。可以调用 pushViewControllerAnimated:方法将视图控制器推入栈顶,也可以调用popViewControllerAnimated:方 法将视图控制器弹出堆栈。
2、UINavigationController的结构组成
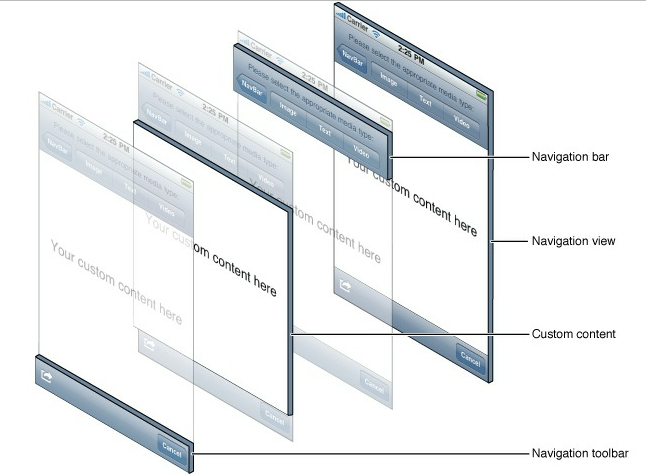
看下图,UINavigationController有Navigation bar ,Navigation View ,Navigation toobar等组成。
1.新建工程,关闭ARC(Automatic Reference Counting),即开启手动引用计数;
[super dealloc];
}
- (BOOL)application:(UIApplication *)application didFinishLaunchingWithOptions:(NSDictionary *)launchOptions {
self.window = [[UIWindow alloc]initWithFrame:[UIScreen mainScreen].bounds];
self.window.backgroundColor = [UIColor whiteColor];//不添加背景颜色的话,测试时屏幕会卡一下
[self.window makeKeyAndVisible];
//创建一个视图控制器对象
ViewController *vc = [[ViewController alloc]init];
//创建一个UINavigationController的对象,即导航控制器
UINavigationController *nav = [[UINavigationController alloc]initWithRootViewController:vc];
//设置window的根视图控制器
_window.rootViewController = nav;
[nav release];
[vc release];
//1)是否透明:NO为不透明。
self.navigationController.navigationBar.translucent = NO;
//主要区别:不透明的在Navigation View里添加label、button等时以原有window的(0, 128)为原点作参考。如果是透明的,有可能添加的东西被覆盖掉。
如下图:


//2)设置导航栏的背景
//(a)在AppDeglate.m
//修改状态栏的背景颜色(系统方法)
[[UIApplication sharedApplication] setStatusBarStyle:UIStatusBarStyleLightContent];
//(b)在ViewController.m
self.navigationController.navigationBar.barTintColor = [UIColor colorWithRed:0.24 green:0.78 blue:0.35 alpha:1];

//3)修改Navigation背景图
[self.navigationController.navigationBar setBackgroundImage:[UIImage imageNamed:@"NavBar_64@2x.jpg"] forBarMetrics:UIBarMetricsDefault];

//4)添加title
self.title = @"第一页";
//添加一个SegmentedControl
UISegmentedControl *segment = [[UISegmentedControl alloc]initWithItems:[NSArray arrayWithObjects:@"消息", @"通话", nil]];
[self.view addSubview:segment];
//前面这一步只是将segment添加到Navigation View里面了。

//加上下面这一句才是添加到状态栏上
self.navigationItem.titleView = segment;

//左右添加按钮
self.navigationItem.leftBarButtonItem = [[UIBarButtonItem alloc]initWithImage:[UIImage imageNamed:@"iconfont-locationfill.png"] style:UIBarButtonItemStylePlain target:self action:@selector(sayHi)];
self.navigationItem.rightBarButtonItem = [[UIBarButtonItem alloc]initWithTitle:@"Next" style:UIBarButtonItemStylePlain target:self action:@selector(sayHi)];
[self.navigationItem.rightBarButtonItem setTitleTextAttributes:[NSDictionary dictionaryWithObjectsAndKeys:[UIColor greenColor], NSForegroundColorAttributeName, [UIFont fontWithName:@"Zapfino" size:18], NSFontAttributeName, nil] forState:UIControlStateNormal];

至此,状态栏的相关属性操作完毕!

 浙公网安备 33010602011771号