学习笔记-CentOS 7.x时间同步服务chrony配置详解 20210129
CentOS 7.x时间同步服务chrony配置详解
一、时间服务概述
1.为什么需要时间服务器
   事实上,我们各种电子设备它们都是靠时钟驱动的,在分布式场景当中,更多主机的协作也是靠时钟驱动的。因此,多节点的主机时间必须要一致。
   以Linux为例,Linux的时间是系统启动时,内核会从主板的硬件资源读取时间并设置为内核中的时钟。接下来系统时间和硬件的内核时间是各自分开独立运行的。
   由于操作系统在运行过程中CPU繁忙等各种原因,久而久之很可能会导致系统时钟不精确的显现,这种不精确反应在同一个集群的多台主机上其实就是集群时间不一致。
   我们大家都知道虚拟机并获得的CPU是虚拟机产品虚拟出来的CPU,并不是我们真正物理机上的CPU,因此出现时间误差的概率是相当的大,所以在我们普遍使用云计算的虚拟机上,
   必须要配置一个时间服务器,否则可能各个虚拟机的时间出现不一致的情况。
2.chrony时间服务
   chrony是网络时间协议(NTP)的通用实现。它可以将系统时钟与NTP服务器、参考时钟(例如GPS接收器)和使用手表和键盘的手动输入同步。它还可以作为NTPv4(RFC 5905)
服务器和对等服务器运行,为网络中的其他计算机提供时间服务。它被设计成在各种条件下都能很好地运行,包括断续的网络连接、严重拥挤的网络、不断变化的温度(普通的计算机
时钟对温度很敏感),以及不连续运行或在虚拟机上运行的系统。
   chrony是ntpd的替代方案。在互联网上同步的两台机器之间的典型精度在几毫秒内;在局域网上,精度通常在几十微秒内。使用硬件时间戳或硬件参考时钟,可以达到亚微秒精度。
   chrony中包含两个程序,chronyd是一个可以在启动时启动的守护程序,chronyc是一个命令行接口程序,可用于监视chronyd的性能,并在运行时更改各种操作参数。
   如果非要把NTP和chrony做一个对比的话,我们就以手动调整手表时间为例,我们假设手表时间和实际服务器时间相差3小时:
   ntpd的解决思路就是飞速的转动秒针,以最快的速度调准时间,可想而是,我们需要非常快的速度转动180圈秒针才能追上时间服务器的时间,真个转动过程是相当费时间的。
chrony的解决思路就是直接调整时针,可想而知,我们挑拨时针不到一圈就能把问题解决掉了,这就是为什么生产环境中大家使用的时间服务器基本上都是chrony啦。和ntpd一样,
chronyd程序包既可以做服务端也可以做客户端,实际上chrony服务本身是兼容ntpd服务的,我们直到123/UDP是传统的NTP服务所默认监听的端口,而323/UDP是chrony所默认
监听的端口。因此我们使用chronyd做服务端后,我们既可以使用ntpd做客户端也可以使用chronyd做客户端。
chrony的官方网站:https://chrony.tuxfamily.org/
3.chrony的优势
chrony是网络时间协议(NTP)的另一种实现,与网络时间协议后台程序(ntpd)不同,它可以更快地且更准确地同步系统时钟,请注意,ntpd仍然包含其中以供需要运行NTP服务的客户使用。
chrony的优势包括以下几点:
 (1)更快的同步只需要数分钟而非数小时时间,从而最大程度减少时间和频率误,这对于并非全天24小时的运行的台式计算机或系统而言非常有用;
 (2)能够更好地响应时钟频率的快速变化,这对于具备不稳定时钟的虚拟机或导致赛事中频率发生比变化的节能技术;
 (3)在初始同步后,它不会停止时钟,以防对需要系统时间保持单调的应用程序造成影响;
 (4)在应对临时非对称延迟时(例如大规模下载造成链接饱和等情况)提供了更好的稳定性;
 (5)无需对时间服务器进行定期轮询,因此具备间歇性网络连接(如网络不稳定的场景)的系统仍然可以快速同步时钟。
二、安装并配置chrony服务
1.安装chrony
1 WARNING! The remote SSH server rejected X11 forwarding request.
2 Last login: Fri Jan 29 23:48:42 2021(#记住这个时间)
3 [00:19:53 root@localhost ~]#yum -y install chrony(#安装chrony服务)

 1 [00:19:53 root@localhost ~]#yum -y install chrony(#安装服务)
 2 Loaded plugins: fastestmirror
 3 Loading mirror speeds from cached hostfile
 4  * base: mirrors.163.com
 5  * extras: mirrors.nju.edu.cn
 6  * updates: mirrors.aliyun.com
 7 Resolving Dependencies
 8 --> Running transaction check
 9 ---> Package chrony.x86_64 0:3.4-1.el7 will be installed
10 --> Processing Dependency: libseccomp.so.2()(64bit) for package: chrony-3.4-1.el7.x86_64
11 --> Running transaction check
12 ---> Package libseccomp.x86_64 0:2.3.1-4.el7 will be installed
13 --> Finished Dependency Resolution
14
15 Dependencies Resolved
16
17 =============================================================================================================
18  Package                    Arch                   Version                        Repository            Size
19 =============================================================================================================
20 Installing:
21  chrony                     x86_64                 3.4-1.el7                      base                 251 k
22 Installing for dependencies:
23  libseccomp                 x86_64                 2.3.1-4.el7                    base                  56 k
24
25 Transaction Summary
26 =============================================================================================================
27 Install  1 Package (+1 Dependent package)
28
29 Total download size: 307 k
30 Installed size: 788 k
31 Downloading packages:
32 (1/2): libseccomp-2.3.1-4.el7.x86_64.rpm                                              |  56 kB  00:00:00
33   /2): chrony-3.4-1.el7.x86_64.rpm                                                    | 251 kB  00:00:00
34 -------------------------------------------------------------------------------------------------------------
35 Total                                                                        748 kB/s | 307 kB  00:00:00
36 Running transaction check
37 Running transaction test
38 Transaction test succeeded
39 Running transaction
40   Installing : libseccomp-2.3.1-4.el7.x86_64                                                             1/2
41   Installing : chrony-3.4-1.el7.x86_64                                                                   2/2
42   Verifying  : libseccomp-2.3.1-4.el7.x86_64                                                             1/2
43   Verifying  : chrony-3.4-1.el7.x86_64                                                                   2/2
44
45 Installed:
46   chrony.x86_64 0:3.4-1.el7
47
48 Dependency Installed:
49   libseccomp.x86_64 0:2.3.1-4.el7
50
51 Complete!
2.查看chrony是否成功安装
 1 [00:19:53 root@localhost ~]#yum info chrony(#查看是否成功)
 2 Loaded plugins: fastestmirror
 3 Loading mirror speeds from cached hostfile
 4  * base: mirrors.163.com
 5  * extras: mirrors.nju.edu.cn
 6  * updates: mirrors.aliyun.com
 7 Installed Packages
 8 Name        : chrony
 9 Arch        : x86_64
10 Version     : 3.4
11 Release     : 1.el7
12 Size        : 491 k
13 Repo        : installed
14 From repo   : base
15 Summary     : An NTP client/server
16 URL         : https://chrony.tuxfamily.org
17 License     : GPLv2
18 Description : A client/server for the Network Time Protocol, this program keeps your
19             : computer's clock accurate. It was specially designed to support
20             : systems with intermittent internet connections, but it also works well
21             : in permanently connected environments. It can use also hardware reference
22             : clocks, system real-time clock or manual input as time references.
3.编辑chrony的配置文件
 1 [00:20:03 root@localhost ~]#vim /etc/chrony.conf(#编辑配置文件)
 2 # Use public servers from the pool.ntp.org project.
 3 # Please consider joining the pool (http://www.pool.ntp.org/join.html).
 4 server ntp.aliyun.com iburst
 5 server time1.cloud.tencent.com iburst
 6 server slb.time.edu.cn iburst
 7 #添加这三行内容至.conf配置文件中
 8 # Record the rate at which the system clock gains/losses time.
 9 driftfile /var/lib/chrony/drift
10
11 # Allow the system clock to be stepped in the first three updates
12 # if its offset is larger than 1 second.
13 makestep 1.0 3
14
15 # Enable kernel synchronization of the real-time clock (RTC).
16 rtcsync
17
18 # Enable hardware timestamping on all interfaces that support it.
19 #hwtimestamp *
20
21 # Increase the minimum number of selectable sources required to adjust
22 # the system clock.
23 "/etc/chrony.conf" 37L, 1061C written

4.重启chrony配置文件
[00:24:31 root@localhost ~]#systemctl restart chronyd #安装好之后执行重启服务

5.查看chrony服务的监听端口
1 [00:24:49 root@localhost ~]#ss -ntul
2 Netid State      Recv-Q Send-Q       Local Address:Port                      Peer Address:Port
3 udp   UNCONN     0      0                127.0.0.1:323                                  *:*
4 udp   UNCONN     0      0                    [::1]:323                               [::]:*
5 tcp   LISTEN     0      128                      *:22                                   *:*
6 tcp   LISTEN     0      100              127.0.0.1:25                                   *:*
7 tcp   LISTEN     0      128                   [::]:22                                [::]:*
8 tcp   LISTEN     0      100                  [::1]:25                                [::]:*
ss -ntulp,可以看的更详细,其中#323是chrony的客户端端口,#123是chrony的服务端端口,需要配置了服务器才会显示

6.查看chrony的时间同步资源详细信息
1 [00:25:00 root@localhost ~]#chronyc sources -nv
2 210 Number of sources = 2
3 MS Name/IP address         Stratum Poll Reach LastRx Last sample
4 ===============================================================================
5 ^* 203.107.6.88                  2   6    17     0   +556us[+3270us] +/-   22ms  (#* 星号表示和这台服务器已经同步时间#)
6 ^- 139.199.215.251               2   6    17    10  -3755us[-3755us] +/-   45ms

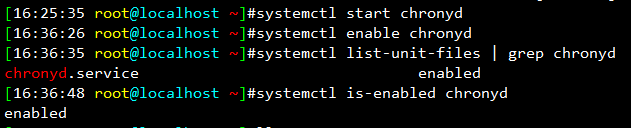
7.设置chrony服务为开启自启动并查看结果
1 [16:25:35 root@localhost ~]#systemctl start chronyd
2 [16:36:26 root@localhost ~]#systemctl enable chronyd
3 [16:36:35 root@localhost ~]#systemctl list-unit-files | grep chronyd
4 chronyd.service                               enabled
5 [16:36:48 root@localhost ~]#systemctl is-enabled chronyd(#查看状态)
6 enabled
8.状态正常 enabled


 浙公网安备 33010602011771号