基于【 springBoot +springCloud+vue 项目】一 || 后端搭建
缘起
本项目是基于之前学习的一个Dubbo+SSM分布式项目进行升级,基于此项目对前后端分离项目、微服务项目进一步深入学习。之前学习了vue、springBoot、springCloud后,没有进行更多实战练习,借助此机会,整合之前所学知识,搭建一套微服务电商系统。本项目纯属个人学习总结,如有错误之处,还希望大家能指出,共同讨论学习。
正文
1、项目依赖环境
工具:idea+vsCode
数据库:mysql
缓存:redis
消息中间件:ActiveMq
2、项目架构图(暂时留个位置)
3、整体框架结构
-parent 聚合工程
-api 各模块提供服务的接口
-eurekaserver 服务注册中心
-pojo 通用实体类层
-dao 通用数据访问层
-common 通用方法
-xxxxx-interface 某服务层接口
-xxxxx-service 某服务层实现
-xxxxx-web 某web工程
4、数据库表
(后期上传)
一、搭建框架
1、创建父工程
至于如何创建聚合工程,此处不在详细说明,网上有更多详细的教程。
创建Maven工程pinyougou-parent (POM) ,groupId 为com.pinyougou ,artifactId 为pinyougou-parent 。
添加依赖(后期根据需求有所变更)
<dependencies>
    <!--安全框架-->
    <!--<dependency>
        <groupId>org.springframework.boot</groupId>
        <artifactId>spring-boot-starter-security</artifactId>
    </dependency>-->

    <!-- springboot整合activemq -->
    <dependency>
        <groupId>org.springframework.boot</groupId>
        <artifactId>spring-boot-starter-activemq</artifactId>
    </dependency>
    <!-- springboot整合amqp -->
    <!--<dependency>
        <groupId>org.springframework.boot</groupId>
        <artifactId>spring-boot-starter-amqp</artifactId>
    </dependency>-->

    <!--数据库jdbc连接池-->
    <dependency>
        <groupId>org.springframework.boot</groupId>
        <artifactId>spring-boot-starter-jdbc</artifactId>
    </dependency>

    <!-- 集成web-->
    <dependency>
        <groupId>org.springframework.boot</groupId>
        <artifactId>spring-boot-starter-web</artifactId>
    </dependency>
    <!--整合mybatis-->
    <dependency>
        <groupId>org.mybatis.spring.boot</groupId>
        <artifactId>mybatis-spring-boot-starter</artifactId>
        <version>2.0.0</version>
    </dependency>

    <!--集成springCloud-->
    <dependency>
        <groupId>org.springframework.cloud</groupId>
        <artifactId>spring-cloud-starter-netflix-eureka-server</artifactId>
    </dependency>
    <dependency>
        <groupId>org.springframework.cloud</groupId>
        <artifactId>spring-cloud-starter-openfeign</artifactId>
    </dependency>
    <dependency>
        <groupId>org.springframework.cloud</groupId>
        <artifactId>spring-cloud-starter-netflix-zuul</artifactId>
    </dependency>

    <!--集成热部署-->
    <dependency>
        <groupId>org.springframework.boot</groupId>
        <artifactId>spring-boot-devtools</artifactId>
        <scope>runtime</scope>
    </dependency>
    <!--mysql连接驱动-->
    <dependency>
        <groupId>mysql</groupId>
        <artifactId>mysql-connector-java</artifactId>
        <scope>runtime</scope>
    </dependency>

    <!-- 集成lombok 框架 -->
    <dependency>
        <groupId>org.projectlombok</groupId>
        <artifactId>lombok</artifactId>
        <optional>true</optional>
    </dependency>
    <!--springBoot测试-->
    <dependency>
        <groupId>org.springframework.boot</groupId>
        <artifactId>spring-boot-starter-test</artifactId>
        <scope>test</scope>
    </dependency>
    <!-- 集成redis -->
    <dependency>
        <groupId>org.springframework.boot</groupId>
        <artifactId>spring-boot-starter-data-redis</artifactId>

    </dependency>
    <!-- jedis客户端 -->
    <dependency>
        <groupId>redis.clients</groupId>
        <artifactId>jedis</artifactId>
    </dependency>

    <!-- spring2.X集成redis所需common-pool2,使用jedis必须依赖它-->
    <dependency>
        <groupId>org.apache.commons</groupId>
        <artifactId>commons-pool2</artifactId>
        <version>2.5.0</version>
    </dependency>

    <!-- 集成aop -->
    <dependency>
        <groupId>org.springframework.boot</groupId>
        <artifactId>spring-boot-starter-aop</artifactId>
    </dependency>
    <!-- 集成commons工具类 -->
    <dependency>
        <groupId>org.apache.commons</groupId>
        <artifactId>commons-lang3</artifactId>
        <version>3.4</version>
    </dependency>
    <!-- 集成发送邮件-->
    <dependency>
        <groupId>org.springframework.boot</groupId>
        <artifactId>spring-boot-starter-mail</artifactId>
    </dependency>
    <!-- 阿里巴巴数据源 -->
    <dependency>
        <groupId>com.alibaba</groupId>
        <artifactId>druid</artifactId>
        <version>1.1.14</version>
    </dependency>
    <!-- httpclient -->
    <dependency>
        <groupId>commons-httpclient</groupId>
        <artifactId>commons-httpclient</artifactId>
        <version>3.1</version>
    </dependency>
    <dependency>
        <groupId>org.apache.httpcomponents</groupId>
        <artifactId>httpclient</artifactId>
    </dependency>
    <dependency>
        <groupId>com.alibaba</groupId>
        <artifactId>fastjson</artifactId>
        <version>1.2.30</version>
    </dependency>
    <dependency>
        <groupId>org.springframework</groupId>
        <artifactId>spring-context-support</artifactId>
    </dependency>
    <dependency>
        <groupId>commons-net</groupId>
        <artifactId>commons-net</artifactId>
        <version>3.3</version>
    </dependency>
    <!--<dependency>
        <groupId>org.springframework.security</groupId>
        <artifactId>spring-security-test</artifactId>
        <scope>test</scope>
    </dependency>-->
</dependencies>
2、服务注册中心模块
创建服务注册中心模块-pinyougou-eurekaserver
配置注册中心,端口号设置为8761
server:
  port: 8761
eureka:
  instance:
    hostname: localhost # eureka实例的主机名
  client:
    register-with-eureka: false #不把自己注册到eureka上
    fetch-registry: false #不从eureka上来获取服务的注册信息
    service-url:
      defaultZone: http://${eureka.instance.hostname}:${server.port}/eureka/ #服务的注册地址
添加启动类,开启Eureka Server服务
@SpringBootApplication(exclude = {DataSourceAutoConfiguration.class})
@EnableEurekaServer //开启Eureka Server
public class EurekaServerApplication {
    public static void main(String[] args){
        SpringApplication.run(EurekaServerApplication.class,args);
    }
}
测试:启动Eureka Server服务,浏览器输入http://localhost:8761/,
能访问springEureka说明服务注册中心配置成功.
3、通用实体类模块
创建通用实体类模块-pinyougou-pojo
Pojo:数据库实体类
Entity:统一返回数据实体类
Pojogroup:封装的实体类数据
4、通用数据访问模块
创建通用数据访问模块pinyougou-dao .添加依赖pinyougou-pojo
新建包com.pinyougou.mapper,写需要的mapper接口,注意:需要在加注释@Mapper
在resource下,写mapper映射文件
5、通用工具类模块
创建通用工具类模块pinyougou-common
6、商家商品服务接口模块
创建模块pinyougou-sellergoods-interface,添加依赖pinyougou-pojo
新建包com.pinyougou.sellergoods.service,写service层接口
7、服务接口提供模块
创建pinyougou-api(pom)
说明:该模块提供各模块所需提供的接口,为api父工程,各模块需要提供接口服务时,在该父工程下新建各自的子模块.
本项目实现流程:该模块提供的接口,在对应service模块编写逻辑,调用方调用服务的时候,继承api提供的接口,使用@FeignClient(‘service模块的名称’)注解调用服务.
8、商品服务api
创建pinyougou-sellergoods-api模块,依赖pinyougou-pojo
创建包com.pinyougou.pojo.TbBrand,编写一个测试类:
 @RequestMapping("/brand")
public interface BrandApiService {
    @RequestMapping("/findAll")
public List<TbBrand> findAll();
}
9、商家商品服务模块
创建pinyougou-sellergoods-service,
添加依赖pinyougou-sellergoods-interface,pinyougou-dao,pinyougou-sellergoods-api
配置文件:
server:
  port: 9001
eureka:
  client:
    service-url:
      defaultZone: http://localhost:8761/eureka/
spring:
  application:
    name: sellergoods

  datasource:
    name: pinyougoudb
    #?useUnicode=true&characterEncoding=utf8
    url: jdbc:mysql://localhost:3306/pinyougoudb?useUnicode=true&characterEncoding=utf8&serverTimezone=UTC
    username: root
    password: root
    # 使用druid数据源
    type: com.alibaba.druid.pool.DruidDataSource
    driver-class-name: com.mysql.cj.jdbc.Driver
    #   数据源其他配置
    initialSize: 5
    minIdle: 5
    maxActive: 20
    maxWait: 60000
    timeBetweenEvictionRunsMillis: 60000
    minEvictableIdleTimeMillis: 300000
    validationQuery: SELECT 1 FROM DUAL
    testWhileIdle: true
    testOnBorrow: false
    testOnReturn: false
    poolPreparedStatements: true
    #   配置监控统计拦截的filters,去掉后监控界面sql无法统计,'wall'用于防火墙
    filters: stat,wall,log4j
    maxPoolPreparedStatementPerConnectionSize: 20
    useGlobalDataSourceStat: true
    connectionProperties: druid.stat.mergeSql=true;druid.stat.slowSqlMillis=500
mybatis:
  # 指定全局配置文件位置
  #config-location: classpath:mybatis/mybatis-config.xml
  mapper-locations: classpath*:/mapper/*Mapper.xml
  #实体扫描,多个package用逗号或者分号分隔
  type-aliases-package: com.pinyougou.pojo
  configuration:
    #配置返回数据库(column下划线命名&&返回java实体是驼峰命名),自动匹配无需as(没开启这个,SQL需要写as: select user_id as userId)
    map-underscore-to-camel-case: true
    #配置JdbcTypeForNull, oracle数据库必须配置
    jdbc-type-for-null: 'null'
编写启动类,添加扫描mapper类的注解,将服务注册到注册中心
@MapperScan(value = "com.pinyougou.mapper")
@SpringBootApplication
@EnableEurekaClient
public class SellerGoodsServiceApplication {
    public static void main(String[] args) {
        SpringApplication.run(SellerGoodsServiceApplication.class, args);
    }
}
创建包com.pinyougou.sellergoods.service.impl,作用:实现interface模块,编写数据访问层业务逻辑.注意:该类上要加@Service注解.
创建包com.pinyougou.sellergoods.api.service.impl,作用:实现服务提供者api接口,编写暴露接口的业务逻辑,注意:该类上要添加@RestController注解.
10、运营商管理后台
创建包pinyougou-manager-web,依赖pinyougou-sellergoods-api
在resources下创建配置文件:
server:
  port: 9101
eureka:
  client:
    service-url:
      defaultZone: http://localhost:8761/eureka/
spring:
  freemarker:
    suffix: .html
    templateLoaderPath: classpath:/templates/
    cache: false #禁用模板缓存,正式环境取消
  application:
    name: managerweb
  main:
    allow-bean-definition-overriding: true
创建包com.pinyougou.manager.feign,用于服务的调用
@FeignClient("sellergoods") //写service层的名称
public interface BrandFeign extends BrandApiService {
}
此时,就可以使用BrandFeign调用BrandApiService的接口
创建包com.pinyougou.manager.controller,进行测试
@RestController
@RequestMapping("/brands")
public class BrandController {
    @Autowired
    private BrandFeign brandFeign;
    @RequestMapping("/findAll")
    public List<TbBrand> findAll(){
        List<TbBrand> lists=null;
        lists=brandFeign.findAll();
        return lists;
    }
}
启动服务:
启动pinyougou-eurekaserver
启动pinyougou-sellergoods-service
启动pinyougou-manager-web
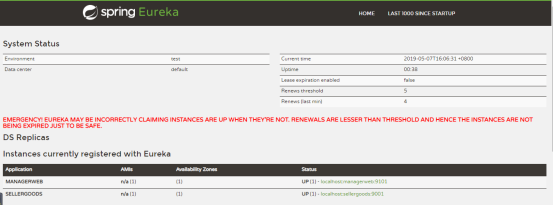
在浏览器输入:http://localhost:9101/brands/findAll,如果能获取到数据库数据,说明服务调用成功.
此时,浏览器中输入http://localhost:8761/,能看到刚启动的两个服务已经注册到Eureka注册中心了.
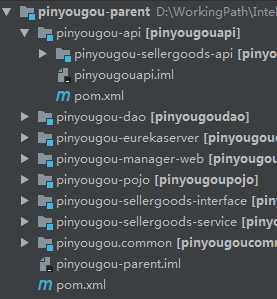
目前的项目框架如下: