树莓派4B-PCA9685驱动舵机
前言
不知道你们有没有遇到过这么一种情况,直接用树莓派的引脚输出PWM控制舵机,舵机是会出现抖动的。就算代码进行一定的时延迟优化还是会有影响的。
现在我们可以使用PCA9685这个模块去驱动舵机。
PCA9685 是一种常用的 PWM(脉冲宽度调制)驱动器芯片,通常用于控制舵机、电机和其他需要精确控制的设备。该芯片可以通过 I2C 总线与微控制器或单片机通信,以实现对多路 PWM 信号的生成和控制。
16 路 PWM 输出:PCA9685 可以同时控制最多 16 路 PWM 输出,每路输出的占空比都可以独立设置,但是16路PWM频率一样。
12 位分辨率:PCA9685 提供了 12 位分辨率的 PWM 输出,可以实现精细的输出控制。
内部振荡器:芯片内部集成了振荡器,可以产生稳定25MHz的时钟信号,无需外部晶振。
可编程频率:可以通过配置寄存器来设置 PWM 输出的频率,范围从 24 Hz 到 1526 Hz。
I2C 接口:使用标准的 I2C 串行总线接口与主控设备通信,方便集成到各种微控制器系统中。
输出驱动能力:每路 PWM 输出都具有较强的驱动能力,可以直接驱动舵机或者其他负载。
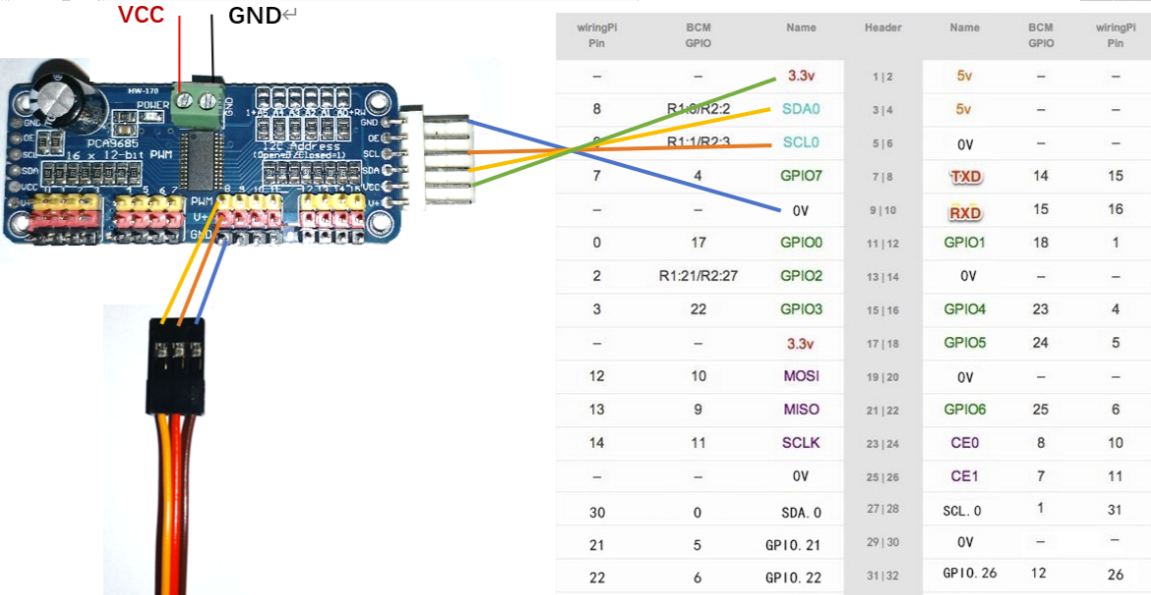
接线
- PCA9685绿端VCC和GND要和电池的正负极相连。
- PCA9685控制端的GND和VCC和树莓派的3.3v(pin1)和GND(pin9)相连。
- PCA9685的SCL和SDA和树莓派的SCL0(pin5)以及SDA0(pin3)相连。
安装PCA9685驱动
在树莓派终端输入:
pip3 install adafruit-circuitpython-pca9685
或者输入:
sudo pip3 install adafruit-circuitpython-pca9685
如果只是想下载虚拟环境到你当前的项目里可以:
mkdir project-name && cd project-name
python3 -m venv .venv
source .venv/bin/activate
pip3 install adafruit-circuitpython-pca9685
安装Motor驱动
在树莓派终端输入:
pip3 install adafruit-circuitpython-motor
或者输入:
sudo pip3 install adafruit-circuitpython-motor
如果只是想下载虚拟环境到你当前的项目里可以:
mkdir project-name && cd project-name
python3 -m venv .venv
source .venv/bin/activate
pip3 install adafruit-circuitpython-motor
测试程序
# SPDX-FileCopyrightText: 2021 ladyada for Adafruit Industries
# SPDX-License-Identifier: MIT

import time
import board
from adafruit_motor import servo
from adafruit_pca9685 import PCA9685

i2c = board.I2C()  # uses board.SCL and board.SDA
# i2c = busio.I2C(board.GP1, board.GP0)    # Pi Pico RP2040

# Create a simple PCA9685 class instance.
pca = PCA9685(i2c)
# You can optionally provide a finer tuned reference clock speed to improve the accuracy of the
# timing pulses. This calibration will be specific to each board and its environment. See the
# calibration.py example in the PCA9685 driver.
# pca = PCA9685(i2c, reference_clock_speed=25630710)
pca.frequency = 50

# To get the full range of the servo you will likely need to adjust the min_pulse and max_pulse to
# match the stall points of the servo.
# This is an example for the Sub-micro servo: https://www.adafruit.com/product/2201
# servo7 = servo.Servo(pca.channels[7], min_pulse=580, max_pulse=2350)
# This is an example for the Micro Servo - High Powered, High Torque Metal Gear:
#   https://www.adafruit.com/product/2307
# servo7 = servo.Servo(pca.channels[7], min_pulse=500, max_pulse=2600)
# This is an example for the Standard servo - TowerPro SG-5010 - 5010:
#   https://www.adafruit.com/product/155
# servo7 = servo.Servo(pca.channels[7], min_pulse=400, max_pulse=2400)
# This is an example for the Analog Feedback Servo: https://www.adafruit.com/product/1404
# servo7 = servo.Servo(pca.channels[7], min_pulse=600, max_pulse=2500)
# This is an example for the Micro servo - TowerPro SG-92R: https://www.adafruit.com/product/169
# servo7 = servo.Servo(pca.channels[7], min_pulse=500, max_pulse=2400)

# The pulse range is 750 - 2250 by default. This range typically gives 135 degrees of
# range, but the default is to use 180 degrees. You can specify the expected range if you wish:
# servo7 = servo.Servo(pca.channels[7], actuation_range=135)
servo7 = servo.Servo(pca.channels[0])

# We sleep in the loops to give the servo time to move into position.
for i in range(180):
    servo7.angle = i
    time.sleep(0.03)
for i in range(180):
    servo7.angle = 180 - i
    time.sleep(0.03)

# You can also specify the movement fractionally.
fraction = 0.0
while fraction < 1.0:
    servo7.fraction = fraction
    fraction += 0.01
    time.sleep(0.03)

pca.deinit()
参考资料
Introduction — Adafruit motor Library 1.0 documentation (circuitpython.org)
Introduction — Adafruit PCA9685 Library 1.0 documentation (circuitpython.org))

 浙公网安备 33010602011771号