ubuntu20.04 搭建kernel调试环境第一篇--安装系统
ubuntu官网下载ubuntu-20.04.1-desktop-amd64.iso,系统安装完成后,更新Software Update,然后按下面步骤配置环境。
由于Ubuntu官网的iso会升级,建议从网盘下载本文用的版本(https://pan.baidu.com/s/1v0804hVqQNTyQm_zYRDw0g 提取码:wld8),版本信息:
root@linux:/home/gsf# uname -a
Linux linux 5.15.0-53-generic #59~20.04.1-Ubuntu SMP Thu Oct 20 15:10:22 UTC 2022 x86_64 x86_64 x86_64 GNU/Linux
一、增加root用户
sudo passwd root
二、更换软件源
cd /etc/apt
mv sources.list sources.list.ubuntu
vi sources.list ,文件内容如下:
#添加阿里源
deb http://mirrors.aliyun.com/ubuntu/ focal main restricted universe multiverse
deb-src http://mirrors.aliyun.com/ubuntu/ focal main restricted universe multiverse
deb http://mirrors.aliyun.com/ubuntu/ focal-security main restricted universe multiverse
deb-src http://mirrors.aliyun.com/ubuntu/ focal-security main restricted universe multiverse
deb http://mirrors.aliyun.com/ubuntu/ focal-updates main restricted universe multiverse
deb-src http://mirrors.aliyun.com/ubuntu/ focal-updates main restricted universe multiverse
deb http://mirrors.aliyun.com/ubuntu/ focal-proposed main restricted universe multiverse
deb-src http://mirrors.aliyun.com/ubuntu/ focal-proposed main restricted universe multiverse
deb http://mirrors.aliyun.com/ubuntu/ focal-backports main restricted universe multiverse
deb-src http://mirrors.aliyun.com/ubuntu/ focal-backports main restricted universe multiverse
#添加清华源
deb https://mirrors.tuna.tsinghua.edu.cn/ubuntu/ focal main restricted universe multiverse
# deb-src https://mirrors.tuna.tsinghua.edu.cn/ubuntu/ focal main restricted universe multiverse
deb https://mirrors.tuna.tsinghua.edu.cn/ubuntu/ focal-updates main restricted universe multiverse
# deb-src https://mirrors.tuna.tsinghua.edu.cn/ubuntu/ focal-updates main restricted universe multiverse
deb https://mirrors.tuna.tsinghua.edu.cn/ubuntu/ focal-backports main restricted universe multiverse
# deb-src https://mirrors.tuna.tsinghua.edu.cn/ubuntu/ focal-backports main restricted universe multiverse
deb https://mirrors.tuna.tsinghua.edu.cn/ubuntu/ focal-security main restricted universe multiverse
# deb-src https://mirrors.tuna.tsinghua.edu.cn/ubuntu/ focal-security main restricted universe multiverse multiverse
apt-get update
apt-get upgrade
三、增加google域名服务器
编译rootfs时,可能会出现wget: unable to resolve host address ‘sources.buildroot.net’。需要增加dns域名服务器(8.8.8.8,4.4.4.4是google的域名服务器,也可以用其他的)。
vi /etc/systemd/resolved.conf 增加一行:
DNS=8.8.8.8 4.4.4.4systemctl restart systemd-resolved
systemctl enable systemd-resolved
mv /etc/resolv.conf /etc/resolv.conf.bak
ln -s /run/systemd/resolve/resolv.conf /etc/
四、安装基础软件
apt-get install vim
apt-get install vim-scripts
apt-get install vim-gtk
| 为了使vim与系统之间可以复制粘贴,进入home目录,设置一下vim配置文件: root@linux:~# cd ~ |
apt-get install fcitx (中文输入法需要)
apt-get install fcitx-libs (中文输入法需要)
apt-get install kolourpaint4(图片编辑软件)
apt-get install rar (压缩、解压文件)
apt-get install unrar
apt-get install wine (模拟win系统环境)
apt-get install hexedit (16进制编辑器)
apt-get install net-tools(网络相关工具)
apt-get install wireshark (可选,抓包软件)
eclipse工具(可选,图形化调试IDE):Release - Eclipse IDE | The Eclipse Foundation
五、安装开发软件
apt-get install libncurses5-dev
apt-get install libelf-dev
apt-get install libssl-dev
apt-get install bison
apt-get install git
apt-get install gcc-arm-linux-gnueabi
apt-get install build-essential
apt-get install ninja-build
apt-get install libpixman-1-dev
apt-get install flex(编译用到的词法分析器)
安装ARM GDB(可选,交叉编译arm体系架构代码用到):
在linaro官网下载gcc-linaro-7.5.0-2019.12-x86_64_arm-linux-gnueabihf.tar.xz,解压后拷贝到/opt 目录,操作如下:
root@linux:/home/gsf/Downloads# tar xvJf gcc-linaro-7.5.0-2019.12-x86_64_arm-linux-gnueabihf.tar.tar

root@linux:/home/gsf/Downloads# cp -R gcc-linaro-7.5.0-2019.12-x86_64_arm-linux-gnueabihf /opt/

root@linux:/home/gsf/Downloads# ls /opt/
gcc-linaro-7.5.0-2019.12-x86_64_arm-linux-gnueabihf
添加工具链路径到PATH环境变量,在/etc/profile最后增加一行(重启后生效,或者执行source /etc/profile生效):
export PATH=$PATH:/opt/gcc-linaro-7.5.0-2019.12-x86_64_arm-linux-gnueabihf/bin
六、安装qemu
1)安装qemu
方法一:版本可能较老,但安装速度快
apt-get install qemu-system-x86 (安装x86架构qemu执行程序)
apt install qemu-system-arm (安装arm架构qemu执行程序)
方法二:安装新版本,编译时间长(编译后,生成所有架构的qemu执行程序)
wget https://download.qemu.org/qemu-6.1.0-rc4.tar.xz
tar xvjf qemu-6.1.0-rc4.tar.xz
cd qemu-6.1.0-rc4
./configure
make
2)安装qume工具
apt install qemu-utils
七、安装apache服务
apt-get install apache2
/etc/init.d/apache2 restart
安装成功后,ubuntu中多了一个 /var/www/html,这是apache服务器目录,其他机器可以用wget命令下载目录中的文件。
比如我在虚拟机中通过wget命令从apache服务器目录中下载文件
##### wget http://apache服务器机器ip地址/apache目录中的文件
# wget http://10.223.11.5/myfile
Connecting to 10.223.11.5 (10.223.11.5:80)
saving to 'myfile'
myfile            100% |********************************| 43440  0:00:00 ETA
'myfile' saved
八、安装python2.7
ubuntu20.04自带python3.8,因为有一些开发软件需用到python2.7的lib,所以需要安装2.7版本。
1) apt-get install python
2) 搜索python2.7的lib(每台电脑的路径不一样):
root@linux:/home/gsf# find / -name "libpython2.7.so.1.0"
/snap/gnome-3-34-1804/60/usr/lib/x86_64-linux-gnu/libpython2.7.so.1.0
/snap/gnome-3-34-1804/36/usr/lib/x86_64-linux-gnu/libpython2.7.so.1.0
3) 拷贝so文件到/usr/lib目录
root@linux:# cp /snap/gnome-3-34-1804/60/usr/lib/x86_64-linux-gnu/libpython2.7.so.1.0 /usr/lib/
九、安装搜狗拼音
1)官网下载inux版搜狗拼音
2)根据官网安装说明修改系统语言设置
3)安装
root@linux:/home/gsf/Downloads# dpkg -i sogoupinyin_2.4.0.2905_amd64.deb
4)重启电脑,然后做如下配置
点击屏幕右上角键盘图标,选择Configure Current Input Method:


点击ok,重启电脑
十、安装sourceinsight4
网上有很多破解教程,一类是替换sourceinsight4.exe文件,该方法在我的环境中会出现Toolbar很大的情况(临时解决:右击异常区域,点击Toolbars--> Maintoolbar隐藏起来)。

另一类破解是通过16进制编辑器修改exe文件,但是90天后又会到期,并且只要联网,时不时的会跳出激活窗口。
经过摸索,用下面的方法可完美运行sourceinsight。
下载安装文件(sourceinsight40121-setup.exe和si4_kgen_unis.exe),然后按下面步骤安装:
链接: https://pan.baidu.com/s/1EwL1Nr_bhzG3BynqKkzRrQ 提取码: zuvz
1)如果之前安装过sourceinsight,需清理安装环境,防止之前有残留文件 (因路径中有空格,所以路径中有转义字符\)
root@linux:/home/gsf/Downloads# rm -rf /root/.wine/drive_c/Program\ Files\ \(x86\)/Source\ Insight\ 4.0
root@linux:/home/gsf/Downloads# rm -rf /root/.wine/drive_c/ProgramData/Source\ Insight
2)安装sourceinsight4
root@linux:/home/gsf/Downloads# unrar x Source_Insight.rar
root@linux:/home/gsf/Downloads# wine sourceinsight40121-setup.exe
3)修改sourceinsight4.exe文件
用16进制打开exe文件:
root@linux:~/.wine/drive_c/Program Files (x86)/Source Insight 4.0# hexedit sourceinsight4.exe
将c800 0000 742a中的74修改成eb,注意,有2处需要修改,ctrl+W保存,ctrl+X退出。
4)生成license文件
root@linux:/home/gsf/Downloads# unrar si4_kgen_unis.rar
root@linux:/home/gsf/Downloads# wine si4_kgen_unis.exe
ActID、Serial可以随便点几次,然后点击Generate生产lic文件,并保存下来。

5)打开sourceinsight,导入刚刚生成的lic文件
root@linux:/home/gsf/Downloads# wine /root/.wine/drive_c/Program\ Files\ \(x86\)/Source\ Insight\ 4.0/sourceinsight4.exe
(由于wine自身问题,第一次启动sourceinsight,点击菜单栏可能没有反应,把sourceinsight最小化,再最大化,就正常了)


至此激活成功,信息如下:

6)禁止sourceinsight联网检查license
sourceinsight会频繁向服务器发送信息,检查license的合法性,通过抓包,发现license服务器ip及域名如下:
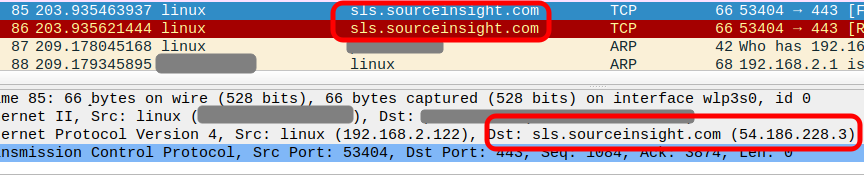
所以可执行命令 iptables -t filter -w -I OUTPUT -p tcp -d 54.186.228.3 -j DROP把送往license服务器的报文禁掉即可。
为避免每次重启后需要重新执行该命令,将该命令写入启动脚本中。
6.1) 设置local.service
root@linux:/home/gsf# vim /etc/systemd/system/rc-local.service
[Unit]
 Description=/etc/rc.local Compatibility
 ConditionPathExists=/etc/rc.local
[Service]
 Type=forking
 ExecStart=/etc/rc.local start
 TimeoutSec=0
 StandardOutput=tty
 RemainAfterExit=yes
 SysVStartPriority=99
[Install]
 WantedBy=multi-user.target
6.2)执行命令
root@linux:/home/gsf# systemctl enable rc-local.service
7.3)写入开机启动命令
root@linux:/home/gsf# vim /etc/rc.local
#!/bin/sh -e
#
# rc.local
#
# This script is executed at the end of each multiuser runlevel.
# Make sure that the script will "exit 0" on success or any other
# value on error.
#
# In order to enable or disable this script just change the execution
# bits.
#
# By default this script does nothing.

# 下面这条是要开机启动的命令
iptables -t filter -w -I OUTPUT -p tcp -d 54.186.228.3 -j DROP

exit 0
root@linux:/home/gsf# chmod +x /etc/rc.local (务必增加可执行权限,否则没有权限执行)
至此,sourceinsight已经可以完美使用了,永不过期,不会弹出license注册窗口。
附上sourceinsight破解验证
1)开机重启后,通过命令iptables -L看到规则已经加进去:

2)wine打开sourceinsight后,周期执行命令iptables -nv -L可以看到发往sourceinsight license服务器的报文已经被丢弃。


 浙公网安备 33010602011771号