BeautifulSoup
阅读目录
一 什么是BeautifulSoup
简单来说,Beautiful Soup是python的一个库,最主要的功能是从网页抓取数据。
官方解释如下:
Beautiful Soup提供一些简单的、python式的函数用来处理导航、搜索、修改分析树等功能。它是一个工具箱,通过解析文档为用户提供需要抓取的数据,因为简单,所以不需要多少代码就可以写出一个完整的应用程序。
Beautiful Soup 是一个可以从HTML或XML文件中提取数据的Python库。它能够通过你喜欢的转换器实现惯用的文档导航,查找,修改文档的方式。所以需要配合解析器一起使用!
Beautiful Soup会帮你节省数小时甚至数天的工作时间.你可能在寻找 Beautiful Soup3 的文档,Beautiful Soup 3 目前已经停止开发,官网推荐在现在的项目中使用Beautiful Soup 4。
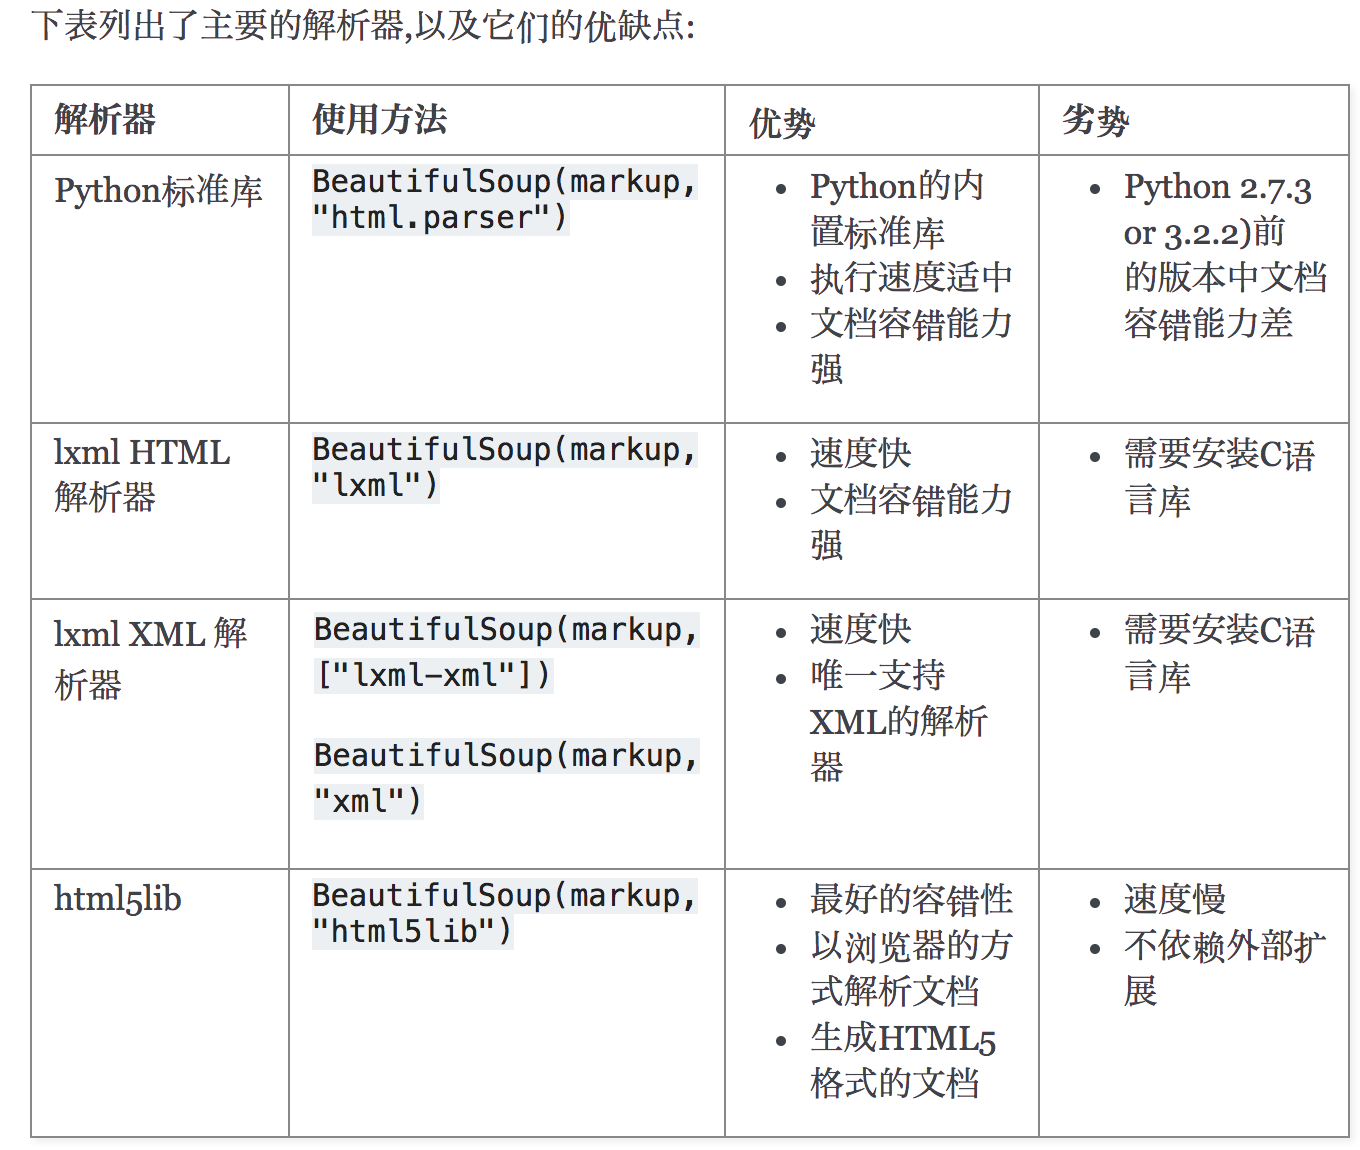
解析器:
Beautiful Soup支持Python标准库中的HTML解析器,还支持一些第三方的解析器,如果我们不安装它,则 Python 会使用 Python默认的解析器,lxml 解析器更加强大,速度更快,推荐安装另一个可供选择的解析器是纯Python实现的 html5lib , html5lib的解析方式与浏览器相同。
解析器对比: 官方文档


# 安装 Beautiful Soup

    pip3 install beautifulsoup4

#安装解析器
'''
    Beautiful Soup支持Python标准库中的HTML解析器,还支持一些第三方的解析器,其中一个是 lxml .根据操作系统不同,可以选择下列方法来安装lxml:

        apt-get install Python-lxml

        pip3 install lxml


    另一个可供选择的解析器是纯Python实现的 html5lib , html5lib的解析方式与浏览器相同,可以选择下列方法来安装html5lib:

      apt-get install Python-html5lib

      pip3 install html5lib
'''
二 为什么要用BeautifulSoup?
BeautifulSoup能给我们提供一些列查找文档树的方法,使我们能快速定位到我们想要爬取的数据。我们再回想一下之前学的一个re模块,它可以全局查找我们想要的文本,从文本开头到结束开始匹配,然后通过贪婪匹配,再通过非贪婪匹配拿到需要的数据,整个过程是不是非常繁琐,而却搜索效率极低!
BeautifulSoup内既封装了re,还为我们提供了一些更加强大、高效的功能,使我们可以快速匹配到我们想要的数据,提高爬取效率和开发效率。
三 安装
1、安装
# 安装BeautifulSoup4
pip3 install beautifulsoup4

# 安装解析器
# 根据官网解释,推荐使用lxml
pip3 install lxml
四 怎么使用
1、基本使用
注意: 如何初始文本内有换行,也会算在里面。(坑)
html_doc = """
<html><head><title>The Dormouse's story</title></head>
<body>
<p class="sister"><b>$37</b></p>

<p class="story" id="p">Once upon a time there were three little sisters; and their names were
<a href="http://example.com/elsie" class="sister" >Elsie</a>,
<a href="http://example.com/lacie" class="sister" id="link2">Lacie</a> and
<a href="http://example.com/tillie" class="sister" id="link3">Tillie</a>;
and they lived at the bottom of a well.</p>

<p class="story">...</p>
"""

from bs4 import BeautifulSoup

# 第一个参数是解析文本
# 第二个参数是解析器
soup = BeautifulSoup(html_doc, 'lxml')

# 具备自动补全html标签功能
print(soup)

# 美化html便签
html_doc = soup.prettify()
print(html_doc)
2、遍历文档树
'''
    1、直接使用
    2、获取标签的名称
    3、获取标签的属性
    4、获取标签的内容
    5、嵌套选择
    6、子节点、子孙节点
    7、父节点、祖先节点
    8、兄弟节点
'''
from bs4 import BeautifulSoup

# 注意: 如何初始文本内有换行,也会算在里面。(坑)
html_doc = """
<html><head><title>The Dormouse's story</title></head><body><p class="sister"><b>$37</b></p><p class="story" id="p">Once upon a time there were three little sisters; and their names were<a href="http://example.com/elsie" class="sister" >Elsie</a><a href="http://example.com/lacie" class="sister" id="link2">Lacie</a> and<a href="http://example.com/tillie" class="sister" id="link3">Tillie</a>and they lived at the bottom of a well.</p><p class="story">...</p>
"""


# 第一个参数是解析文本
# 第二个参数是解析器
soup = BeautifulSoup(html_doc, 'lxml')

# 具备自动补全html标签功能
# print(soup)

# 美化html便签
html_doc = soup.prettify()
# print(html_doc)
# soup = BeautifulSoup(html_doc, 'lxml')


# 1、直接选择标签(返回的是一个对象)
print(soup.a)  # 获取第一个a标签
print(soup.p)  # 获取第一个p标签
print(type(soup.a))  # <class 'bs4.element.Tag'>

# 2、获取标签的名称
print(soup.a.name)  # 获取a标签的名字

# 3、获取标签的属性
print(soup.a.attrs)  # 获取a标签内所有的属性

# 4、获取标签的内容
print(soup.a.attrs['href'])  # 获取a标签内的href属性

# 5、嵌套选择标签
print(soup.p.b)  # 获取第一个p标签内的b标签
print(soup.p.b.text)  # 打印b标签内的文本

# 6、子节点、子孙节点
# 获取子节点
print(soup.p.children)  # 获取第一个p标签所有的子节点,返回的是一个迭代器
print(list(soup.p.children))  # list转成列表

# 获取子孙节点
print(soup.body.descendants)  # 获取body标签内所有的子孙节点,返回的是一个生成器
print(list(soup.body.descendants))  # list转成列表

# 获取第一个p标签中所有的内容,返回的是一个列表
print(soup.p.contents)

# 7、父节点、祖先节点
# 获取父节点
print(soup.a.parent)  # 获取第一个a标签内的父节点

# 获取祖先节点(爸爸,爸爸的爸爸,爸爸的爸爸的爸爸...以此类推)
print(list(soup.a.parents))  # 获取第一个a标签的祖先节点,返回的是一个生成器

print('*' * 1000)
# 8、兄弟节点  (sibling: 兄弟姐妹)
print(soup.a)
# 获取下一个兄弟节点
print(soup.a.next_sibling)
# 获取下一个的所有兄弟节点,返回的是一个生成器
print(soup.a.next_siblings)
print(list(soup.a.next_siblings))

# 获取上一个兄弟节点
print(soup.a.previous_sibling)
# 获取上一个的所有兄弟节点,返回的是一个生成器
print(list(soup.a.previous_siblings))
3、搜索文档树
BeautifulSoup定义了很多搜索方法,这里着重介绍2个:find() 和 find_all() 。其它方法的参数和用法类似!
'''
标签查找与属性查找:

    标签:
        - 字符串过滤器   字符串全局匹配
            name 属性匹配
            attrs 属性查找匹配
            text 文本匹配

        - 正则过滤器
            re模块匹配

        - 列表过滤器
            列表内的数据匹配

        - bool过滤器
            True匹配

        - 方法过滤器
            用于一些要的属性以及不需要的属性查找。

    属性:
        - class_
        - id
'''
from bs4 import BeautifulSoup
import re

# 注意: 如何初始文本内有换行,也会算在里面。(坑)
html_doc = """
<html><head><title>The Dormouse's story</title></head><body><p class="sister"><b>$37</b></p><p class="story" id="p">Once upon a time there were three little sisters; and their names were<a href="http://example.com/elsie" class="sister" >Elsie</a><a href="http://example.com/lacie" class="sister" id="link2">Lacie</a> and<a href="http://example.com/tillie" class="sister" id="link3">Tillie</a>and they lived at the bottom of a well.</p><p class="story">...</p>
"""


# 第一个参数是解析文本
# 第二个参数是解析器
soup = BeautifulSoup(html_doc, 'lxml')

'''
标签查找与属性查找:

    标签:
        - 字符串过滤器   字符串全局匹配
            name 属性匹配
            attrs 属性查找匹配
            text 文本匹配

        - 正则过滤器
            re模块匹配

        - 列表过滤器
            列表内的数据匹配

        - bool过滤器
            True匹配

        - 方法过滤器
            用于一些要的属性以及不需要的属性查找。

    属性:
        - class_
        - id
'''


# 1、字符串
# find的默认参数 第一个是name、第二个是attrs、第四个是text
# name: 根据标签名匹配节点
print(soup.find('p'))  # 获取第一个p标签
print(soup.find_all(name='p'))  # 获取所有的p标签

# attrs: 根据属性查找匹配节点
print(soup.find(attrs={'id': 'p'}))  # 查找id为p的标签
print(soup.find_all(attrs={'class': 'sister'}))  # 查找class为sister的所有标签

# text: 根据文本匹配文档树内的文本
# 推荐配合其他匹配规则使用,否则毫无意义
print(soup.find(text='$37'))  # 查找标签内为$37的文本

# name与text配合使用
print(soup.find_all(name='p', text='$37'))  # 查找所有文本为$37的p标签

# name与attrs配合使用
print(soup.find(name='a', attrs={'id': 'link2'}))  # 查找第一个id为link2的a标签

# attrs与text配合使用
print(soup.find_all(attrs={'id': 'link2'}, text='Lacie'))  # 查找所有id为link2,文本为Lacie的标签

# name、attrs、text组合使用
print(soup.find_all(name='a', attrs={'id': 'link3'}, text='Tillie'))  # 查找所有id为link3,文本为Tillie的a标签


# 2、正则
print(soup.find(name=re.compile('a')))  # 通过第一个标签名带有a的节点
print(soup.find_all(attrs={'id': re.compile('link')}))  # 匹配所有id名带有link的节点
print(soup.find_all(text=re.compile('and')))  # 匹配所有文本带有"and"的节点


# 3、列表 (列表内可以匹配多个)
print(soup.find_all(name=['a', re.compile('e')]))  # 匹配所有a标签节点与所有标签中带有e的节点
print(soup.find_all(text=['$']))  # 找不到,因为$是精确查找
print(soup.find_all(text=['$37']))  # 查找$37文本,这样查找是没有意义的
print(soup.find_all(text=[re.compile('\$')]))  # 正则中$是特殊字符,所以需要转义


# 4、bool
print(soup.find_all(name=True))  # 查找所有有标签名的节点
print(soup.find_all(attrs={'id': True}))  # 查找所有有id的节点
print(soup.find_all(text=True))  # 查找所有文本


# 5、方法
# 写一个只要有class没有id的a标签的函数
def has_class_not_id(arg):
    if arg.name == 'a' and arg.has_attr('class') and not arg.has_attr('id'):
        return arg.name

print(soup.find_all(name=has_class_not_id))  # 通过has_class_not_id的函数匹配节点


# 6、标签与属性查找
# 标签
print(soup.find_all(attrs={'class': 'sister'}))

# 属性
# 根据class属性查找,因为class是关键字,所以后面需要加下划线
print(soup.find_all(class_='sister'))
# 根据id属性查找
print(soup.find_all(id='link2'))
五 自动登录抽屉新热榜并点赞与评论
'''
# 抽屉新热榜自动登陆并点赞
    1.需要携带评论主页的cookies信息去进行点赞,否则点赞失败

'''
from bs4 import BeautifulSoup
import requests
# 通过bs4解析库获取所有新闻的id
for line in range(2, 4):
    index_url = 'https://dig.chouti.com/all/hot/recent/{0}'.format(line)
    response1 = requests.get(index_url,
                            headers={
                                'user-agent': 'Mozilla/5.0 (Windows NT 10.0; WOW64) AppleWebKit/537.36 (KHTML, like Gecko) Chrome/70.0.3538.77 Safari/537.36'
                            }
                            )

    response1_cookies = response1.cookies

    soup = BeautifulSoup(response1.text, 'html.parser')

    items = soup.find_all(attrs={'class': 'item'})
    # print(items)

    for item in items:
        div_tag = item.find(attrs={'class': 'part2'})
        # print(div)
        # print(type(div))
        # 拿到所有的id
        user_id = div_tag.get('share-linkid')
        # print(user_id)

        form_data = {
            "phone": "8615622792660",
            "password": "kermit46709394",
            "oneMonth": '1'
        }

        # print(url)
        response2 = requests.post('https://dig.chouti.com/login',
                                  headers={
                                      'user-agent': 'Mozilla/5.0 (Windows NT 10.0; WOW64) AppleWebKit/537.36 (KHTML, like Gecko) Chrome/70.0.3538.77 Safari/537.36'
                                  },
                                  data=form_data,
                                  cookies=response1_cookies
                                  )

        url = 'https://dig.chouti.com/link/vote?linksId={user_id}'.format(user_id=user_id)

        # 抽屉新热榜自动点赞
        response3 = requests.post(url,
                                  headers={
                                      'user-agent': 'Mozilla/5.0 (Windows NT 10.0; WOW64) AppleWebKit/537.36 (KHTML, like Gecko) Chrome/70.0.3538.77 Safari/537.36'
                                  },
                                  cookies=response1_cookies
                                  )


        print(response3.text)

 浙公网安备 33010602011771号