网站集群架构(LVS负载均衡、Nginx代理缓存、Nginx动静分离、Rsync+Inotify全网备份、Zabbix自动注册全网监控)--技术流ken
前言
最近做了一个不大不小的项目,现就删繁就简单独拿出来web集群这一块写一篇博客。数据库集群请参考《MySQL集群架构篇:MHA+MySQL-PROXY+LVS实现MySQL集群架构高可用/高性能-技术流ken》下面是项目的一些简单介绍。
WEB集群项目简介
随着网站访问量的激增,势必会导致网站的负载增加,现需求搭载一套高性能,高负载,高可用的网站集群架构以保障网站的持续、高效、安全、稳定的运行。
针对以上需求,我们采用了如下的技术:
- 使用负载均衡技术来实现网站请求的调度分发,减小后端服务器的压力。
- 配置了KEEPALIVED解决单点故障问题。
- 采用动静分离的技术,客户端请求会根据请求文件类型往不同的后端节点进行转发、调度,均衡每个节点的压力。
- 数据库采用读写分离及级联复制的架构,使得数据的写入和读取更加的快捷。
- 为了保障数据库的持续运行及安全,我们部署了MHA实现数据库的高可用,可实现即时报警及故障切换。
- 为了保障数据的安全,定时做了数据库的完全备份以及增量备份。
- 针对网站数据做了实时差异化备份,保证数据的一致性和完整性。
- 分布式监控系统,实时监测各个节点的运行状况;邮件报警通知机制,做到实时报警通知,快速定位问题,解决问题。
WEB集群项目环境说明
² 系统版本:CentOS Linux release 7.5.1804 (Core)
² 内核版本:3.10.0-862.el7.x86_64
² SELinux关闭状态
² Firewalld关闭状态
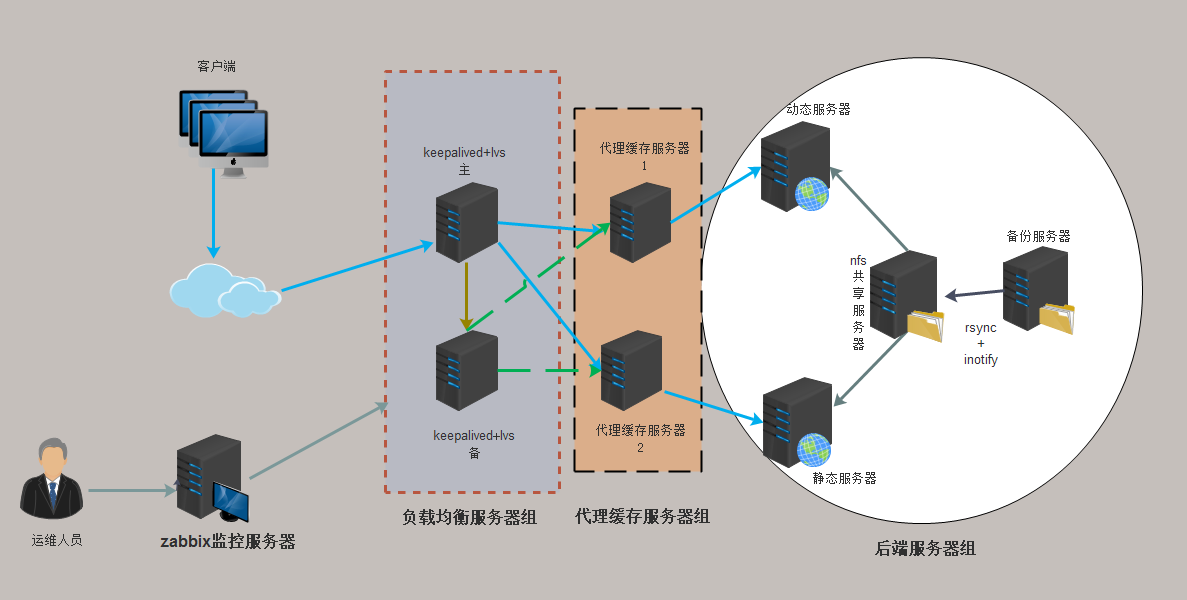
WEB集群项目图片示例

WEB集群项目架构说明
第一部分:WEB集群
1.当用户请求经过路由器转发进网络中,由Keepalived+Lvs组成的一台服务器首先接收请求,根据配置好的调度规则转发至后端服务器节点。在这里准备了两台服务器,使用Keepalived解决单点故障问题,实现服务的高可用。
2.由Keepalived+Lvs转发过来的用户请求进入到缓存代理服务器当中。这里使用Nginx做了一个缓存服务器以及代理服务器,如果缓存中有用户请求的缓存数据,就会直接返回给客户端,如果没有用户请求数据的缓存就会根据文件类别进行往后方节点转发。
3.如果客户请求是静态文件就会被调度到静态服务器。静态服务器由apache构建,静态服务器提供静态文件,并由后方的文件共享服务器提供文件。
4.如果客户请求是动态文件就会被调度到动态服务器。动态服务器由nginx构建,动态服务器提供动态文件,这里做了一个apache,mysql,php分离的架构。
5.把需要部署的网站包放在文件共享服务器。文件共享服务器部署NFS。
6.对文件共享服务器做好备份,防止数据丢失。这里采用rsync+inotify实现数据的完全备份,保证数据的一致性。
第二部分:监控集群
1.监控采用zabbix,并使用分布式监控系统,减小主监控节点的压力。
2.两个mysql-proxy分别监控web集群和mysql集群,实时反应每个节点的状态信息,快速定位故障节点进行修复。
3.在zabbix服务器端一起配置了DNS以及NTP服务,分别提供内部服务器的网站域名解析服务,以及时间同步服务。
IP地址分配
|
主机名(角色) |
IP地址 |
|
keepalived+lvs主 |
10.220.5.131 |
|
keepalived+lvs备 |
10.220.5.132 |
|
VIP |
10.220.5.133 |
|
代理缓存1 |
10.220.5.134 |
|
代理缓存2 |
10.220.5.135 |
|
静态服务器 |
10.220.5.137 |
|
动态服务器 |
10.220.5.138 |
|
文件共享服务器 |
10.220.5.139 |
|
备份服务器 |
10.220.5.140 |
|
zabbix.ntp.dns |
10.220.5.111 |
WEB集群架构脚本
上面的架构我已经写成了脚本,可以实现一键安装,脚本可以复用。先就针对每个脚本进行讲解
[root@ken ~]# ls
arp.sh       fileshare.sh  inotify7.sh  keepalived.conf  qimojiagou.tar.gz  ssh1.sh     zhengti.sh
dongtai5.sh  huancun3.sh   keep2.sh     nginx.conf       rsync6.sh          static4.sh
第一步:秘钥自动批量分发
1.实现脚本一键安装第一步要做的就是秘钥的分发。
2.秘钥自动分发借助于expect来实现,所以脚本中第一步是要安装expect。
3.删除保存的秘钥信息,可以实现脚本的复用。
4.使用ssh-keygen来生成秘钥,借助于expect实现自动化。
5.使用一个for循环的语句,把你需要联系的节点的IP地址写进去,这样就可以实现免秘钥登录了。
[root@ken ~]# vim ssh1.sh
#!/bin/bash
. /etc/init.d/functions
#下载expect
yum install expect -y &>/dev/null
if [ $? -eq 0 ];then
        echo -n "download expect"
        success
        echo ""
else
        echo -n "download expect"
        failure
        echo ""
        exit 8
fi
#删除保存的秘钥信息
if [ -f id_rsa -o -f id_rsa.pub -o known_hosts ];then
        rm -rf /root/.ssh/id*
        rm -rf /root/.ssh/known*
fi
#自动生成秘钥对
/usr/bin/expect<<eof
spawn ssh-keygen
expect {
"(/root/.ssh/id_rsa)" {send \r;exp_continue}
"passphrase" {send \r;exp_continue}
"again" {send \r}
}
expect eof
exit
eof
#在各个节点分发秘钥
for i in 31 32 34 35 37 38 39 40
do
ken=10.220.5.1$i
/usr/bin/expect<<eof
spawn ssh-copy-id $ken
expect {
"yes/no" {send yes\r;exp_continue}
"password" {send o\r}
}
expect eof
exit
eof
done
第二步:配置keepalived+lvs
1.在两个keepalived节点之上下载需要的软件
2.使用ssh结合命令在备节点执行下载操作
3.把/root/下的keepalived文件传到备节点之上
4.使用sed修改keepalived配置文件
5.做后端节点的arp抑制
[root@ken ~]# vim keep2.sh
#!/bin/bash
. /etc/init.d/functions
bash /root/ssh1.sh
yum install nginx keepalived ipvsadm libnl* popt* -y &>/dev/null
if [ $? -ne 0 ];then
        echo -n "download error at master"
        failure
        echo ""
        exit 4
fi
#keepalved备节点也下载软件
ssh 10.220.5.132 yum install keepalived ipvsadm libnl* popt* -y &>/dev/null
if [ $? -ne 0 ];then
        echo -n "download error at slave"
        failure
        echo ""
        exit 2
fi

#把准备好的从节点keepalived文件传送到备节点并启动
scp -q /root/keepalived.conf 10.220.5.132:/etc/keepalived &>/dev/null
ssh  10.220.5.132 systemctl restart keepalived  &>/dev/null

#准备主keepalived文件并启动
cp -f /root/keepalived.conf /etc/keepalived/
sed -i 's/router_id id2/router_id id1/' /etc/keepalived/keepalived.conf &>/dev/null
sed -i 's/state SLAVE/state MASTER/'    /etc/keepalived/keepalived.conf &>/dev/null
sed -i 's/priority 100/priority 150/'   /etc/keepalived/keepalived.conf &>/dev/null
systemctl restart keepalived  &>/dev/null
#缓存1arp抑制
scp -q /root/arp.sh 10.220.5.134:/root
ssh 10.220.5.134 bash /root/arp.sh

#缓存2arp抑制
scp -q /root/arp.sh 10.220.5.135:/root
ssh 10.220.5.135 bash /root/arp.sh

systemctl restart nginx
ipvsadm -L -n
第三步:配置代理缓存节点
1.在后端节点10.220.5.134,10.220.5.135安装nginx作为缓存代理服务器
2.把准备好的nginx配置文件发送到后端节点并进行重启生效
#!/bin/bash
. /etc/init.d/functions

#配置134代理缓存
ssh 10.220.5.134 yum install nginx -y &>/dev/null
if [ $? -ne 0 ];then
        echo -n "download nginx"
        failure
        echo ""
        exit 5
fi
mkdir /k  &>/dev/null
mkdir /kenken  &>/dev/null
scp -q /root/nginx.conf 10.220.5.134:/etc/nginx &>/dev/null
ssh 10.220.5.134 systemctl restart nginx &>/dev/null
#配置135代理缓存
ssh 10.220.5.135 yum install nginx -y &>/dev/null
if [ $? -ne 0 ];then
        echo -n "download nginx"
        failure
        echo ""
        exit 5
fi
scp -q /root/nginx.conf 10.220.5.135:/etc/nginx   &>/dev/null
ssh 10.220.5.135 systemctl restart nginx &>/dev/null
第四步:配置静态服务器
1.安装httpd以及nfs组件
2.挂载共享服务器节点至本机的网站根目录
3.重启nginx使配置生效
[root@ken ~]# vim static4.sh
#!/bin/bash
. /etc/init.d/functions
yum install httpd nfs-utils -y &>/dev/null
#mkdir -p /var/www/html/static &>/dev/null
mount -t nfs 10.220.5.139:/ken /var/www/html &>/dev/null
systemctl restart httpd
第五步:配置动态服务器
1.安装配置lnmp环境
2.挂载共享服务器节点至本机的网站根目录之下
3.重启apache使配置生效
[root@ken ~]# vim dongtai5.sh
#!/bin/bash
yum install httpd php php-mysql  nfs-utils -y &>/dev/null
#mkdir -p /var/www/html/dongtai &>/dev/null
mount -t nfs 10.220.5.139:/ken /var/www/html/ &>/dev/null
systemctl restart httpd
第六步:配置rsync服务器
[root@ken ~]# vim rsync6.sh
#!/bin/bash
. /etc/init.d/functions
ruser=user1
vuser=kenken
file=/ken
hosts=10.220.5.139/24
yum install rsync -y &>/dev/null
useradd -r -u 333 -s /sbin/nologin $ruser &>/dev/null
if [ ! -e $file ];then
        mkdir $file &>/dev/null
fi
chown -R $ruser $file
cat>/etc/rsyncd.conf<<eof
pid file=/var/lock/subsys/pidfile
lock file=/var/lock/subsys/rsync
log file=/var/log/rsync
uid=333
gid=333
timeout=100
max connections=199
[ken]
path=/ken
list=yes
use chroot=yes
read only=no
auth users=kenken
secrets file=/etc/rsyncd.pwd
hosts allow=10.220.5.139/24
eof
echo "$vuser:123" > /etc/rsyncd.pwd
chmod 600 /etc/rsyncd.pwd
rsync --daemon &>/dev/null
if [ $? -eq 0 ];then
        echo -n "start rsync..."
        success
        echo ""
else
        echo -n "start rsync..."
        failure
        echo ""
fi
第七步:配置inotify
1.在本机安装inotify和rsync
2.监控/ken下的文件,如果发生更改就会被推送至rsync服务器端
[root@ken ~]# vim inotify7.sh
#!/bin/bash
. /etc/init.d/functions
file=/ken
vuser=kenken
host=10.220.5.140
mname=ken
yum install inotify-tools -y &>/dev/null
echo "123" >/etc/rsync.pwd
chmod 600 /etc/rsync.pwd
inotifywait -mrq --format "%w%f" -e create,delete,modify $file | while read line
do
rsync -rz --delete $file $vuser@$host::$mname --password-file=/etc/rsync.pwd
done
第八步:配置nfs服务器端
1.把本机的/ken目录共享给10.220.5.137,10.220.5.138服务器端文件可以解压在本目录下即可
[root@ken ~]# vim fileshare.sh
#!/bin/bash
. /etc/init.d/functions
yum install nfs-utils rpcbind -y &>/dev/null
mkdir -p /ken/static &>/dev/null
mkdir -p /ken/dongtai &>/dev/null
chown -R nfsnobody.nfsnobody /ken
cat>/etc/exports<<eof
/ken 10.220.5.137/24(rw,async,all_squash)
/ken 10.220.5.138/24(rw,async,all_squash)
eof
systemctl restart rpcbind
systemctl restart nfs
至此所有的脚本已经介绍完毕,下面来看一下nginx的配置文件。
# For more information on configuration, see:
#   * Official English Documentation: http://nginx.org/en/docs/
#   * Official Russian Documentation: http://nginx.org/ru/docs/

user nginx;
worker_processes auto;
error_log /var/log/nginx/error.log;
pid /run/nginx.pid;

# Load dynamic modules. See /usr/share/nginx/README.dynamic.
include /usr/share/nginx/modules/*.conf;

events {
    worker_connections 1024;
}

http {
    log_format  main  '$remote_addr - $remote_user [$time_local] "$request" '
                      '$status $body_bytes_sent "$http_referer" '
                      '"$http_user_agent" "$http_x_forwarded_for"';

    access_log  /var/log/nginx/access.log  main;

    sendfile            on;
    tcp_nopush          on;
    tcp_nodelay         on;
    keepalive_timeout   65;
    types_hash_max_size 2048;

    include             /etc/nginx/mime.types;
default_type        application/octet-stream;

    # Load modular configuration files from the /etc/nginx/conf.d directory.
    # See http://nginx.org/en/docs/ngx_core_module.html#include
    # for more information.
        proxy_cache_path /k  levels=1:2 keys_zone=scache:30m;   #定义静态文件的缓存
        fastcgi_cache_path /kenken levels=1:2 keys_zone=kenken:30m;  #定义动态文件的缓存
    server {
        listen       80 default_server;
        listen       [::]:80 default_server;
        server_name  _;
        root         /var/www/html;
        index  index.html;

        # Load configuration files for the default server block.
       # include /etc/nginx/default.d/*.conf;

        location / {
        proxy_pass http://10.220.5.137;    #静态文件会被代理到10.220.5.137
        proxy_set_header host $host;
        proxy_set_header realip $remote_addr;

        proxy_cache scache;                 #使scache缓存
        proxy_cache_valid any 10m;         #定义缓存的类型及时间
        }
        location ~ \.php$ {
        proxy_pass http://10.220.5.138;         #动态的文件会被缓存到10.220.5.138
        proxy_set_header host $host;
        proxy_set_header realip $remote_addr;
        fastcgi_cache kenken;                      #使用动态缓存
        fastcgi_cache_valid any 10m;
        fastcgi_cache_key http://$host$request_uri;             #定义动态缓存的key
        }

        error_page 404 /404.html;
            location = /40x.html {
        }

        error_page 500 502 503 504 /50x.html;
            location = /50x.html {
        }
    }
}
最后来看一下整体的脚本,即执行的脚本
1.把写好的脚本及准备好的配置文件都存放在10.220.5.131的/root下
2.使用scp及ssh进行远程传送脚本及运行脚本
[root@ken ~]# vim zhengti.sh
#!/bin/bash
. /etc/init.d/functions

#执行秘钥分发
bash /root/ssh1.sh

#实现keepalived+LVS
bash /root/keep2.sh

#实现缓存代理
bash /root/huancun3.sh

#实现文件共享
scp -q /root/fileshare.sh 10.220.5.139:/root
ssh 10.220.5.139 bash /root/fileshare.sh

#实现静态服务器
scp -q /root/static4.sh 10.220.5.137:/root
ssh 10.220.5.137 bash /root/static4.sh

#实现动态服务器
scp -q /root/dongtai5.sh 10.220.5.138:/root
ssh 10.220.5.138 bash /root/dongtai5.sh


#实现备份服务器rsync
scp -q /root/rsync6.sh 10.220.5.140:/root
ssh 10.220.5.140 bash /root/rsync6.sh

#实现共享文件服务器inotify
scp -q /root/inotify7.sh 10.220.5.139:/root
ssh 10.220.5.139 bash /root/inotify7.sh  &

iptables -F
运行脚本并测试
只要运行总的脚本即可,会自动调用其他脚本
[root@ken ~]# bash zhengti.sh
第一步:在10.220.5.137主机创建静态测试文件
[root@ken html]# cat index.html
test for 137ddd
第二步:在10.220.5.138主机创建动态测试文件
[root@ken html]# cat index.php
<?php
phpinfo();
?>
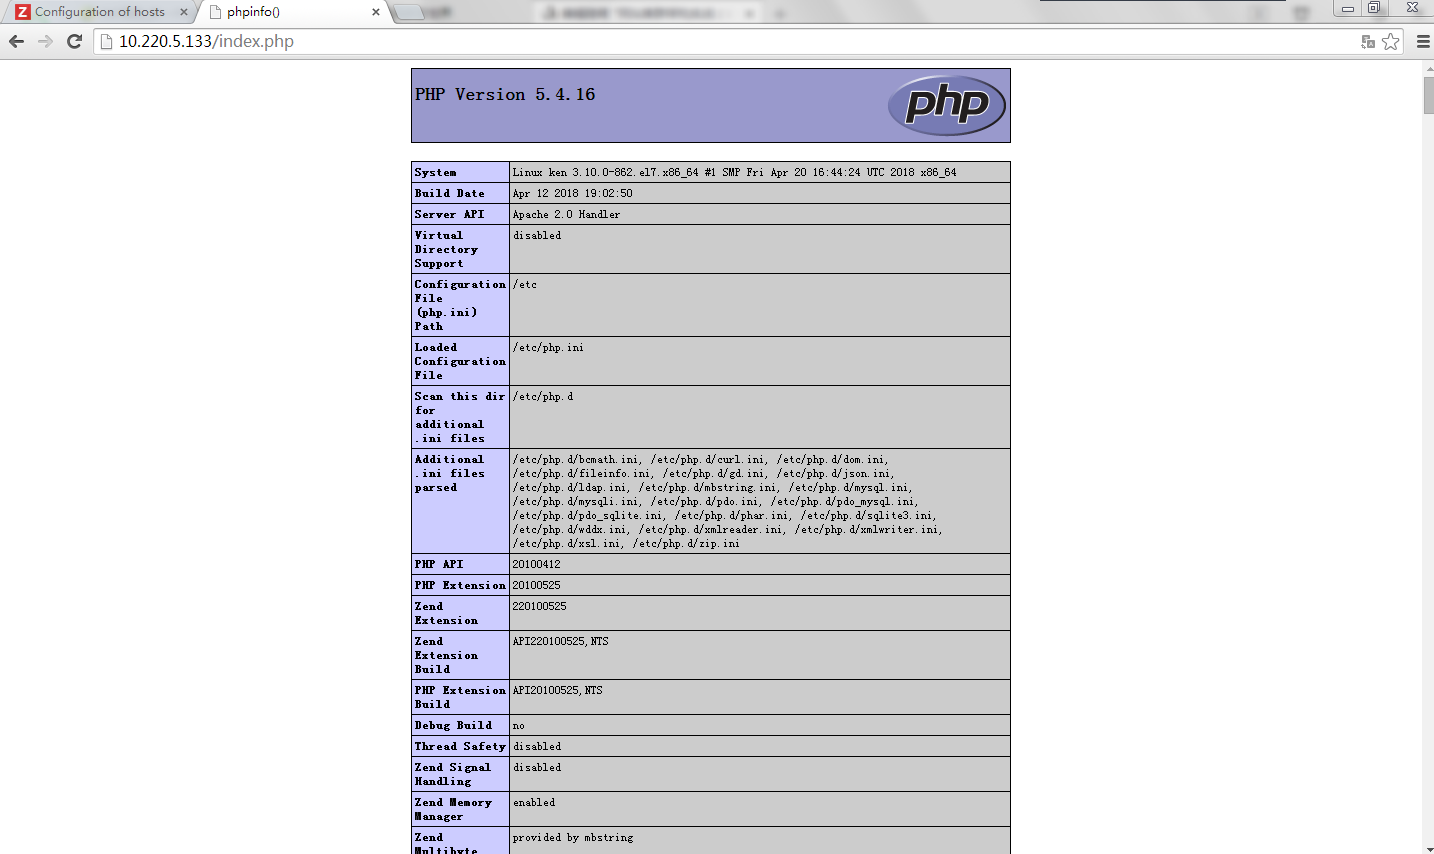
第三步:输入10.220.5.133/index.html,即虚拟IP 访问10.220.5.137主机的动态文件

第四步:输入10.220.5.133/index.php,即虚拟IP 访问10.220.5.138主机的动态文件
看到这些信息即表示成功

zabbix自动注册全网监控
实现全网监控首先需要给每个待监控的主机安装zabbix的客户端,可以使用如下脚本进行安装\
第一步:执行如下脚本
给每个待监控的客户端安装zabbix-agen客户端
还要确保开启主动模式及
ServerActive=172.20.10.6 ##这个IP地址是你监控服务器的地址,客户端都要指向服务器端
#!/bin/bash
#author:技术流ken
#date:2018-11-15
#desc:this script for downloading zabbix-agent for clients
ip=10.220.5.1
for i in 31 32 34 35 37 38 39 40
do
   ssh $ip$i yum install zabbix-agent -y  &>/dev/null
   ssh $ip$i sed -i 's/Server=127.0.0.1/Server=10.220.5.137/' /etc/zabbix/zabbix_agentd.conf &>/dev/null
   ssh $ip$i systemctl restart zabbix-agent &>/dev/null
done
第二步:在zabbix服务器端开启自动注册
点击configuration>actions>选择右上角的auto redistration

点击creation action
选择如下动作

点击add保存
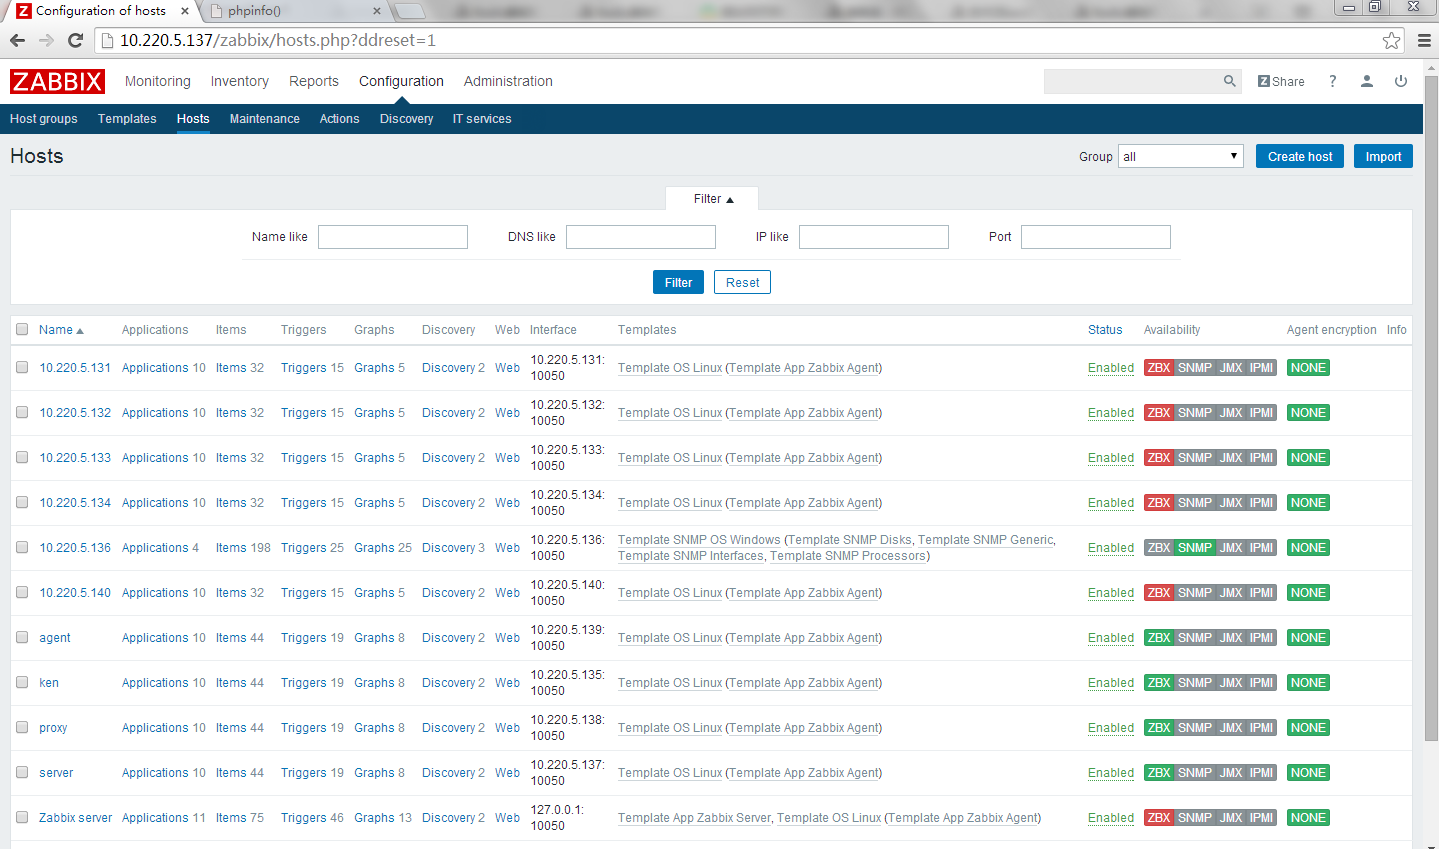
第三步:查看
点击configure>hosts即可查看自动注册到的主机


