MybatisPlus最新代码生成器(3.5.1+)使用教程(1)——输出路径详细解析
MybatisPlus最新代码生成器(3.5.1+)使用教程(1)——输出路径详细解析
MybatisPlus最新代码生成器(3.5.1+)使用教程(2)——输出文件名详细解析
MybatisPlus最新代码生成器(3.5.1+)使用教程(3)——指定数据库表详细解析
MybatisPlus最新代码生成器(3.5.1+)使用教程(4)——文件模板解析
简介
MyBatisPlus 基于 MyBatis 进行封装,强调“为简化开发而生”,极大提高了基于数据库的 Web 应用开发的效率。鉴于目前网络上 mybatis-plus-generator 的进阶使用教程寥寥无几,所以我决定抛砖引玉,为大家愉快地使用代码生成器扫清障碍。
mybatis-plus-generator 替我们生成的文件类型,主要有六种:

从 代码生成器(新) 可以看到一个简单的示例代码:
FastAutoGenerator.create("url", "username", "password")
    .globalConfig(builder -> {
        builder.author("baomidou") // 设置作者
            .enableSwagger() // 开启 swagger 模式
            .fileOverride() // 覆盖已生成文件
            .outputDir("D://"); // 指定输出目录
    })
    .packageConfig(builder -> {
        builder.parent("com.baomidou.mybatisplus.samples.generator") // 设置父包名
            .moduleName("system") // 设置父包模块名
            .pathInfo(Collections.singletonMap(OutputFile.mapperXml, "D://")); // 设置mapperXml生成路径
    })
    .strategyConfig(builder -> {
        builder.addInclude("t_simple") // 设置需要生成的表名
            .addTablePrefix("t_", "c_"); // 设置过滤表前缀
    })
    .templateEngine(new FreemarkerTemplateEngine()) // 使用Freemarker引擎模板,默认的是Velocity引擎模板
    .execute();
跟踪 execute 的代码,可以追踪到 com.baomidou.mybatisplus.generator.engine.AbstractTemplateEngine 的 batchOutput 方法:
public AbstractTemplateEngine batchOutput() {
    try {
        ConfigBuilder config = this.getConfigBuilder();
        List<TableInfo> tableInfoList = config.getTableInfoList();
        tableInfoList.forEach(tableInfo -> {
            Map<String, Object> objectMap = this.getObjectMap(config, tableInfo);
            Optional.ofNullable(config.getInjectionConfig()).ifPresent(t -> {
                t.beforeOutputFile(tableInfo, objectMap);
                // 输出自定义文件
                outputCustomFile(t.getCustomFile(), tableInfo, objectMap);
            });
            // Mp.java
            outputEntity(tableInfo, objectMap);
            // mapper and xml
            outputMapper(tableInfo, objectMap);
            // service
            outputService(tableInfo, objectMap);
            // MpController.java
            outputController(tableInfo, objectMap);
        });
    } catch (Exception e) {
        throw new RuntimeException("无法创建文件,请检查配置信息!", e);
    }
    return this;
}
查看所有的 outputXXX 方法代码,都有 String xxxPath = getPathInfo(OutputFile.xxx);,且文件的输出路径统一格式为:{xxxPath}/{文件名}.{文件后缀},例如实体文件的输出路径代码为:
String entityFile = String.format((entityPath + File.separator + "%s" + suffixJavaOrKt()), entityName);
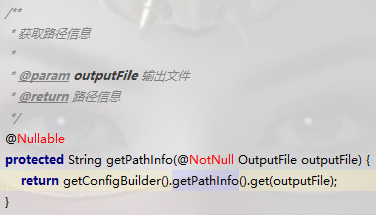
既然,文件完整路径的拼接规则 我们已经知悉,我们重新聚焦到 getPathInfo 方法源码:

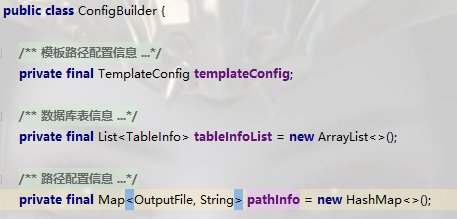
以下是 ConfigBuilder 的源码:

也就是说,输出文件所在文件夹的路径 是从 com.baomidou.mybatisplus.generator.config.builder.ConfigBuilder 的成员映射 pathInfo 中获取的。
PackageConfig.packageInfo≠ConfigBuilder.packageInfo
我们在写 com.baomidou.mybatisplus.generator.FastAutoGenerator 代码时,可以用 .packageConfig(builder -> builder.pathInfo(customPathInfo)) 设置 PackageConfig.pathInfo,
但是,查看 ConfigBuilder 构造函数源码:

我们自定义的 PackageConfig.pathInfo 需要经过 PathInfoHandler 处理才能得到最终的 ConfigBuilder.pathInfo !
PathInfoHandler源码解析
结论1:自定义路径优先级高于默认输出路径
PathInfoHandler(GlobalConfig globalConfig, TemplateConfig templateConfig, PackageConfig packageConfig) {
  this.outputDir = globalConfig.getOutputDir();
  this.packageConfig = packageConfig;
  // 设置默认输出路径
  this.setDefaultPathInfo(globalConfig, templateConfig);
  // 覆盖自定义路径
  Map<OutputFile, String> pathInfo = packageConfig.getPathInfo();
  if (CollectionUtils.isNotEmpty(pathInfo)) {
    // 自定义路径优先级高于默认输出路径,如果设置了自定义路径,将覆盖默认输出路径
    this.pathInfo.putAll(pathInfo);
  }
}
也正因为如此,所以在设置自定义路径时,需要把 项目目录,模块名称,src/main/java 或者 src/main/resources,以及包名 全都考虑进去! 例如:
// 自定义路径
Map<OutputFile, String> customPathInfo = new EnumMap<>(OutputFile.class);
// 项目路径
String projectPath = System.getProperty("user.dir");
// 子模块名称
String webModulePath = "platform-web";
// src/main/java
String srcMain = String.join(File.separator, "src", "main", "java");
// 包名
String packageName = "org.coderead.controller".replace('.', File.separatorChar);
// 自定义控制器路径
customPathInfo.put(OutputFile.controller, String.join(File.separator, projectPath, webModulePath, srcMain, packageName));
FastAutoGenerator.create("url", "username", "password")
  .packageConfig(builder -> buidler.pathInfo(customPathInfo))
  .execute();
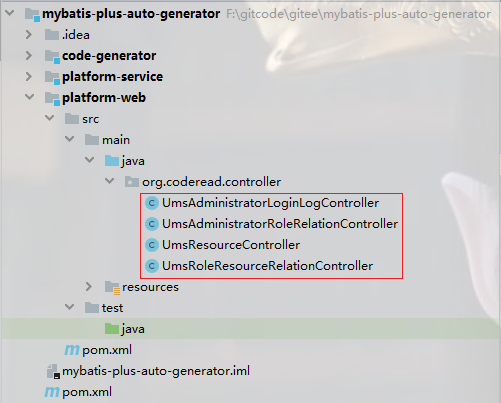
我把 FastAutoGenerator 的客户端代码放在了 code-generator 模块,给大家展示一下 controller 文件的输出路径:

结论2:默认所有文件输出到同一个模块中
如果跟踪 PathInfoHandler 的 setDefaultPathInfo 方法,代码会来到如下位置:

而 outputDir 来自于 PathInfoHandler 的构造函数:

而这个全局配置则来自于 FastAutoGenerator 客户端代码中的全局配置:
FastAutoGenerator.create("url", "username", "password")
    .globalConfig(builder -> {
        builder.author("baomidou") // 设置作者
            .outputDir("D://"); // 指定输出目录
    })
    .execute();
但是,这还不是完整路径,继续往下看 PackageConfig 的 getPackageInfo 的源码:

关键就在于这个私有的无参 getPackageInfo() 方法:
@NotNull
public Map<String, String> getPackageInfo() {
  // 这个方法会被执行多次,因此首次进入该方法需要初始化
  if (packageInfo.isEmpty()) {
    // 指定模块名称
    packageInfo.put(ConstVal.MODULE_NAME, this.getModuleName()); // 对应下图中 .moduleName("system")
    // 获取 实体类 的包名
    packageInfo.put(ConstVal.ENTITY, this.joinPackage(this.getEntity())); // 对应下图中 .entity("entity")
    // 获取 Mapper 接口的包名
    packageInfo.put(ConstVal.MAPPER, this.joinPackage(this.getMapper())); // 对应下图中 .mapper("dao")
    // 获取 Mapper.xml 的“包”名
    packageInfo.put(ConstVal.XML, this.joinPackage(this.getXml())); // 对应下图中 .xml("generate")
    // 获取 Service 接口的包名
    packageInfo.put(ConstVal.SERVICE, this.joinPackage(this.getService())); // 对应下图中 .service("service")
    // 获取 ServiceImpl 实现类的包名
    packageInfo.put(ConstVal.SERVICE_IMPL, this.joinPackage(this.getServiceImpl())); // 这个稍后再说,因为我想放到 service.impl 包中
    // 获取 Controller 的包名
    packageInfo.put(ConstVal.CONTROLLER, this.joinPackage(this.getController())); // 对应下图中 .controller("controller")
    packageInfo.put(ConstVal.OTHER, this.joinPackage(this.getOther()));
    packageInfo.put(ConstVal.PARENT, this.getParent()); // 对应下图中 .parent("org.coderead")
  }
  return Collections.unmodifiableMap(this.packageInfo);
}
以上代码可以对应 FastAutoGenerator 的客户端代码:
结论3:填写多级包名时用.分隔
继续阅读 joinPackage 的源码,才能搞清楚完整的包路径:
/**
 * 连接父子包名
 */
public String joinPackage(String subPackage) {
  String parent = getParent();
  // 如果 父包名 为空,则父子包名={用户自定义的 子包名}
  // 如果 父包名 不为空,则父子包名={父包名}.{子包名}
  return StringUtils.isBlank(parent) ? subPackage : (parent + StringPool.DOT + subPackage);
}

/**
 * 父包名
 */
public String getParent() {
  // 如果 moduleName 不为空,则父包名={parent}.{moduleName}
  if (StringUtils.isNotBlank(moduleName)) {
    return parent + StringPool.DOT + moduleName;
  }
  // 如果 moduleName 为空,则父包名={parent}
  return parent;
}
最后,包名中的.会被替换成系统对应的文件分隔符。在 PathInfoHandler.putPathInfo(OutputFile outputFile, String module) 方法中用到的 PathInfoHandler.joinPath 方法如下:

图中红框中,就是将父子包名中的
.替换成操作系统对应文件分隔符的代码!
结论4:默认路径=全局配置输出路径 + 父子包名
父子包名={parent}.{moduleName}.{具体某类输出文件的子包名}
父子包名转换为完整文件路径时,会把
.替换。


 浙公网安备 33010602011771号