.net6使用IdentityServer4
一.新建一个获取token的项目
引用 IdentityServer4 包源
添加IdentityServer的配置文件Config(名字随意)
using IdentityServer4.Models;

public static IEnumerable<IdentityResource> IdentityResources =>
        new List<IdentityResource>
        {
            new IdentityResources.OpenId(),
            new IdentityResources.Profile()
        };


    public static IEnumerable<ApiScope> ApiScopes =>
        new ApiScope[]
        {
            new ApiScope("api1")
        };

    public static IEnumerable<Client> Clients =>
        new List<Client>
        {
            new Client
            {
                ClientId = "client",

                // 没有交互式用户,使用 clientid/secret 进行身份验证
                AllowedGrantTypes = GrantTypes.ClientCredentials,

                // 用于身份验证的密钥
                ClientSecrets =
                {
                    new Secret("secret".Sha256())  //secret加密密钥 Sha256加密方式
                },

                // 客户端有权访问的范围
                AllowedScopes = { "api1" },
                AccessTokenLifetime = 120 //过期时间,默认3600秒
            }
        };
在Program里注册
using IdentityServer;

var builder = WebApplication.CreateBuilder(args);

builder.Services.AddIdentityServer()
    .AddDeveloperSigningCredential() //这仅适用于没有证书可以使用的开发场景。
    .AddInMemoryApiScopes(Config.ApiScopes)
    .AddInMemoryClients(Config.Clients)
    .AddInMemoryIdentityResources(Config.IdentityResources);

var app = builder.Build();

app.UseIdentityServer();
app.MapGet("/", () => "Hello World!");

app.Run();
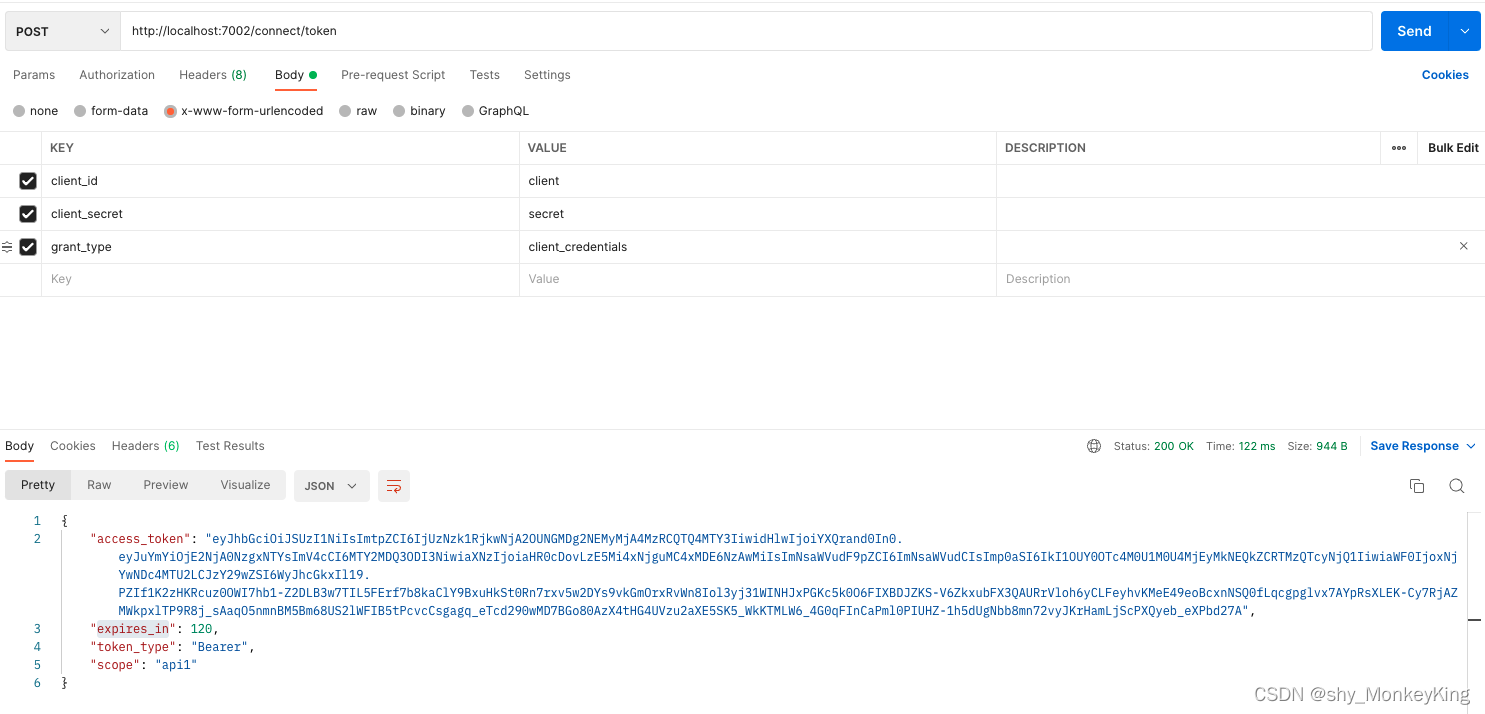
postman请求
二.新建一个需要token项目
引用 Microsoft.AspNetCore.Authentication.JwtBearer 包源
在controller加上 [Authorize(“api1”)] 值要与配置对应上
using Microsoft.AspNetCore.Authorization;
using Microsoft.AspNetCore.Mvc;

namespace Client.Controllers;

[ApiController]
[Route("[controller]")]
[Authorize("api1")]
public class TestAuthController : ControllerBase
{
    [HttpGet("TestAuthApi")]
    public IActionResult TestAuthApi()
    {
        return Ok("1234567");
    }
}
在Program中注册
builder.Services.AddAuthentication("Bearer")
    .AddJwtBearer("Bearer", options =>
    {
        options.Authority = "http://localhost:7002/";
        options.TokenValidationParameters = new TokenValidationParameters { ValidateAudience = false };
        options.RequireHttpsMetadata = false;
    });
builder.Services.AddAuthorization(option =>
{
    option.AddPolicy("Api1", builder =>
    {
        builder.RequireAuthenticatedUser();
        builder.RequireClaim("scope", "api1");
    });
});


//启用身份认证
app.UseAuthentication();
三.创建获取token的请求
引用 IdentityModel 包源
var client = new HttpClient();
var config = new DiscoveryDocumentRequest() { Address = "http://local:7002", Policy = new DiscoveryPolicy() { RequireHttps = false } };  //忽略IP或域名时Https请求
var disco = await client.GetDiscoveryDocumentAsync(config);

if (disco.IsError)
{
    Console.WriteLine(disco.Error);
    return;
}
// 请求令牌
var tokenResponse = await client.RequestClientCredentialsTokenAsync(new ClientCredentialsTokenRequest
{
    Address = disco.TokenEndpoint,

    ClientId = "client",
    ClientSecret = "secret",
    Scope = "api1"
});

if (tokenResponse.IsError)
{
    Console.WriteLine(tokenResponse.Error);
    return;
}
Console.WriteLine(tokenResponse.Json);

// 调用api
var apiClient = new HttpClient();
apiClient.SetBearerToken(tokenResponse.AccessToken);

var response = await apiClient.GetAsync("接口地址");
if (!response.IsSuccessStatusCode)
{
    Console.WriteLine(response.StatusCode);
}
else
{
    var content = await response.Content.ReadAsStringAsync();
    Console.WriteLine(content);
}

 浙公网安备 33010602011771号