
KAFKA 进阶:【八】能否说一下 KAFKA 服务端的网络通信模型设计?
大家好,这是一个为了梦想而保持学习的博客。这个专题会记录我对于 KAFKA 的学习和实战经验,希望对大家有所帮助,目录形式依旧为问答的方式,相当于是模拟面试。
【概述】
KAFKA 并没有使用现有的网络框架比如 Netty 去作为自己通信的底座,而是基于 NIO 自行研发了一套适合 KAFKA 自身的网络框架模型。
这个网络通信模型的设计十分的经典,值得我们好好学习和借鉴。
一、Reactor 设计模式
在学习 kafka 的网络通信模型实现之前,我们需要了解 Reactor 设计模式,这个模式和 NIO 网络编程简直天生一对,所以很多网络框架都是基于这个思想去实现的,例如 Netty。
Reactor 网络框架说白了就是根据不同的网络事件,将后台线程划分为不同的角色,例如:
负责处理 OP_ACCEPT 事件的,称之为 acceptor 线程;
负责处理 OP_READ/OP_WRITE 这种网络读写事件的,称之为 processor 线程;
以上两种角色的线程,是整个 Reactor 设计模式的核心。整个模型如下图所示:
除此之外,我们还可以对 processor 角色再细分一层:
也就是 processor 线程只负责网络读写,其中读出的数据再提交到 handlers 线程池中,以此进一步解耦,让 processor 线程只关注网络读写,业务处理交由 handlers 线程池来处理。
而 kafka 就是采用这种模型去进行实现的,整个模型如下图所示:

二、kafka 是如何实现 reactor 设计模式的?
有了上面一张整体的模型图,我们就来看下代码里,kafka 是如何实现对应的角色的功能的呢?
分为四个阶段:
- kafka 启动的时候,网络模块是如何初始化的?
- acceptor 是如何运行的?
- processor 是如何运行的?
- handlers 是如何运行的?
1、网络模块的初始化
从下面的源码中,我们可以得知:
在 kafka 启动的时候,会去初始化 SocketServer 这么一个网络模块,整个初始化过程主要包括:初始化 acceptor,初始化 processor。
需要注意的是:endpoints.foreach 这一行代码的意思是每监听一个端口,就初始化一套完整上网络模块,也就是上面的 acceptor+processor。
举个栗子,现在监听了 9091 和 9092 两个端口,那么此时在服务端就存在两套网络模块,分别负责 9091/9092 端口的数据通信。
那么此时内部就存在 2 个 acceptor 线程,和 6 个 processor 线程。
// 网络相关模块初始化
socketServer = new SocketServer(config, metrics, time, credentialProvider)
socketServer.startup()
def startup() {
  this.synchronized {
    // 限制单个ip的连接数量
    connectionQuotas = new ConnectionQuotas(maxConnectionsPerIp, maxConnectionsPerIpOverrides)
    // 根据配置的listeners信息,得到 endpoints
    // 创建acceptor和processor
    createAcceptorAndProcessors(config.numNetworkThreads, config.listeners)
  }
private def createAcceptorAndProcessors(processorsPerListener: Int,
                                        endpoints: Seq[EndPoint]): Unit = synchronized {
  // socket缓冲区,默认都是100kb
  val sendBufferSize = config.socketSendBufferBytes
val recvBufferSize = config.socketReceiveBufferBytes
val brokerId = config.brokerId
// 遍历endpoints,为每一个端口都整一套完整的通信模块
  endpoints.foreach { endpoint =>
    val listenerName = endpoint.listenerName
    val securityProtocol = endpoint.securityProtocol
    // 创建acceptor
    val acceptor = new Acceptor(endpoint, sendBufferSize, recvBufferSize, brokerId, connectionQuotas)
    // 以非daemon形式启动acceptor线程
    KafkaThread.nonDaemon(s"kafka-socket-acceptor-$listenerName-$securityProtocol-${endpoint.port}", acceptor).start()
    // 等待完成,也就是acceptor线程启动后,执行run函数,最后释放掉栅栏
    acceptor.awaitStartup()
    // 缓存到一个map中
    acceptors.put(endpoint, acceptor)
    // 为这个acceptor 创建对应的processors
    addProcessors(acceptor, endpoint, processorsPerListener)
  }
}
private def addProcessors(acceptor: Acceptor, endpoint: EndPoint, newProcessorsPerListener: Int): Unit = synchronized {
  val listenerName = endpoint.listenerName
  val securityProtocol = endpoint.securityProtocol
  val listenerProcessors = new ArrayBuffer[Processor]()
  // 遍历,根据num.network.threads配置,生成对应的processor个数
  for (_ <- 0 until newProcessorsPerListener) {
    val processor = newProcessor(nextProcessorId, connectionQuotas, listenerName, securityProtocol, memoryPool)
    listenerProcessors += processor
    // 与工作队列关联
    requestChannel.addProcessor(processor)
    nextProcessorId += 1
  }
  // 缓存到SocketServer的map中
  listenerProcessors.foreach(p => processors.put(p.id, p))
  // 添加到acceptor中,并且启动processor
  acceptor.addProcessors(listenerProcessors)
}
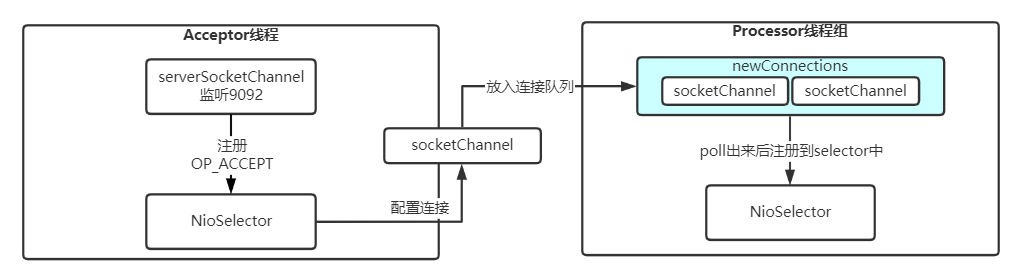
2、acceptor 的运工作内容
从下面的源码中,我们可以得知:
acceptor 线程的主要工作内容就是处理 OP_ACCEPT 事件,在三次握手完成后,通过 serverSocketChannel.accept () 拿到了连接,配置必要的属性后,将连接传入都 newConnections 内存队列中。
这里有两点需要注意:
- acceptor 在选取 processor 进行连接交付的时候,是通过取模来的,其实就是轮询。
- 最后连接在配置好属性之后,是传入了对应 processor 的 newConnections 内存队列中,等待线程去拉取。
def run() {
  serverChannel.register(nioSelector, SelectionKey.OP_ACCEPT)
  startupComplete()
  try {
    var currentProcessor = 0
    while (isRunning) {
      try {
        val ready = nioSelector.select(500)
        if (ready > 0) {
          val keys = nioSelector.selectedKeys()
          val iter = keys.iterator()
          while (iter.hasNext && isRunning) {
            try {
              val key = iter.next
              iter.remove()
              if (key.isAcceptable) {
                val processor = synchronized {
                  currentProcessor = currentProcessor % processors.size
                  processors(currentProcessor)
                }
                accept(key, processor)
              } else
                throw new IllegalStateException("Unrecognized key state for acceptor thread.")

              // round robin to the next processor thread, mod(numProcessors) will be done later
              currentProcessor = currentProcessor + 1
            } catch {
              case e: Throwable => error("Error while accepting connection", e)
            }
          }
        }
      }
      catch {
        // ... 略
    }
  } finally {
        // ... 略
  }
}
def accept(key: SelectionKey, processor: Processor) {
  val serverSocketChannel = key.channel().asInstanceOf[ServerSocketChannel]
  val socketChannel = serverSocketChannel.accept()
  try {
    connectionQuotas.inc(socketChannel.socket().getInetAddress)
    // 配置连接属性
    socketChannel.configureBlocking(false)
    socketChannel.socket().setTcpNoDelay(true)
    socketChannel.socket().setKeepAlive(true)
    if (sendBufferSize != Selectable.USE_DEFAULT_BUFFER_SIZE)
      socketChannel.socket().setSendBufferSize(sendBufferSize)

    debug("Accepted connection from %s on %s and assigned it to processor %d, sendBufferSize [actual|requested]: [%d|%d] recvBufferSize [actual|requested]: [%d|%d]"
          .format(socketChannel.socket.getRemoteSocketAddress, socketChannel.socket.getLocalSocketAddress, processor.id,
                socketChannel.socket.getSendBufferSize, sendBufferSize,
                socketChannel.socket.getReceiveBufferSize, recvBufferSize))

    processor.accept(socketChannel)
  } catch {
    case e: TooManyConnectionsException =>
      info("Rejected connection from %s, address already has the configured maximum of %d connections.".format(e.ip, e.count))
      close(socketChannel)
  }
}
def accept(socketChannel: SocketChannel) {
  newConnections.add(socketChannel)
  wakeup()
}
3、processor 的工作内容
从下面的源码中,我们可以得知:
processor 会从 newConnections 中将对应的 socketChannel 取出,然后注册到自己的 selector 中,
紧接着还会负责数据的接收和发送,也就是负责网络读写;
其中读取的数据最后会写入到 requestQueue 中,而处理响应数据的时候会从 responseQueue 中拉取对应的 response 进行处理。
override def run() {
  startupComplete()
  try {
    // processor实际的执行内容
    // 可以理解为,从newConnections中拿出一个个的socketChannel进行操作
    while (isRunning) {
      try {
        // setup any new connections that have been queued up
        // 配置建立好连接的connections
        configureNewConnections()
        // register any new responses for writing
        // 从响应队列里获取新的响应,然后返回给客户端
        processNewResponses()
        // 这就是具体的网络时间处理的地方
        // 这里的逻辑是和客户端一摸一样的
        poll()
        // 已完毕的Receives处理的地方(已接收完毕)
        processCompletedReceives()
        // 已完成的Sends的处理的地方(已发送完毕)
        processCompletedSends()
        // 处理一些断连的地方
        processDisconnected()
      } catch {
        // We catch all the throwables here to prevent the processor thread from exiting. We do this because
        // letting a processor exit might cause a bigger impact on the broker. This behavior might need to be
        // reviewed if we see an exception that needs the entire broker to stop. Usually the exceptions thrown would
        // be either associated with a specific socket channel or a bad request. These exceptions are caught and
        // processed by the individual methods above which close the failing channel and continue processing other
        // channels. So this catch block should only ever see ControlThrowables.
        case e: Throwable => processException("Processor got uncaught exception.", e)
      }
    }
  } finally {
    debug("Closing selector - processor " + id)
    CoreUtils.swallow(closeAll(), this, Level.ERROR)
    shutdownComplete()
  }
}
private def configureNewConnections() {
  while (!newConnections.isEmpty) {
    val channel = newConnections.poll()
    try {
      debug(s"Processor $id listening to new connection from ${channel.socket.getRemoteSocketAddress}")
      selector.register(connectionId(channel.socket), channel)
    } catch {
        // 略
    }
  }
}
private def processCompletedReceives() {
  selector.completedReceives.asScala.foreach { receive =>
    try {
      openOrClosingChannel(receive.source) match {
        case Some(channel) =>
          val header = RequestHeader.parse(receive.payload)
          val context = new RequestContext(header, receive.source, channel.socketAddress,
            channel.principal, listenerName, securityProtocol)
          val req = new RequestChannel.Request(processor = id, context = context,
            startTimeNanos = time.nanoseconds, memoryPool, receive.payload, requestChannel.metrics)
          // 将请求放入requestChannel的requestQueue中
          requestChannel.sendRequest(req)
          // 取消当前channel对OP_READ的关注
          selector.mute(receive.source)
        case None =>
          // This should never happen since completed receives are processed immediately after `poll()`
          throw new IllegalStateException(s"Channel ${receive.source} removed from selector before processing completed receive")
      }
    } catch {
        // 略
    }
  }
}
private def processNewResponses() {
  var curr: RequestChannel.Response = null
  while ({curr = dequeueResponse(); curr != null}) {
    val channelId = curr.request.context.connectionId
try {
        // 略
    } catch {
      case e: Throwable =>
        processChannelException(channelId, s"Exception while processing response for $channelId", e)
    }
  }
}
private def dequeueResponse(): RequestChannel.Response = {
  val response = responseQueue.poll()
  if (response != null)
    response.request.responseDequeueTimeNanos = Time.SYSTEM.nanoseconds
  response
}
4、handlerPool 的初始化以及 handler 的工作内容
从下面的源码中,我们可以得知:
在 kafka 启动的时候会去初始化 handlerPool,创建 8 个 handler 线程。
handler 线程主要是负责从 requestQueue 中拉取对应的 req,然后交个 apis 进行业务处理。
requestHandlerPool = new KafkaRequestHandlerPool(config.brokerId, socketServer.requestChannel, apis, time,
  config.numIoThreads)
class KafkaRequestHandlerPool(val brokerId: Int,
                              val requestChannel: RequestChannel,
                              val apis: KafkaApis,
                              time: Time,
                              numThreads: Int) extends Logging with KafkaMetricsGroup {

  private val threadPoolSize: AtomicInteger = new AtomicInteger(numThreads)
  /* a meter to track the average free capacity of the request handlers */
  private val aggregateIdleMeter = newMeter("RequestHandlerAvgIdlePercent", "percent", TimeUnit.NANOSECONDS)

  this.logIdent = "[Kafka Request Handler on Broker " + brokerId + "], "
  // 创建指定个数的线程池
  val runnables = new mutable.ArrayBuffer[KafkaRequestHandler](numThreads)
  for (i <- 0 until numThreads) {
    createHandler(i)
  }

  def createHandler(id: Int): Unit = synchronized {
    runnables += new KafkaRequestHandler(id, brokerId, aggregateIdleMeter, threadPoolSize, requestChannel, apis, time)
    KafkaThread.daemon("kafka-request-handler-" + id, runnables(id)).start()
  }
def run() {
  while (!stopped) {
    // We use a single meter for aggregate idle percentage for the thread pool.
    // Since meter is calculated as total_recorded_value / time_window and
    // time_window is independent of the number of threads, each recorded idle
    // time should be discounted by # threads.
    val startSelectTime = time.nanoseconds

    val req = requestChannel.receiveRequest(300)
    val endTime = time.nanoseconds
    val idleTime = endTime - startSelectTime
    aggregateIdleMeter.mark(idleTime / totalHandlerThreads.get)

    req match {
      case RequestChannel.ShutdownRequest =>
        debug(s"Kafka request handler $id on broker $brokerId received shut down command")
        shutdownComplete.countDown()
        return

      case request: RequestChannel.Request =>
        try {
          request.requestDequeueTimeNanos = endTime
          trace(s"Kafka request handler $id on broker $brokerId handling request $request")
          apis.handle(request)
        } catch {
          case e: FatalExitError =>
            shutdownComplete.countDown()
            Exit.exit(e.statusCode)
          case e: Throwable => error("Exception when handling request", e)
        } finally {
          request.releaseBuffer()
        }

      case null => // continue
    }
  }
  shutdownComplete.countDown()
}
/** Get the next request or block until specified time has elapsed */
def receiveRequest(timeout: Long): RequestChannel.BaseRequest =
  requestQueue.poll(timeout, TimeUnit.MILLISECONDS)
def sendResponse(response: RequestChannel.Response) {
  if (isTraceEnabled) {
    val requestHeader = response.request.header
    val message = response.responseAction match {
      case SendAction =>
        s"Sending ${requestHeader.apiKey} response to client ${requestHeader.clientId} of ${response.responseSend.get.size} bytes."
      case NoOpAction =>
        s"Not sending ${requestHeader.apiKey} response to client ${requestHeader.clientId} as it's not required."
      case CloseConnectionAction =>
        s"Closing connection for client ${requestHeader.clientId} due to error during ${requestHeader.apiKey}."
    }
    trace(message)
  }
  // 通过processors引用,拿到processor
  val processor = processors.get(response.processor)
  // The processor may be null if it was shutdown. In this case, the connections
  // are closed, so the response is dropped.
  // 然后把响应放入其响应队列中
  if (processor != null) {
    processor.enqueueResponse(response)
  }
}
三、各个线程组所处的角色以及职责
分析完整个实现的源码,以及映照最开始的 Reactor 的模型图,我们最后再来梳理总结一下各个模块的职责。
acceptor:负责处理 OP_ACCPET 事件,将配置好的连接存入对应 processor 的 newConnections 中。
newConnections:每个 processor 都有一个,负责接收 acceptor 收到的连接。
processor:负责网络读写,从 newConnections 中取得连接后再注册到自己的 selector 中,最后循环处理数据。
requestQueue:processor 收到的数据最终会写入这个 requestQueue 中,这个 requestQueue 是多个 processor 共有的(无论多个组网络模块都只有一个 requestQueue)。
handlerPool:业务处理线程池,主要负责从 requestQueue 中拉取请求数据,然后进行业务处理。
responseQueue:业务代码处理完成后,会写入对应 processor 的 responseQueue 中,最终 processor 会拉取里面的数据进行数据发送。
具体各个模块是如何工作的,建议结合上面的模型图,再看看源码,更好记忆和理解~
【综述】
最后,来总结一下 kafka 整个网络模块的运转流程:
当 kafka 启动时,会去初始化网络模块,每监听一个端口就初始化一组 acceptor 和 processor,默认一组内有 1 个 acceptor 和 3 个 processor 线程。
acceptor 是负责处理 OP_ACCEPT 事件,也就是当三次握手完成后会去初始化这个连接信息,然后将配置好的连接放入对应 processor 的 newConnections 连接队列中。
processor 是负责网络读写,会从 newConnections 队列中 poll 出对应的连接,然后注册到自己的 selector 中;主要处理 OP_READ/OP_WRITE 网络事件。
当读取到数据后,会放入公共的 requestQueue 内存队列中去;当有对应的 OP_WRITE 事件时会从 responseQueue 拉取对应的数据进行响应。
最后 handlerPool 中的线程(默认 8 个)会从 requestQueue 内存队列中拉取对应的请求数据,进行业务处理,处理完成后再根据 processorId,
写入对应的 processor 中的 responseQueue 中,最后由 processor 通过 socketChannel 写回数据。

 浙公网安备 33010602011771号