Angular Material 18+ 高级教程 – Material Form Field
介绍
Form Field 或 Text Field 是 Material Design 独有的设计风格 。它长这样

注:Material Design 管它叫 Text Field,Angular Material 管它叫 Form Field。我们不要乱,本篇统一叫 Form Field 就好。
顾名思义,Form 代表表单,Field 代表 <fieldset> 里的 field。
拿一个 W3Schools 的例子

<fieldset> 里面,一 pair <label> + <input> (a.k.a accessor) 就等于一个 Field。
Form Field 就是 Angular Material 对 label + accessor = Field 的体验封装。
CDK Text Field
Material Design 的 Text Field 等价于 Angular Material 的 Form Field。
而 CDK Text Field 和 Material Design Text Field 毫无关系,它是对 Angular Material Form Field 功能的小抽象。
<textarea> autoresize
<textarea></textarea>
这是一个 textarea

by default,当用户输入超过 2 行时,它会出现 scrollbar。
我们加上 cdkTextareaAutosize 指令
<textarea cdkTextareaAutosize></textarea>
效果

不管用户输入多少行,textarea 会 autoresize,不会再出现 scrollbar。
另外,我们还可以透过 @Input cdkAutosizeMinRows 和 cdkAutosizeMaxRows 设置最少和最多行数。
<textarea cdkTextareaAutosize cdkAutosizeMinRows="2" cdkAutosizeMaxRows="10"></textarea>
当超过最多行数就会停止 increase height 取而代之的是出现 scrollbar。
想知道它实现原理的朋友可以参考这篇 CSS & JS Effect – Textarea Autoresize
监听 input autofill
我以前有写过 MDC Text Field (Angular Material 底层依赖的 library) 的文章,里面有提到 Autofill Floating Label Problem。
为了要解决这个问题,Angular Material Form Field 就要能判断 input autofill,而这个小功能也被收纳到了 CDK Text Field 里。
<form>
  <label for="username"></label>
  <input #usernameInput id="username" name="username">

  <label for="password"></label>
  <input id="password" name="password" type="password">

  <button>submit</button>
</form>
browser 会 autofill username 和 password input。
我们可以用 AutofillMonitor 监听这个事件。这个 AutofillMonitor 就类似于之前我们学过的 FocusMonitor。
export class AppComponent {
  // 1. query username input
  private readonly usernameInputRef = viewChild.required<string, ElementRef<HTMLElement>>('usernameInput', {
    read: ElementRef,
  });

  constructor() {
    // 2. inject AutofillMonitor,它是一个 Root Service Provider
    const autofillMonitor = inject(AutofillMonitor);
    const destroyRef = inject(DestroyRef);
    afterNextRender(() => {
      const usernameInput = this.usernameInputRef().nativeElement;

      // 3. 调用 monitor 方法,把 input 传进去
      //    它会返回 RxJS Observable<AutofillEvent>
      //    isAutofilled 是一个 boolean,表示 input 是否有 autofill
      autofillMonitor.monitor(usernameInput).subscribe(e => console.log(e.isAutofilled));

      // 4. 要退订需要调用 stopMonitoring,而不是 unsubscribe Subscription 哦。
      destroyRef.onDestroy(() => autofillMonitor.stopMonitoring(usernameInput));
    });
  }
}
monitor 方法用于监听,stopMonitoring 用来退订。
像 username input 的话,当 browser autofill 以后,它会发布 AutofillEvent,isAutofilled 是 true。
然后,当用户去操作 username input (比如 keydown),这时 autofill 就没了,于是它又再发布 AutofillEvent,isAutofilled 是 false。
我们可以依据这 2 个事件做相应的处理。
效果:

问:如果一个 input 没有 autofill,那一开始会发布 AutofillEvent,isAutofilled = false 吗?
答:不会,因为它是事件,不是 state。
监听 autofill 的原理
好奇它是如何监听 autofill 的?
我在 DOM & BOM – 冷知识 (新手) 文章中介绍过 CSS selector :-webkit-autofill,它可以 selector 到有 autofill 的 element。
CDK Text Field 会 select 带有 autofill-monitored 同时 autofill 的 element,然后给它一个 animation。相关源码在 _index.scss

接着监听 animation event 发布 AutofillEvent。相关源码在 autofill.ts

好,细节我们不在乎,知道原理就可以了,总之关键就是 CSS selector :-webkit-autofill。
Form Field
介绍完抽象的 CDK Text Field 后,我们正式进入本篇的主角 -- Form Field。
MatFormField, MatLabel, MatInput (accessor)
上面我们讲了,一个 Field 就是 label + accessor,它长这样
<mat-form-field>
  <mat-label>First name</mat-label>
  <input matInput>
</mat-form-field>
MatFormField 组件 (<mat-form-field>) 和 MatLabel 组件 (<mat-label>) 都 under MatFormFieldModule。
至于 MatInput 指令 (matInput) 则是 Angular Material 对原生 input 的封装,我们不用在意它,因为它只是来客串而已。
MatFormField 可以搭配不同的 accessor,比如 input, textarea, select 都可以。
只要尺寸,交互体验这些 match 的到,任何 accessor 都可以搭配 MatFormField,包括我们自定义的 accessor。
效果:

Appearance
Appearance 的意思是外貌,MatFormField 有两款 Design,一个叫 fill,一个叫 outline。
<mat-form-field appearance="fill">
<mat-form-field appearance="outline">
我们可以通过 @Input appearance 配置它的外貌。

默认外貌是 fill。我们可以透过 Dependency injection 机制全局替换。
到 app.config.ts
export const appConfig: ApplicationConfig = {
  providers: [
    provideExperimentalZonelessChangeDetection(),
    provideAnimationsAsync(),
    // 1. 提供 MAT_FORM_FIELD_DEFAULT_OPTIONS Provider
    {
      provide: MAT_FORM_FIELD_DEFAULT_OPTIONS,
      useValue: { appearance: 'outline' } satisfies MatFormFieldDefaultOptions,
    },
  ],
};
提供 MAT_FORM_FIELD_DEFAULT_OPTIONS Provider,附上 MatFormFieldDefaultOptions 对象就可以了。
Floating label
Floating label 是 Form Field 体验的一大特色,它长这样

一开始 label 在正中央,它是主角。当用户 focus 之后,label 缩小移到上方,此时内容变成主角,label 变成配角。非常巧妙的空间利用👍
它唯一的缺点是,当 label 在上方时会变的比较小,如果用户想复查 label 会比较吃力。这也是为什么 Form Field 通常用于 creation form 少用于 update form。
<mat-form-field floatLabel="always">
我们可以透过 @Input floatLabel 让 label 永远处在上方 (floating)。

Required asterisk (*)
* 星号代表 required 是一个填写表单的潜规则。
我们只要在 MatInput 写上 required
<mat-form-field>
  <mat-label>First name</mat-label>
  <input matInput required>
</mat-form-field>
MatFormField 会自动给 label 添加 * 星号。

原理下一 part 逛源码的时候会讲解。
如果我们不喜欢这个默认配置,比如我们想用 optional 取代 * 星号,那我们可以透过 @Input hideRequiredMarker 关掉这个机制
<mat-form-field hideRequiredMarker>
或者在 app.config.ts 做全局配置
{
  provide: MAT_FORM_FIELD_DEFAULT_OPTIONS,
  useValue: { appearance: 'outline', hideRequiredMarker: true } satisfies MatFormFieldDefaultOptions,
},
Hint labels
Hint labels 是用来写提示的,让用户知道填写的相关规则等等。
<mat-form-field hideRequiredMarker>
  <mat-label>First name</mat-label>
  <mat-hint align="start">Max 10 characters</mat-hint>
  <input #input matInput required>
  <mat-hint align="end">{{input.value.length}}/10</mat-hint>
</mat-form-field>
一个 MatFormField 里最多只能有两个 MatHint 组件 (<mat-hint>),一个左,一个右。
提醒:字数最好控制在一行,不然可能会破坏整体的排版。
效果

Prefix & Suffix
Prefix 和 Suffix 可以放一些 icon,补助 accessor。
比如经典的 password accessor 眼睛
<mat-form-field>
  <mat-label>Password</mat-label>
  <input matInput type="password" >
  <button mat-icon-button matSuffix >
    <mat-icon fontIcon="visibility_off" />
  </button>
</mat-form-field>
使用 MatSuffix 指令
效果

再一个例子,price accessor 的 $
<mat-form-field floatLabel="always"> <mat-label>Price</mat-label> <span matTextPrefix>$ </span> <input matInput type="number" > </mat-form-field>
使用 MatTextPrefix 指令
效果

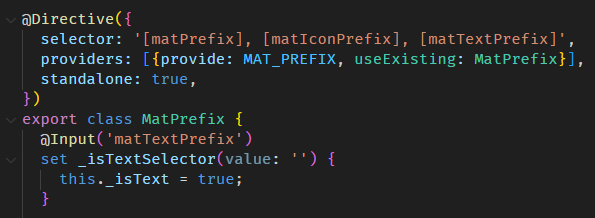
Suffix 和 Preffix 指令可以分成 text 和 icon 两种 (因为空间有限,除了 icon 和 short text 以外,其它 element 放进去都不会太合适)

MatPrefix 和 MatIconPrefix 指令 (matIconPrefix) 是等价的,都代表 icon。
MatTextPrefix 指令则代表 text。
Error messages
有 validation 自然要有 error message。
比如 required
<mat-form-field>
  <mat-label>Email</mat-label>
  <input matInput type="email" required>
  <mat-error>Email is required</mat-error>
</mat-form-field>
虽然 required 有 * 星号做提示,但那毕竟是潜规则,假如用户不经常填表格可能会直接忽视星号提交。
这时我们就需要给出更明确的指示,那就是 error message 了。
效果

没有任何效果...🤔
因为虽然上面 HTML 表达了我们的需求,但它不明确,MatFormField 不是那样子工作的。
首先我们需要引入 Angular 的 Reactive Forms,不熟悉的可以看这篇 Angular 高级教程 – Reactive Forms。
组件
export class AppComponent {
  readonly emailFormControl = new FormControl('', {
    validators: [Validators.required],
  });
}
创建一个 emailFormControl,并且给它一个 required validation。
Template
<mat-form-field>
  <mat-label>Email</mat-label>
  <input matInput type="email" [formControl]="emailFormControl">
  <mat-error>Email is required</mat-error>
</mat-form-field>
在 input 上添加 FormControl 指令,把 emailFormControl 传进去。
效果

一开始没有显示 error,focus + blur 之后才会显示 error,填写 text 之后,error 消失。
问:为什么一开始不会显示 error,而是在 blur 之后才显示 error?
答:这是 Material Design 的规范,在用户还没有完成交互之前,不显示 error (因为假设用户会填对),只有在完成交互 (blur) 以后如果 invalid 才显示 error。
MatFormField, MatError, MatInput 的关系与职责
可能我们会误以为 MatFormField 是 error message 的主角,但其实算不上。
MatFormField 会查看有没有 MatError 组件 (<mat-error>),没有自然就没有 error。同时还会询问 MatInput 是否需要显示这些 error。
MatFormField Template 的源码在 form-field.html
_getDisplayedMessages 方法的源码在 form-field.ts

题外话:MatError 出现时,MatHint 会被隐藏起来,因为空间不足。
MatInput.errorState 的源码在 input.ts

_errorStateTracker

ngControl 指的是 FormControlDirective 指令
parentFormGroup 指的是 FormGroupDirective 指令,我们上面的例子没有 form,所以是 null。
parentForm 指的是 NgForm 指令,我们上面的例子没有 form,所以是 null。
stateChanges 是一个变更通知器,不重要,我们先无视它。
最重要的是 defaultErrorStateMatcher 对象

它来自 inject root provider -- ErrorStateMatcher,它的源码在 error-options.ts

判断是否需要显示 error 的逻辑是 FormControl invalid 同时 touched 或者 parentFormGroup / parentForm 已经 submitted。
我们有两个方法可以替换掉 default errorStateMatcher:
-
透过 MatInput @Input errorStateMatcher

-
到 app.config.ts 提供一个 ErrorStateMatcher provider
export class MyErrorStateMatcher {
  isErrorState(control: AbstractControl | null, _form: FormGroupDirective | NgForm | null): boolean {
    return control?.invalid ?? false;
  }
}

export const appConfig: ApplicationConfig = {
  providers: [
    provideExperimentalZonelessChangeDetection(),
    provideAnimationsAsync(),
    {
      provide: MAT_FORM_FIELD_DEFAULT_OPTIONS,
      useValue: { appearance: 'outline' } satisfies MatFormFieldDefaultOptions,
    },
    {
      provide: ErrorStateMatcher,
      useClass: MyErrorStateMatcher,

      // 或者使用 built-in 的 ShowOnDirtyErrorStateMatcher
      // 它和 default ErrorStateMatcher 的区别是, default 是看 touched 而它是看 dirty
      // useClass: ShowOnDirtyErrorStateMatcher
    },
  ],
};
总结:
MatFormField 只是负责 design 而已,是否要显示 error 由 MatInput 决定。
Handle multiple <mat-error>
MatInput 只表示要不要显示 error,但它没有能力指定哪些 MatError 要显示,哪些可能不要显示。
比如说,我们有两个 MatError (required 和 email),当用户 touched + 没有填 value 时就满足了显示 error 的条件,这时两个 MatError 都会被显示出来。
<mat-form-field>
  <mat-label>Email</mat-label>
  <input matInput type="email" [formControl]="emailFormControl">
  <mat-error>Email is required</mat-error>
  <mat-error>Incorrect email format</mat-error>
</mat-form-field>
效果

若想指定显示某一个 MatError,我们需要使用 @if 一条一条定义显示逻辑。
<mat-form-field>
  <mat-label>Email</mat-label>
  <input matInput type="email" [formControl]="emailFormControl">
  @if (emailFormControl.hasError('required')) {
    <mat-error>Email is required</mat-error>
  }
  @if (emailFormControl.hasError('email')) {
    <mat-error>Incorrect email format</mat-error>
  }
</mat-form-field>
效果

这个职责既不在 MatFormField,也不在 MatError,也不在 MatInput,而是在 App 组件...😅
Override MatFormField Styling
下图是 Google Ads 里的一个 MatFormField

下图是 Angular Material 原装的 MatFormField

它们有好几个不一样的地方:
-
Google Ads 的是 density 版本,height 只有 48px,而 Angular Material 是 56px
-
font-size 不一样,Google Ads 是 14px,Angular Material 是 16px
-
当 MatError 出现后,Google Ads 会 resize MatFormField width,而 Angular Materail 则是让 MatError white-space wrap
-
当 error 的时候,Google Ads hover 时是不会变色的 (一直红色),而 Angular Materail 会变色
那我们就针对这几个地方做 override
首先是 density
$density-theme: mat.define-theme(
  (
    density: (
      scale: -2,
    ),
  )
);

mat-form-field {
  @include mat.form-field-density($density-theme);
}
接着是 font-size (我只换了 label 没有换 input)
$font-family: "Roboto, 'Helvetica Neue', sans-serif";
$typography-theme: mat.define-theme(
  (
    typography: (
      brand-family: $font-family,
      plain-family: $font-family,
      bold-weight: 700,
      medium-weight: 500,
      regular-weight: 400,
    ),
  )
);

mat-form-field {
  --mdc-outlined-text-field-label-text-font: #{mat.get-theme-typography($typography-theme, 'body-medium', 'font-family')};
  --mdc-outlined-text-field-label-text-size: #{mat.get-theme-typography($typography-theme, 'body-medium', 'font-size')};
  --mdc-outlined-text-field-label-text-weight: #{mat.get-theme-typography(
      $typography-theme,
      'body-medium',
      'font-weight'
    )};
  --mdc-outlined-text-field-label-text-tracking: #{mat.get-theme-typography(
      $typography-theme,
      'body-medium',
      'letter-spacing'
    )};
  --mat-form-field-outlined-label-text-populated-size: #{mat.get-theme-typography(
      $typography-theme,
      'body-medium',
      'font-size'
    )};

  // 原本是 0.75
  --mat-mdc-form-field-floating-label-scale: 0.85;
}
接着是 hover
mat-form-field {
  --mdc-outlined-text-field-error-hover-label-text-color: var(--mdc-outlined-text-field-error-label-text-color);
  --mdc-outlined-text-field-error-hover-outline-color: var(--mdc-outlined-text-field-error-outline-color);
}
最后是最难搞的 resize width when error shown
我们无法单纯用 CSS 来完成,因为 error wrapper 其实是 position absolute

所以 <mat-form-field> 无法 max-content 它。
我们还需要写一些 script 才行。
首先让它不要 wrap,然后 overflow hide
mat-error {
  white-space: nowrap;
}
接着在组件写 script
export class SimpleTestComponent {
  readonly columnSetNameCtrl = new FormControl('', { validators: [Validators.required], nonNullable: true });

  private readonly matFormFieldRef = viewChild.required<string, ElementRef<HTMLElement>>('matFormField', {
    read: ElementRef,
  });

  constructor() {
    const destroyRef = inject(DestroyRef);
    afterNextRender(() => {
      const formField = this.matFormFieldRef().nativeElement;
      // 用 MutationObserver 监听 <mat-error> 的 add and remove
      const mo = new MutationObserver(() =>
        requestAnimationFrame(() => {
          const errorWrapper = formField.querySelector<HTMLElement>('.mat-mdc-form-field-error-wrapper');

          // 如果没有 error 那就删掉 min width
          if (!errorWrapper) {
            formField.style.removeProperty('min-width');
            return;
          }

          // 我们需要 wrapper 的 padding-inline 做计算
          const matErrorWrapperComputedStyle = window.getComputedStyle(errorWrapper);
          const matErrorWrapperPaddingInline =
            parseFloat(matErrorWrapperComputedStyle.paddingLeft) +
            parseFloat(matErrorWrapperComputedStyle.paddingRight);

          // query 所有 <mat-error>
          const errors = Array.from(errorWrapper.querySelectorAll<HTMLElement>('mat-error'));

          // 找出最宽的
          const biggestErrorWidth = Math.max(...errors.map(error => error.scrollWidth)) + matErrorWrapperPaddingInline;

          // set min-width to <mat-form-field>
          if (formField.offsetWidth < biggestErrorWidth) {
            formField.style.minWidth = `${biggestErrorWidth}px`;
          }
        }),
      );
      mo.observe(formField, { childList: true, subtree: true });
      destroyRef.onDestroy(() => mo.disconnect());
    });
  }
}
写这一 part 主要是想让读者感受一些 override Angular Materail 的手法次序:
-
优先改 theme,或者使用 Angular Material 提供的 Scss mixin,比如改 density
-
override CSS variables,比如改 font-size
-
如果上面两招不灵,那就表示 Angular Material 没有公开接口让我们修改了。
这时就可以自由发挥了,比如 ::ng-deep select element + !important 或者用 script add inline styles,这些招数都可以使用。
Custom Form Field Accessor (MatFormFieldControl)
上一 part 我们有提到,只要符合 Form Field 的交互体验,任何 accessor 都可以搭配 MatFormField,比如 input, textarea, select 甚至是我们自定义的 accessor。
话虽如此,但也有个前提,那就是我们自定义的 accessor 必须满足 MatFormFieldControl interface。
这是因为 MatFormField 在实现交互体验的过程依赖了 accessor,比如上一 part 提到的 error 显示就是由 accessor MatInput 决定的。
那 accessor 具体要如何 implement MatFormFieldControl interface 呢?
很简单,我们逛一逛 MatInput 源码就知道了,因为 MatInput 就是用同样的手法实现的。
MatFormFieldControl, MatFormField and MatInput
下图是 MatFormFieldControl 抽象 class,源码在 form-field-control.ts
它有一堆的属性方法,这些都是 MatFormField 需要用到的,每个自定义 accessor 都需要 implement 它们。
MatInput 指令的源码在 input.ts

除了 implement class MatFormFieldControl 还需要提供 Provider。
MatFormField 会透过 content query 找到 MatFormFieldControl (也就是 accessor MatInput),然后使用 interface 上的 property 和 method。

Implement properties & methods
我们聚焦在两个点,第一是 MatFormField 在那些地方使用到这些 property 和 method,第二是 MatInput 如何去 implement 这些 property 和 method。
shouldLabelFloat
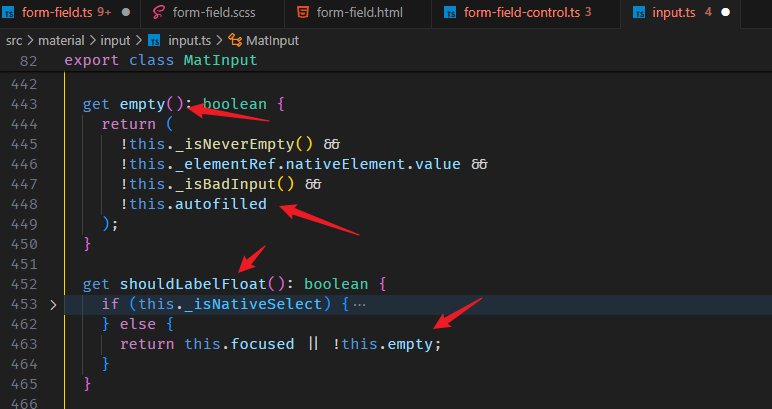
顾名思义,就是 label 要不要缩小移去上方 (a.k.a floating)。
对 MatFormField 来说,如果是 shouldAlwaysFloat (本身的 @Input) 那就一定要 floating

不然的话就看 _control.sholdLabelFloat,这个 _control 就是 MatFormFieldControl 也就是例子中的 MatInput。
MatInput implement shouldLabelFloat

憋开复杂的 native select,普通 input text 的条件是 focused 就 float label,或者 not empty 有填 value 就 float label。
required
required 被用于表示是否要显示 * 星号

MatInput implement required

对应
<input matInput type="email" required>
<input matInput type="email" [formControl]="emailFormControl">
ngControl 是 FormControlDirective,control 是 FormControl。
autofilled? (不一定要 implement)
当 MatInput autofilled 后,MatFormField 会多一个 class,不过我没有找到对应的 styles,可能它只是单纯添加一个 class 做识别而已。

MatInput 利用 CDK AutofillMonitor 监听 autofill 事件

还有一点,autofilled 以后 label 会 floating 其实不是 MatFormField 负责的,而是 MatInput 在判断 empty value 时也对 autofilled 情况进行了检查。

empty
empty 属性其实也是 MatFormFieldControl 里其中一个需要 implement 的。
但我没在 MatFormField 里找到任何使用 empty 属性的地方。
focused & disabled
MatInput focused 和 disabled 时,MatFormField 会有一些 styles

MatInput implement focused

MatInput implement disabled

ngControl
ngControl 指的是 FormControlDirective。
MatFormField 会监听 valueChanges 然后调用 markForCheck 触发 refreshView。

此外 FornControl 的 status 也会被写入 CSS class (虽然我没有看到对应的 styles,可能只是为了识别)

_shouldForward 是一个简单的代码读取

MatInput implement ngControl

ngCotnrol 就是 FormControlDirective 也就是 [formControl]="emailFormControl",所以这里是透过 inject 的方式去拿到这个指令。
注:如果 accessor 本身就是 Custom Accessor Element,那 inject NgControl 可能会导致循环引用报错。
破解之法:

FormControlDirective (NgControl) 会尝试 inject accessor (NG_VALUE_ACCESSOR ),如果 accessor 也 inject 回 FormControlDirective,那就循环引用了。
解决方法是不 provide accessor,这样 FormControlDirective 就 inject 不到,然后在 accessor constructor 阶段 inject FormControlDirective manual set valueAccessor property,
这样就相等于 FormControlDirective “被” inject 了 accessor。破除循环引用👍
id
id 被用于 MatFormField 的 label element "for" attribute

MatInput implement id

placeholder
我没有在 MatFormField 里找到 placeholder 被使用的地方。
MatInput implement placeholder

value
我没有在 MatFormField 里找到 value 被使用的地方。
MatInput implement value

这个 _inputValueAccessor 指的是 HTMLInputElement

MAT_INPUT_VALUE_ACCESSOR 是 MatDatepickerInput 指令 (input[matDatepicker]) 才有的,其它情况下都是拿 nativeElement (HTMLInputElement)。
stateChanges
stateChanges 主要是用于 trigger markForCheck 也就是 refreshView 啦。

accessor 如果有变更,想让 MatFormField refreshView 那就发布 stateChanges。
MatInput implement stateChanges
当 value 变更

当 disabled 变更

当 autofilled 变更

当 focused 变更

还有

简单说就是动不动就 stateChanges 就对了😅
controlType? (不一定要 implement)
controlType 会被添加进 class,作为一个识别。它没有对应的 styles。

MatInput implement controlType

by default 是 mat-input,当遇到 native select (select[matInput]) 它会换成 mat-native-select

errorState
errorState 上一 part 我们讲解过了,它用来表示是否要显示 error。
MatInput implement errorState

_errorStateTracker 上一 part 讲解过了,这里不再复述。
disableAutomaticLabeling? (不一定要 implment)
disableAutomaticLabeling === true 意思是不要 label "for"。

MatInput 没有 implement disableAutomaticLabeling。
onContainerClick
onContainerClick 指的是用户点击到 MatFormField


MatInput 的范围是粉色,当用户点击到白色区域同样会 focus,原理就是 onContainerClick。
MatInput implement onContainerClick

userAriaDescribedBy? (不一定要 implement)
这个和无障碍设计相关,我对这一块一窍不通,以后了解了再补上。
setDescribedByIds
也是和无障碍设计相关,以后再补上。
MatInput implement setDescribedByIds

如果项目不需要支持无障碍,可以 implement 一个空方法 bypass 它。
总结
是的,accessor 需要 implement 超级无敌多 property 和 method 才能搭配 MatFormField 使用。
但每一个都不太难 implement,所以只是繁琐了一些,还不算太难。
聊一聊 Angular Material 与 MDC
MDC (Material Design Component for Web) 是 Angular Material 底层依赖的 Library。
它是由 Material Design 团队维护的,并且在 2022 年 5 月 v14 版本后就不再发布新版本了。
MDC 被 Material Design 团队抛弃后,它们把精力都投入到了 MWC (material-web),它是用来替代 MDC 的,
MWC 底层依赖 Lit 框架 (它也是 Google 前端框架,前生叫 Polymer),Lit 和 Angular 算是竞品,所以 Angular Material 是不可能依赖 MWC 的。
所以 Angular Material 也很无奈,自己做不出 UI 组件,想依靠人家,但是人家自己玩自己的,没有要理你...
Angular Material 依赖的 MDC 不是 v14 公开版,而是 v15 隐藏版。我猜这个 v15 可能是 Angular Material 自己维护的😅。
另外,在几天前 (2024 年 6 月) MWC 也被 Material Design 团队抛弃了,据说是要把精力投入到 Wiz framework (就是那个要和 Angular 合并的框架)。
我的天啊,Material Design 团队是真的有够不可靠的...
以前写的 MDC 文章:(如果你想对 Angular Material 更了解的话,不妨也逛一逛它底层依赖的 MDC)
-
MDC – Text field (和本篇高度相关)
目录
上一篇 Angular Material 18+ 高级教程 – Material Tooltip
下一篇 Angular Material 18+ 高级教程 – Datepicker の Calendar & Custom DateAdapter (Temporal)
想查看目录,请移步 Angular 18+ 高级教程 – 目录
喜欢请点推荐👍,若发现教程内容以新版脱节请评论通知我。happy coding 😊💻


【推荐】编程新体验,更懂你的AI,立即体验豆包MarsCode编程助手
【推荐】凌霞软件回馈社区,博客园 & 1Panel & Halo 联合会员上线
【推荐】抖音旗下AI助手豆包,你的智能百科全书,全免费不限次数
【推荐】博客园社区专享云产品让利特惠,阿里云新客6.5折上折
【推荐】轻量又高性能的 SSH 工具 IShell:AI 加持,快人一步
· 清华大学推出第四讲使用 DeepSeek + DeepResearch 让科研像聊天一样简单!
· 推荐几款开源且免费的 .NET MAUI 组件库
· 实操Deepseek接入个人知识库
· 易语言 —— 开山篇
· 【全网最全教程】使用最强DeepSeekR1+联网的火山引擎,没有生成长度限制,DeepSeek本体
2021-06-13 Asp.net core 学习笔记之异常处理
2017-06-13 angular2 学习笔记 ( animation 动画 )