CSS & JS Effect – Virtual Scrolling
前言
我正在写 Angular CDK Scrolling 教程,它里面有一个 Virtual Scrolling 功能。借此机会,我想顺便写一篇纯 Sass & TS 的版本作为学习。
Virtual Scroll 长这样
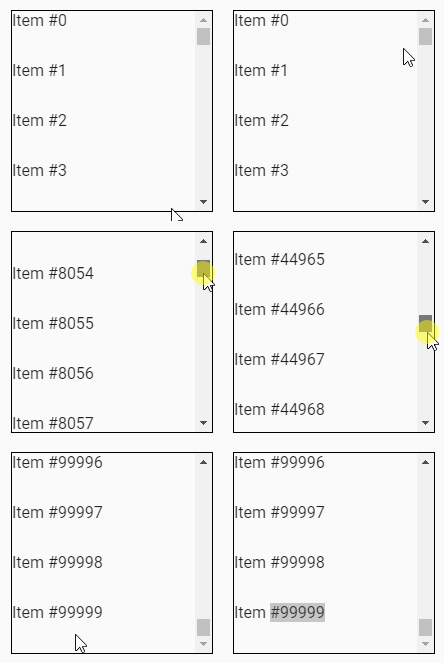
表面上看,它只是一个普普通通的 item list。但仔细观察,你会发现它竟然有十万条 item,而且它在 scroll 的时候尽然不会卡。
为什么十万条 item 不会卡?
原因是 Virtual Scroll 并不会把十万条 item 都放到 body 里,它会依据 item list 和 item 的高度推算出用户可见的 item 数,然后只把一小部分的 item 放入 body。
只要 item 不多,那自然就不会卡了。这个概念有点类似 image lazy loading 那样,你需要我才给你看。
参考
Medium – Build your Own Virtual Scroll - Part I (没有参考过,只是瞄过一眼,感觉值得参考)
Virtual Scrolling 实现思路
我虽然没有做过 research,不过我估计市场上应该有不同实现方式的 Virtual Scrolling。
而本篇主要是基于 Angular CDK Virtual Scrolling 的实现思路。
The Limitation
Angular CDK Virtual Scrolling 最大的局限是它不支持 unknown size。

意思是,所有的 item height 必须 preset 而且每个 item 一定要一样高。
这些限制来自于它的实现方式,下面我们会看到。
Get Started
我们一步一步推,看看它的实现思路是如何形成的。
首先,有一个 item-list 和 20 个 item
<div class="item-list">
  <div class="item">item1</div>
  <div class="item">item2</div>
  <div class="item">item3</div>
  <div class="item">item4</div>
  <div class="item">item5</div>
  <div class="item">item6</div>
  <div class="item">item7</div>
  <div class="item">item8</div>
  <div class="item">item9</div>
  <div class="item">item10</div>
  <div class="item">item11</div>
  <div class="item">item12</div>
  <div class="item">item13</div>
  <div class="item">item14</div>
  <div class="item">item15</div>
  <div class="item">item16</div>
  <div class="item">item17</div>
  <div class="item">item18</div>
  <div class="item">item19</div>
  <div class="item">item20</div>
</div>
Styles
.item-list {
  border: 1px solid black;
  width: 128px;
  height: 256px;
  overflow-y: auto;

  .item {
    height: 50px;
  }
}

// for pretty only
.item-list {
  margin-top: 128px;
  margin-inline: auto;
  margin-bottom: 128px;

  .item {
    display: flex;
    justify-content: center;
    align-items: center;
  }
}
效果
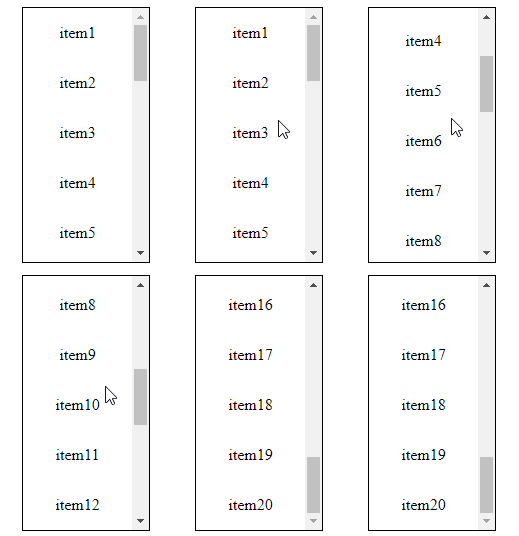
spacer & item-wrapper
目前的问题是 item 太多了。item-list 高度是 256px,item 高度是 50px,这意味着用户最多只能看见 256px / 50 = 5.12 个 item,但我们却放了 20 个 items 到 body。
那就把 item 减少到 6 个吧。
<div class="item-list">
  <div class="item">item1</div>
  <div class="item">item2</div>
  <div class="item">item3</div>
  <div class="item">item4</div>
  <div class="item">item5</div>
  <div class="item">item6</div>
</div>
效果
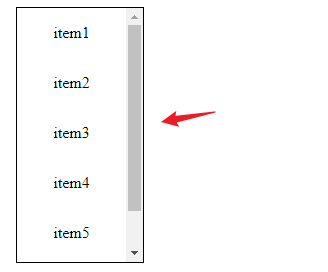
马上就出问题了。减少 item 的同时 scroll height 也减少了,这不行啊。
破解之法是添加一个假空间 <div class="spacer" > 去充数。

.item-list .spacer {
  height: calc((20 - 6) * 50px);
}
效果

scroll height 恢复了。
接着尝试 scroll 几下
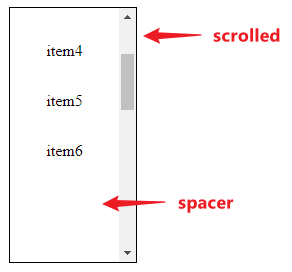
非常合理,下半部分全都是 spacer,往下 scroll 以后自然是看到一片空白。
我们需要让 item 始终显示在用户可视范围。
有好几种方法可以做到这个效果,比如说
我们可以做 2 个 spacer,一前一后
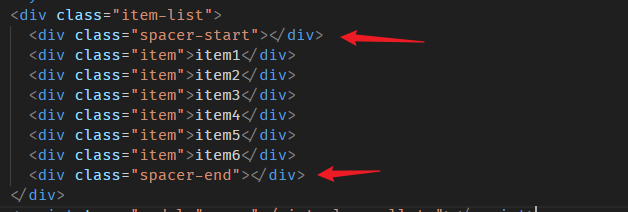
通过调整前后 spacer 的高度可以让中间的 item 出现在不同的位置。
比如一开始是 【0,items,700】,当滚动到 scrollTop 200后,调整为 【200,items,500】
虽然效果正确,但该方法明显操作繁琐,更佳的选择是像 Angular CDK 那样使用 spacer + item-wrapper。
<div class="item-list">
  <div class="item-wrapper">
    <div class="item">item1</div>
    <div class="item">item2</div>
    <div class="item">item3</div>
    <div class="item">item4</div>
    <div class="item">item5</div>
    <div class="item">item6</div>
  </div>
  <div class="spacer"></div>
</div>
把 item wrap 起来,spacer 依然负责假空间,item-wrapper 则负责搞定位移动。
.item-list {
  position: relative;

  .item-wrapper {
    position: absolute;
    top: 0;
    left: 0;
    width: 100%;
  }

  .spacer {
    height: calc(20 * 50px);
  }
}
每当用户滚动的时候,我们就修改 item-wrapper 的 translateY 或者 top,让 items 始终出现在用户可视范围。
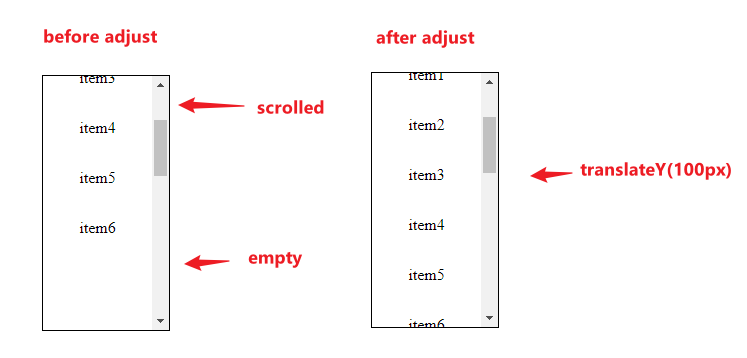
这个 translateY 是依据当前 scrollTop 计算出来的。
displayed items
虽然位置正确了,但是显示的 items 是错误的
当 scrollTop 0 时,显示的 items 是 item1 – item6
当 scrollTop 是 746 时,应该要显示 item15 – item20
所以除了搞 translateY 定位,我们还需要依据 scrollTop 的位置推算出该显示的 items,然后把 items 给换掉。
总结
Angular CDK Virtual Scrolling 的核心思路:
-
用 spacer 做假空间
-
用 item-wrapper 做定位,让 items 依据 scrollTop 移动,始终显示在可视空间。
-
依据 scrollTop 替换 items
有了这几招用户滚动时就可以看到不断移位的 item-wrapper 和不断切换的 items 了。
Virtual Scrolling 小小计算法
上面的实现思路需要运用到一些小算法。我们在写代码前先理一理。
这里我用 Figma 演示一下
Without Virtual Scrolling Default Look
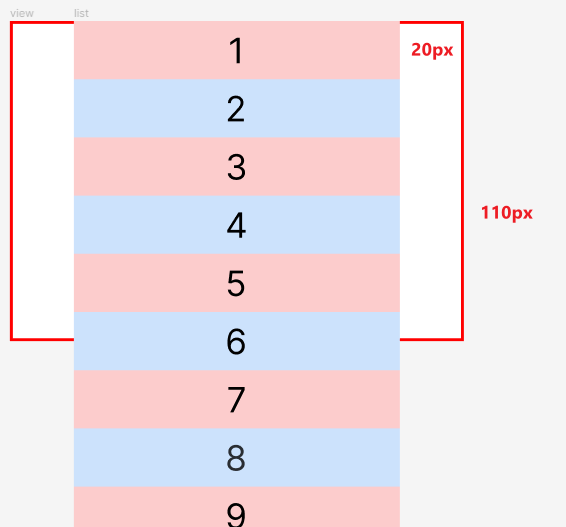
红框是 item-list,它的高度是 110px
item-list 里面有 20 个 items (虽然截图中只有 9 个),每个 item 高度是 20px
用户可看见的范围只有红框,它只能呈现 110 / 20 = 5.5 个 items,在没有 scroll 的情况下,显示的 items 是 1 到 6 (严格来讲是 5.5),其它的将被 overflow: auto 隐藏起来 (为了方便理解,我们就不隐藏了)
scroll 起来的变化是这样的
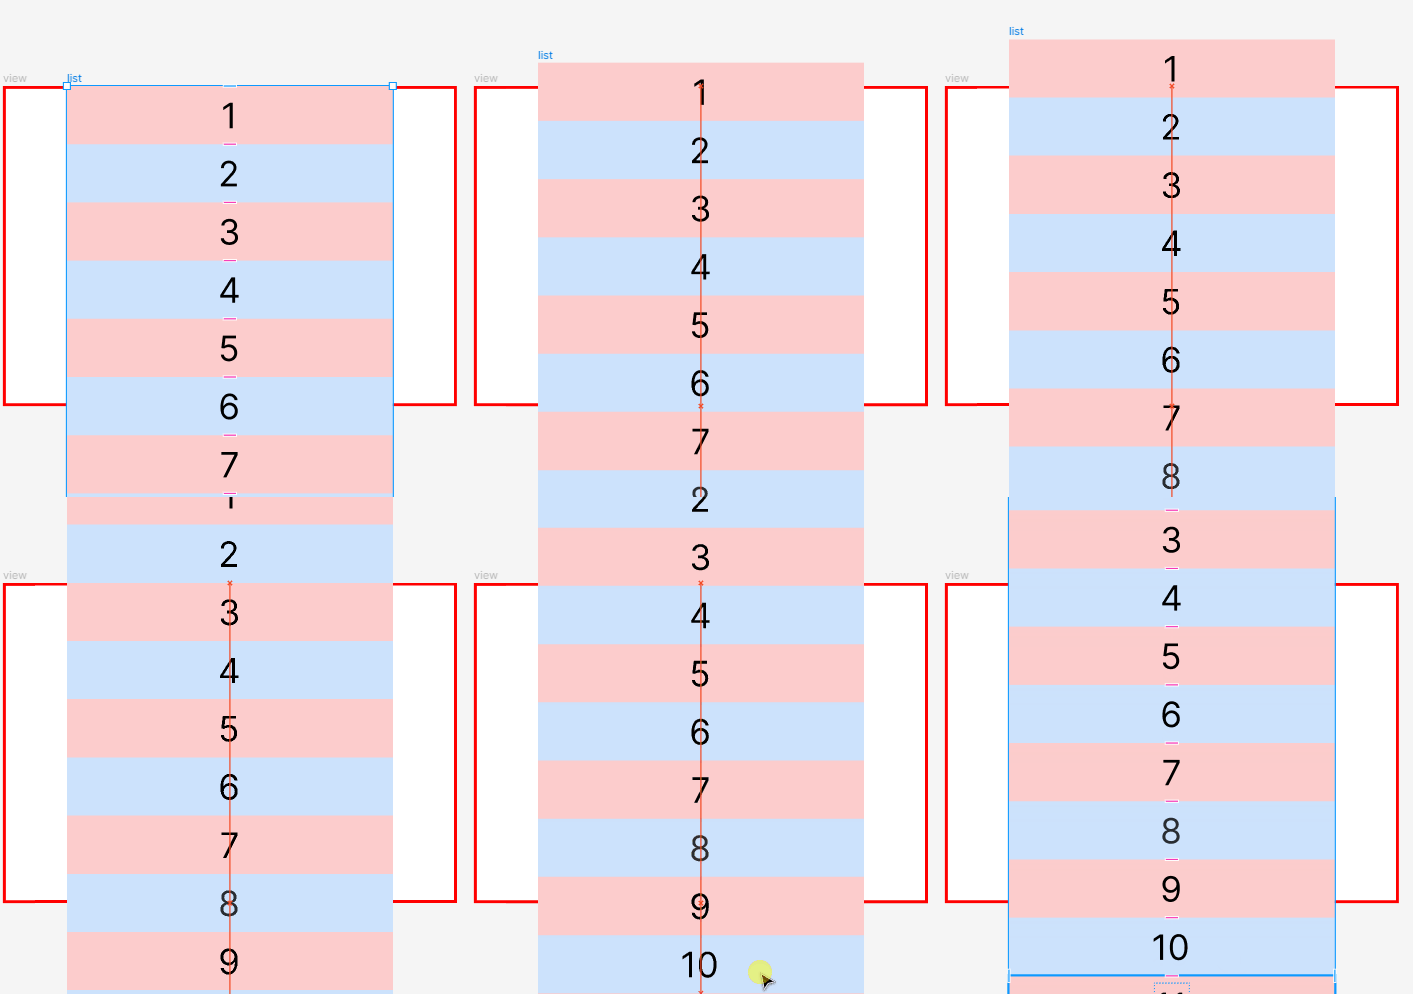
With Virtual Scrolling Default Look
接着我们看 Virtual Scrolling 的版本
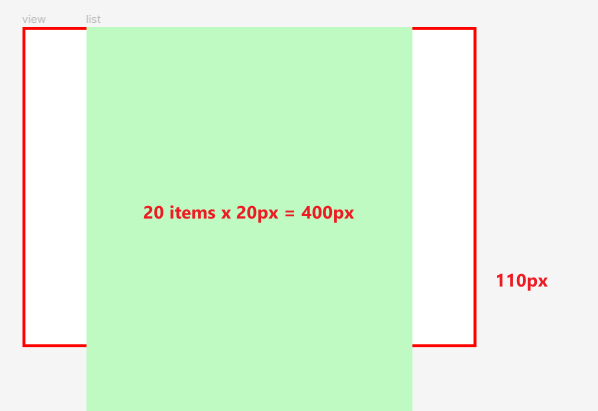
红框依据是 item-list,高度 110px
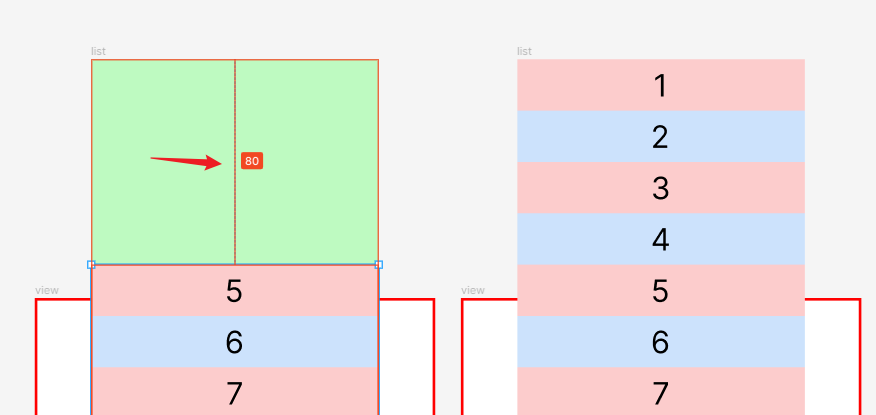
绿色背景的是 spacer,它用来做假空间,它的高度是 20 个 items x 每一个 20px = 400px,有了假空间 item-list 就依然可以 scroll。
接着添加上 item-wrapper 和 items
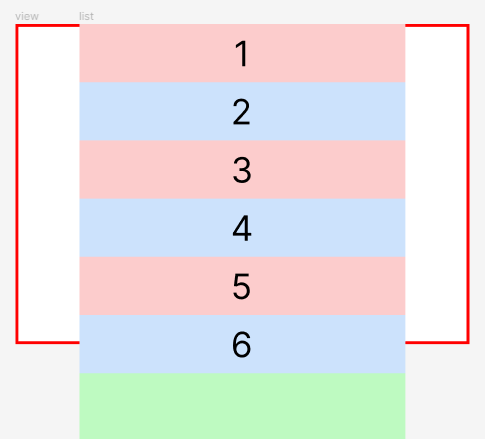
这里的重点是不要把 20 items 都放进去,只放入用户可见范围的 items 数量就可以了。
scroll 起来的变化是这样的
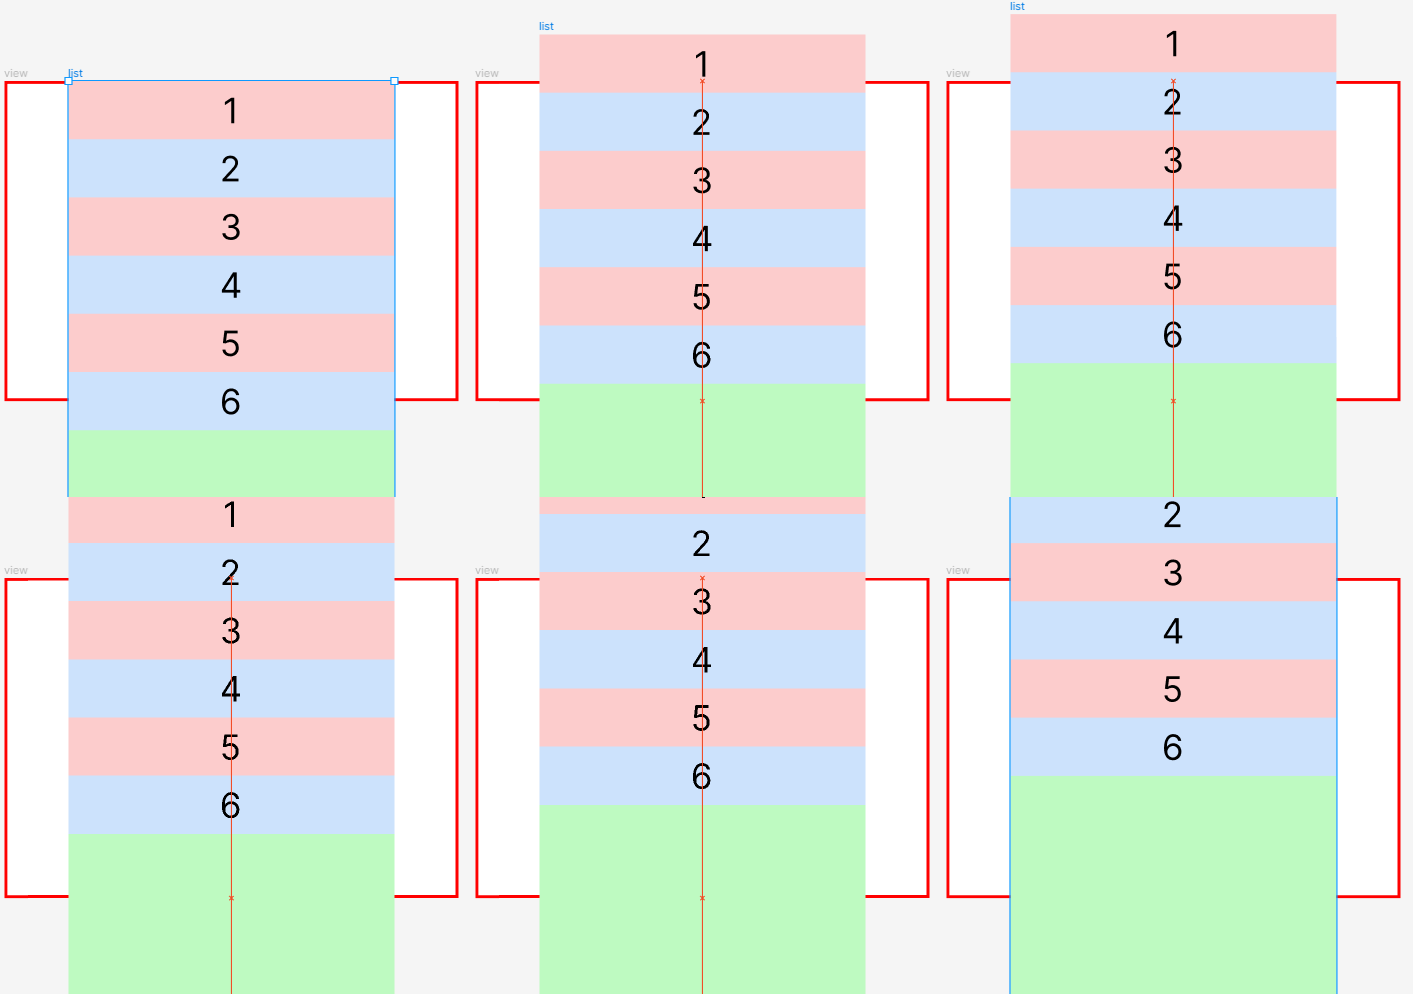
scroll 以后就看不见 items 只能看见 spacer 了。合理,所以我们需要做调整。
调整 item-wrapper translateY 和 displayed items
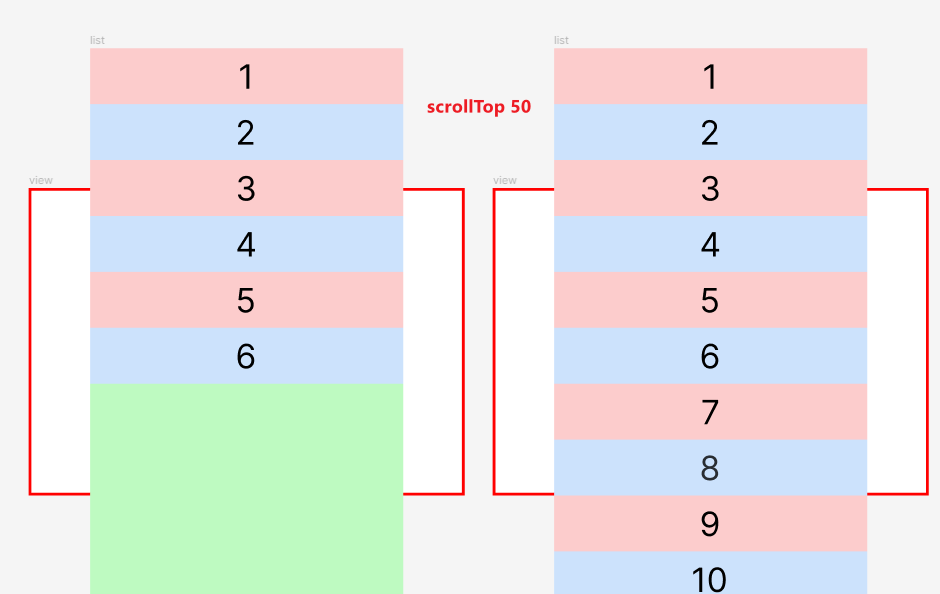
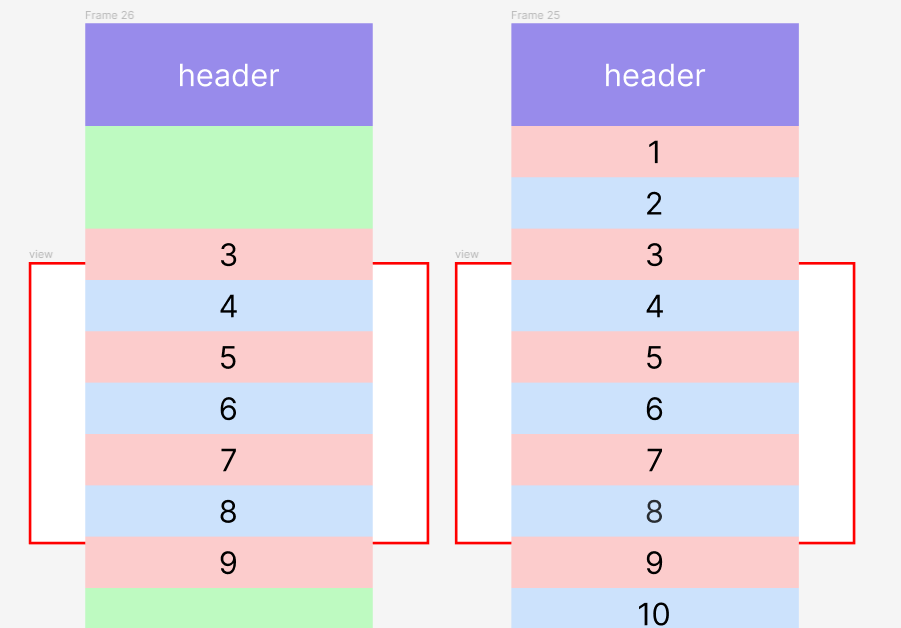
左边是 Virtual Scrolling,右边是正常。
当滚动到 scrollTop 50px 时,它们各自的长相。
我们要做 2 件事才能让左右图一样
-
调 translateY,让 item-wrapper 往下移
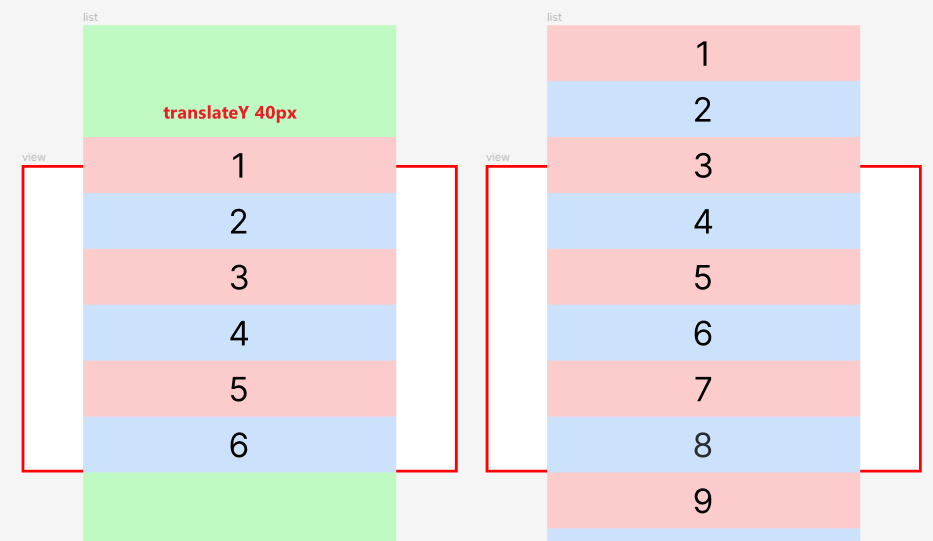
加上 translateY 40px 以后,item-list (红框) 内就看不见任何 spacer (绿) 了。
-
把 Item1 – item6 换成 item3 – item8
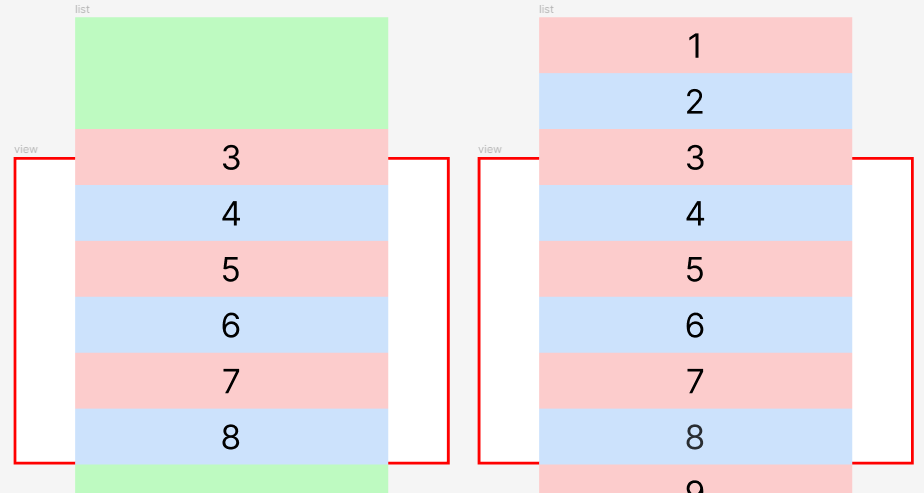
此时,站用户视角 (用户只能看见红框内的东西),左右是一模一样的。
displayed items 计算法
来看一个新例子
item-list (红框) 110px
item height 20px
目前滚动了的 scrollTop 是 93px
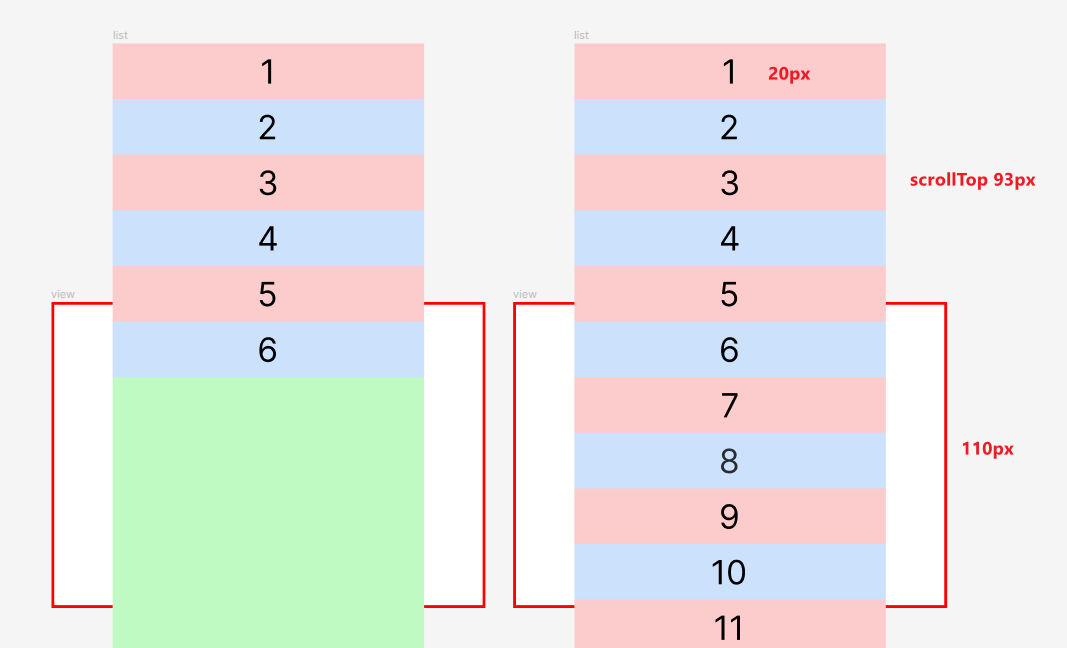
左边是 Virtual Scrolling 还未调整 translateY 和 items 的样子,右边是正常应该要出现的样子。
从右图我们可以看到,第一个显示在红框内的 item 是 5 号 (从 1 算起是第 5 个 item,从 0 算起的话就是 index 4)
5 号是这样算出来的:
-
scrollTop 93px 意味着有 93px 的 items 已经退出了红框。
-
93px / 每个 item 20px = 4.65 个 items 已经退出了红框。
-
4.65 个 items 意味着 item1 – item4 肯定已经完全看不见了。item5 有 0.65 (13px) 看不见,但任然有 0.35 (7px) 在红框内,这是看得见的。
-
Math.floor(4.65) 得到 4 代表看不见的 item1 – item4,然后 4 + 1 代表下一个看的见得号数 5,也就是 item5。
-
formula
const itemHeight = 20;
const scrollTop = 93;

const firstItemCount = Math.floor(scrollTop / itemHeight) + 1;  // 5
有头就要有尾,最后一个显示在红框内的 item 是 11 号。
11 号是这样算出来的:
-
红框的高度是 110px
-
经过上一轮的算法,我们知道第一个 item5 会占据红框内的空间 7px。
-
红框高度 110px - first item 7px = 剩余空间 103px
-
103px / 每个 item 20px = 可显示 5.15 个 items
- 5.15 个 items 意味着最少要出 5 个 items,第 6 个虽然只需要显示 0.15 (3px) 但只要要显示就得出一整个 item,所以一共出 6 个。
-
由此我们就得出了结论,第一个 item 是 item5,之后还需要出 6 个 items,所以 5 + 6 = 11,最后一个 item 是 item11。
-
formula
const itemHeight = 20;
const scrollTop = 93;
const viewportHeight = 110; // viewport 指的是红框

const firstItemCount = Math.floor(scrollTop / itemHeight) + 1;                        // 5
const firstItemShownHeight = itemHeight - (scrollTop % itemHeight);                   // 7px
const needMoreItem = Math.ceil((viewportHeight - firstItemShownHeight) / itemHeight); // 6
const lastItemCount = firstItemCount + needMoreItem;                                  // 11
把 items 换上正确得显示号码长这样
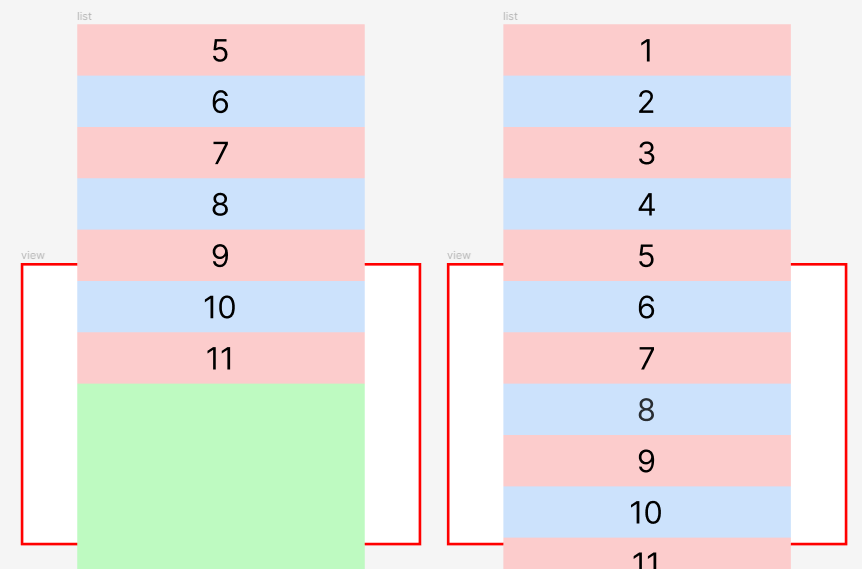
下一步是调 translateY。
translateY 计算法
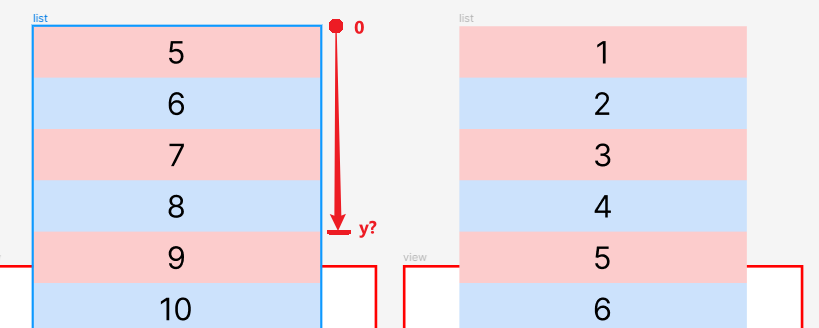
左边 item5 要往下移动到和右边 item5 水平位置。
也就是 item1 – item4 的高度,4 x 20px = 80px。
formula
const translateY = (firstItemCount - 1) * itemHeight;
我们先算出 first item count 再用它来推算 translateY 就简单多了。
上难度 の odd/even
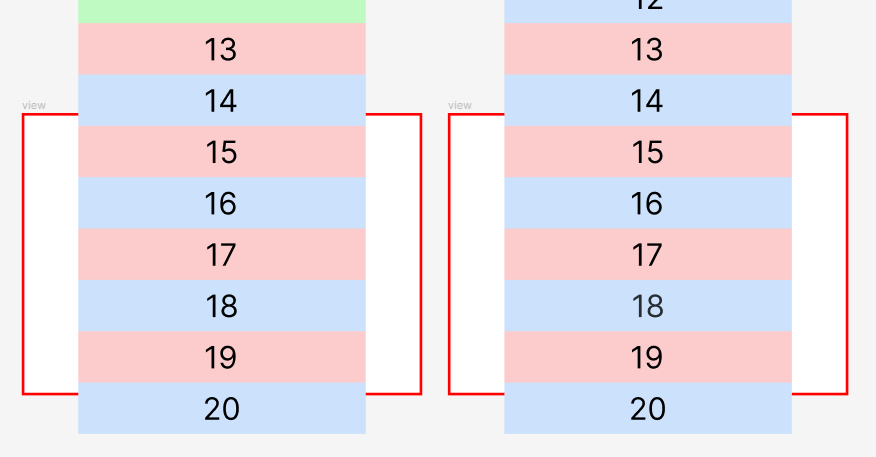
同样是上面的例子,scrollTop 是 275px。
计算结果:item14 – item20,translateY 260px

位置正确,item 号数正确,但是颜色不对。
这是因为 CSS Styles 声明单数是红色,双数是蓝色,当我们在计算输出多少 items 时,我们只考虑到了红框内需要显示多少 items 我们就出多少。
我们没有考虑到第一个 item 号必须是单数。
比如上面这个例子,如果我们出的 items 是 item13 – item20 那么颜色就是正确的。
添加调整的 formula
// 1. 如果是双数
if (firstItemCount % 2 === 0) {
  // 2. 多出 一个 item
  firstItemCount -= 1;
  // 3. 因为加了一个 item,所以 translateY 需要往上退 1 个 item 的高度
  translateY -= itemHeight
}
计算结果:item13 – item20,translateY 240px
上难度 の header
我们在 item-list 上方添加一个 header
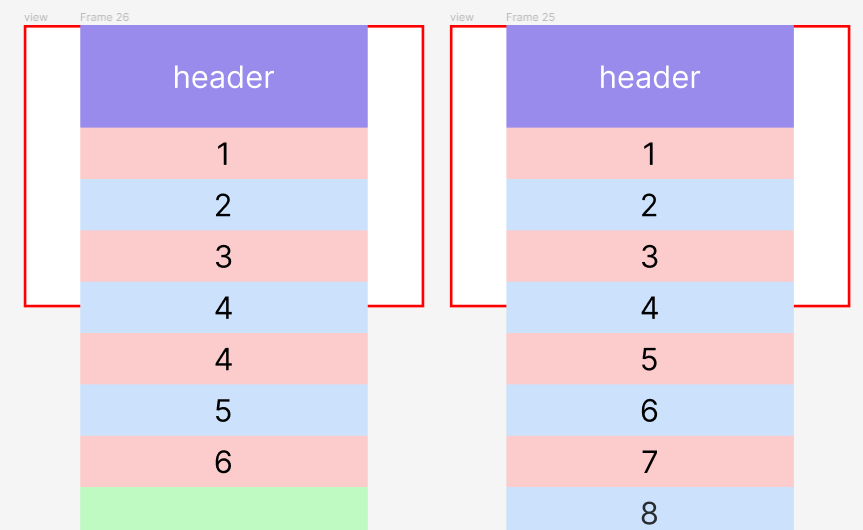
此时,计算方法马上就出错了,输出了 item1 – item6,但其实只需要 item1 – item4 就够了。
这是因为我们在计算时没有把 header 考虑进去。
我们用回上一 part 的例子 scrollTop 93px
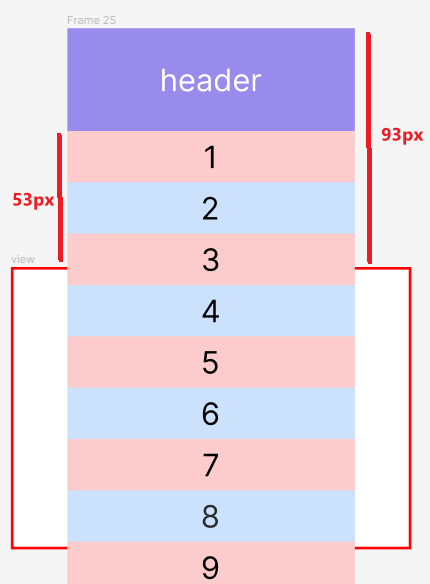
由于 header 的出现,如果我们依然使用 scrollTop 93px 来做计算,那最终结果肯定不会是我们想要的。
我们正确的做法是使用红框 top to item-list top 的距离 (53px) 来替代 scrollTop 做计算 (在没有 header 的情况下,scrollTop 相等于红框 top to item-list top 的距离,但在有 header 的情况下它们就不相等了)
添加红框 top to item-list top 的距离 (我们可以使用 getBoundingClientRect().top 算出它)。
提醒:红框的 border 1px 可能会对 rect 有影响,我这里只是讲解概念就不算得那么细了。
const itemHeight = 20;
const viewportItemListRectTop = -53; // rect top 负数表示 item-list 在红框的上方
const absviewportItemListRectTop = Math.abs(viewportItemListRectTop); // 做计算的时候,我们不要使用负数,用 abs 把它转成正数
const viewportHeight = 110;
把之前用 scrollTop 计算的地方,全部换成 absviewportItemListRectTop。

const itemHeight = 20;
const viewportItemListRectTop = -53;
const absViewportItemListRectTop = Math.abs(viewportItemListRectTop);
const viewportHeight = 110;

let firstItemCount = Math.floor(absViewportItemListRectTop / itemHeight) + 1;
const firstItemShownHeight = itemHeight - (absViewportItemListRectTop % itemHeight);
const needMoreItem = Math.ceil((viewportHeight - firstItemShownHeight) / itemHeight);
const lastItemCount = firstItemCount + needMoreItem;
let translateY = (firstItemCount - 1) * itemHeight;

if (firstItemCount % 2 === 0) {
  firstItemCount -= 1;
  translateY -= itemHeight
}

console.log([firstItemCount, lastItemCount, translateY]);
计算结果:item3 – item9,translateY 40px
这个计算方法没有 cover 到 header inside 红框的情况,比如说 scrollTop 0px
计算结果:item3 – item8,translateY 40px
但正确答案应该是 item1 – item4,translateY 0px
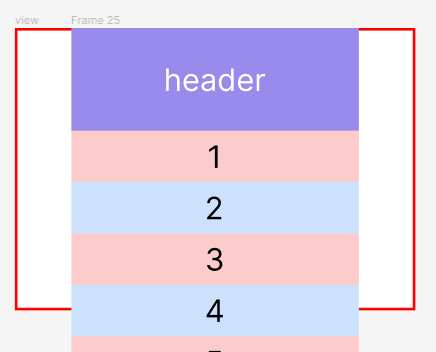
可以看到 first item count 就算错了,这是因为当红框 top to item-list top 的距离 (rect top) 是正数时,first item count 一定是 1 号。
之前用 scrollTop 做计算我们不会遇到这种情况,因为 scrollTop 最低是 0,它不会出现负数。但 rect top 却会出现正数。
解决方法是做一个 rect top 正数判断然后调整 first item count
let firstItemCount = Math.floor(absViewportItemListRectTop / itemHeight) + 1;
// 1. 如果 rect top 是正数
if(viewportItemListRectTop >= 0) {
    // 2. first item count 一定是 1
    firstItemCount = 1;
}
// 3. 如果 header 有可能比红框还大,那就看不到任何 item 了,first item count = 0 or null
if (viewportItemListRectTop >= viewportHeight) {
  firstItemCount = 0;
}
const firstItemShownHeight = itemHeight - (absViewportItemListRectTop % itemHeight);
计算结果:item1 – item6,translateY 0px
first item count 对了,但是 end item count 还是错的。
这是因为当 header 在红框内时,它会占据空间,我们在计算要出多少个 item 时,需要扣除 header 占据的空间。
const firstItemShownHeight = itemHeight - (absViewportItemListRectTop % itemHeight);
// 1. 当 rect top 是正数,表示 header 在红框内,我们需要扣除 header 占据的空间
const needMoreItem = Math.ceil((viewportHeight - (viewportItemListRectTop >= 0 ? viewportItemListRectTop : 0) - firstItemShownHeight) / itemHeight);
const lastItemCount = firstItemCount + needMoreItem;
计算结果:item1 – item4,translateY 0px
最终 formula

const itemHeight = 20;
const viewportItemListRectTop = 40;
const absViewportItemListRectTop = Math.abs(viewportItemListRectTop);
const viewportHeight = 110;

let firstItemCount = Math.floor(absViewportItemListRectTop / itemHeight) + 1;
if(viewportItemListRectTop >= 0) {
    firstItemCount = 1;
}
const firstItemShownHeight = itemHeight - (absViewportItemListRectTop % itemHeight);
const needMoreItem = Math.ceil((viewportHeight - (viewportItemListRectTop >= 0 ? viewportItemListRectTop : 0) - firstItemShownHeight) / itemHeight);
const lastItemCount = firstItemCount + needMoreItem;
let translateY = (firstItemCount - 1) * itemHeight;

if (firstItemCount % 2 === 0) {
  firstItemCount -= 1;
  translateY -= itemHeight
}

console.log([firstItemCount, lastItemCount, translateY]);
上难度 の footer
scrollTop = 370px
红框 top to item-list top 距离是 -330px
计算结果:item17 – item22,translateY 320px
first item count 和 translateY 对了,但 item22 错了
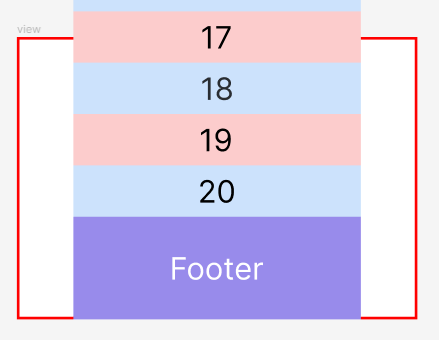
和上一 part 相同的原因,footer 占据了红框内的空间,但是我们的计算方法没有顾虑到它。
我们有 2 个做法,第一个就是判断 footer 是否出现,然后扣除 footer 占据的空间。
第二个做法非常简单粗暴
const lastItemCount = Math.min(firstItemCount + needMoreItem, totalItemCount); // e.g. totalItemCount = 20
我们只有 20 个 items,那就限制 last item count 不能超过 20。
计算结果:item17 – item20,translateY 320px
上难度 の 总结
还有一些情况是我没提到的,比如 header footer 大过红框,item 数量太少或没有,border padding margin 这些都可能会影响到计算方法。
但是它们不至于破坏整个算法,通常只是需要添加一些特别处理就可以解决了。
那是否有一种计算方法,可以不写 if else,一个 formula 统一算出结果呢?呃...反正我目前是没有想到啦。
Virtual Scrolling 实现
HTML
<div class="viewport">
  <div class="header">Header</div>

  <div class="item-list"></div>

  <div class="footer">Footer</div>
</div>
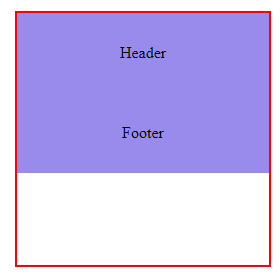
viewport 就是上面提到的红框,它负责 scroll。
有 header,有 footer。
item-list 就是主角咯,我们会用 scripts:
-
创建 scaper 做假空间。
-
创建 item-wrapper 负责 wrap item 和 translateY。
-
依据 viewport top to item-list top 的距离计算出 first item count,last item count 和 translateY。
接着创建出 item 然后 append to item-wrapper。
注:在真实项目中,item 理应使用 <template> 让外部控制样貌,但我这里只是演示所以就不搞 template 了。
Styles
.viewport {
  margin-top: 128px;
  margin-inline: auto;
  width: 256px;
  height: 256px;
  border: 2px solid red;

  .header,
  .footer {
    height: 80px;
    background-color: #988beb;
    display: flex;
    justify-content: center;
    align-items: center;
  }
}
效果
Scripts
// 1. select all elements
const viewport = document.querySelector<HTMLElement>('.viewport')!;
const itemList = document.querySelector<HTMLElement>('.item-list')!;// 2. formula parametes
const itemHeight = 40;
const items = new Array(500).fill(null).map((_, index) => `item${index + 1}`);

// 3. make viewport scrollable
viewport.style.overflowY = 'auto';

// 4. create item-wrapper
const itemWrapper = document.createElement('div');
itemWrapper.classList.add('item-wrapper');
itemList.style.position = 'relative';
itemWrapper.style.position = 'absolute';
itemWrapper.style.top = '0';
itemWrapper.style.left = '0';
itemWrapper.style.width = '100%';
itemList.appendChild(itemWrapper);

// 5. create spacer
const spacer = document.createElement('div');
spacer.classList.add('spacer');
spacer.style.height = `${items.length * itemHeight}px`;
itemList.appendChild(spacer);
效果
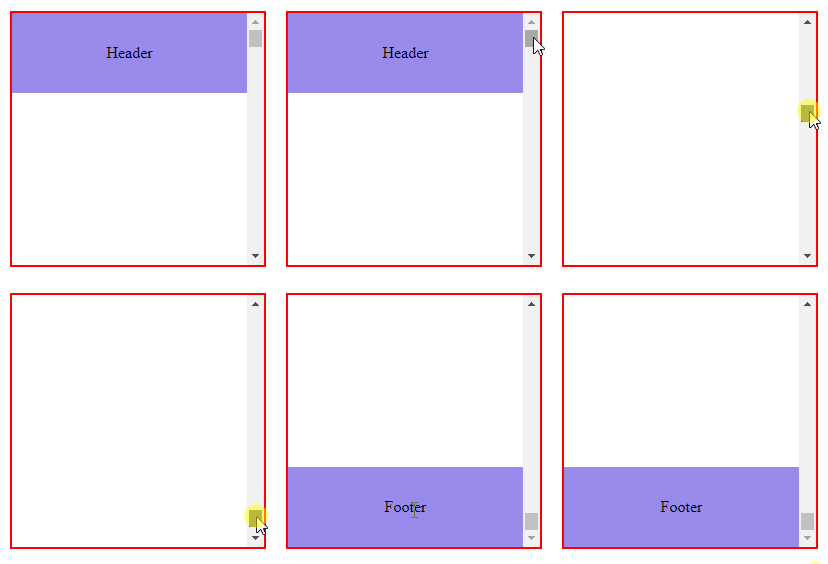
接着需要监听 scroll event,然后依据 rect top 计算出要显示的 items 和 translateY。
Scripts
// 6. first time render
calcAndRender();

// 7. 监听 scroll re-render
viewport.addEventListener('scroll', calcAndRender);

function calcAndRender() {
  // 1. 计算红框 top to item-list top 的距离
  const viewportRect = viewport.getBoundingClientRect().top;
  const itemListRect = itemList.getBoundingClientRect().top;
  const viewportItemListRectTop = itemListRect - viewportRect;

  // 2. 计算 first item count, last item count, translateY
  const absViewportItemListRectTop = Math.abs(viewportItemListRectTop);
  const viewportHeight = viewport.offsetHeight;

  let firstItemCount = Math.floor(absViewportItemListRectTop / itemHeight) + 1;
  if (viewportItemListRectTop >= 0) {
    firstItemCount = 1;
  }
  const firstItemShownHeight = itemHeight - (absViewportItemListRectTop % itemHeight);
  const needMoreItem = Math.ceil(
    (viewportHeight - (viewportItemListRectTop >= 0 ? viewportItemListRectTop : 0) - firstItemShownHeight) / itemHeight,
  );
  const lastItemCount = Math.min(firstItemCount + needMoreItem, itemTexts.length);
  let translateY = (firstItemCount - 1) * itemHeight;

  if (firstItemCount % 2 === 0) {
    firstItemCount -= 1;
    translateY -= itemHeight;
  }

  // 3. 从 itemTexts slice 出要显示的 item text
  const shownItemTexts = itemTexts.slice(firstItemCount - 1, lastItemCount);
  // 4. 清空当前显示的 items
  itemWrapper.innerHTML = '';
  shownItemTexts
    // 5. for loop 创建 item element
    .map(text => {
      const itemElement = document.createElement('div');
      itemElement.classList.add('item');
      itemElement.textContent = text;
      itemElement.style.height = `${itemHeight}px`;
      return itemElement;
    })
    // 6. for loop append item element
    .forEach(itemElement => {
      itemWrapper.appendChild(itemElement);
    });

  // 7. 调整 translateY
  itemWrapper.style.transform = `translateY(${translateY}px)`;
}
注:每一次清空 item-wrapper 和创建 item 是挺伤性能的,这里最好做一个缓存判断复用。
效果
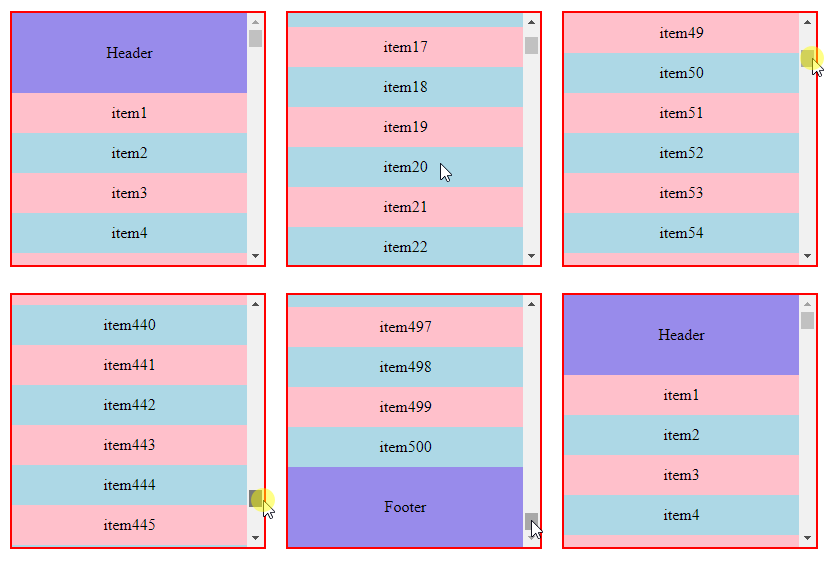

总结
本篇按照 Angular CDK 的思路用 HTML Sass TypeScript 简单的呈现了 Virtual Scrolling。


