

ASP.NET Core – Upload and Download Files (上传和下载文件)
前言
以前得文章 Asp.net core 学习笔记 ( upload/download files 文件上传与下载 ), 这篇是修订版.
Handle Upload File (处理上传文件)
我的例子是基于 Web API 和 Ajax 的.
前端 Ajax

const btn = document.querySelector('button')!;
btn.addEventListener('click', async () => {
  const formData = new FormData();
  formData.append('file', createTextBlob('Hello World'), 'text1.txt');
  // formData.append('file', createTextBlob('Derrick'), 'text2.txt'); // for multiple file

  await fetch('http://localhost:5221/Upload', {
    method: 'POST',
    body: formData,
  });

  function createTextBlob(text: string): Blob {
    const textEncoder = new TextEncoder();
    const bytes = textEncoder.encode(text);
    return new Blob([bytes], {
      type: 'text/plain',
    });
  }
});
upload 一个/多个 text file.
Web API
DTO
public class UploadDto
{
    public IFormFile File { get; set; } = null!;
}
关键就是这个 IFormFile, 它就是用来接收前端 File 的.
Controller
[ApiController]
public class UploadController : ControllerBase
{
    [HttpPost("Upload")]
    [Consumes("multipart/form-data")]
    [ProducesResponseType(StatusCodes.Status200OK)]
    public async Task<ActionResult> Upload([FromForm] UploadDto dto)
    {
        return Ok("ok");
    }
}
把 upload file 写入 disk
var fileRootFullPath = Path.Combine(AppContext.BaseDirectory, $@"..\..\..\{dto.File.FileName}");
using var fileStream = System.IO.File.Create(fileRootFullPath);
await dto.File.CopyToAsync(fileStream);
IFormFile 用法很简单, 它通过 .FileName 拿到文件名, 通过 CopyToAsync 把 stream 传给别人. 比如上面是把 stream 导入 file stream, 这样就写入磁盘了.
把 upload file stream 传给任何人使用
// 直接读 string 出来
using var stream = dto.File.OpenReadStream();
using var streamReader = new StreamReader(stream, encoding: Encoding.UTF8);
var text = await streamReader.ReadToEndAsync(); // Hello World
通过 OpenReadStream() 导出 stream 就可以做任何 stream 处理了.
handle multiple files
// JavaScript
const formData = new FormData();
formData.append('file', createTextBlob('Hello World'), 'text1.txt');
formData.append('file', createTextBlob('Derrick'), 'text2.txt'); // for multiple file

// C#
public class UploadDto
{
    public List<IFormFile> File { get; set; } = null!;
}
没什么提别的, 就只是换成了 List<IFormFile>
file size limit
ASP.NET Core 默认的 max upload file size 是 28.6 MB。
在 Program.cs
修改 Kestrel
builder.WebHost.ConfigureKestrel((context, serverOptions) =>
{
  serverOptions.Limits.MaxRequestBodySize = 157286400; // 150MB
});
修改 FormOptions
builder.Services.Configure<FormOptions>(options =>
{
  options.MultipartBodyLengthLimit = 157286400; // 150 MB
});
Production IIS 的话,修改 web.config
<?xml version="1.0" encoding="utf-8"?>
<configuration>
  <system.webServer>
    <security>
      <requestFiltering>
        <!-- Set the maximum allowed content length to 150 MB (in bytes) -->
        <requestLimits maxAllowedContentLength="157286400" />
      </requestFiltering>
    </security>
    <!-- Add other configurations as needed -->
  </system.webServer>
</configuration>
Download File (下载文件)
前端 HTML
<a href="http://localhost:5221/Download" download="">download</a>
假如是 same origin 同域,那么 ASP.NET Core 的 statis files 就可以处理了。不需要什么特比的配置。
那如果是 cors origin 的话就比较麻烦。
首先,必须开启 cros origin 咯,另外呢,还需要有 response header Content-Disposition,像这样

通常我们会用 Web Api 另开一个接口处理。
Web API Controller
[ApiController]
public class UploadController : ControllerBase
{
  [HttpGet("Download")]
  [Produces(MediaTypeNames.Application.Octet)]
  [ProducesResponseType(StatusCodes.Status200OK)]
  public ActionResult Download()
  {
    var filePath = @"C:\TestDownload\wwwroot\yangmi.jpg";

    // 第一招 PhysicalFile + 自己添加 header "Content-Disposition"
    Response.Headers.Append("Content-Disposition", "attachment;filename=yangmi.jpg");
    return PhysicalFile(filePath, "image/jpeg");

    // 第二招,使用 File,它自带 header "Content-Disposition": attachment
    return File(
      fileContents: System.IO.File.ReadAllBytes(filePath),
      contentType: "image/jpeg",
      fileDownloadName: "yangmi.jpg"
    );

    // 或这样也是等价的
    // return new FileContentResult(System.IO.File.ReadAllBytes(filePath), "image/jpeg")
    // {
    //     FileDownloadName = "yangmi.jpg"
    // };
  }
}
重点就是要有 bytes,mime type, file name 还有 header "Content-Disposition" attachment。
Force open save as dialog (showSaveFilePicker)
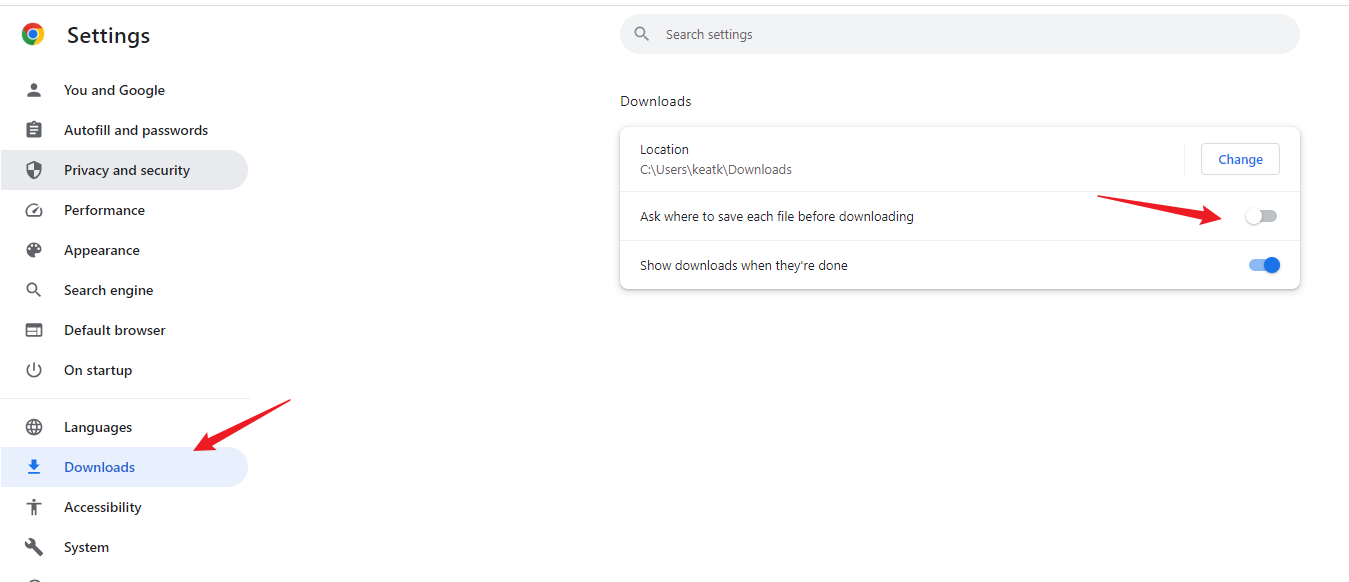
用 Chrome 下载文件的体验是,它会直接放到 default location folder 里,除非用户开启 “Ask where to save each file before downloading” 设置
Firefox 也是这样。无意间发现 pixlr.com 在 Chrome 可以 force open save as dialog。
我猜它用了一个比较新的 File System API : showSaveFilePicker。目前只有 Chrome 支持。
参考: Stack Overflow – Force showing the "Save as" dialog box when downloading a file
代码大致长这样
const canvas = document.querySelector<HTMLCanvasElement>('.img')!;
const ctx = canvas.getContext('2d')!;
const response = await fetch('https://192.168.1.152:4200/src/images/nana.jpg');
const blob = await response.blob();
const img = await createImageBitmap(blob);
[canvas.width, canvas.height] = [img.width, img.height];
ctx.drawImage(img, 0, 0);

const btn = document.querySelector<HTMLElement>('.btn')!;

btn.addEventListener('click', () => {
  canvas.toBlob(async blob => {
    // 关键:
    const handle = await showSaveFilePicker({
      suggestedName: 'nana.jpg',
      types: [
        {
          description: 'Jpeg file',
          accept: {
            'image/jpeg': ['.jpeg', '.jpg'],
          },
        },
      ],
    });
    const writable = await handle.createWritable();
    await writable.write(blob!);
    writable.close();
  }, 'image/jpeg');
});
不过这个方式下载的文件,不会出现在 Chrome 的 recently download 记入里面,体验有点差。
另外,目前 TypeScript 还不支持哦,需要
yarn add @types/wicg-file-system-access --dev


【推荐】编程新体验,更懂你的AI,立即体验豆包MarsCode编程助手
【推荐】凌霞软件回馈社区,博客园 & 1Panel & Halo 联合会员上线
【推荐】抖音旗下AI助手豆包,你的智能百科全书,全免费不限次数
【推荐】博客园社区专享云产品让利特惠,阿里云新客6.5折上折
【推荐】轻量又高性能的 SSH 工具 IShell:AI 加持,快人一步
· CSnakes vs Python.NET:高效嵌入与灵活互通的跨语言方案对比
· DeepSeek “源神”启动!「GitHub 热点速览」
· 我与微信审核的“相爱相杀”看个人小程序副业
· Plotly.NET 一个为 .NET 打造的强大开源交互式图表库
· 上周热点回顾(2.17-2.23)