RxJS 系列 – 实战练习
前言
这篇主要是给一些简单例子, 从中体会 RxJS 在管理上的思路.
Slide Down Effect with Dynamic Content
我在这篇 CSS & JS Effect – FAQ Accordion & Slide Down 讲过如何实现 slide down with dynamic content.
效果大概是这样的

RxJS 的思路步骤
元素 > 事件 > 状态 > 渲染
1. 先把涉及到的元素找出来. 比如上面的 open button, close button, add more button, card 等等
2. 把监听的事件找出来, 比如 click, transitionend 等等
3. 抽象出状态, 然后通过事件改变状态. 比如 Status: 'opening' | 'opened' | 'closing' | 'closed'
opening 表示正要打开, opened 表示已经打开, closing 表示正要关闭, closed 表示已经关了.
依据上面的操作那么就是 closed > opening > opened > closing > closed, 当然依据用户的操作也可以是 closed > opening > closing > closed (在还没有完全打开的时候 user 就点击了关闭)
4. 依据状态对元素进行渲染 (修改 DOM)
RxJS 之管理
从上面几个步骤可以发现它带有 mvvm 的思想, 也有 redux 那种 state management 的味道.
拆分步骤有几个好处
1. 出现 bug 的时候容易排查定位.
2. 实现的时候可以一步一步一来.
坏处就是复杂了一些. 所以这其实是一个取舍. 如果你的项目没有遇到 bug 难定位, 不用分段实现 (为了休息, 缓口气) 的话, 其实不用 RxJS 也是 ok 的.
Without RxJS 版本
const openBtn = document.querySelector('.open-btn')!;
const cardWrapper = document.querySelector<HTMLElement>('.card-wrapper')!;
openBtn.addEventListener('click', () => {
  cardWrapper.style.height = `${cardWrapper.scrollHeight}px`;
});

const closeBtn = document.querySelector('.close-btn')!;
closeBtn.addEventListener('click', () => {
  if (cardWrapper.style.height === 'auto') {
    cardWrapper.style.height = `${cardWrapper.scrollHeight}px`;
    requestAnimationFrame(() => {
      cardWrapper.style.removeProperty('height');
    });
  } else {
    cardWrapper.style.removeProperty('height');
  }
});

cardWrapper.addEventListener('transitionend', () => {
  if (cardWrapper.style.height !== '') {
    cardWrapper.style.height = 'auto';
  }
});

const addMoreBtn = document.querySelector('.add-more-btn')!;
const description = document.querySelector('.description')!;
addMoreBtn.addEventListener('click', () => {
  description.textContent = `${description.textContent}\n${description.textContent}`;
});
简单明了, 就是监听然后操作 DOM, 需要判断的地方直接读取 DOM 当前的状态.
RxJS 版本
先把 element 抓出来
import { fromEvent, map, merge, pairwise, startWith, withLatestFrom } from 'rxjs';

const openBtn = document.querySelector('.open-btn')!;
const closeBtn = document.querySelector('.close-btn')!;
const cardWrapper = document.querySelector<HTMLElement>('.card-wrapper')!;
const description = document.querySelector('.description')!;
监听 event 并转换成 state (状态)
type Status = 'opening' | 'opened' | 'closing' | 'closed';

const opening$ = fromEvent(openBtn, 'click').pipe(map<Event, Status>(() => 'opening'));
const closing$ = fromEvent(closeBtn, 'click').pipe(map<Event, Status>(() => 'closing'));
const openingOrClosing$ = merge(opening$, closing$);

const transitionend$ = fromEvent(cardWrapper, 'transitionend');

const openedOrClosed$ = transitionend$.pipe(
  withLatestFrom(openingOrClosing$),
  map(([_event, openingOrClosing]) => (openingOrClosing === 'opening' ? 'opened' : 'closed'))
);

const status$ = merge(openingOrClosing$, openedOrClosed$).pipe(
  startWith<Status>('closed'),
  pairwise()
);
这里是考功夫的地方, 需要懂多一点 RxJS 的操作. 很多 stream 都是通过组合搞出来的.
渲染
status$.subscribe(([prevStatus, currStatus]) => {
  switch (currStatus) {
    case 'opening':
      cardWrapper.style.height = `${cardWrapper.scrollHeight}px`;
      break;
    case 'opened':
      cardWrapper.style.height = 'auto';
      break;
    case 'closing':
      {
        if (prevStatus === 'opening') {
          cardWrapper.style.height = '0';
        } else {
          cardWrapper.style.height = `${cardWrapper.scrollHeight}px`;
          requestAnimationFrame(() => {
            cardWrapper.style.height = '0';
          });
        }
      }
      break;
  }
});
这里和 pure JS 最大的不同是, 它不通过读取 DOM 发现当前是什么状态的, 而是通过 RxJS 把之前的状态缓存了起来.
这样代码就很直观好理解了.
最后补上
const addMoreBtn = document.querySelector('.add-more-btn')!;
addMoreBtn.addEventListener('click', () => {
  description.textContent = `${description.textContent}\n${description.textContent}`;
});
由于这个很简单所以不需要用 RxJS 来实现.
显示公告体验
当用户游览网站到 “价格” 这个部分时, 需要显示公司的公告.

有一个体验要求是, 用户必须 "静止" 在这个部分超过 2 秒钟才能显示公告. 如果用户只是轻轻滑过, 那么是不显示公告的.
单侧版本
先简化成一个测试版本
HTML
<body>
  <div class="container">
    <div class="prev"></div>
    <div class="box">box</div>
    <div class="next"></div>
  </div>
</body>
CSS Style

body {
  display: flex;
  justify-content: center;
  align-items: center;

  .container {
    display: flex;
    flex-direction: column;
    gap: 2rem;

    .box {
      width: 300px;
      height: 600px;
      border: 1px solid black;
      display: flex;
      justify-content: center;
      align-items: center;
      font-size: 4rem;
      color: red;
    }

    .next,
    .prev {
      height: 100vh;
      background-color: lightblue;
    }
  }
}
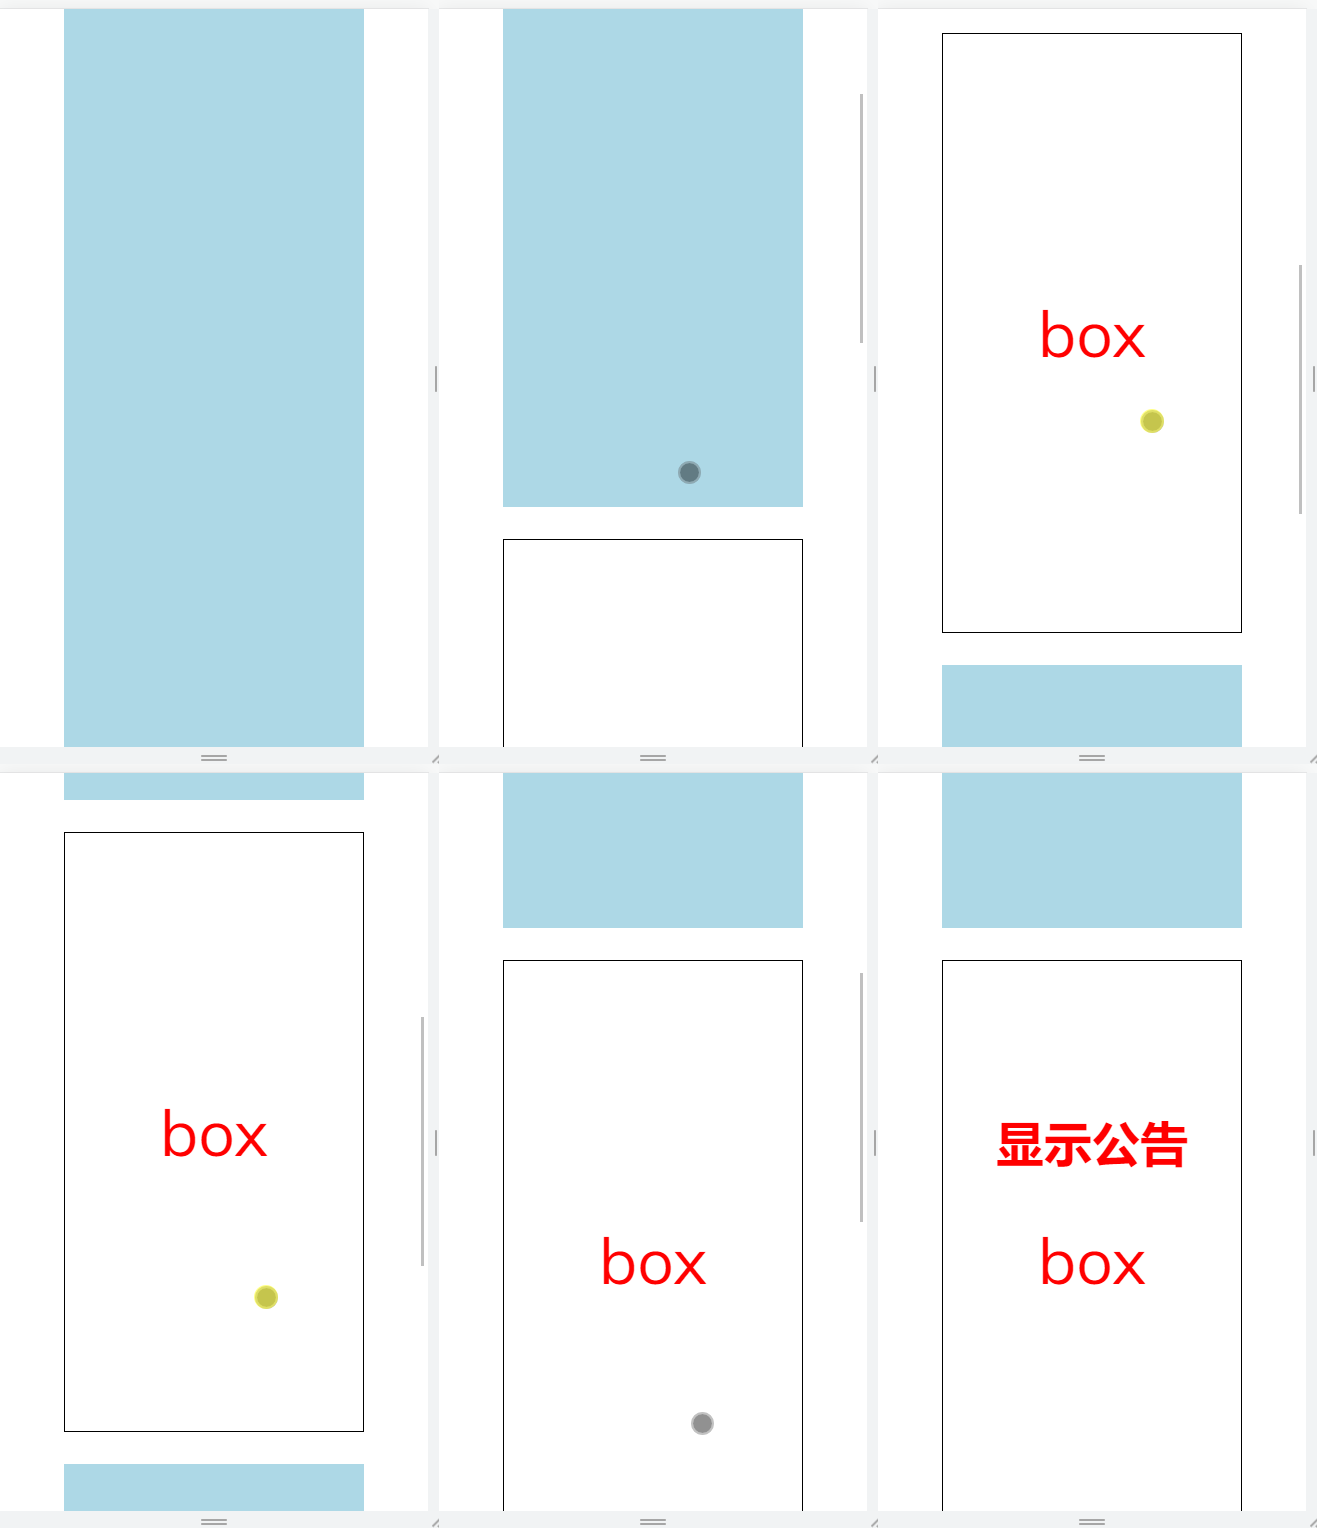
效果

思路与实现
首先看看需求描述
当 box 出现后 + 没有 scrolling 2 秒后 = 显示公告
虽然 RxJS standard 的实现步骤是 元素 > 事件 > 状态 > 渲染, 但这一题比较简单.
元素就只有 box, 也谈不上什么状态. 渲染更不用说. 所以只要专注在事件就行了.
box 显示事件
const intersected$ = new Observable<boolean>(subscriber => {
  const box = document.querySelector('.box')!;
  const io = new IntersectionObserver(
    entries => {
      subscriber.next(entries[0].intersectionRatio >= 0.2 && entries[0].isIntersecting);
    },
    {
      threshold: [0, 0.2],
    }
  );
  io.observe(box);
}).pipe(distinctUntilChanged(), share());
const [boxShowed$, boxHidden$] = partition(intersected$, showed => showed);
利用 Intersection Observer 监听 box 的显示和隐藏. 当隐藏触发, 我们就必须停止后续的行为.
scrolling 事件
const scrolling$ = fromEventPattern(
  handler => {
    document.addEventListener('scroll', handler, { passive: true, capture: true });
  },
  handler => {
    document.removeEventListener('scroll', handler, { capture: true });
  }
);
const noScrollingMoreThanTwoSecond$ = scrolling$.pipe(startWith(null), debounceTime(2000), take(1));
我们需要知道用户没有 scrolling 超过 2 秒. 这里用了 debounceTime, 如果用户一直 scroll 就重来, 直到它停止超过 2 秒
事件结合和渲染
最后就是监听 boxShowed$ > 然后监听 2 秒没有 scrolling > 然后显示. 中途如果 box hidden 那就作废.
boxShowed$
  .pipe(switchMap(() => noScrollingMoreThanTwoSecond$.pipe(takeUntil(boxHidden$))))
  .subscribe(() => {
    const h1 = document.createElement('h1');
    h1.textContent = '显示公告';
    h1.style.position = 'fixed';
    h1.style.top = '50%';
    h1.style.left = '50%';
    h1.style.transform = 'translate(-50%, -50%)';
    h1.style.fontSize = '3rem';
    h1.style.color = 'red';
    document.body.appendChild(h1);
  });
这种一小步, 一小步, 最后大组合的实现手法体验是不是很棒呢? 如果你喜欢, 那就多用 RxJS 呗.
其它实战例子


【推荐】编程新体验,更懂你的AI,立即体验豆包MarsCode编程助手
【推荐】凌霞软件回馈社区,博客园 & 1Panel & Halo 联合会员上线
【推荐】抖音旗下AI助手豆包,你的智能百科全书,全免费不限次数
【推荐】博客园社区专享云产品让利特惠,阿里云新客6.5折上折
【推荐】轻量又高性能的 SSH 工具 IShell:AI 加持,快人一步
· CSnakes vs Python.NET:高效嵌入与灵活互通的跨语言方案对比
· DeepSeek “源神”启动!「GitHub 热点速览」
· 我与微信审核的“相爱相杀”看个人小程序副业
· Plotly.NET 一个为 .NET 打造的强大开源交互式图表库
· 上周热点回顾(2.17-2.23)