

CSS – Sass & SCSS
前言
CSS 代码多了就不好管理了, 这是它语法先天的不足.
Sass 就是加强它语法的, Sass 为 CSS 引入了一些 JS 语言的特性, 比如 variable, function, parameter, extend, import.
Sass 的 variable 和 import (用于管理), 和 CSS 的 variable, import 不是一回事儿. 分开看待会更好理解.
它的原理很简单, 就是解析 Sass 语法, 然后编辑去 CSS. 和 TS > JS 一样的道理.
参考:
Learn Sass In 20 Minutes | Sass Crash Course
How to Compile?
搭配 Webpack 的话, 看这篇 : Webpack 学习笔记
这里使用的方式是 VS Code Extension.
安装插件
注: 它有 2 个同名字的哦, 旧的没有维护了 github issue, 旧的 version 使用 @use 会报错哦.

点击 Watch Sass 开启 watching mode.

这时, scss 文件就会被 compile 生成 css 文件了 (.map 是 debug 用的)

Output window 一直弹出来的问题, 它默认是 information 所以一直会跳出来.

如果不用 webpack 又不用 extension 也可以用 nodejs 单独版本, 看这篇: Youtube – Stop using an extension to compile Sass
补上一个 Gulp 版本
npm install --global gulp-cli
yarn add sass --dev
yarn add gulp --dev
yarn add gulp-sass --dev
yarn add gulp-sourcemaps --dev
gulpfile.js

const { src, dest, watch } = require("gulp");
const sass = require("gulp-sass")(require("sass"));
const sourcemaps = require("gulp-sourcemaps");

function sassTask() {
  return src("./src/**/*.scss")
    .pipe(sourcemaps.init())
    .pipe(sass().on("error", sass.logError))
    .pipe(sourcemaps.write("."))
    .pipe(dest("src/"));
}

exports.build = sassTask;
exports.watch = function () {
  watch("./src/**/*.scss", sassTask);
};
folder and files 结构
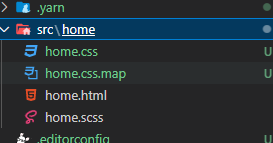
只要是 src 里面的 .scss 都会被 transplie 成 .css, 位置是 sibling
运行 command
yarn run gulp watch
or
yarn run gulp build
注意: for 第一次, 最好先 gulp build 一次创建出所有的 files. gulp watch 只有在 file change 的时候才会执行的哦.
Variable
CSS 的 variable 和 Sass 的 variable 不是一个概念. 不要把它们放一起看待.
Sass 的 variable 是用来存变量的, 编辑完之后就没有.
CSS variable 是定义在 element 了, JS 是可以获取到和修改的. 总之完全不是一个世界的东西. 用途动机都不一样.
$primary-color: red;
$secondary-color: red;

h1 {
  color: $primary-color;
}
p {
  color: $secondary-color;
}
定义变量是用 $ 符号, 使用就直接放去想用的地方就可以了.
编译完成后 css file
h1 {
  color: red;
}
p {
  color: red;
}
有了变量表达加分, 要批量换也容易, 修改加分.
Private Variable
$_private-variable: blue;
变量名字开头是下划线 _ 表示它是一个私有变量, 在 @use 的时候无法引用.
Default Variable Value
$primary-color: blue !default;
!defualt, 这样 @use 的时候可以 override.
当用于给 CSS variable 赋值
参考: Breaking Change: CSS Variable Syntax
直接把 Sass variable 赋值给 CSS variable 是错误的, 必须加上 #{}

另外当值有 quote 的时候 #{} 依然是错的, 需要用 meta.inspect()

Nested 嵌套
CSS 是平的
#hero-section h1 {
  color: red;
}
#hero-section h1:hover {
  color: black;
}
#hero-section h1:my-class {
  color: yellow;
}
#hero-section p {
  color: blue;
}
#hero-section 被重复了 3 次, #hero-section h1 被重复了 2 次
而且不容易看出它们的关系.
Sass 是可嵌套的, 它这样写.
#hero-section {
  h1 {
    color: red;
    &:hover {
      color: black;
    }
    &.my-class {
      color: yellow;
    }
  }
  > p {
    color: blue;
  }
}
& 是同时的意思.
这样就去除了重复的部分, 而且包在一起也增加了关系的表达.
它编辑出来就和上面 CSS 版本一样.
@keyframes
Sass 允许把 @keyframes 写到某个 style code 里面.
.container {
  animation: dada 2s ease forwards;

  @keyframes dada {
    100% {
      background-color: blue;
    }
  }
}
compile 以后会被放到 root.
提醒: 因为最后是放到 root 的, 所以 keyframes 的名字不可以撞哦, 它可没有 scope 的概念, 只是简单的搬出去而已.
@media
media query 也不例外, 可嵌套
.container {
  max-width: 100%;
  @media (min-width: $breakpoint-sm) {
    max-width: 540px;
  }
}
效果
.container {
  max-width: 100%;
}
@media (min-width: 576px) {
  .container {
    max-width: 540px;
  }
}
parent selector
参考:
Stack Overflow – Can I check parent element has specific class in sass?

把 & 写在后面. 它会生成如下的 selector

.blue 被放到了最前面, 变成了所谓的 "parent" 但其实是 ancestor. 这招 parent selector 也不是那么厉害, 一些小地方能用到罢了. 很多时候是不够用的.
@use (前生是 @import)
参考:
Stop using @import with Sass | @use and @forward explained
2020年的css周边之sass用法指南 @use和@forward 的部分.
早年是叫 @import 的, 后来换成 @use 了, 功能也改了一些.
@use 可以理解为 module / namespace, 它让我们可以把 CSS 代码分散到多个 file 做管理. 通过 @use 引入来使用.
基本用法
最常见的就是 _variable.scss 了

它的 file name 开头是下划线 _ 这表示这个 file 是需要被 @use 的, 所以 compiler 不会生成 _variable.css 文件.
它的使用方式是:

注意 @use 一定要放在顶部 (before style code, 如果 @use 前面是定义 variable 的话还 ok) , 它的 file name 不需要有下划线(_), 也不需要有 extension (.scss)
调用 variable 的时候需要配上 namespace (file name)
Change Namespace
和 JS 的 import 类似, 可以通过 as 关键字换名字

通过 as * 还能去掉 namespace 哦

Override Default Variable
$primary-color: blue !default;
@use "./variable" as * with (
  $primary-color: yellow
);
使用关键字 with (variable : value) 可以覆盖 default variable.
@forward
它有点像 Angular 中的 re-export. import from a,b,c then export as d 这种方式.
比如有 variable1,2

做一个 forward import variable 1,2
@forward "./variable1" as first-*;
@forward "./variable2" as second-*;
as first-* 是添加 prefix, 防止撞名字, 如果没有撞名字的可能性,那可以不加
使用
@use "./forward";
h1 {
  color: forward.$first-primary-color;
}
p {
  color: forward.$second-primary-color;
}
此外它还有 show, hide 可以指定要 export 的 members, 它也可以通过 with override default variable

@use 和 @forward 的复杂例子
有 3 个 files: _core.scss, _base.scss, style.scss
core 是核心模块, base 是项目通用模块, style 是某个 page 的样式
_core.scss


@use "sass:list";
@use "sass:math";

@function map-get-next($map, $key) {
  $keys: map-keys($map);
  $values: map-values($map);
  $index: list.index($keys, $key);
  $count: length($keys);
  $next-index: $index + 1;
  @if ($next-index > $count) {
    @return null;
  }
  @return list.nth($values, $next-index);
}
$breakpoint: null !default;
@function breakpoint($size) {
  @return map-get($breakpoint, $size);
}
@function breakpoint-next($size) {
  @return map-get-next($breakpoint, $size);
}
@mixin media-breakpoint-up($breakpoint) {
  @media (min-width: breakpoint($breakpoint)) {
    @content;
  }
}
@mixin media-breakpoint-down($breakpoint) {
  @media (max-width: breakpoint($breakpoint) - 0.02px) {
    @content;
  }
}
@mixin media-breakpoint-only($breakpoint) {
  $current: breakpoint($breakpoint);
  $next: breakpoint-next($breakpoint);
  @if ($next == null) {
    @media (min-width: $current) {
      @content;
    }
  } @else {
    @media (min-width: $current) and (max-width: $next - 0.02px) {
      @content;
    }
  }
}
@mixin media-breakpoint-between($from-breakpoint, $to-breakpoint) {
  @media (min-width: breakpoint($from-breakpoint)) and (max-width: breakpoint($to-breakpoint) - 0.02px) {
    @content;
  }
}
4 个 breakpoint 的 mixin 和一个 map-get-next 小方法, breakpoint 需要外部输入 variables.
_base.scss
$breakpoint: (
  xs: 0,
  sm: 640px,
  md: 768px,
  lg: 1024px,
  xl: 1280px,
  "2xl": 1536px,
);

// 顺序是 as > show > with
// show 的名字是有加 prefix 的
@forward "./core" as core-* show core-map-get-next,
  core-media-breakpoint-up with (
    $breakpoint: $breakpoint
  );

// 需要用 @use 当前文档才可以调用到 core
// 不需要也不可以再设置 variables 了
@use "./core";
@mixin base-mixin {
  @include core.media-breakpoint-up("lg") {
    h1 {
      width: 30px;
    }
  }
}
有几个点需要注意
1. @forward 使用 as, show/hide, with 的顺序是讲究的. as > show > with
2. show 在 as 之后, 所以 show 的名字需要加上 prefix
3. 如果当前 _base.css 也需要调用 core 方法的话, 还需要再 @use './core', @forward 不能让当前文档可调用 core 哦
4. 一个 module 只能有一个使用 with, 比如
@forward './core' as hide with
@forward './core' as show
@use './core'
上面只能在其中一个放 with. 不然会报错 This module was already loaded, so it can't be configured using "with".
style.scss
@use "./base" as *;

$obj: (
  my-color: red,
  my-width: 400px,
);

@include core-media-breakpoint-up("lg") {
  h1 {
    width: core-map-get-next($obj, "my-color");
  }
}

@include base-mixin();
Operator
Sass 允许我们直接写 operator
h1 {
  font-size: 10px + 20px;
}
虽然说 CSS 可以用 calc 但是上面这种写法在 compile 之后就变成 30px 了. 性能可定比较好.
@mixin and @include
mixin 类似 JS 的 function, 它可以用来封装一段 style code, 想要 copy paste 的时候就调用.
而且它可以用 parameter 做微调整哦.
@mixin some-repeat-style {
  h1 {
    color: red;
  }
}

@mixin some-repeat-property-style {
  color: red;
}

@include some-repeat-style();
@include name-repeat-style; /* 如果没有参数也可以不需要括弧 */

p {
  @include some-repeat-property-style();
}
它就是把 mixin 内的 style code, copy paste 到 @include 的位置就对了.
效果
h1 {
  color: red;
}

p {
  color: red;
}
搭配 parameter 和 default paramter value
@mixin my-mixin($extra-width: 100px) {
  h1 {
    font-size: 20px + $extra-width;
  }
}
和 C# 类似 optional parameter 只能通过 assign default value 来实现. 不像 JS 写个 ? 就可以了.
所以最起码需要 assign 一个 null, 比如
@mixin func1($color: red) {
  $color: if($color == null, red, $color);
  color: $color;
}

@mixin func2($color: null) {
  @include func1($color);
}

h1 {
  @include func2;
}
底层 mixin 可以通过 ternay operator 判断是 null 就 assign default value. ternary operator 下面会详细讲.
@content 的用法
h1 {
  @include font("display") {
    color: red;
  }
}
include 调用紧跟着一个对象.
@mixin font($type) {
  @if $type == "display" {
    font-size: 10rem;
    @content;
  } @else {
    font-size: 1rem;
    @content;
  }
}
对象会被传入 @mixin 然后通过 @content paste 出来使用. 很适合用来做 extend 和 conditional (比如 media query)
甚至可以传参数沟通哦.

@function
mixin include 只是简单的 copy paste style code, function 则更像 JS, 它一般用来做算法逻辑等等.
@function my-function() {
  @return 50px;
}
和 mixin 不同, 不管有没有 parameter, function 都要有括弧. 也必须有 return.
使用的时候不需要加 @include 之类的
h1 {
  font-size: my-function() + 20px;
}
function 一般上会比较复杂, 会搭配 @if, @for, @each 这类 JS 语法来使用. 我目前没有用到这么复杂, 以后才讲.
@extend
继承, 比如某个 selector 想拥有另一个 selector 的 style code 的时候, 就可以用到.
.container {
  width: 500px;
  border: 2px solid red;
}

.child-container {
  @extend .container;
}
child-container 想拥有 .container 的 style. 可以用 @extend 表达
出来的效果是这样:
.container, .child-container {
  width: 500px;
  border: 2px solid red;
}
看不出什么厉害之处, 挺多只是表达好一些而已. 但是如果要扩展的话..
.child-container {
  @extend .container;
  background-color: red;
}
结果
.container, .child-container {
  width: 500px;
  border: 2px solid red;
}

.child-container {
  background-color: red;
}
这样结构上就加分了. 所以说 Sass 的目的就是让你的 CSS code 更加 manageable.
%placeholder
参考: Youtube – Sass Tutorials #19 - Placeholder Selectors
上面介绍的是 extend existing class, 但如果只是想抽象的话呢? 可以用 placeholder
%box {
  outline: 1px solid black;
}
.box1 {
  @extend %box;
}
.box2 {
  @extend %box;
}
%box 是抽象的, 如果没用被引用, 它完全不会出现在 CSS 里面
效果
.container .box2, .container .box1 {
  outline: 1px solid black;
}
You may not @extend selectors across media queries
%dada {
  color: blue;
}
body {
  @media (min-width: 1px) {
    @extend %dada;
  }
}
上面这样是不 ok 的, extend 必须在 media 里面

下面这样是 ok 的
body {
  @media (min-width: 1px) {
    %dada {
      color: blue;
    }
    @extend %dada;
  }
}
可以用 mixin 来替代, 参考: stackoverflow – Extending selectors from within media queries with Sass
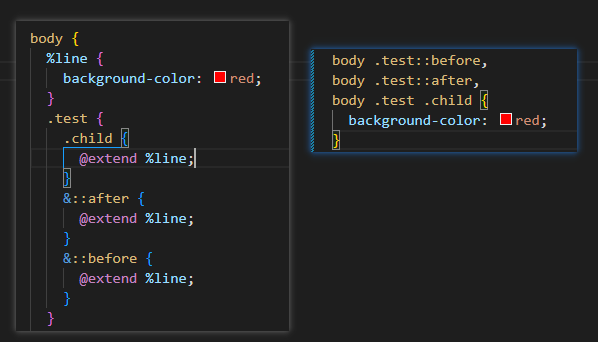
当 @extend 遇上 pseudo
注意 %line 的位置. 如果它在 pseudo sbiling 就会错误 (多了一个 .test)
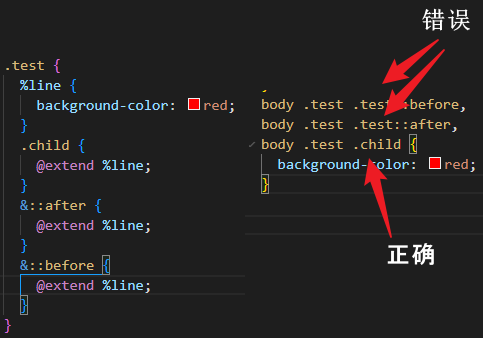
如果它在多一个 parent 就正常了. 多出来的 .test 没了.
当 @extend + override 遇上 @media
首先看看 CSS 的顺序
h1 {
  color: pink;
}

@media (max-width : 1024px) {
  h1 {
    color: lightgreen;
  }
}

h1 {
  color: lightblue;
}
即便在 vw < 1024px 的情况下, h1 都是 lightblue. 最下面的代码赢.
而当我们 @extend + override 时
.aaa {
  background-color: blue;
  @media (width >= 1024px) {
    background-color: red;
  }
}
.bbb {
  @extend .aaa;
  background-color: yellow;
}
它出来的代码长这样
.aaa, .bbb {
  background-color: blue;
}
@media (width >= 1024px) {
  .aaa, .bbb {
    background-color: red;
  }
}
.bbb {
  background-color: yellow;
}
最终 bbb 一定是 yellow, @extend 只是单纯把 selector 往之前的加而已 (参考这篇), 如果这不是你期望的. 那么可以改成用 mixin
@mixin aaa {
  background-color: blue;
  @media (width >= 1024px) {
    background-color: red;
  }
}
.bbb {
  @include aaa;
  background-color: yellow;
}
结果
.bbb {
  background-color: blue;
  background-color: yellow;
}
@media (width >= 1024px) {
  .bbb {
    background-color: red;
  }
}
当 vw >= 1024px .bbb 是 red color.
Color Function
Sass 有自带一些 function。
首先 @use
@use 'sass:color';
color.complement 补色 (色轮 180°)

color.scale
控制色调和饱和度, 还有透明度
background-color: color.scale(red, $lightness: 0%); /* 起点 */
background-color: color.scale(red, $lightness: -100%); /* 黑色 */
background-color: color.scale(red, $lightness: 100%); /* 白色 */

background-color: color.scale(red, $alpha: -40%); /* 相等于 rgba(red, 0.6) */

background-color: color.scale(red, $saturation: 10%, $lightness: -10%); /* 调饱和度, 同时也可以调色调或透明 */
依据背景色调整 text color
@function text-color($color) {
  @return if(color.lightness($color) > 40%, black, white);
}

@mixin bg-and-text-color($color) {
  background-color: $color;
  color: text-color($color);
}

.container {
  @include bg-and-text-color(black);
}
通过 color.lightness 判断是亮色还是暗色
Get hue, saturation, lightness
$color: hsl(206, 94%, 28%);
$hue: color.channel($color, 'hue', $space: hsl); // 206
$saturation: color.channel($color, 'saturation', $space: hsl); // 94%
$lightness: color.channel($color, 'lightness', $space: hsl); // 28%
获取到色相, 饱和度, 明度
JS 语法
JS 有 object, array, for loop, if else, 等. Sass 也有, 只是比较少会用到, 除非你的项目真的很复杂, 或者你没有使用 Tailwind, Bootstrap 这种自带架构的框架或库.
这里介绍一些比较常会用到的
object & array
@use "sass:list";
@use "sass:map";

$obj: (
  color: red,
  size: 100px,
);
$obj-keys: map.keys($obj); // color, size
$obj-values: map.values($obj); //  red, 100px

$arr: red 100px;

h1 {
  color: map.get($obj, "color"); /* get property color */
  color: map.get($obj, color); /* 不一定要 quote, 但 best practice 是有放的 */
  background-color: list.nth($arr, 1); /* get first, not start with zero oh */
}
map dot 或 hypen 效果是一样的. e.g. map.get / map-get, map.keys / map-keys, map.has-key / map-has-key.
由于它的调用很丑, map.get($obj, color); 倒不如用 variable, $obj-color 更好一些.
所以通常会用 function 包装使用. 参考: Using SCSS maps as object - is it good?
$color: (
  "red": red,
  "yellow": yellow,
);

@function color($key) {
  @if not map.has-key($color, $key) {
    @warn "Color `#{$key}` not found.";
  }
  @return map.get($color, $key);
}
调用
body {
  background-color: color("red");
}
这样就比较好一些了.
注意: key 最好 quote 起来
$color-collection: (
  white: hsl(0, 0%, 100%),
);
@function color($key) {
  @return map.get($color-collection, $key);
}
.container {
  color: color("white");
}
key = white 的时候, 上面这样 color 是出不来的.
一定要
$color-collection: (
  'white': hsl(0, 0%, 100%),
);
sass 的对象是 immutable, 想修改 value 需要这样写
$obj: (
  color: red,
  size: 100px,
);
$obj : map.set($obj, 'color', blue);
if else & ternay operator
@function my-function($value) {
  @if $value < 100 {
    @return 50px;
  } @else {
    @return 10px;
  }
}

h1 {
  width: my-function(30);
  height: if(30 < 100, 50px, 10px); // ternary operator
}
当 if 遇上 array (Equality Operators)
@debug (5px 7px 10px) == (5px 7px 10px); // true
@debug (7px 5px 10px) == (5px 7px 10px); // false
@debug 7px 5px 10px == 5px 7px 10px; // 7px 5px false 7px 10px
顺序也要对。
没有括弧会有鬼。所以记得一定要括弧。
$values: 5px 7px 10px;
@debug $values == (5px 7px 10px); // true
for loop
from...to
@for $i from 0 to 3
result: [0, 1, 2], 从 0 开始到 2 结束. 3 不包含在内
from...through
@for $i from 0 through 3
result: [0, 1, 2, 3], 从 0 开始到 3 结束. 3 也包含在内
常见用法
$length: 3;
@for $i from 0 to $length {
  h1:nth-child(#{$i + 1}) {
    font-size: $i;
  }
}
注:nth-child 括弧内需要 #{} 来引用 $i, font-size 值则不需要.
@each
$breakpoint: (
  sm: 640px,
  md: 768px,
  lg: 1024px,
  xl: 1280px,
  2xl: 1536px,
);
@each $bp in $breakpoint {
  .container-#{list.nth($bp, 1)} {
    max-width: list.nth($bp, 2);
  }
}
和 for loop 差不多, 也可以用来 each 出 object 的 key 哦, 它返回的是 array [key, value] 形式
array length
$breakpoints: "sm" "md" "lg";
$breakpoint-count: length($breakpoints);
array index of
@use "sass:list";

$breakpoints: "sm" "md" "lg";
$breakpoint-count: list.index($breakpoints, "sm");
.target {
  width: $breakpoint-count; /* 1 */
}
注: 如果找不到返回值不是 -1 哦, 而是直接没有 width.
Rest Parameters
@use 'sass:list';

@function abc($values...){
 @return list.nth($values, 2);
}

$value: abc(red, yellow);

* {
  color: $value; // yellow
}
和 JS 类似,只是 点点点 在后面。
Nullish Coalescing
$value1: null;
$value2: $value1 or yellow;

$value3: red;
$value4: $value3 or yellow;

* {
  color: $value2; // yellow
  color: $value4; // red
}


【推荐】编程新体验,更懂你的AI,立即体验豆包MarsCode编程助手
【推荐】凌霞软件回馈社区,博客园 & 1Panel & Halo 联合会员上线
【推荐】抖音旗下AI助手豆包,你的智能百科全书,全免费不限次数
【推荐】博客园社区专享云产品让利特惠,阿里云新客6.5折上折
【推荐】轻量又高性能的 SSH 工具 IShell:AI 加持,快人一步
· CSnakes vs Python.NET:高效嵌入与灵活互通的跨语言方案对比
· DeepSeek “源神”启动!「GitHub 热点速览」
· 我与微信审核的“相爱相杀”看个人小程序副业
· Plotly.NET 一个为 .NET 打造的强大开源交互式图表库
· 上周热点回顾(2.17-2.23)