【代码】LLaVA 代码学习与调试
代码地址:https://github.com/haotian-liu/LLaVA
感谢 b 站 @良睦路程序员 的教程
LLaVA 是一个端到端训练的大型多模态模型,旨在根据视觉输入(图像)和文本指令理解和生成内容。已经成为目前最基本、影响力最广的多模态大语言模型之一;恰好最近正在学习 LLaVA 整体结构,特此开帖记录在调试中学习代码的过程。
Prepare
本人使用 VsCode + macOS 进行代码调试,可以直接使用官方给出的 demo;
from PIL import Image import requests from transformers import AutoProcessor, LlavaForConditionalGeneration model = LlavaForConditionalGeneration.from_pretrained("llava-hf/llava-1.5-7b-hf") processor = AutoProcessor.from_pretrained("llava-hf/llava-1.5-7b-hf") prompt = "" url = "" image = Image.open(requests.get(url, stream=True).raw) inputs = processor(text=prompt, images=image, return_tensors="pt") # Generate generate_ids = model.generate(**inputs, max_length=600) response = processor.batch_decode(generate_ids, skip_special_tokens=True, clean_up_tokenization_spaces=False)[0] print(response)
注意,由于我们真正调试的是LlavaForConditionalGeneration的 forward 函数,所以要在launch.json中手动添加一行:
"justMyCode": false
最后在forward函数第一行打上断点即可开始调试。
Code review
注:所有记录均基于pretrain.sh的默认参数,如果改过可能会有不同
不会 LLaVA 的同学可以点击这里学习

纯文本
用户输入一句指令后,会有指定的 tokenizer 对其进行切分成 input_ids,LLaVA 使用的是 transformers 库中的 AutoTokenizer,在 train.py 中可以找到:
tokenizer = transformers.AutoTokenizer.from_pretrained( model_args.model_name_or_path, cache_dir=training_args.cache_dir, model_max_length=training_args.model_max_length, padding_side="right", use_fast=False, )
LLaVA使用的LLaVATrainer继承自Trainer,声明如下,可以看到传入了tokenizer
trainer = LLaVATrainer(model=model, tokenizer=tokenizer, args=training_args, **data_module)
接下来是模型对于 input_ids 的处理,也就是 LlavaLlamaForCausalLM 类,在
llava/model/language_model/llava_llama.py 中定义如下:
class LlavaLlamaForCausalLM(LlamaForCausalLM, LlavaMetaForCausalLM): config_class = LlavaConfig def __init__(self, config): super(LlamaForCausalLM, self).__init__(config) self.model = LlavaLlamaModel(config) self.pretraining_tp = config.pretraining_tp self.vocab_size = config.vocab_size self.lm_head = nn.Linear(config.hidden_size, config.vocab_size, bias=False) # Initialize weights and apply final processing self.post_init()
其继承自 LlamaForCausalLM 和 LlavaMetaForCausalLM,这里我们想看 tokens 处理,因此找 LLama 相关的即可。点击跳转后可以发现其定义如下:
class LlamaForCausalLM(LlamaPreTrainedModel): _tied_weights_keys = ["lm_head.weight"] def __init__(self, config): super().__init__(config) self.model = LlamaModel(config) self.vocab_size = config.vocab_size self.lm_head = nn.Linear(config.hidden_size, config.vocab_size, bias=False)
发现这里使用的为LlamaModel,继续点击跳转:
class LlamaModel(LlamaPreTrainedModel): """ Transformer decoder consisting of *config.num_hidden_layers* layers. Each layer is a [`LlamaDecoderLayer`] Args: config: LlamaConfig """ def __init__(self, config: LlamaConfig): super().__init__(config) self.padding_idx = config.pad_token_id self.vocab_size = config.vocab_size self.embed_tokens = nn.Embedding(config.vocab_size, config.hidden_size, self.padding_idx) self.layers = nn.ModuleList( [LlamaDecoderLayer(config, layer_idx) for layer_idx in range(config.num_hidden_layers)] ) self._use_sdpa = config._attn_implementation == "sdpa" self._use_flash_attention_2 = config._attn_implementation == "flash_attention_2" self.norm = LlamaRMSNorm(config.hidden_size, eps=config.rms_norm_eps) self.gradient_checkpointing = False # Initialize weights and apply final processing self.post_init()
其中 text embedding 对应的为第14行的定义,即 LLaVA 使用的 nn.Embedding 进行文本嵌入,在 forward 方法中,inputs_embeds 即为词嵌入的 tokens:
if inputs_embeds is None: inputs_embeds = self.embed_tokens(input_ids)
注:后续 hidden_states 会初始化为 inputs_embeds ,经过多层 transformer,自回归式地进行训练。
多模态处理
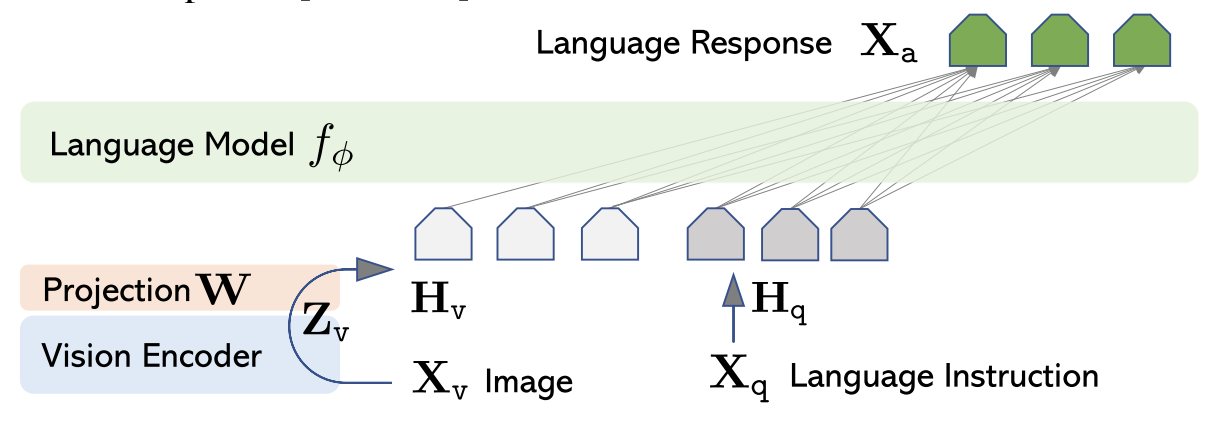
该部分是LLaVA的重点创新部分,整体逻辑为将 image token 和 text token 拼接起来一起送入LLM中。
首先看LLaVA的核心模型类 LlavaLlamaForCausalLM,由于是多模态处理,需要关注继承的 LlavaMetaForCausalLM 类:
class LlavaMetaForCausalLM(ABC): @abstractmethod def get_model(self): pass def get_vision_tower(self): return self.get_model().get_vision_tower() def encode_images(self, images): image_features = self.get_model().get_vision_tower()(images) image_features = self.get_model().mm_projector(image_features) return image_features
其中包含了对于 vision 模态的处理,而其精髓部分在于 prepare_inputs_labels_for_multimodal(也是整个 LLaVA 的核心)。我们重点关注最终返回的 new_input_embeds,跟踪其生成过程:
- 处理没有图像的单模态数据时:
if num_images == 0: cur_image_features = image_features[cur_image_idx] cur_input_embeds_1 = self.get_model().embed_tokens(cur_input_ids) cur_input_embeds = torch.cat([cur_input_embeds_1, cur_image_features[0:0]], dim=0) new_input_embeds.append(cur_input_embeds) new_labels.append(labels[batch_idx]) cur_image_idx += 1 continue
- cur_input_embeds_1 是通过模型的 embed_tokens 方法将 cur_input_ids 转换为文本嵌入。
- cur_image_features[0:0] 是一个空的张量,用于占位(因为没有图像)。
- 将文本嵌入和空的图像嵌入拼接在一起,得到 cur_input_embeds。
- 将 cur_input_embeds 添加到 new_input_embeds 中,并将对应的标签添加到 new_labels 中。
- 处理有图像的多模态数据时:
image_token_indices = [-1] + torch.where(cur_input_ids == IMAGE_TOKEN_INDEX)[0].tolist() + [cur_input_ids.shape[0]] cur_input_ids_noim = [] cur_labels = labels[batch_idx] cur_labels_noim = [] for i in range(len(image_token_indices) - 1): cur_input_ids_noim.append(cur_input_ids[image_token_indices[i]+1:image_token_indices[i+1]]) cur_labels_noim.append(cur_labels[image_token_indices[i]+1:image_token_indices[i+1]])
- 如果当前 batch 中有图像 token,首先找到所有图像 token 的位置(image_token_indices)。
- 将 cur_input_ids 和 cur_labels 按照图像 token 的位置分割成多个部分,分别存储到 cur_input_ids_noim 和 cur_labels_noim 中。
- 文本嵌入,继续沿用之前写的embed_tokens层:
split_sizes = [x.shape[0] for x in cur_labels_noim] cur_input_embeds = self.get_model().embed_tokens(torch.cat(cur_input_ids_noim)) cur_input_embeds_no_im = torch.split(cur_input_embeds, split_sizes, dim=0)
- 将分割后的 cur_input_ids_noim 拼接在一起,并通过 embed_tokens 方法生成文本嵌入 cur_input_embeds。
- 将 cur_input_embeds 按照 split_sizes 重新分割,得到 cur_input_embeds_no_im,即每个部分的文本嵌入。
- 图像的features生成
这部分 LLaVA 分为了多张图和单张图的 encode,多张图需要 concat 在一起,会考虑不同图片的空间、位置信息,encode 完还需要 split 到原始位置,但核心为使用 self.encode_images 方法进行编码:
image_features = self.encode_images(images)
该过程定义如下,使用的是训练好的ViT,也没有进行BP参数更新:
def encode_images(self, images): image_features = self.get_model().get_vision_tower()(images) image_features = self.get_model().mm_projector(image_features) return image_features
- 整合图像和文本token
cur_new_input_embeds = [] cur_new_labels = [] for i in range(num_images + 1): cur_new_input_embeds.append(cur_input_embeds_no_im[i]) cur_new_labels.append(cur_labels_noim[i]) if i < num_images: cur_image_features = image_features[cur_image_idx] cur_image_idx += 1 cur_new_input_embeds.append(cur_image_features) cur_new_labels.append(torch.full((cur_image_features.shape[0],), IGNORE_INDEX, device=cur_labels.device, dtype=cur_labels.dtype)) cur_new_input_embeds = [x.to(self.device) for x in cur_new_input_embeds] cur_new_input_embeds = torch.cat(cur_new_input_embeds) cur_new_labels = torch.cat(cur_new_labels) new_input_embeds.append(cur_new_input_embeds) new_labels.append(cur_new_labels)
- 将刚刚分离的文本和图像对应的token重新整合在一起,即 cur_new_input_embeds。
- 将 cur_new_input_embeds 中的文本嵌入和图像嵌入拼接在一起,得到当前 batch 的最终嵌入。
- 注:最后还需要维度扩展到相同,即
本文作者:KeanShi
本文链接:https://www.cnblogs.com/keanshi/p/18619263
版权声明:本作品采用知识共享署名-非商业性使用-禁止演绎 2.5 中国大陆许可协议进行许可。


【推荐】国内首个AI IDE,深度理解中文开发场景,立即下载体验Trae
【推荐】编程新体验,更懂你的AI,立即体验豆包MarsCode编程助手
【推荐】抖音旗下AI助手豆包,你的智能百科全书,全免费不限次数
【推荐】轻量又高性能的 SSH 工具 IShell:AI 加持,快人一步