【转】Redux教程
本篇文章转自阮一峰老师写的详细教程。
第一部分
一、基本概念和 API
1.1 Store
Store 就是保存数据的地方,你可以把它看成一个容器。整个应用只能有一个 Store。
Redux 提供createStore这个函数,用来生成 Store。
import { createStore } from 'redux';
const store = createStore(fn);
上面代码中,createStore函数接受另一个函数作为参数,返回新生成的 Store 对象。
1.2 State
Store对象包含所有数据。如果想得到某个时点的数据,就要对 Store 生成快照。这种时点的数据集合,就叫做 State。
当前时刻的 State,可以通过store.getState()拿到。
import { createStore } from 'redux';
const store = createStore(fn);

const state = store.getState();
Redux 规定, 一个 State 对应一个 View。只要 State 相同,View 就相同。你知道 State,就知道 View 是什么样,反之亦然。
1.3 Action
State 的变化,会导致 View 的变化。但是,用户接触不到 State,只能接触到 View。所以,State 的变化必须是 View 导致的。Action 就是 View 发出的通知,表示 State 应该要发生变化了。
Action 是一个对象。其中的type属性是必须的,表示 Action 的名称。其他属性可以自由设置,社区有一个规范可以参考。
const action = {
  type: 'ADD_TODO',
  payload: 'Learn Redux'
};
上面代码中,Action 的名称是ADD_TODO,它携带的信息是字符串Learn Redux。
可以这样理解,Action 描述当前发生的事情。改变 State 的唯一办法,就是使用 Action。它会运送数据到 Store。
1.4 Action Creator
View 要发送多少种消息,就会有多少种 Action。如果都手写,会很麻烦。可以定义一个函数来生成 Action,这个函数就叫 Action Creator。
const ADD_TODO = '添加 TODO';

function addTodo(text) {
  return {
    type: ADD_TODO,
    text
  }
}

const action = addTodo('Learn Redux');
上面代码中,addTodo函数就是一个 Action Creator。
1.5 store.dispatch()
store.dispatch()是 View 发出 Action 的唯一方法。
import { createStore } from 'redux';
const store = createStore(fn);

store.dispatch({
  type: 'ADD_TODO',
  payload: 'Learn Redux'
});
上面代码中,store.dispatch接受一个 Action 对象作为参数,将它发送出去。
结合 Action Creator,这段代码可以改写如下。
store.dispatch(addTodo('Learn Redux'));
1.6 Reducer
Store 收到 Action 以后,必须给出一个新的 State,这样 View 才会发生变化。这种 State 的计算过程就叫做 Reducer。
Reducer 是一个函数,它接受 Action 和当前 State 作为参数,返回一个新的 State。
const reducer = function (state, action) {
  // ...
  return new_state;
};
整个应用的初始状态,可以作为 State 的默认值。下面是一个实际的例子。
const defaultState = 0;
const reducer = (state = defaultState, action) => {
  switch (action.type) {
    case 'ADD':
      return state + action.payload;
    default:
      return state;
  }
};

const state = reducer(1, {
  type: 'ADD',
  payload: 2
});
上面代码中,reducer函数收到名为ADD的 Action 以后,就返回一个新的 State,作为加法的计算结果。其他运算的逻辑(比如减法),也可以根据 Action 的不同来实现。
实际应用中,Reducer 函数不用像上面这样手动调用,store.dispatch方法会触发 Reducer 的自动执行。为此,Store 需要知道 Reducer 函数,做法就是在生成 Store 的时候,将 Reducer 传入createStore方法。
import { createStore } from 'redux';
const store = createStore(reducer);
上面代码中,createStore接受 Reducer 作为参数,生成一个新的 Store。以后每当store.dispatch发送过来一个新的 Action,就会自动调用 Reducer,得到新的 State。
为什么这个函数叫做 Reducer 呢?因为它可以作为数组的reduce方法的参数。请看下面的例子,一系列 Action 对象按照顺序作为一个数组。
const actions = [
  { type: 'ADD', payload: 0 },
  { type: 'ADD', payload: 1 },
  { type: 'ADD', payload: 2 }
];

const total = actions.reduce(reducer, 0); // 3
上面代码中,数组actions表示依次有三个 Action,分别是加0、加1和加2。数组的reduce方法接受 Reducer 函数作为参数,就可以直接得到最终的状态3。
1.7 纯函数
Reducer 函数最重要的特征是,它是一个纯函数。也就是说,只要是同样的输入,必定得到同样的输出。
纯函数是函数式编程的概念,必须遵守以下一些约束。
- 不得改写参数
- 不能调用系统 I/O 的API
- 不能调用
Date.now()或者Math.random()等不纯的方法,因为每次会得到不一样的结果
由于 Reducer 是纯函数,就可以保证同样的State,必定得到同样的 View。但也正因为这一点,Reducer 函数里面不能改变 State,必须返回一个全新的对象,请参考下面的写法。
// State 是一个对象
function reducer(state, action) {
  return Object.assign({}, state, { thingToChange });
  // 或者
  return { ...state, ...newState };
}

// State 是一个数组
function reducer(state, action) {
  return [...state, newItem];
}
最好把 State 对象设成只读。你没法改变它,要得到新的 State,唯一办法就是生成一个新对象。这样的好处是,任何时候,与某个 View 对应的 State 总是一个不变的对象。
1.8 store.subscribe()
Store 允许使用store.subscribe方法设置监听函数,一旦 State 发生变化,就自动执行这个函数。
import { createStore } from 'redux';
const store = createStore(reducer);

store.subscribe(listener);
显然,只要把 View 的更新函数(对于 React 项目,就是组件的render方法或setState方法)放入listen,就会实现 View 的自动渲染。
store.subscribe方法返回一个函数,调用这个函数就可以解除监听。
let unsubscribe = store.subscribe(() =>
  console.log(store.getState())
);

unsubscribe();
二、Store 的实现
上一节介绍了 Redux 涉及的基本概念,可以发现 Store 提供了三个方法。
- store.getState()
- store.dispatch()
- store.subscribe()
import { createStore } from 'redux';
let { subscribe, dispatch, getState } = createStore(reducer);
createStore方法还可以接受第二个参数,表示 State 的最初状态。这通常是服务器给出的。
let store = createStore(todoApp, window.STATE_FROM_SERVER)
上面代码中,window.STATE_FROM_SERVER就是整个应用的状态初始值。注意,如果提供了这个参数,它会覆盖 Reducer 函数的默认初始值。
下面是createStore方法的一个简单实现,可以了解一下 Store 是怎么生成的。
const createStore = (reducer) => {
  let state;
  let listeners = [];

  const getState = () => state;

  const dispatch = (action) => {
    state = reducer(state, action);
    listeners.forEach(listener => listener());
  };

  const subscribe = (listener) => {
    listeners.push(listener);
    return () => {
      listeners = listeners.filter(l => l !== listener);
    }
  };

  dispatch({});

  return { getState, dispatch, subscribe };
};
三、Reducer 的拆分
Reducer 函数负责生成 State。由于整个应用只有一个 State 对象,包含所有数据,对于大型应用来说,这个 State 必然十分庞大,导致 Reducer 函数也十分庞大。
请看下面的例子。
const chatReducer = (state = defaultState, action = {}) => {
  const { type, payload } = action;
  switch (type) {
    case ADD_CHAT:
      return Object.assign({}, state, {
        chatLog: state.chatLog.concat(payload)
      });
    case CHANGE_STATUS:
      return Object.assign({}, state, {
        statusMessage: payload
      });
    case CHANGE_USERNAME:
      return Object.assign({}, state, {
        userName: payload
      });
    default: return state;
  }
};
上面代码中,三种 Action 分别改变 State 的三个属性。
- ADD_CHAT:
chatLog属性- CHANGE_STATUS:
statusMessage属性- CHANGE_USERNAME:
userName属性
这三个属性之间没有联系,这提示我们可以把 Reducer 函数拆分。不同的函数负责处理不同属性,最终把它们合并成一个大的 Reducer 即可。
const chatReducer = (state = defaultState, action = {}) => {
  return {
    chatLog: chatLog(state.chatLog, action),
    statusMessage: statusMessage(state.statusMessage, action),
    userName: userName(state.userName, action)
  }
};
上面代码中,Reducer 函数被拆成了三个小函数,每一个负责生成对应的属性。
这样一拆,Reducer 就易读易写多了。而且,这种拆分与 React 应用的结构相吻合:一个 React 根组件由很多子组件构成。这就是说,子组件与子 Reducer 完全可以对应。
Redux 提供了一个combineReducers方法,用于 Reducer 的拆分。你只要定义各个子 Reducer 函数,然后用这个方法,将它们合成一个大的 Reducer。
import { combineReducers } from 'redux';

const chatReducer = combineReducers({
  chatLog,
  statusMessage,
  userName
})

export default todoApp;
上面的代码通过combineReducers方法将三个子 Reducer 合并成一个大的函数。
这种写法有一个前提,就是 State 的属性名必须与子 Reducer 同名。如果不同名,就要采用下面的写法。
const reducer = combineReducers({
  a: doSomethingWithA,
  b: processB,
  c: c
})

// 等同于
function reducer(state = {}, action) {
  return {
    a: doSomethingWithA(state.a, action),
    b: processB(state.b, action),
    c: c(state.c, action)
  }
}
总之,combineReducers()做的就是产生一个整体的 Reducer 函数。该函数根据 State 的 key 去执行相应的子 Reducer,并将返回结果合并成一个大的 State 对象。
下面是combineReducer的简单实现。
const combineReducers = reducers => {
  return (state = {}, action) => {
    return Object.keys(reducers).reduce(
      (nextState, key) => {
        nextState[key] = reducers[key](state[key], action);
        return nextState;
      },
      {}
    );
  };
};
你可以把所有子 Reducer 放在一个文件里面,然后统一引入。
import { combineReducers } from 'redux'
import * as reducers from './reducers'

const reducer = combineReducers(reducers)
四、工作流程
本节对 Redux 的工作流程,做一个梳理。

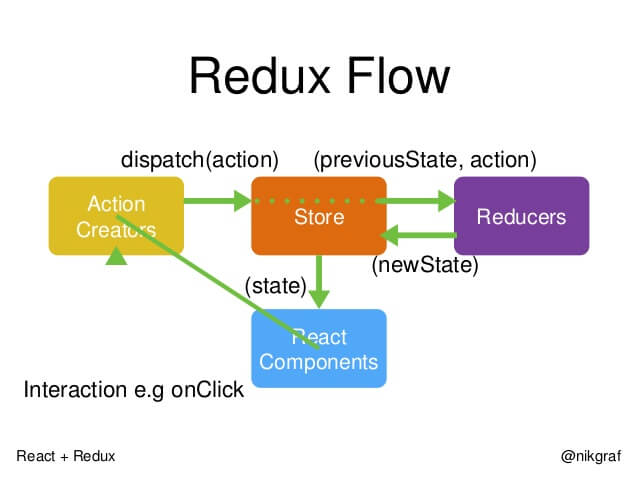
首先,用户发出 Action。
store.dispatch(action);
然后,Store 自动调用 Reducer,并且传入两个参数:当前 State 和收到的 Action。 Reducer 会返回新的 State 。
let nextState = todoApp(previousState, action);
State 一旦有变化,Store 就会调用监听函数。
// 设置监听函数
store.subscribe(listener);
listener可以通过store.getState()得到当前状态。如果使用的是 React,这时可以触发重新渲染 View。
function listerner() {
  let newState = store.getState();
  component.setState(newState);
}
五、实例:计数器
下面我们来看一个最简单的实例。
const Counter = ({ value }) => (
  <h1>{value}</h1>
);

const render = () => {
  ReactDOM.render(
    <Counter value={store.getState()}/>,
    document.getElementById('root')
  );
};

store.subscribe(render);
render();
上面是一个简单的计数器,唯一的作用就是把参数value的值,显示在网页上。Store 的监听函数设置为render,每次 State 的变化都会导致网页重新渲染。
下面加入一点变化,为Counter添加递增和递减的 Action。
const Counter = ({ value }) => (
  <h1>{value}</h1>
  <button onClick={onIncrement}>+</button>
  <button onClick={onDecrement}>-</button>
);

const reducer = (state = 0, action) => {
  switch (action.type) {
    case 'INCREMENT': return state + 1;
    case 'DECREMENT': return state - 1;
    default: return state;
  }
};

const store = createStore(reducer);

const render = () => {
  ReactDOM.render(
    <Counter
      value={store.getState()}
      onIncrement={() => store.dispatch({type: 'INCREMENT'})}
      onDecrement={() => store.dispatch({type: 'DECREMENT'})}
    />,
    document.getElementById('root')
  );
};

render();
store.subscribe(render);
第二部分
一、中间件的概念
为了理解中间件,让我们站在框架作者的角度思考问题:如果要添加功能,你会在哪个环节添加?
(1)Reducer:纯函数,只承担计算 State 的功能,不合适承担其他功能,也承担不了,因为理论上,纯函数不能进行读写操作。
(2)View:与 State 一一对应,可以看作 State 的视觉层,也不合适承担其他功能。
(3)Action:存放数据的对象,即消息的载体,只能被别人操作,自己不能进行任何操作。
想来想去,只有发送 Action 的这个步骤,即store.dispatch()方法,可以添加功能。举例来说,要添加日志功能,把 Action 和 State 打印出来,可以对store.dispatch进行如下改造。
let next = store.dispatch;
store.dispatch = function dispatchAndLog(action) {
  console.log('dispatching', action);
  next(action);
  console.log('next state', store.getState());
}
上面代码中,对store.dispatch进行了重定义,在发送 Action 前后添加了打印功能。这就是中间件的雏形。
中间件就是一个函数,对store.dispatch方法进行了改造,在发出 Action 和执行 Reducer 这两步之间,添加了其他功能。
二、中间件的用法
本教程不涉及如何编写中间件,因为常用的中间件都有现成的,只要引用别人写好的模块即可。比如,上一节的日志中间件,就有现成的redux-logger模块。这里只介绍怎么使用中间件。
import { applyMiddleware, createStore } from 'redux';
import createLogger from 'redux-logger';
const logger = createLogger();

const store = createStore(
  reducer,
  applyMiddleware(logger)
);
上面代码中,redux-logger提供一个生成器createLogger,可以生成日志中间件logger。然后,将它放在applyMiddleware方法之中,传入createStore方法,就完成了store.dispatch()的功能增强。
这里有两点需要注意:
(1)createStore方法可以接受整个应用的初始状态作为参数,那样的话,applyMiddleware就是第三个参数了。
const store = createStore(
  reducer,
  initial_state,
  applyMiddleware(logger)
);
(2)中间件的次序有讲究。
const store = createStore(
  reducer,
  applyMiddleware(thunk, promise, logger)
);
上面代码中,applyMiddleware方法的三个参数,就是三个中间件。有的中间件有次序要求,使用前要查一下文档。比如,logger就一定要放在最后,否则输出结果会不正确。
三、applyMiddlewares()
看到这里,你可能会问,applyMiddlewares这个方法到底是干什么的?
它是 Redux 的原生方法,作用是将所有中间件组成一个数组,依次执行。下面是它的源码。
export default function applyMiddleware(...middlewares) {
  return (createStore) => (reducer, preloadedState, enhancer) => {
    var store = createStore(reducer, preloadedState, enhancer);
    var dispatch = store.dispatch;
    var chain = [];

    var middlewareAPI = {
      getState: store.getState,
      dispatch: (action) => dispatch(action)
    };
    chain = middlewares.map(middleware => middleware(middlewareAPI));
    dispatch = compose(...chain)(store.dispatch);

    return {...store, dispatch}
  }
}
上面代码中,所有中间件被放进了一个数组chain,然后嵌套执行,最后执行store.dispatch。可以看到,中间件内部(middlewareAPI)可以拿到getState和dispatch这两个方法。
四、异步操作的基本思路
理解了中间件以后,就可以处理异步操作了。
同步操作只要发出一种 Action 即可,异步操作的差别是它要发出三种 Action。
- 操作发起时的 Action
- 操作成功时的 Action
- 操作失败时的 Action
以向服务器取出数据为例,三种 Action 可以有两种不同的写法。
// 写法一:名称相同,参数不同
{ type: 'FETCH_POSTS' }
{ type: 'FETCH_POSTS', status: 'error', error: 'Oops' }
{ type: 'FETCH_POSTS', status: 'success', response: { ... } }

// 写法二:名称不同
{ type: 'FETCH_POSTS_REQUEST' }
{ type: 'FETCH_POSTS_FAILURE', error: 'Oops' }
{ type: 'FETCH_POSTS_SUCCESS', response: { ... } }
除了 Action 种类不同,异步操作的 State 也要进行改造,反映不同的操作状态。下面是 State 的一个例子。
let state = {
  // ...
  isFetching: true,
  didInvalidate: true,
  lastUpdated: 'xxxxxxx'
};
上面代码中,State 的属性isFetching表示是否在抓取数据。didInvalidate表示数据是否过时,lastUpdated表示上一次更新时间。
现在,整个异步操作的思路就很清楚了。
- 操作开始时,送出一个 Action,触发 State 更新为"正在操作"状态,View 重新渲染
- 操作结束后,再送出一个 Action,触发 State 更新为"操作结束"状态,View 再一次重新渲染
五、redux-thunk 中间件
异步操作至少要送出两个 Action:用户触发第一个 Action,这个跟同步操作一样,没有问题;如何才能在操作结束时,系统自动送出第二个 Action 呢?
奥妙就在 Action Creator 之中。
class AsyncApp extends Component {
  componentDidMount() {
    const { dispatch, selectedPost } = this.props
    dispatch(fetchPosts(selectedPost))
  }

// ...
上面代码是一个异步组件的例子。加载成功后(componentDidMount方法),它送出了(dispatch方法)一个 Action,向服务器要求数据 fetchPosts(selectedSubreddit)。这里的fetchPosts就是 Action Creator。
下面就是fetchPosts的代码,关键之处就在里面。

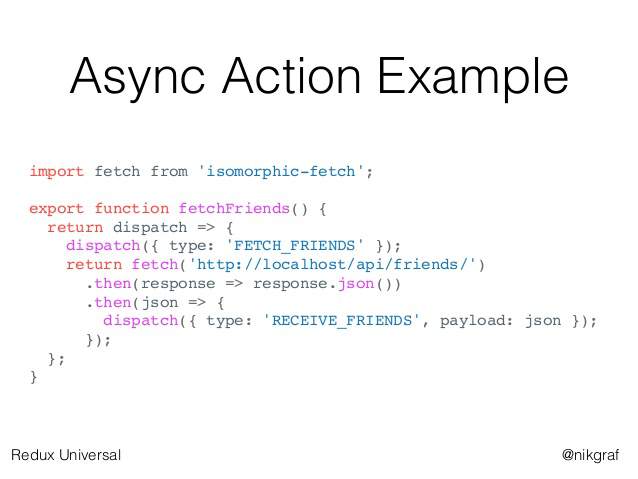
const fetchPosts = postTitle => (dispatch, getState) => {
  dispatch(requestPosts(postTitle));
  return fetch(`/some/API/${postTitle}.json`)
    .then(response => response.json())
    .then(json => dispatch(receivePosts(postTitle, json)));
  };
};

// 使用方法一
store.dispatch(fetchPosts('reactjs'));
// 使用方法二
store.dispatch(fetchPosts('reactjs')).then(() =>
  console.log(store.getState())
);
上面代码中,fetchPosts是一个Action Creator(动作生成器),返回一个函数。这个函数执行后,先发出一个Action(requestPosts(postTitle)),然后进行异步操作。拿到结果后,先将结果转成 JSON 格式,然后再发出一个 Action( receivePosts(postTitle, json))。
上面代码中,有几个地方需要注意。
(1)
fetchPosts返回了一个函数,而普通的 Action Creator 默认返回一个对象。(2)返回的函数的参数是
dispatch和getState这两个 Redux 方法,普通的 Action Creator 的参数是 Action 的内容。(3)在返回的函数之中,先发出一个 Action(
requestPosts(postTitle)),表示操作开始。(4)异步操作结束之后,再发出一个 Action(
receivePosts(postTitle, json)),表示操作结束。
这样的处理,就解决了自动发送第二个 Action 的问题。但是,又带来了一个新的问题,Action 是由store.dispatch方法发送的。而store.dispatch方法正常情况下,参数只能是对象,不能是函数。
这时,就要使用中间件redux-thunk。
import { createStore, applyMiddleware } from 'redux';
import thunk from 'redux-thunk';
import reducer from './reducers';

// Note: this API requires redux@>=3.1.0
const store = createStore(
  reducer,
  applyMiddleware(thunk)
);
上面代码使用redux-thunk中间件,改造store.dispatch,使得后者可以接受函数作为参数。
因此,异步操作的第一种解决方案就是,写出一个返回函数的 Action Creator,然后使用redux-thunk中间件改造store.dispatch。
六、redux-promise 中间件
既然 Action Creator 可以返回函数,当然也可以返回其他值。另一种异步操作的解决方案,就是让 Action Creator 返回一个 Promise 对象。
这就需要使用redux-promise中间件。
import { createStore, applyMiddleware } from 'redux';
import promiseMiddleware from 'redux-promise';
import reducer from './reducers';

const store = createStore(
  reducer,
  applyMiddleware(promiseMiddleware)
);
这个中间件使得store.dispatch方法可以接受 Promise 对象作为参数。这时,Action Creator 有两种写法。写法一,返回值是一个 Promise 对象。
const fetchPosts =
  (dispatch, postTitle) => new Promise(function (resolve, reject) {
     dispatch(requestPosts(postTitle));
     return fetch(`/some/API/${postTitle}.json`)
       .then(response => {
         type: 'FETCH_POSTS',
         payload: response.json()
       });
});
写法二,Action 对象的payload属性是一个 Promise 对象。这需要从redux-actions模块引入createAction方法,并且写法也要变成下面这样。
import { createAction } from 'redux-actions';

class AsyncApp extends Component {
  componentDidMount() {
    const { dispatch, selectedPost } = this.props
    // 发出同步 Action
    dispatch(requestPosts(selectedPost));
    // 发出异步 Action
    dispatch(createAction(
      'FETCH_POSTS',
      fetch(`/some/API/${postTitle}.json`)
        .then(response => response.json())
    ));
  }
上面代码中,第二个dispatch方法发出的是异步 Action,只有等到操作结束,这个 Action 才会实际发出。注意,createAction的第二个参数必须是一个 Promise 对象。
看一下redux-promise的源码,就会明白它内部是怎么操作的。
export default function promiseMiddleware({ dispatch }) {
  return next => action => {
    if (!isFSA(action)) {
      return isPromise(action)
        ? action.then(dispatch)
        : next(action);
    }

    return isPromise(action.payload)
      ? action.payload.then(
          result => dispatch({ ...action, payload: result }),
          error => {
            dispatch({ ...action, payload: error, error: true });
            return Promise.reject(error);
          }
        )
      : next(action);
  };
}
从上面代码可以看出,如果 Action 本身是一个 Promise,它 resolve 以后的值应该是一个 Action 对象,会被dispatch方法送出(action.then(dispatch)),但 reject 以后不会有任何动作;如果 Action 对象的payload属性是一个 Promise 对象,那么无论 resolve 和 reject,dispatch方法都会发出 Action。
第三部分
一、UI 组件
React-Redux 将所有组件分成两大类:UI 组件(presentational component)和容器组件(container component)。
UI 组件有以下几个特征。
- 只负责 UI 的呈现,不带有任何业务逻辑
- 没有状态(即不使用
this.state这个变量)- 所有数据都由参数(
this.props)提供- 不使用任何 Redux 的 API
下面就是一个 UI 组件的例子。
const Title =
  value => <h1>{value}</h1>;
因为不含有状态,UI 组件又称为"纯组件",即它纯函数一样,纯粹由参数决定它的值。
二、容器组件
容器组件的特征恰恰相反。
- 负责管理数据和业务逻辑,不负责 UI 的呈现
- 带有内部状态
- 使用 Redux 的 API
总之,只要记住一句话就可以了:UI 组件负责 UI 的呈现,容器组件负责管理数据和逻辑。
你可能会问,如果一个组件既有 UI 又有业务逻辑,那怎么办?回答是,将它拆分成下面的结构:外面是一个容器组件,里面包了一个UI 组件。前者负责与外部的通信,将数据传给后者,由后者渲染出视图。
React-Redux 规定,所有的 UI 组件都由用户提供,容器组件则是由 React-Redux 自动生成。也就是说,用户负责视觉层,状态管理则是全部交给它。
三、connect()
React-Redux 提供connect方法,用于从 UI 组件生成容器组件。connect的意思,就是将这两种组件连起来。
import { connect } from 'react-redux'
const VisibleTodoList = connect()(TodoList);
上面代码中,TodoList是 UI 组件,VisibleTodoList就是由 React-Redux 通过connect方法自动生成的容器组件。
但是,因为没有定义业务逻辑,上面这个容器组件毫无意义,只是 UI 组件的一个单纯的包装层。为了定义业务逻辑,需要给出下面两方面的信息。
(1)输入逻辑:外部的数据(即
state对象)如何转换为 UI 组件的参数(2)输出逻辑:用户发出的动作如何变为 Action 对象,从 UI 组件传出去。
因此,connect方法的完整 API 如下。
import { connect } from 'react-redux'

const VisibleTodoList = connect(
  mapStateToProps,
  mapDispatchToProps
)(TodoList)
上面代码中,connect方法接受两个参数:mapStateToProps和mapDispatchToProps。它们定义了 UI 组件的业务逻辑。前者负责输入逻辑,即将state映射到 UI 组件的参数(props),后者负责输出逻辑,即将用户对 UI 组件的操作映射成 Action。
四、mapStateToProps()
mapStateToProps是一个函数。它的作用就是像它的名字那样,建立一个从(外部的)state对象到(UI 组件的)props对象的映射关系。
作为函数,mapStateToProps执行后应该返回一个对象,里面的每一个键值对就是一个映射。请看下面的例子。
const mapStateToProps = (state) => {
  return {
    todos: getVisibleTodos(state.todos, state.visibilityFilter)
  }
}
上面代码中,mapStateToProps是一个函数,它接受state作为参数,返回一个对象。这个对象有一个todos属性,代表 UI 组件的同名参数,后面的getVisibleTodos也是一个函数,可以从state算出 todos 的值。
下面就是getVisibleTodos的一个例子,用来算出todos。
const getVisibleTodos = (todos, filter) => {
  switch (filter) {
    case 'SHOW_ALL':
      return todos
    case 'SHOW_COMPLETED':
      return todos.filter(t => t.completed)
    case 'SHOW_ACTIVE':
      return todos.filter(t => !t.completed)
    default:
      throw new Error('Unknown filter: ' + filter)
  }
}
mapStateToProps会订阅 Store,每当state更新的时候,就会自动执行,重新计算 UI 组件的参数,从而触发 UI 组件的重新渲染。
mapStateToProps的第一个参数总是state对象,还可以使用第二个参数,代表容器组件的props对象。
// 容器组件的代码
//    <FilterLink filter="SHOW_ALL">
//      All
//    </FilterLink>

const mapStateToProps = (state, ownProps) => {
  return {
    active: ownProps.filter === state.visibilityFilter
  }
}
使用ownProps作为参数后,如果容器组件的参数发生变化,也会引发 UI 组件重新渲染。
connect方法可以省略mapStateToProps参数,那样的话,UI 组件就不会订阅Store,就是说 Store 的更新不会引起 UI 组件的更新。
五、mapDispatchToProps()
mapDispatchToProps是connect函数的第二个参数,用来建立 UI 组件的参数到store.dispatch方法的映射。也就是说,它定义了哪些用户的操作应该当作 Action,传给 Store。它可以是一个函数,也可以是一个对象。
如果mapDispatchToProps是一个函数,会得到dispatch和ownProps(容器组件的props对象)两个参数。
const mapDispatchToProps = (
  dispatch,
  ownProps
) => {
  return {
    onClick: () => {
      dispatch({
        type: 'SET_VISIBILITY_FILTER',
        filter: ownProps.filter
      });
    }
  };
}
从上面代码可以看到,mapDispatchToProps作为函数,应该返回一个对象,该对象的每个键值对都是一个映射,定义了 UI 组件的参数怎样发出 Action。
如果mapDispatchToProps是一个对象,它的每个键名也是对应 UI 组件的同名参数,键值应该是一个函数,会被当作 Action creator ,返回的 Action 会由 Redux 自动发出。举例来说,上面的mapDispatchToProps写成对象就是下面这样。
const mapDispatchToProps = {
  onClick: (filter) => {
    type: 'SET_VISIBILITY_FILTER',
    filter: filter
  };
}
六、<Provider> 组件
connect方法生成容器组件以后,需要让容器组件拿到state对象,才能生成 UI 组件的参数。
一种解决方法是将state对象作为参数,传入容器组件。但是,这样做比较麻烦,尤其是容器组件可能在很深的层级,一级级将state传下去就很麻烦。
React-Redux 提供Provider组件,可以让容器组件拿到state。
import { Provider } from 'react-redux'
import { createStore } from 'redux'
import todoApp from './reducers'
import App from './components/App'

let store = createStore(todoApp);

render(
  <Provider store={store}>
    <App />
  </Provider>,
  document.getElementById('root')
)
上面代码中,Provider在根组件外面包了一层,这样一来,App的所有子组件就默认都可以拿到state了。
它的原理是React组件的context属性,请看源码。
class Provider extends Component {
  getChildContext() {
    return {
      store: this.props.store
    };
  }
  render() {
    return this.props.children;
  }
}

Provider.childContextTypes = {
  store: React.PropTypes.object
}
上面代码中,store放在了上下文对象context上面。然后,子组件就可以从context拿到store,代码大致如下。
class VisibleTodoList extends Component {
  componentDidMount() {
    const { store } = this.context;
    this.unsubscribe = store.subscribe(() =>
      this.forceUpdate()
    );
  }

  render() {
    const props = this.props;
    const { store } = this.context;
    const state = store.getState();
    // ...
  }
}

VisibleTodoList.contextTypes = {
  store: React.PropTypes.object
}
React-Redux自动生成的容器组件的代码,就类似上面这样,从而拿到store。
七、实例:计数器
我们来看一个实例。下面是一个计数器组件,它是一个纯的 UI 组件。
class Counter extends Component {
  render() {
    const { value, onIncreaseClick } = this.props
    return (
      <div>
        <span>{value}</span>
        <button onClick={onIncreaseClick}>Increase</button>
      </div>
    )
  }
}
上面代码中,这个 UI 组件有两个参数:value和onIncreaseClick。前者需要从state计算得到,后者需要向外发出 Action。
接着,定义value到state的映射,以及onIncreaseClick到dispatch的映射。
function mapStateToProps(state) {
  return {
    value: state.count
  }
}

function mapDispatchToProps(dispatch) {
  return {
    onIncreaseClick: () => dispatch(increaseAction)
  }
}

// Action Creator
const increaseAction = { type: 'increase' }
然后,使用connect方法生成容器组件。
const App = connect(
  mapStateToProps,
  mapDispatchToProps
)(Counter)
然后,定义这个组件的 Reducer。
// Reducer
function counter(state = { count: 0 }, action) {
  const count = state.count
  switch (action.type) {
    case 'increase':
      return { count: count + 1 }
    default:
      return state
  }
}
最后,生成store对象,并使用Provider在根组件外面包一层。
import { loadState, saveState } from './localStorage';

const persistedState = loadState();
const store = createStore(
  todoApp,
  persistedState
);

store.subscribe(throttle(() => {
  saveState({
    todos: store.getState().todos,
  })
}, 1000))

ReactDOM.render(
  <Provider store={store}>
    <App />
  </Provider>,
  document.getElementById('root')
);
完整的代码看这里。
八、React-Router 路由库
使用React-Router的项目,与其他项目没有不同之处,也是使用Provider在Router外面包一层,毕竟Provider的唯一功能就是传入store对象。
const Root = ({ store }) => (
  <Provider store={store}>
    <Router>
      <Route path="/" component={App} />
    </Router>
  </Provider>
);
【笔记】


