三层交换配置实验
场景1-废铁级
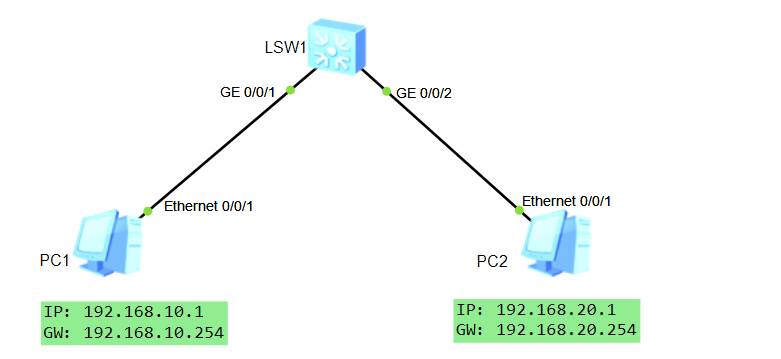
两台不同网段的PC,连接到同一台三层交换交换机,要实现PC间的跨网段通信。
通信思路:
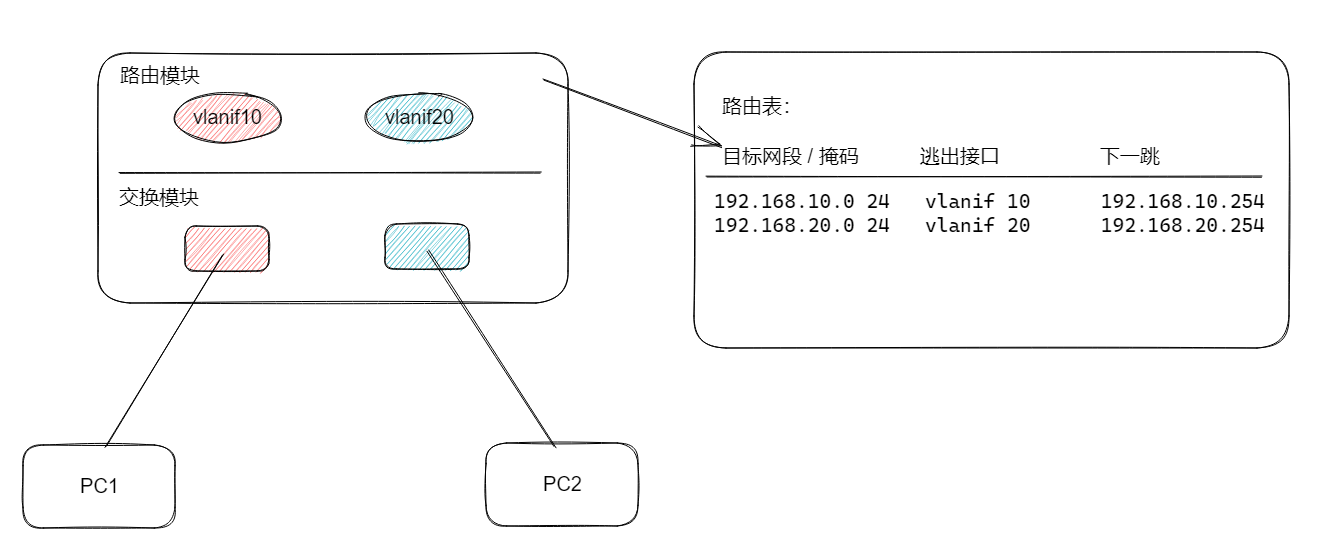
让PC1、PC2能找到各自的网关,PC间发生跨网段通信时,PC将数据交给网关(Vlanif),三层交换机根据Vlanif产生的直连路由进行数据转发。
VLANif 只有物理和协议双up才能产生直连路由
VLANif 生效的条件:
相应VLAN下要有激活的 access接口。
相应VLAN下要有激活的Trunk接口,并且允许该VLAN通过。
配置思路:
根据目前所学内容,分析交换机的二三层配置:
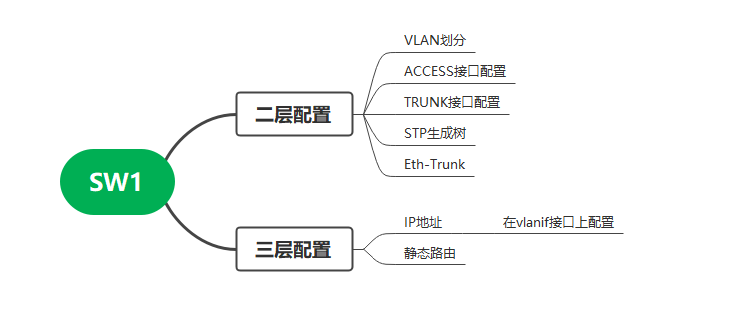
# 二层配置: # vlan vlan batch 10 20 # access接口配置 # interface GigabitEthernet0/0/1 port link-type access port default vlan 10 # interface GigabitEthernet0/0/2 port link-type access port default vlan 20 # 三层配置: # IP地址,在vlanif上配置三层接口,会产生直连路由 interface Vlanif10 ip address 192.168.10.254 255.255.255.0 # interface Vlanif20 ip address 192.168.20.254 255.255.255.0
查看SW1的路由表,此时可以看见 vlanif10 和 vlanif20在配置生效后,产生的直连路由:
[SW1]dis ip routing-table
Route Flags: R - relay, D - download to fib
------------------------------------------------------------------------------
Routing Tables: Public
Destinations : 6 Routes : 6
Destination/Mask Proto Pre Cost Flags NextHop Interface
192.168.10.0/24 Direct 0 0 D 192.168.10.254 Vlanif10
192.168.10.254/32 Direct 0 0 D 127.0.0.1 Vlanif10
192.168.20.0/24 Direct 0 0 D 192.168.20.254 Vlanif20
192.168.20.254/32 Direct 0 0 D 127.0.0.1 Vlanif20
需要注意的是,路由的出接口都是虚拟的vlanif接口,所以我们在配置静态路由的时候,出接口也应该配置为 vlanif接口。
最终能实现 vlan10 和 vlan20 用户的数据通信
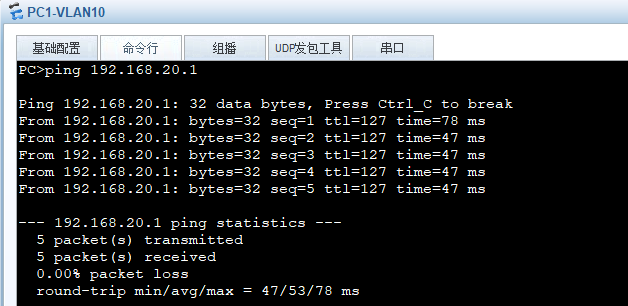
场景2-青铜级
青铜1

场景描述:
PC1 和PC2连接到接入交换机SW2,SW2为二层交换机,不能提供网关和路由,需要将网关配置在SW1上,并在SW1上配置路由
通信思路:
让PC1、PC2能找到各自的网关,PC间发生跨网段通信时,PC将数据交给网关(Vlanif),三层交换机根据Vlanif产生的直连路由进行数据转发。
此时PC1、PC2和它们各自的网关直接有一台二层交换机,SW2和SW1直接有唯一的链路,这条链路支持了VLAN10、VLAN20的数据由SW2到SW1,所以需要配置为Trunk链路!
配置思路:
分析各台设备的二三层技术
# 二层技术配置 ------------------------------------------------------------------------------ # SW2 # vlan vlan batch 10 20 # access # interface Ethernet0/0/1 port link-type access port default vlan 10 # interface Ethernet0/0/2 port link-type access port default vlan 20 # Trunk interface GigabitEthernet0/0/1 port link-type trunk port trunk allow-pass vlan 10 20 # SW1 # vlan vlan batch 10 20 # Trunk链路 interface GigabitEthernet0/0/1 port link-type trunk port trunk allow-pass vlan 10 20 # 三层技术配置 ------------------------------------------------------------------------------ # IP地址,在vlanif上配置三层接口,会产生直连路由 interface Vlanif10 ip address 192.168.10.254 255.255.255.0 # interface Vlanif20 ip address 192.168.20.254 255.255.255.0
查看SW1的路由表,此时可以看见 vlanif10 和 vlanif20在配置生效后,产生的直连路由:
[SW1]dis ip routing-table
Route Flags: R - relay, D - download to fib
------------------------------------------------------------------------------
Routing Tables: Public
Destinations : 6 Routes : 6
Destination/Mask Proto Pre Cost Flags NextHop Interface
192.168.10.0/24 Direct 0 0 D 192.168.10.254 Vlanif10
192.168.10.254/32 Direct 0 0 D 127.0.0.1 Vlanif10
192.168.20.0/24 Direct 0 0 D 192.168.20.254 Vlanif20
192.168.20.254/32 Direct 0 0 D 127.0.0.1 Vlanif20
PC到各自网关连通性测试:
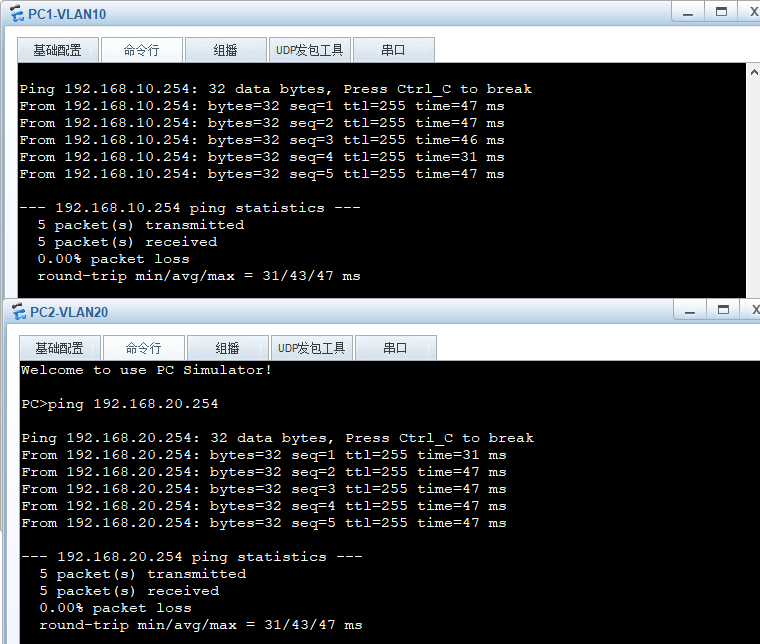
PC间跨网段通信:
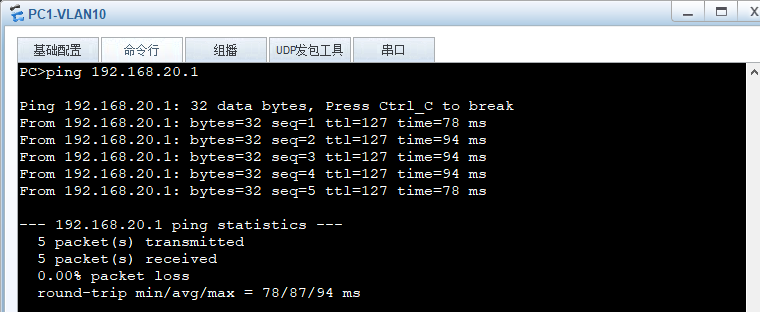
青铜2

三层交换机和路由器的互通实验,实现PC1、PC2、PC3之间的互通
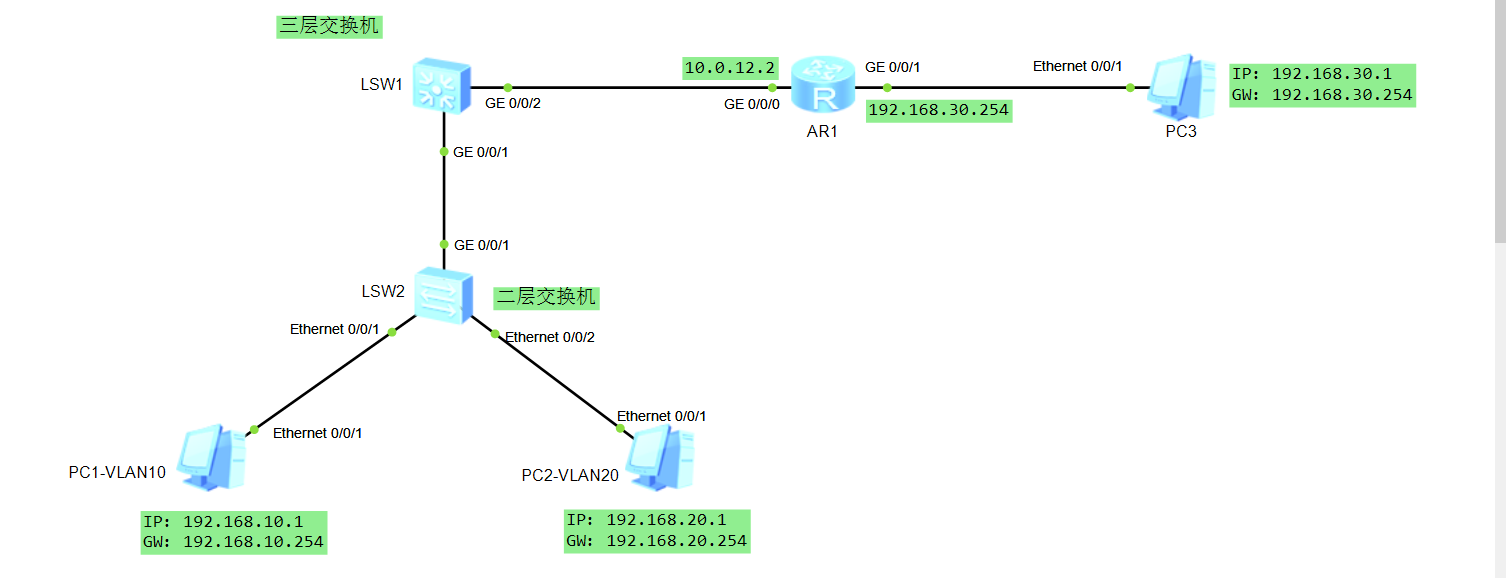
根据基本信息,交换机部分不动,先配置PC3及AR1。
# AR1 IP地址的配置
#
interface GigabitEthernet0/0/0
 ip address 10.0.12.2 255.255.255.0
#
interface GigabitEthernet0/0/1
 ip address 192.168.30.254 255.255.255.0
AR1要想把PC3网段的数据发给PC1和PC2,需要有这两个网段的路由:
现在设定 SW1(即对端设备)的下一跳IP地址是 10.0.12.1
# AR1上路由的配置
ip route-static 192.168.10.0 24 GigabitEthernet 0/0/0  10.0.12.1
ip route-static 192.168.20.0 24 GigabitEthernet 0/0/0  10.0.12.1
-
关于“下一跳” 10.0.12.1
首先尝试将 G0/0/2的接口,配置IP地址为 10.0.12.1,发现该接口虽然可以配置为三层接口,但是不支持配置IP地址

所以需要配置一个虚拟接口,然后让来自R1的数据通过G0/0/2接口,找到这个虚拟接口即可:
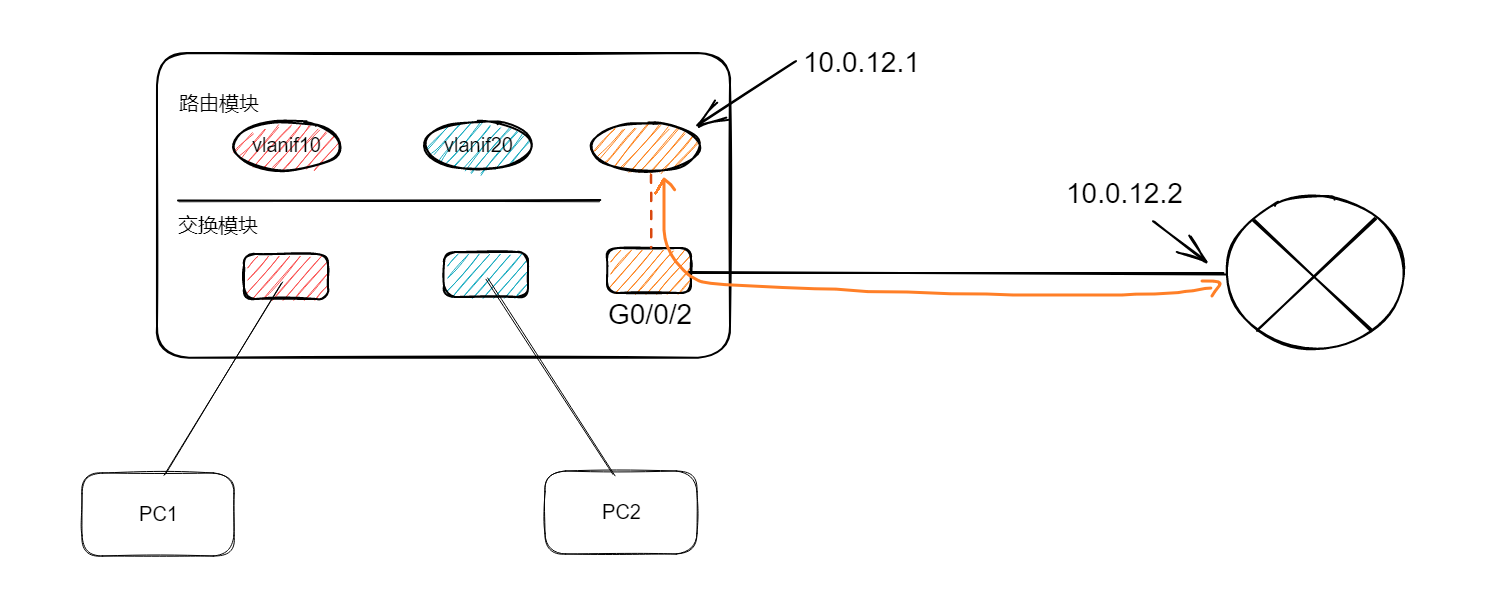
将这个虚拟接口,新定义一个vlanif接口,如 vlanif 12
# SW1上的配置 vlan batch 12 interface GigabitEthernet 0/0/2 port link-type access port default vlan 12 interface vlanif 12 ip address 10.0.12.1 255.255.255.0
SW1上配置了vlanif12,有正确的IP地址, 由于G0/0/2是vlan12的成员接口,于是 vlanif12被激活,SW1的路由表目前如下:
[SW1]dis ip routing-table
Route Flags: R - relay, D - download to fib
------------------------------------------------------------------------------
Routing Tables: Public
Destinations : 8 Routes : 8
Destination/Mask Proto Pre Cost Flags NextHop Interface
10.0.12.0/24 Direct 0 0 D 10.0.12.1 Vlanif12
10.0.12.1/32 Direct 0 0 D 127.0.0.1 Vlanif12
192.168.10.0/24 Direct 0 0 D 192.168.10.254 Vlanif10
192.168.10.254/32 Direct 0 0 D 127.0.0.1 Vlanif10
192.168.20.0/24 Direct 0 0 D 192.168.20.254 Vlanif20
192.168.20.254/32 Direct 0 0 D 127.0.0.1 Vlanif20
目前SW1的路由表上只有三个VLANif接口生成的直连路由,SW1要把来自于PC1和PC2的数据发到 PC3,即192.168.30.0网段,需要在配置静态路由,注意逃出接口配置为 VLANif12:
ip route-static 192.168.30.0 255.255.255.0 Vlanif12 10.0.12.2
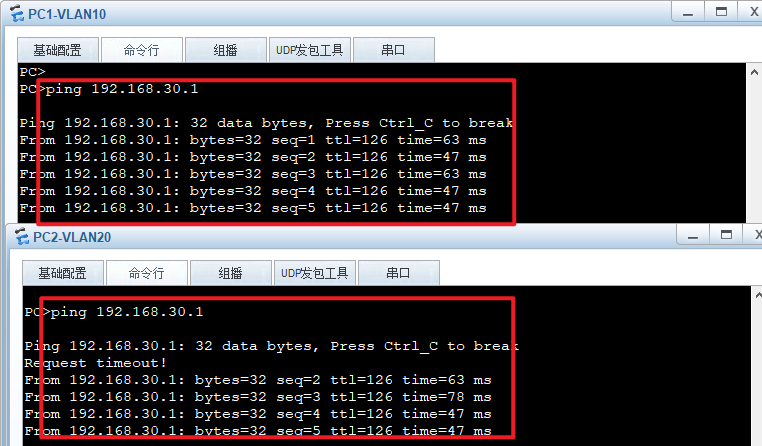
PC间通信测试:
场景3-白银级
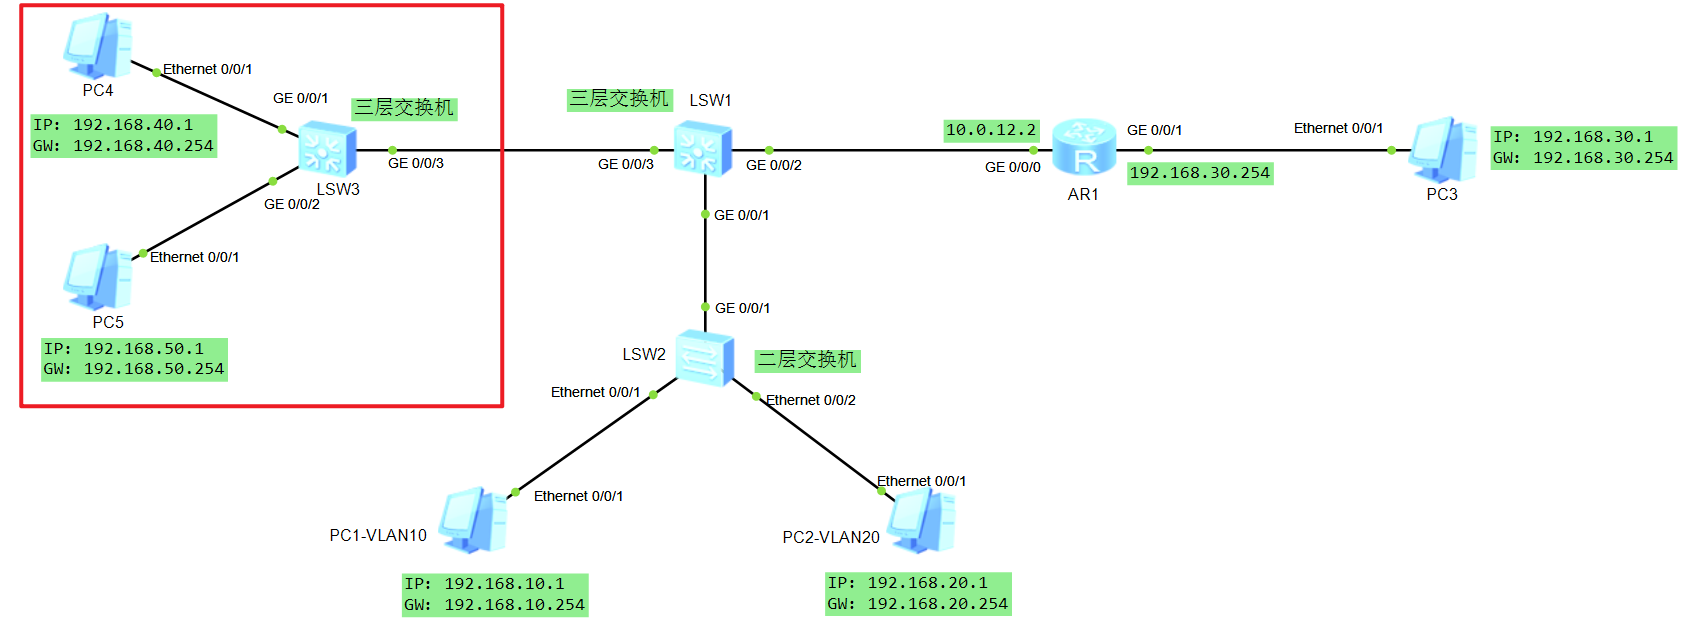
配置需求:完成PC1-PC5之间所有终端设备的互通。
-
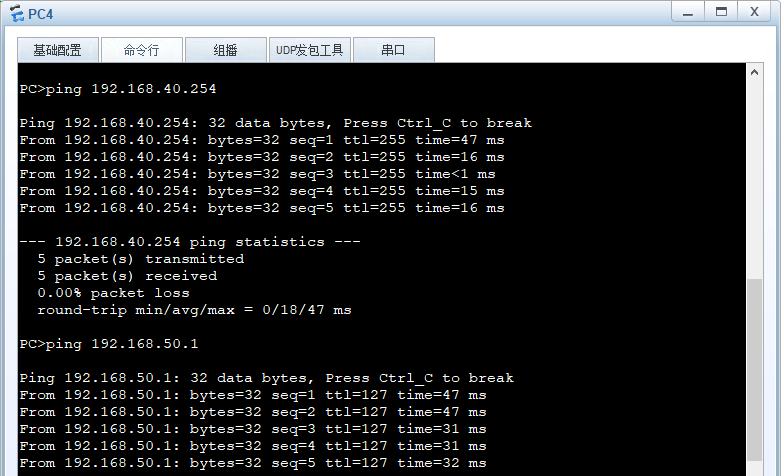
分析1:根据就近原则,先实现PC4、PC5之间互通,参照场景1即可
具体配置如下:
# 二层配置
# ## vlan
vlan batch 40 50
# ## access链路
interface GigabitEthernet 0/0/1
 port link-type access
 port default vlan 40
#
interface GiagbitEthernet 0/0/2
 port link-type access
 port default vlan 50

# 三层配置
# ## vlanif接口
interface vlanif40
 ip address 192.168.40.254 255.255.255.0
interface vlanif50
 ip address 192.168.50.254 255.255.255.0
-
分析2,两台交换机之间,需要像路由器一样,中间的链路和接口IP,能组成一个局域网

-
如何让SW3与SW1连接组成局域网?

两台交换机之间,配置相同的 vlanif,即可组成局域网,解决方案有很多:
最终选择在SW3上创建vlanif12:
# SW3
vlan batch 12
#
interface GigabitEthernet0/0/3
 port link-type access
 port default vlan 12
#
interface Vlanif12
 ip address 10.0.12.3 255.255.255.0
同时需要考虑SW1连接SW3的接口G0/0/3:
# SW1
interface GigabitEthernet0/0/3
 port link-type access
 port default vlan 12
-
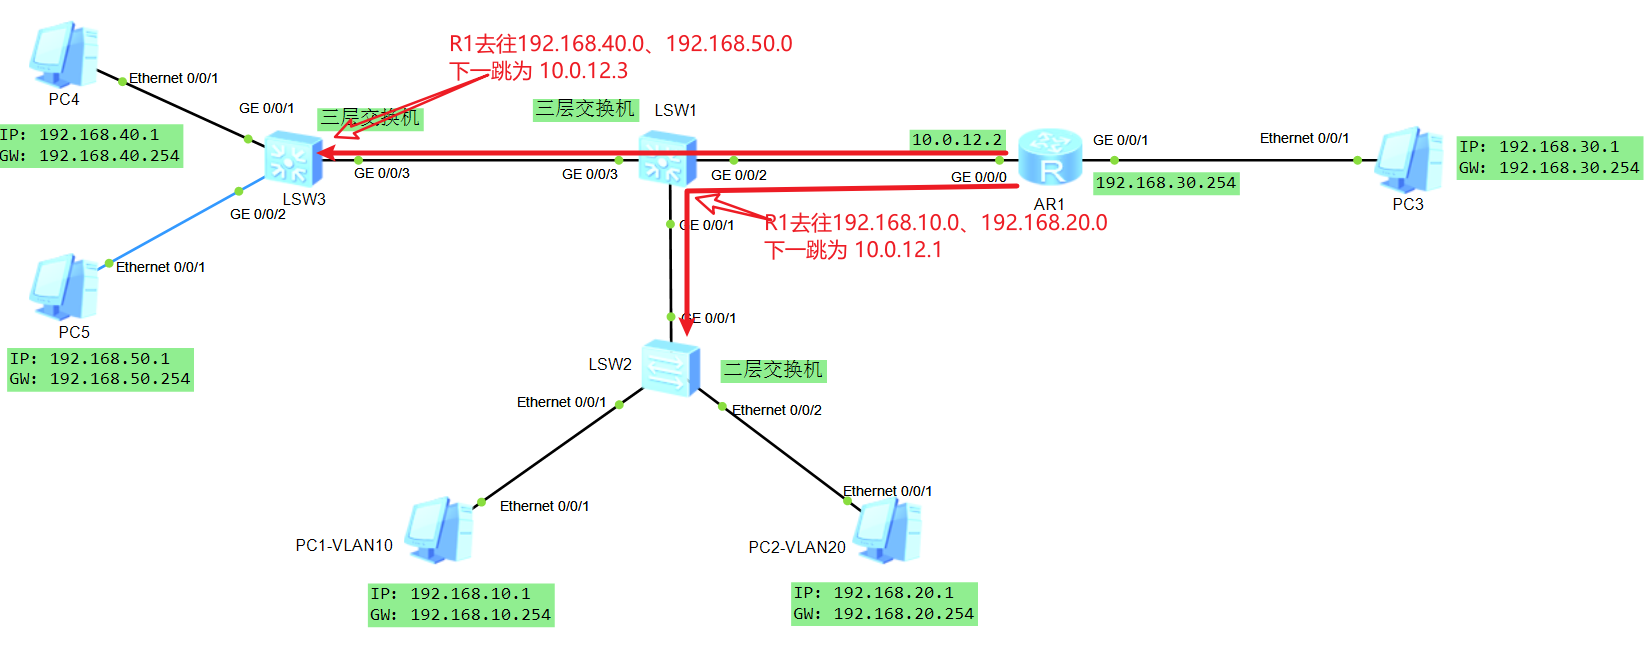
此时逻辑拓扑如下:

要实现各个网段间互通,在SW1、SW3和R1上配置静态路由即可:
-
SW1
ip route-static 192.168.40.0 24 Vlanif 12 10.0.12.3
ip route-static 192.168.50.0 24 Vlanif 12 10.0.12.3
-
SW3
注意去往SW1网段的路由,下一跳为10.0.12.1,去往R1网段的路由,下一跳为10.0.12.2
# 去往192.168.10.0、192.168.20.0、
ip route-static 192.168.10.0 24 Vlanif 12 10.0.12.1
ip route-static 192.168.20.0 24 Vlanif 12 10.0.12.1
# 去往192.168.30.0网段
ip route-static 192.168.30.0 24 Vlanif 12 10.0.12.2
-
R1
# 去往192.168.40.0 192.168.50.0 注意下一跳为10.0.12.3
ip route-static 192.168.40.0 24 GigabitEthernet 0/0/0 10.0.12.3
ip route-static 192.168.50.0 24 GigabitEthernet 0/0/0 10.0.12.3
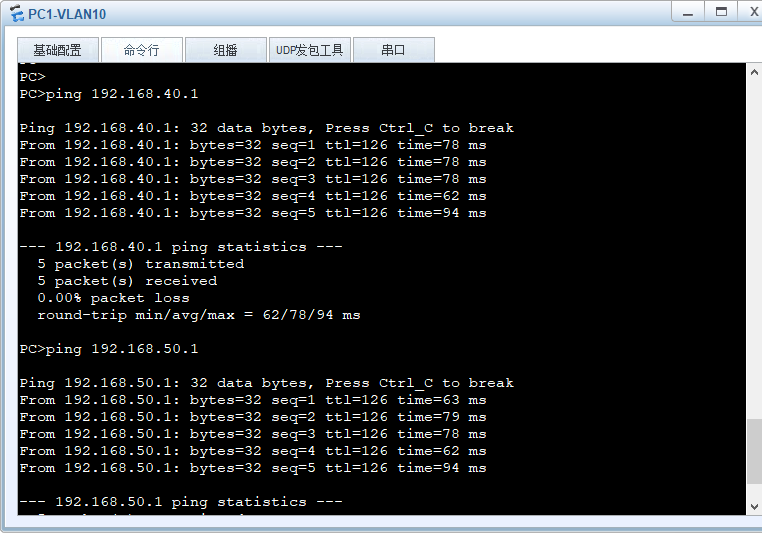
通信测试:
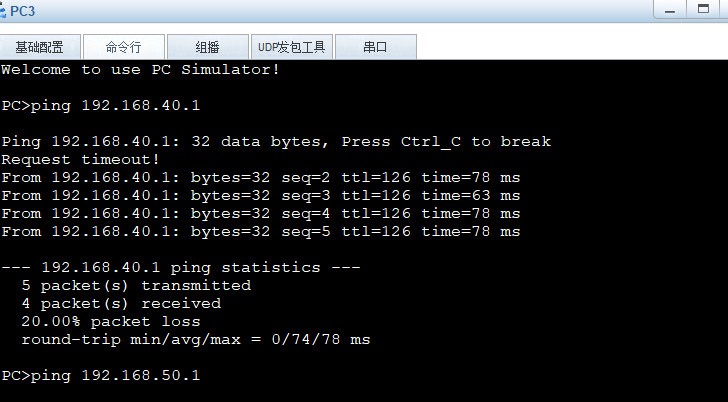
PC1-->PC4、PC5
PC3-->PC4、PC5
