异步执行任务SimpleAsyncTaskExecutor详解
SimpleAsyncTaskExecutor
异步执行用户任务的SimpleAsyncTaskExecutor。每次执行客户提交给它的任务时,它会启动新的线程,并允许开发者控制并发线程的上限(concurrencyLimit),从而起到一定的资源节流作用。默认时,concurrencyLimit取值为-1,即不启用资源节流。
<bean id="simpleAsyncTaskExecutor"
    class="org.springframework.core.task.SimpleAsyncTaskExecutor">
    <property name="daemon" value="true"/>
    <property name="concurrencyLimit" value="2"/>
    <property name="threadNamePrefix" value="simpleAsyncTaskExecutor"/>
</bean>
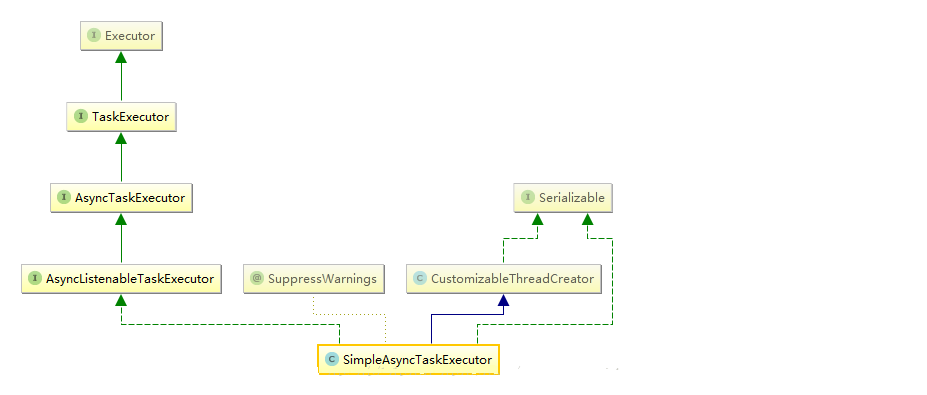
详细图

简单图
主要实现
    public class SimpleAsyncTaskExecutor extends CustomizableThreadCreator implements AsyncListenableTaskExecutor, Serializable {
    //限流主要实现
    private final SimpleAsyncTaskExecutor.ConcurrencyThrottleAdapter concurrencyThrottle = new SimpleAsyncTaskExecutor.ConcurrencyThrottleAdapter();
    private ThreadFactory threadFactory;
    //设置最大的线程数量
    public void setConcurrencyLimit(int concurrencyLimit) {
            this.concurrencyThrottle.setConcurrencyLimit(concurrencyLimit);
    }
    //是否开启了限流 限流数量大于0?
    public final boolean isThrottleActive() {
            return this.concurrencyThrottle.isThrottleActive();
    }
    //1.是否开启限流 否则不开启限流处理
    //2.执行开始之前检测是否可以满足要求 当前数量++
    //3.开启限流将执行的Runable进行封装,执行完成调用final方法 当前数量--
    public void execute(Runnable task, long startTimeout) {
            Assert.notNull(task, "Runnable must not be null");
            if(this.isThrottleActive() && startTimeout > 0L) {
                this.concurrencyThrottle.beforeAccess();
                this.doExecute(new SimpleAsyncTaskExecutor.ConcurrencyThrottlingRunnable(task));
            } else {
                this.doExecute(task);
            }
      }
     //异步提交有返回值
    public Future<?> submit(Runnable task) {
          FutureTask future = new FutureTask(task, (Object)null);
          this.execute(future, 9223372036854775807L);
          return future;
      }

      public <T> Future<T> submit(Callable<T> task) {
          FutureTask future = new FutureTask(task);
          this.execute(future, 9223372036854775807L);
          return future;
      }

      public ListenableFuture<?> submitListenable(Runnable task) {
          ListenableFutureTask future = new ListenableFutureTask(task, (Object)null);
          this.execute(future, 9223372036854775807L);
          return future;
      }

      public <T> ListenableFuture<T> submitListenable(Callable<T> task) {
          ListenableFutureTask future = new ListenableFutureTask(task);
          this.execute(future, 9223372036854775807L);
          return future;
      }
      //拥有工厂?没有的话调用父类可以设置各种参数的创建线程
      protected void doExecute(Runnable task) {
          Thread thread = this.threadFactory != null?this.threadFactory.newThread(task):this.createThread(task);
          thread.start();
      }
      //父类的方法,方便配置线程,方便xml设置线程参数CustomizableThreadCreator
      public Thread createThread(Runnable runnable) {
            Thread thread = new Thread(getThreadGroup(), runnable, nextThreadName());
            thread.setPriority(getThreadPriority());
            thread.setDaemon(isDaemon());
            return thread;
        }
 }
- 支持限流处理
- 异步注册线程返回结果
限流处理其实就是在执行任务之前和之后对于当前线程数量进行统计
内部类的实现
  //下面只是对于操作进行简单的封装,最真的实现还是抽象的ConcurrencyThrottleSupport
  private static class ConcurrencyThrottleAdapter extends ConcurrencyThrottleSupport {
        private ConcurrencyThrottleAdapter() {
        }

        protected void beforeAccess() {
            super.beforeAccess();
        }

        protected void afterAccess() {
            super.afterAccess();
        }
    }
    //这里是对于Runable对象执行在次封装,在执行完毕后处理限流操作
    private class ConcurrencyThrottlingRunnable implements Runnable {
        private final Runnable target;

        public ConcurrencyThrottlingRunnable(Runnable target) {
            this.target = target;
        }

        public void run() {
            try {
                this.target.run();
            } finally {
                SimpleAsyncTaskExecutor.this.concurrencyThrottle.afterAccess();
            }

        }
    }
简单的通过synchronized和wati and notify达到控制线程数量的效果,从而实现限流的策略。
    public abstract class ConcurrencyThrottleSupport implements Serializable {
    protected transient Log logger = LogFactory.getLog(this.getClass());
    private transient Object monitor = new Object();
    private int concurrencyLimit = -1;
    private int concurrencyCount = 0;
    public void setConcurrencyLimit(int concurrencyLimit) {
        this.concurrencyLimit = concurrencyLimit;
    }

    public int getConcurrencyLimit() {
        return this.concurrencyLimit;
    }

    public boolean isThrottleActive() {
        return this.concurrencyLimit > 0;
    }
    protected void beforeAccess() {
        if(this.concurrencyLimit == 0) {
            throw new IllegalStateException("没有设置限制");
        } else {
            if(this.concurrencyLimit > 0) {
                boolean debug = this.logger.isDebugEnabled();
                Object var2 = this.monitor;
                synchronized(this.monitor) {
                    boolean interrupted = false;
                    while(this.concurrencyCount >= this.concurrencyLimit) {
                        if(interrupted) {
                            throw new IllegalStateException("等待过程中发生中断异常");
                        }
                        try {
                            this.monitor.wait();
                        } catch (InterruptedException var6) {
                            Thread.currentThread().interrupt();
                            interrupted = true;
                        }
                    }
                    ++this.concurrencyCount;
                }
            }

        }
    }
    protected void afterAccess() {
        if(this.concurrencyLimit >= 0) {
            Object var1 = this.monitor;
            synchronized(this.monitor) {
                --this.concurrencyCount;
                this.monitor.notify();
            }
        }

    }
}
异步监听获取线程的结果,其实这个不算这里面的实现
ListenableFutureTask 其实主要是依靠FutureTask这个JDK的封装,覆盖了原始的run方法,在run中封装可以获取到线程的返回值。
ListenableFutureTask 在次封装,由于FutureTask执行完成之后会调用done()空方法,ListenableFutureTask覆盖done方法可以获取到执行的结果,然后在调用前期注册的错误处理或者成功处理的方法,即可到达异步处理的效果。
类似于回调的效果
public interface SuccessCallback<T> {

    /**
     * Called when the {@link ListenableFuture} successfully completes.
     * @param result the result
     */
    void onSuccess(T result);
}
public interface FailureCallback {

    /**
     * Called when the {@link ListenableFuture} fails to complete.
     * @param ex the exception that triggered the failure
     */
    void onFailure(Throwable ex);
}

public interface ListenableFuture<T> extends Future<T> {
    //成功和失败的集合
    void addCallback(ListenableFutureCallback<? super T> var1);

    void addCallback(SuccessCallback<? super T> var1, FailureCallback var2);
}
实现类(ListenableFutureTask)可有返回值,可被监听的,注册监听,这里可以注册监听者放在一个单独的类中去处理,很好的分配工作ListenableFutureCallbackRegistry
    public class ListenableFutureTask<T> extends FutureTask<T> implements ListenableFuture<T> {
    private final ListenableFutureCallbackRegistry<T> callbacks = new ListenableFutureCallbackRegistry();

    public ListenableFutureTask(Callable<T> callable) {
        super(callable);
    }

    public ListenableFutureTask(Runnable runnable, T result) {
        super(runnable, result);
    }

    public void addCallback(ListenableFutureCallback<? super T> callback) {
        this.callbacks.addCallback(callback);
    }

    public void addCallback(SuccessCallback<? super T> successCallback, FailureCallback failureCallback) {
        this.callbacks.addSuccessCallback(successCallback);
        this.callbacks.addFailureCallback(failureCallback);
    }
    //FutureTask执行完成后的回调,调用监听接口的实现类的方法
    protected final void done() {
        Object cause;
        try {
            Object ex = this.get();
            //回调实现类的方法
            this.callbacks.success(ex);
            return;
        } catch (InterruptedException var3) {
            Thread.currentThread().interrupt();
            return;
        } catch (ExecutionException var4) {
            cause = var4.getCause();
            if(cause == null) {
                cause = var4;
            }
        } catch (Throwable var5) {
            cause = var5;
        }

        this.callbacks.failure((Throwable)cause);
    }
}
注册监听,还维护了一个状态量的信息,很标准的写法,维护队列的添加和成功消息和失败消息的处理
public class ListenableFutureCallbackRegistry<T> {

    private final Queue<SuccessCallback<? super T>> successCallbacks = new LinkedList<SuccessCallback<? super T>>();

    private final Queue<FailureCallback> failureCallbacks = new LinkedList<FailureCallback>();

    private State state = State.NEW;

    private Object result = null;

    private final Object mutex = new Object();


    /**
     * Add the given callback to this registry.
     * @param callback the callback to add
     */
    public void addCallback(ListenableFutureCallback<? super T> callback) {
        Assert.notNull(callback, "'callback' must not be null");
        synchronized (this.mutex) {
            switch (this.state) {
                case NEW:
                    this.successCallbacks.add(callback);
                    this.failureCallbacks.add(callback);
                    break;
                case SUCCESS:
                    callback.onSuccess((T) this.result);
                    break;
                case FAILURE:
                    callback.onFailure((Throwable) this.result);
                    break;
            }
        }
    }

    /**
     * Add the given success callback to this registry.
     * @param callback the success callback to add
     * @since 4.1
     */
    public void addSuccessCallback(SuccessCallback<? super T> callback) {
        Assert.notNull(callback, "'callback' must not be null");
        synchronized (this.mutex) {
            switch (this.state) {
                case NEW:
                    this.successCallbacks.add(callback);
                    break;
                case SUCCESS:
                    callback.onSuccess((T) this.result);
                    break;
            }
        }
    }

    /**
     * Add the given failure callback to this registry.
     * @param callback the failure callback to add
     * @since 4.1
     */
    public void addFailureCallback(FailureCallback callback) {
        Assert.notNull(callback, "'callback' must not be null");
        synchronized (this.mutex) {
            switch (this.state) {
                case NEW:
                    this.failureCallbacks.add(callback);
                    break;
                case FAILURE:
                    callback.onFailure((Throwable) this.result);
                    break;
            }
        }
    }

    /**
     * Trigger a {@link ListenableFutureCallback#onSuccess(Object)} call on all
     * added callbacks with the given result.
     * @param result the result to trigger the callbacks with
     */
    public void success(T result) {
        synchronized (this.mutex) {
            this.state = State.SUCCESS;
            this.result = result;
            while (!this.successCallbacks.isEmpty()) {
                this.successCallbacks.poll().onSuccess(result);
            }
        }
    }

    public void failure(Throwable ex) {
        synchronized (this.mutex) {
            this.state = State.FAILURE;
            this.result = ex;
            while (!this.failureCallbacks.isEmpty()) {
                this.failureCallbacks.poll().onFailure(ex);
            }
        }
    }

    private enum State {NEW, SUCCESS, FAILURE}

}
TaskExecutor---Spring异步线程池的接口类,其实质是java.util.concurrent.Executor
以下是官方已经实现的全部7个TaskExecuter。Spring宣称对于任何场景,这些TaskExecuter完全够用了:
| 名字 | 特点 |
|---|---|
| SimpleAsyncTaskExecutor | 每次请求新开线程,没有最大线程数设置.不是真的线程池,这个类不重用线程,每次调用都会创建一个新的线程。 --【1】 |
| SyncTaskExecutor | 不是异步的线程.同步可以用SyncTaskExecutor,但这个可以说不算一个线程池,因为还在原线程执行。这个类没有实现异步调用,只是一个同步操作。 |
| ConcurrentTaskExecutor | Executor的适配类,不推荐使用。如果ThreadPoolTaskExecutor不满足要求时,才用考虑使用这个类。 |
| SimpleThreadPoolTaskExecutor | 监听Spring’s lifecycle callbacks,并且可以和Quartz的Component兼容.是Quartz的SimpleThreadPool的类。线程池同时被quartz和非quartz使用,才需要使用此类。 |
| ThreadPoolTaskExecutor | 最常用。要求jdk版本大于等于5。可以在程序而不是xml里修改线程池的配置.其实质是对java.util.concurrent.ThreadPoolExecutor的包装。 |
| TimerTaskExecutor | |
| WorkManagerTaskExecutor |
Spring中的同步执行器
- SyncTaskExecutor:同步可以用SyncTaskExecutor,但这个可以说不算一个线程池,因为还在原线程执行。这个类没有实现异步调用,只是一个同步操作。
- 也可以用ThreadPoolTaskExecutor结合FutureTask做到同步。
SyncTaskExecutor与ThreadPoolTaskExecutor区别
前者是同步执行器,执行任务同步,后者是线程池,执行任务异步。
使用ThreadPoolTaskExecutor
比起从线程池取一个线程再执行, 你仅仅需要把你的Runnable类加入到队列中,然后TaskExecutor用它内置的规则决定何时开始取一个线程并执行该Runnable类
先在xml中添加bean的配置:
<bean id="taskExecutor" class="org.springframework.scheduling.concurrent.ThreadPoolTaskExecutor">
  <property name="corePoolSize" value="5" />
  <property name="maxPoolSize" value="10" />
  <property name="queueCapacity" value="25" />
</bean>

<bean id="taskExecutorExample" class="TaskExecutorExample">
  <constructor-arg ref="taskExecutor" />
</bean>
配置解释
当一个任务通过execute(Runnable)方法欲添加到线程池时:
- 如果此时线程池中的数量小于corePoolSize,即使线程池中的线程都处于空闲状态,也要创建新的线程来处理被添加的任务。
- 如果此时线程池中的数量等于 corePoolSize,但是缓冲队列 workQueue未满,那么任务被放入缓冲队列。
- 如果此时线程池中的数量大于corePoolSize,缓冲队列workQueue满,并且线程池中的数量小于maximumPoolSize,建新的线程来处理被添加的任务。
- 如果此时线程池中的数量大于corePoolSize,缓冲队列workQueue满,并且线程池中的数量等于maximumPoolSize,那么通过 handler所指定的策略来处理此任务。也就是:处理任务的优先级为:核心线程corePoolSize、任务队列workQueue、最大线程 maximumPoolSize,如果三者都满了,使用handler处理被拒绝的任务。
- 当线程池中的线程数量大于 corePoolSize时,如果某线程空闲时间超过keepAliveTime,线程将被终止。这样,线程池可以动态的调整池中的线程数。
推荐 - 使用ThreadPoolTaskExecutor(注解方式)
首先,为了以注解方式使用异步功能,我们需要在Spring的xml配置中定义相关的bean:
1.必须在*-servlet.xml而不是applicationContext.xml中定义@Async相关配置
引自http://stackoverflow.com/questions/6610563/spring-async-not-working
2 不使用线程池版本
引自http://www.springframework.org/schema/task/spring-task-3.2.xsd
所以,如果我们仅仅添加<task:annotation-driven/>,也可以使用@Async标签。然而,此时使用的是SimpleAsyncTaskExecutor。如“官方文档27章:Task Execution”中所述,SimpleAsyncTaskExecutor不会使用线程池,仅仅是为每一个请求新开一个线程。这样在大并发的业务场景下,发生OutOfMemory是不足为奇的。
<?xml version="1.0" encoding="UTF-8"?>
<!--Spring框架的xml标签定义文档, 可访问http://www.springframework.org/schema/task/查看最新task组件的xml标签文档-->
<beans xmlns:task="http://www.springframework.org/schema/task"
       xsi:schemaLocation="
                http://www.springframework.org/schema/task
                http://www.springframework.org/schema/task/spring-task-3.2.xsd">
    <!--扫描项目实例化@Component,@Service,@Controller修饰的类-->
    <context:component-scan base-package="com.your_app" />

    <!--create a SimpleAsyncTaskExecutor instance-->
    <task:annotation-driven/>
</beans>
3.推荐 - 使用线程池版本
?xml version="1.0" encoding="UTF-8"?>
<!--Spring框架的xml标签定义文档, 可访问http://www.springframework.org/schema/task/查看最新task组件的xml标签文档-->
<beans xmlns:task="http://www.springframework.org/schema/task"
       xsi:schemaLocation="
                http://www.springframework.org/schema/task
                http://www.springframework.org/schema/task/spring-task-3.2.xsd">

    <!--扫描项目实例化@Component,@Service,@Controller修饰的类-->
    <context:component-scan base-package="com.your_app" />

    <!-- 在代码中@Async不加参数就会使用task:annotation-driven标签定义的executor-->
    <task:annotation-driven executor="myExecutor"/>
    <!-- 在代码中@Async("myExecutor")可以显式指定executor为"myExecutor"-->
    <task:executor id="myExecutor"
               pool-size="5-25"
               queue-capacity="100"
               rejection-policy="CALLER_RUNS"/>
</beans>
其中,注意到属性pool-size的值”5-25”是一个范围,这对应的是线程池的min和max容量,它们的意义请参考本文上一节的“配置说明”里的第3、4点。如果只有一个值,如pool-size=n, 意味着minSize==maxSize==n
而关于rejection-policy,官方文档总结如下:
| 池满时的拒绝策略 | 效果 |
|---|---|
| AbortPolicy(默认) | 抛异常 |
| DiscardPolicy or DiscardOldestPolicy | 放弃该线程 |
| CallerRunsPolicy | 通知该线程的创建者,让其不要提交新的线程 |

 浙公网安备 33010602011771号