


APScheduler实现定时任务
单独使用
https://www.jianshu.com/p/e36236c1df08
https://www.cnblogs.com/yangxinpython/p/15657010.html
例子:
from apscheduler.schedulers.blocking import BlockingScheduler
from datetime import datetime

def job():
    # 输出当前时间
    print(datetime.now().strftime("%Y-%m-%d %H:%M:%S"))


if __name__ == "__main__":
    scheduler = BlockingScheduler()
    #每3秒执行一次
    scheduler.add_job(job,"interval",seconds=3)
    scheduler.start()
其他定时 且传入参数
def job(text):
    print(text)

if __name__ == "__main__":
    scheduler = BlockingScheduler()
    #指定时间
    scheduler.add_job(job, 'date', run_date=datetime(2022, 12, 6, 19, 56, 5), args=['text'])
    scheduler.start()
#其中id表示任务的唯一标识符,coalesce表示忽略服务器宕机时间段内的任务执行(否则就会出现服务器恢复之后一下子执行多次任务的情况),replace_existing表示如果有重名的任务,直接覆盖
scheduler.add_job(job, 'interval', seconds=3, id="2", coalesce=True, replace_existing=True)
scheduler.start()#其中id表示任务的唯一标识符,coalesce表示忽略服务器宕机时间段内的任务执行(否则就会出现服务器恢复之后一下子执行多次任务的情况),replace_existing表示如果有重名的任务,直接覆盖
不过需要注意的是,在添加重复名称的定时任务时,设置replace_existing=True,直接覆盖已有的任务;相应地,在对其任务信息表
https://blog.csdn.net/kobepaul123/article/details/123616575
里面有设置各种定时方式
# datetime类型(用于精确时间)
scheduler.add_job(my_job, 'date', run_date=datetime(2022, 4, 25, 17, 30, 5), args=['测试任务'])
# 每2小时触发
scheduler.add_job(job_func, 'interval', hours=2)
# 在 2019-04-15 17:00:00 ~ 2019-12-31 24:00:00 之间, 每隔两分钟执行一次 job_func 方法
scheduler .add_job(job_func, 'interval', minutes=2, start_date='2022-04-29 17:00:00' , end_date='2022-12-31 24:00:00')
# 每小时(上下浮动120秒区间内)运行`job_function`
scheduler.add_job(job_func, 'interval', hours=1, jitter=120)
# 在每年 1-3、7-9 月份中的每个星期一、二中的 00:00, 01:00, 02:00 和 03:00 执行 job_func 任务
scheduler .add_job(job_func, 'cron', month='1-3,7-9',day='0, tue', hour='0-3')
其他API
执行的例子: scheduler.add_job(job, 'interval', seconds=3, id="2", coalesce=True, replace_existing=True,name="3333")

#查看任务的执行情况
print(scheduler.print_jobs(jobstore=None,out=sys.stdout))
输出: 3333 (trigger: interval[0:00:03], next run at: 2022-12-07 06:07:36 UTC)


1. 添加任务:
使用 scheduler.add_job(job_obj,args,id,trigger,**trigger_kwargs)。

2. 删除任务:

使用 scheduler.remove_job(job_id,jobstore=None)。

3. 暂停任务:

使用 scheduler.pause_job(job_id,jobstore=None)。

4. 恢复任务:

使用 scheduler.resume_job(job_id,jobstore=None)。

5. 修改某个任务属性信息:

使用 scheduler.modify_job(job_id,jobstore=None,**changes)。

6. 修改单个作业的触发器并更新下次运行时间:

使用 scheduler.reschedule_job(job_id,jobstore=None,trigger=None,**trigger_args)
例子: scheduler.reschedule_job(trigger='interval', seconds=1, job_id="1")

7、 # 查看待运行的任务
scheduler.get_jobs()

8、打印日志
import logging
logging.basicConfig()
logging.getLogger('apscheduler').setLevel(logging.DEBUG)

9、打印所有作业状态
scheduler.print_jobs()
例子:
    Jobstore default:
    4444 (trigger: interval[0:00:10], next run at: 2022-12-07 20:27:54 CST)
    3333 (trigger: interval[0:00:01], paused)

10、获取所有作业
scheduler.get_jobs()
例子:
[<Job (id=a name=3333)>, <Job (id=2 name=4444)>]

11、关闭调度器
默认情况下调度器会等待所有正在运行的作业完成后,关闭所有的调度器和作业存储。如果你不想等待,可以将wait选项设置为False。
 scheduler.shutdown()
 scheduler.shutdown(wait=False)

12、# 获取任务详情
print(scheduler.get_job(job_id="my_job_id"))

13、# 修改任务
temp_dict = {"seconds": 5}
temp_trigger = scheduler._create_trigger(trigger='interval', trigger_args=temp_dict)
result = scheduler.modify_job(job_id='my_job_id_test', trigger=temp_trigger)

14、# 修改任务
result = scheduler.reschedule_job(job_id='my_job_id_test', trigger='interval', seconds=4)

15、# 暂停作业
scheduler.pause()

16、# 恢复作业
scheduler.resume()
结合mysql做持久化
https://dandelioncloud.cn/article/details/1535946540351078401
import pymysql
pymysql.install_as_MySQLdb()
import time
import logging
from apscheduler.schedulers.background import BackgroundScheduler
from apscheduler.executors.pool import ThreadPoolExecutor, ProcessPoolExecutor

logging.basicConfig(level=logging.INFO,
                    format='%(asctime)s %(filename)s[line:%(lineno)d] %(levelname)s %(message)s',
                    datefmt='%Y-%m-%d %H:%M:%S',
                    # filename='log.txt', #让日志打到本地
                    filemode='a')
logging.getLogger('apscheduler').setLevel(logging.DEBUG)


def job():
    print("测试")

def job_b():

    # 暂停id为a的任务
    scheduler.pause_job(job_id = 'a')
    for i in range(4):
        print(i)
        time.sleep(1)
    # 恢复id为a的任务
    scheduler.resume_job(job_id = 'a')

if __name__ == '__main__':
    url = 'mysql://root:123456@127.0.0.1:3317/Django_model?charset=utf8'
    executors = {
        'default': ThreadPoolExecutor(20),
        'processpool': ProcessPoolExecutor(5)
    }
    job_defaults = {
        'coalesce': False,
        'max_instances': 3
    }
    scheduler = BackgroundScheduler(executors=executors, job_defaults=job_defaults)
    scheduler.add_jobstore('sqlalchemy', url=url)
    scheduler.add_job(func=job, trigger='interval', seconds=1, id="a", coalesce=True, replace_existing=True,name="3333")
    scheduler.add_job(func=job_b, trigger='interval',  seconds=10, id="2", coalesce=True,
                      replace_existing=True, name="4444")

    scheduler.start()


    time.sleep(30)
结合redis做持久化
https://www.cnblogs.com/zhufanyu/p/14011317.html
import time
## 配置redis模块
from apscheduler.jobstores.redis import RedisJobStore
## 配置线程
from apscheduler.executors.pool import ThreadPoolExecutor, ProcessPoolExecutor
## 创建定时任务的包
from apscheduler.schedulers.background import BackgroundScheduler

def job():
    # requests.get("http://127.0.0.1:8000/api/checkrequest/")
    print("测试")

def job_b():

    # 暂停id为a的任务
    scheduler.pause_job(job_id = 'a')
    for i in range(4):
        print(i)
        time.sleep(1)
    # 恢复id为a的任务
    scheduler.resume_job(job_id = 'a')

if __name__ == "__main__":

    REDIS = {
        'host': '127.0.0.1',
        'port': '6379',
        'db': 0,
        'password': ''
    }

    jobstores = {
        'redis': RedisJobStore(**REDIS)
    }

    executors = {
        'default': ThreadPoolExecutor(10),  # 默认线程数
        'processpool': ProcessPoolExecutor(3)  # 默认进程
    }
    scheduler=BackgroundScheduler(jobstores=jobstores, executors=executors)
    scheduler.add_job(func=job, trigger='interval', jobstore='redis', seconds=1, id="a", coalesce=True, replace_existing=True,name="3333")
    scheduler.add_job(func=job_b, trigger='interval', jobstore='redis', seconds=10, id="2", coalesce=True,
                      replace_existing=True, name="4444")

    scheduler.start()
    # 查看待运行的任务
    print(scheduler.get_jobs())

    time.sleep(30)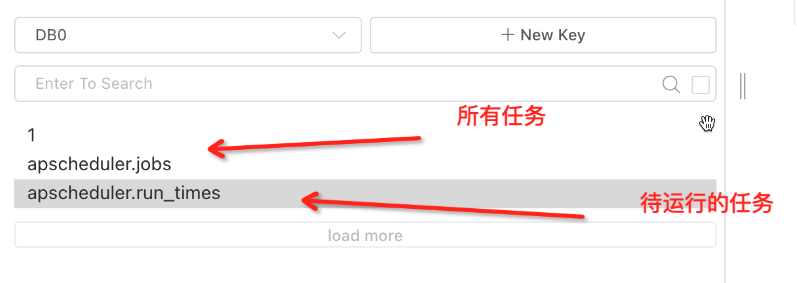
mongo的参考下(还没试,用到再看看)
https://blog.csdn.net/liyacai_20120512/article/details/121915377
from apscheduler.schedulers.background import BackgroundScheduler
from apscheduler.jobstores.mongodb import MongoDBJobStore, MongoClient
from apscheduler.executors.pool import ThreadPoolExecutor, ProcessPoolExecutor
import time


def job():
    print("测试")

def job_b():

    # 暂停id为a的任务
    # scheduler.pause_job(job_id = 'a')
    scheduler.remove_job(job_id="a", jobstore=None)
    for i in range(4):
        print(i)
        time.sleep(1)
    # 恢复id为a的任务
    # scheduler.resume_job(job_id = 'a')

if __name__ == '__main__':

    config = {'host': 'mongodb://xx_all:xxxjbW@xxxxxxx.mongodb.rds.aliyuncs.com:3717'}

    jobstores = {
        'mongo': MongoDBJobStore(database="dev_test_platform", client=MongoClient(config['host']))
    }
    executors = {
        'default': ThreadPoolExecutor(12),  # 工作线程数为 12个
        'processpool': ProcessPoolExecutor(6)  # 工作进程数为 6个
    }
    job_defaults = {
        'coalesce': False,  # 默认情况下为新任务关闭合并模式  True的话服务宕机重启 过去的任务不会再执行
        'max_instances': 3  # 新任务的默认最大实例数限制为 3个
    }

    scheduler = BackgroundScheduler(executors=executors, job_defaults=job_defaults)
    scheduler.add_jobstore(jobstores['mongo'])
    scheduler.add_job(func=job, trigger='interval', seconds=1, id="a", coalesce=True, replace_existing=True,name="3333")
    scheduler.add_job(func=job_b, trigger='interval',  seconds=10, id="2", coalesce=True,
                          replace_existing=True, name="4444")

    scheduler.start()
    time.sleep(15)
监听
https://blog.csdn.net/time_money/article/details/119825381。 (这个实现写到日志了)
~~~
def my_listener(Event):     ---主要这个
    job = scheduler.get_job(Event.job_id)
    if not Event.exception:
        print('任务正常运行!')

    else:
        print("任务出错了!!!!!")
        print(job)

出错例子
任务出错了!!!!!
4444(任务名字) (trigger: interval[0:00:05], next run at: 2022-12-07 20:52:35 CST)

if __name__ == '__main__':
    ~~~
    from apscheduler.events import EVENT_JOB_EXECUTED, EVENT_JOB_ERROR
    scheduler = BackgroundScheduler(executors=executors, job_defaults=job_defaults)    ---这个参考上面持久化的
    scheduler.add_listener(my_listener, EVENT_JOB_EXECUTED | EVENT_JOB_ERROR)    --主要这个
持久化后服务重启,会自动去数据库查看原来设置的任务
from apscheduler.schedulers.background import BackgroundScheduler
from apscheduler.jobstores.mongodb import MongoDBJobStore, MongoClient
from apscheduler.executors.pool import ThreadPoolExecutor, ProcessPoolExecutor
import time


if __name__ == '__main__':

    config = {'host': 'mongodb://xx_all:xxxjbW@xxxxxxx.mongodb.rds.aliyuncs.com:3717'}

    jobstores = {
        'mongo': MongoDBJobStore(database="dev_test_platform", client=MongoClient(config['host']))
    }
    executors = {
        'default': ThreadPoolExecutor(12),  # 工作线程数为 12个
        'processpool': ProcessPoolExecutor(6)  # 工作进程数为 6个
    }
    job_defaults = {
        'coalesce': False,  # 默认情况下为新任务关闭合并模式
        'max_instances': 3  # 新任务的默认最大实例数限制为 3个
    }

    scheduler = BackgroundScheduler(executors=executors, job_defaults=job_defaults)
    scheduler.add_jobstore(jobstores['mongo'])

    scheduler.start()     #启动后,会自动去数据库查看原来设置的任务继续跑
    time.sleep(15)
jbo传递参数的实现
https://www.jianshu.com/p/c4daad6e5f99
from apscheduler.schedulers.blocking import BlockingScheduler

def job1(para1, para2,para3):
    print("This is job1")
    print("The para1 is "+str(para1))
    print("The para2 is "+str(para2))
    print("The para2 is "+str(para2))
def job2(para1, para2,para3):
    print("This is job2")
    print("The para1 is "+str(para1))
    print("The para2 is "+str(para2))
    print("The para2 is "+str(para2))

scheduler.add_job(job1, 'interval', seconds=20,args=['para1','para2','para3'])
scheduler.add_job(job2, 'interval', seconds=20,kwargs={'para1':'3','para2':'2','para3':'1'})
print('Press Ctrl+{0} to exit'.format('Break' if os.name == 'nt' else 'C'))

try:
    scheduler.start()
except (KeyboardInterrupt, SystemExit):
    scheduler.shutdown(wait=False)
这里有讲一丢丢配置
https://www.cnblogs.com/QiuPing-blog/p/16289022.html
部署服务后发现相同的任务会执行多次
(每发版一次,就双倍执行任务) 下面的方法我都试了 可以个卵!!
一、单台机的话
1、用redis的锁,
https://www.cnblogs.com/kaibindirver/p/17206377.html
2、用文件锁
https://www.zhangshengrong.com/p/9Oab73B3Nd/
import atexit
import fcntl
from flask_apscheduler import APScheduler

def init(app):
 f = open("scheduler.lock", "wb")
 try:
  fcntl.flock(f, fcntl.LOCK_EX | fcntl.LOCK_NB)
  scheduler = APScheduler()
  scheduler.init_app(app)
  scheduler.start()
 except:
  pass
 def unlock():
  fcntl.flock(f, fcntl.LOCK_UN)
  f.close()
 atexit.register(unlock)
二、分布式的话
1、redis锁
还有注解的方法 有空研究下
https://blog.csdn.net/Jason_WangYing/article/details/120203973
其他教程介绍--实现定时任务的八种方案!
https://mp.weixin.qq.com/s/C9pxH7W3KSuiK71u7UPvjg
试下加 max_instances=1 看是不是控制不跑2次 不行
持久化的时候会在数据库中的表记录对应任务ID的信息。给这张表加一个执行时间的字段,每当执行任务 ,判断当前执行时间和上一次执行时间相差少于1秒就不执行
把定时任务的功能独立出去一个服务 不发版
最后我的解决方案是 写了一个接口,把所有任务先暂停,然后再按他原来的状态给他启动


【推荐】国内首个AI IDE,深度理解中文开发场景,立即下载体验Trae
【推荐】编程新体验,更懂你的AI,立即体验豆包MarsCode编程助手
【推荐】抖音旗下AI助手豆包,你的智能百科全书,全免费不限次数
【推荐】轻量又高性能的 SSH 工具 IShell:AI 加持,快人一步
· 无需6万激活码!GitHub神秘组织3小时极速复刻Manus,手把手教你使用OpenManus搭建本
· C#/.NET/.NET Core优秀项目和框架2025年2月简报
· 葡萄城 AI 搜索升级:DeepSeek 加持,客户体验更智能
· 什么是nginx的强缓存和协商缓存
· 一文读懂知识蒸馏
2021-11-24 maven学习
2019-11-24 Hashmap(类似字典的东西)
2019-11-24 Hashset(不能添加相同的字符进入数组)
2018-11-24 html css样式
2018-11-24 HTML笔记