Nexus安装与使用
一、基本介绍
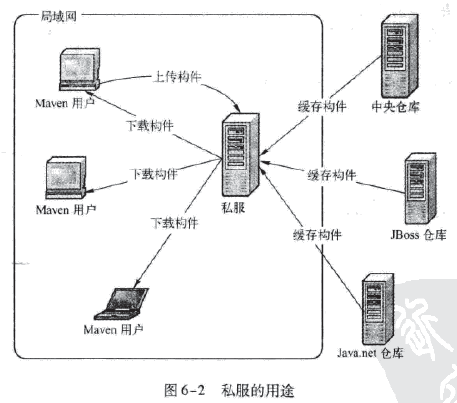
nexus是一个强大的maven仓库管理工具,使用nexus可以方便的管理内部仓库,也就是私服,专门用于管理公司内部的jar包,可以将公司内部的jar包上传到nexus中。
优势:
1.一些无法从外部仓库下载的构件,例如内部的项目还能部署到私服上,以便供其他依赖项目使用。
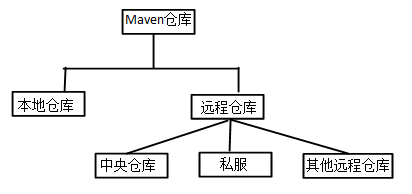
2. 为了节省带宽和时间,在局域网内架设一个私有的仓库服务器,用其代理所有外部的远程仓库。当本地Maven项目需要下载构件时,先去私服请求,如果私服没有,则再去远程仓库请求,从远程仓库下载构件后,把构件缓存在私服上。这样,及时暂时没有Internet链接,由于私服已经缓存了大量构件,整个项目还是可以正常使用的。同时,也降低了中央仓库的负荷。
二、下载与安装
环境:centos7.6
1.下载
去nexus官网:https://www.sonatype.com/ ,下载然后进行解压即可
官网经常下载失败:可以去网上搜“nexus安装包下载”
2.安装
2.1 安装jdk,配置环境变量
2.2解压
tar -zxvf nexus-3.16.1-02-unix.tar.gz
[root@localhost soft]# ll
总用量 864000
drwxr-xr-x. 9 root root       163 5月  14 16:19 nexus-3.19.1-01
-rw-r--r--. 1 root root 135426386 5月  14 16:19 nexus-3.19.1-01-unix.tar.gz
drwxr-xr-x. 3 root root        20 5月  14 16:19 sonatype-work
2.3启动与关闭
[root@localhost bin]# pwd
/opt/soft/nexus-3.19.1-01/bin
[root@localhost bin]# ./nexus status
WARNING: ************************************************************
WARNING: Detected execution as "root" user.  This is NOT recommended!
WARNING: ************************************************************
nexus is running.
[root@localhost bin]# ./nexus sssss
WARNING: ************************************************************
WARNING: Detected execution as "root" user.  This is NOT recommended!
WARNING: ************************************************************
Usage: ./nexus {start|stop|run|run-redirect|status|restart|force-reload}
[root@localhost bin]#
建议使用
./nexus run 这样会打印详细的日志
2.4修改端口
[root@localhost etc]# cat nexus-default.properties
## DO NOT EDIT - CUSTOMIZATIONS BELONG IN $data-dir/etc/nexus.properties
##
# Jetty section
application-port=8081
application-host=0.0.0.0
nexus-args=${jetty.etc}/jetty.xml,${jetty.etc}/jetty-http.xml,${jetty.etc}/jetty-requestlog.xml
nexus-context-path=/

# Nexus section
nexus-edition=nexus-pro-edition
nexus-features=\
 nexus-pro-feature

nexus.hazelcast.discovery.isEnabled=true
[root@localhost etc]# pwd
/opt/soft/nexus-3.19.1-01/etc
[root@localhost etc]#
2.5修改依赖库的存储位置
[root@localhost bin]# pwd
/opt/soft/nexus-3.19.1-01/bin
[root@localhost bin]# cat nexus.vmoptions

-Xms2703m
-Xmx2703m
-XX:MaxDirectMemorySize=2703m
-XX:+UnlockDiagnosticVMOptions
-XX:+LogVMOutput
-XX:LogFile=../sonatype-work/nexus3/log/jvm.log
-XX:-OmitStackTraceInFastThrow
-Djava.net.preferIPv4Stack=true
-Dkaraf.home=.
-Dkaraf.base=.
-Dkaraf.etc=etc/karaf
-Djava.util.logging.config.file=etc/karaf/java.util.logging.properties
-Dkaraf.data=../sonatype-work/nexus3
-Dkaraf.log=../sonatype-work/nexus3/log
-Djava.io.tmpdir=../sonatype-work/nexus3/tmp
-Dkaraf.data=../sonatype-work/nexus3
-Djava.io.tmpdir=../sonatype-work/nexus3/tmp
2.6注册linux系统服务
1)创建软连接
[root@localhost bin]# ll /etc/init.d/nexus
lrwxrwxrwx. 1 root root 35 5月 14 16:33 /etc/init.d/nexus -> /opt/soft/nexus-3.19.1-01/bin/nexus
[root@localhost bin]# ln -s /opt/soft/nexus-3.19.1-01/bin/nexus /etc/init.d/nexus
注意创建软连接时要使用全路径
2)编辑文件
vi /etc/systemd/system/nexus.service
[Unit]
Description=nexus service
After=network.target

[Service]
Type=forking
LimitNOFILE=65536
ExecStart=/etc/init.d/nexus start
ExecStop=/etc/init.d/nexus stop
Restart=on-abort

[Install]
WantedBy=multi-user.target
将其加入到开机中:
sudo systemctl daemon-reload
sudo systemctl enable nexus.service
sudo systemctl start nexus.service
启动失败:原因是启动脚本有点问题
[root@localhost bin]# systemctl status nexus
● nexus.service - nexus service
Loaded: loaded (/etc/systemd/system/nexus.service; enabled; vendor preset: disabled)
Active: failed (Result: exit-code) since 六 2021-05-15 10:36:57 CST; 5h 53min ago
Process: 15532 ExecStart=/etc/init.d/nexus start (code=exited, status=83)
5月 15 10:36:56 localhost.localdomain systemd[1]: Starting nexus service...
5月 15 10:36:57 localhost.localdomain nexus[15532]: No suitable Java Virtual Machine could be found on your system.
5月 15 10:36:57 localhost.localdomain nexus[15532]: The version of the JVM must be 1.8.
5月 15 10:36:57 localhost.localdomain nexus[15532]: Please define INSTALL4J_JAVA_HOME to point to a suitable JVM.
修改官方自带的启动脚本
[root@localhost bin]# pwd
/opt/soft/nexus-3.19.1-01/bin
[root@localhost bin]# vi nexus

增加jdk的配置(ctrl+z fg %1)
再次启动即可
[root@localhost bin]# systemctl start nexus
[root@localhost bin]# systemctl status nexus
● nexus.service - nexus service
   Loaded: loaded (/etc/systemd/system/nexus.service; enabled; vendor preset: disabled)
   Active: deactivating (stop) (Result: exit-code) since 六 2021-05-15 16:30:17 CST; 1s ago
  Process: 109739 ExecStart=/etc/init.d/nexus start (code=exited, status=0/SUCCESS)
 Main PID: 109970 (code=exited, status=1/FAILURE);         : 110030 (java)
    Tasks: 51
   Memory: 29.8M
   CGroup: /system.slice/nexus.service
           └─control
             └─110030 /opt/soft/jdk/bin/java -server -Dinstall4j.jvmDir=/opt/soft/jdk -Dexe4j.moduleName=/opt/soft/...

5月 15 16:30:17 localhost.localdomain nexus[109739]: WARNING: ************************************************...****
5月 15 16:30:17 localhost.localdomain nexus[109739]: WARNING: Detected execution as "root" user.  This is NOT ...ded!
5月 15 16:30:17 localhost.localdomain nexus[109739]: WARNING: ************************************************...****
5月 15 16:30:17 localhost.localdomain nexus[109739]: Starting nexus
5月 15 16:30:17 localhost.localdomain systemd[1]: Started nexus service.
5月 15 16:30:17 localhost.localdomain systemd[1]: nexus.service: main process exited, code=exited, status=1/FAILURE
5月 15 16:30:17 localhost.localdomain nexus[110030]: WARNING: ************************************************...****
5月 15 16:30:17 localhost.localdomain nexus[110030]: WARNING: Detected execution as "root" user.  This is NOT ...ded!
5月 15 16:30:17 localhost.localdomain nexus[110030]: WARNING: ************************************************...****
5月 15 16:30:17 localhost.localdomain nexus[110030]: Shutting down nexus
Hint: Some lines were ellipsized, use -l to show in full.
三、使用-nexus配置相关
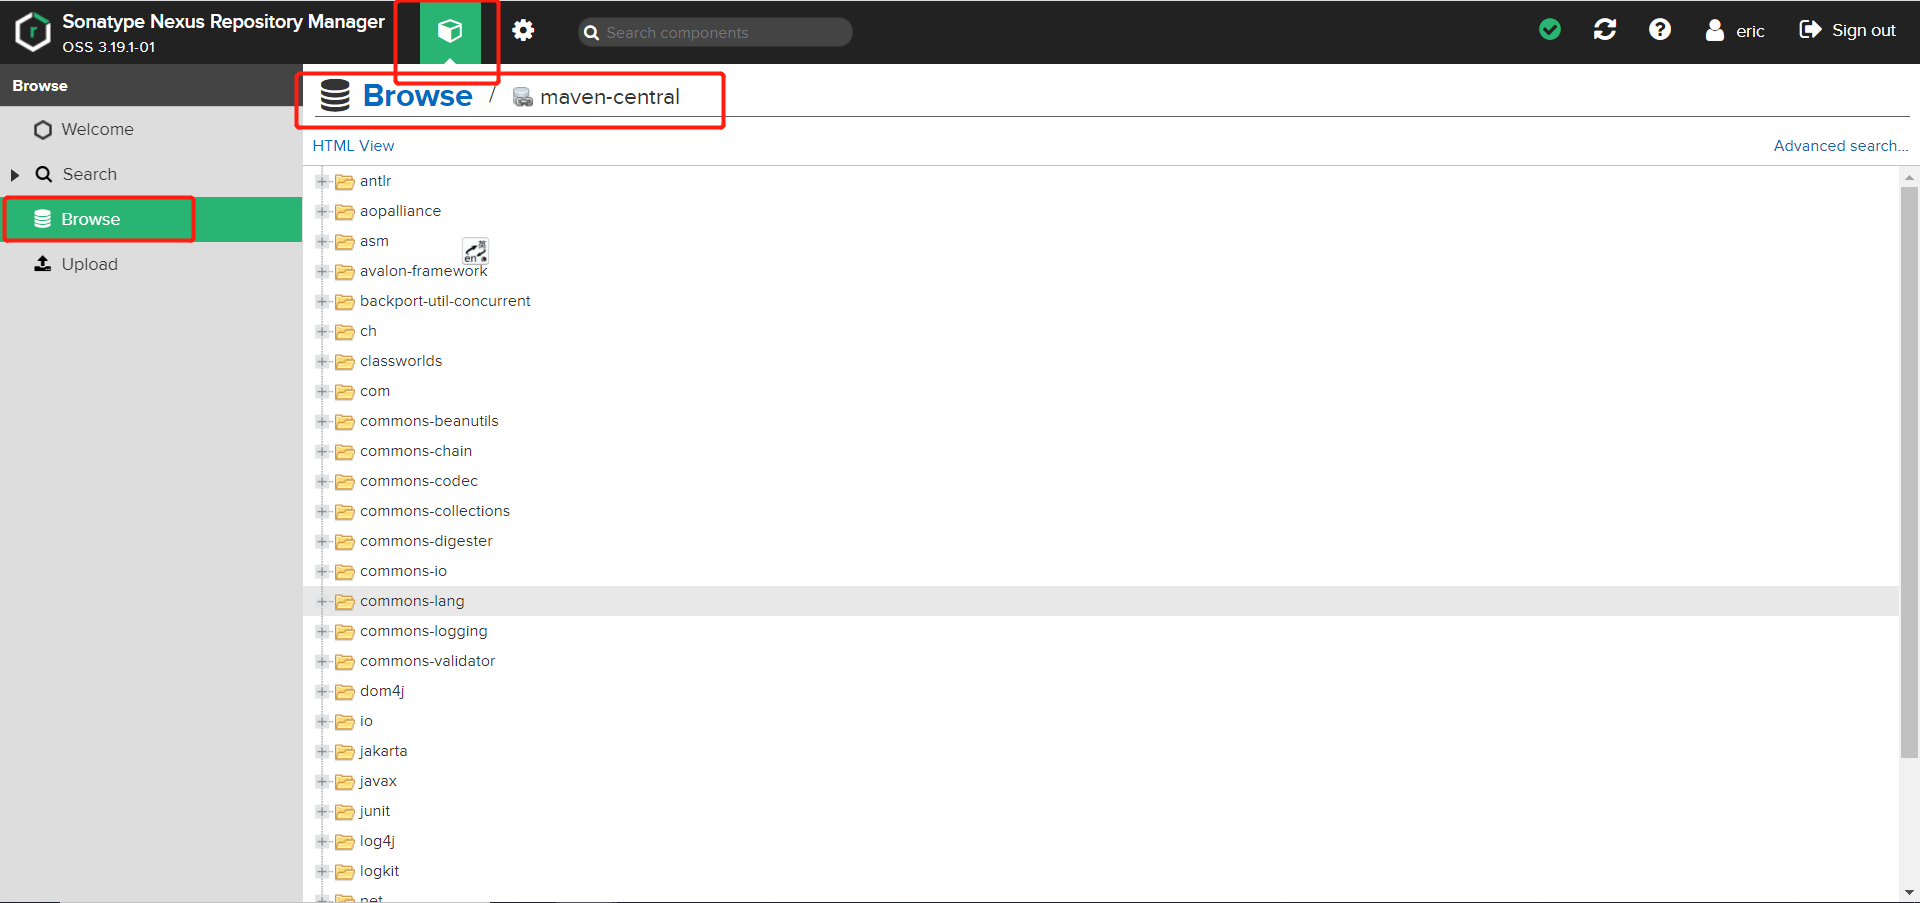
1. 浏览
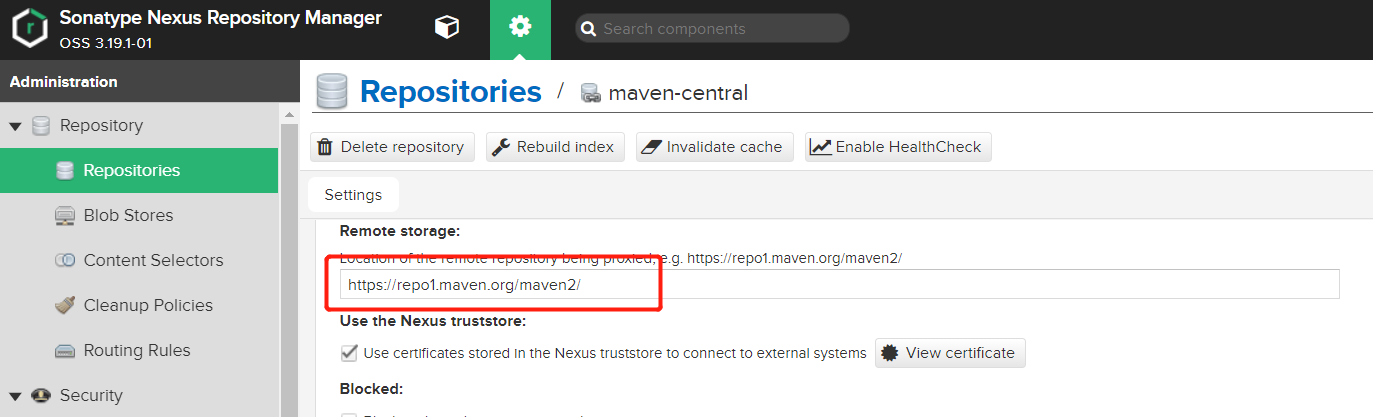
2. 配置
为了更快,可以将该地址改为其他地址
如阿里云地址
http://maven.aliyun.com/nexus/content/groups/public/
四、使用-客户端(maven配置)
第一种方法
1.在pom文件中增加私服地址
<!--私服地址-->
    <repositories>

        <repository>
            <id>maven-public</id>
            <url>http://192.168.1.102:8081/repository/maven-public/</url>
            <releases>
                <enabled>true</enabled>
                <updatePolicy>always</updatePolicy>
            </releases>
            <snapshots>
                <enabled>true</enabled>
            </snapshots>
        </repository>
    </repositories>

    <pluginRepositories>
        <pluginRepository>
            <id>maven-public</id>
            <url>http://192.168.1.102:8081/repository/maven-public/</url>
            <releases>
                <enabled>true</enabled>
            </releases>
            <snapshots>
                <enabled>true</enabled>
            </snapshots>
        </pluginRepository>
    </pluginRepositories>
2.修改maven配置文件
settings.xml
<?xml version="1.0" encoding="UTF-8"?>

<settings xmlns="http://maven.apache.org/SETTINGS/1.0.0"
          xmlns:xsi="http://www.w3.org/2001/XMLSchema-instance"
          xsi:schemaLocation="http://maven.apache.org/SETTINGS/1.0.0 http://maven.apache.org/xsd/settings-1.0.0.xsd">

  <localRepository>E:/gitlab/nexus</localRepository>

  <pluginGroups>
  </pluginGroups>
  <proxies>
  </proxies>

  <servers>
    <server>
      <id>maven-public</id>
      <username>admin</username>
      <password>pwd</password>
    </server>
  </servers>
  <profiles>
  </profiles>
</settings>
第二种方法
直接修改maven配置文件,目前感觉还是有点问题,后续再补充
<?xml version="1.0" encoding="UTF-8"?>

<settings xmlns="http://maven.apache.org/SETTINGS/1.0.0"
          xmlns:xsi="http://www.w3.org/2001/XMLSchema-instance"
          xsi:schemaLocation="http://maven.apache.org/SETTINGS/1.0.0 http://maven.apache.org/xsd/settings-1.0.0.xsd">

  <localRepository>E:/gitlab/nexus</localRepository>

  <pluginGroups>
  </pluginGroups>
  <proxies>
  </proxies>

  <servers>
    <server>
      <id>maven-public</id>
      <username>admin</username>
      <password>nexus0514</password>
    </server>
  </servers>

  <mirrors>
		<mirror>
            <id>maven-public</id>
            <mirrorOf>*</mirrorOf>
            <name>maven-public</name>
            <url>http://192.168.1.102:8081/repository/maven-public/</url>
        </mirror>
  </mirrors>
  <profiles>
  </profiles>
</settings>
其他:
maven的settings.xml文件里面有proxy、server、repository、mirror的配置,在配置仓库地址的时候容易混淆

proxy是服务器不能直接访问外网时需要设置的代理服务,不常用
server是服务器要打包上传到私服时,设置私服的鉴权信息
repository是服务器下载jar包的仓库地址
mirror是用于替代仓库地址的镜像地址


mirror和repository加载顺序:

在mirrorOf与repositoryId相同的时候优先是使用mirror的地址
mirrorOf等于*的时候覆盖所有repository配置
存在多个mirror配置的时候mirrorOf等于*放到最后
只配置mirrorOf为central的时候可以不用配置repository
上面两种办法可以解决以下问题:

参考资料:
1.https://blog.csdn.net/qh870754310/article/details/83780812
2.
