Spring的事件监听机制
最近公司在重构广告系统,其中核心的打包功能由广告系统调用,即对apk打包的调用和打包完成之后的回调,需要提供相应的接口给广告系统。因此,为了将apk打包的核心流程和对接广告系统的业务解耦,利用了spring的事件监听特性来满足需求。以下说明spring的事件机制的相关内容。
1.观察者模式
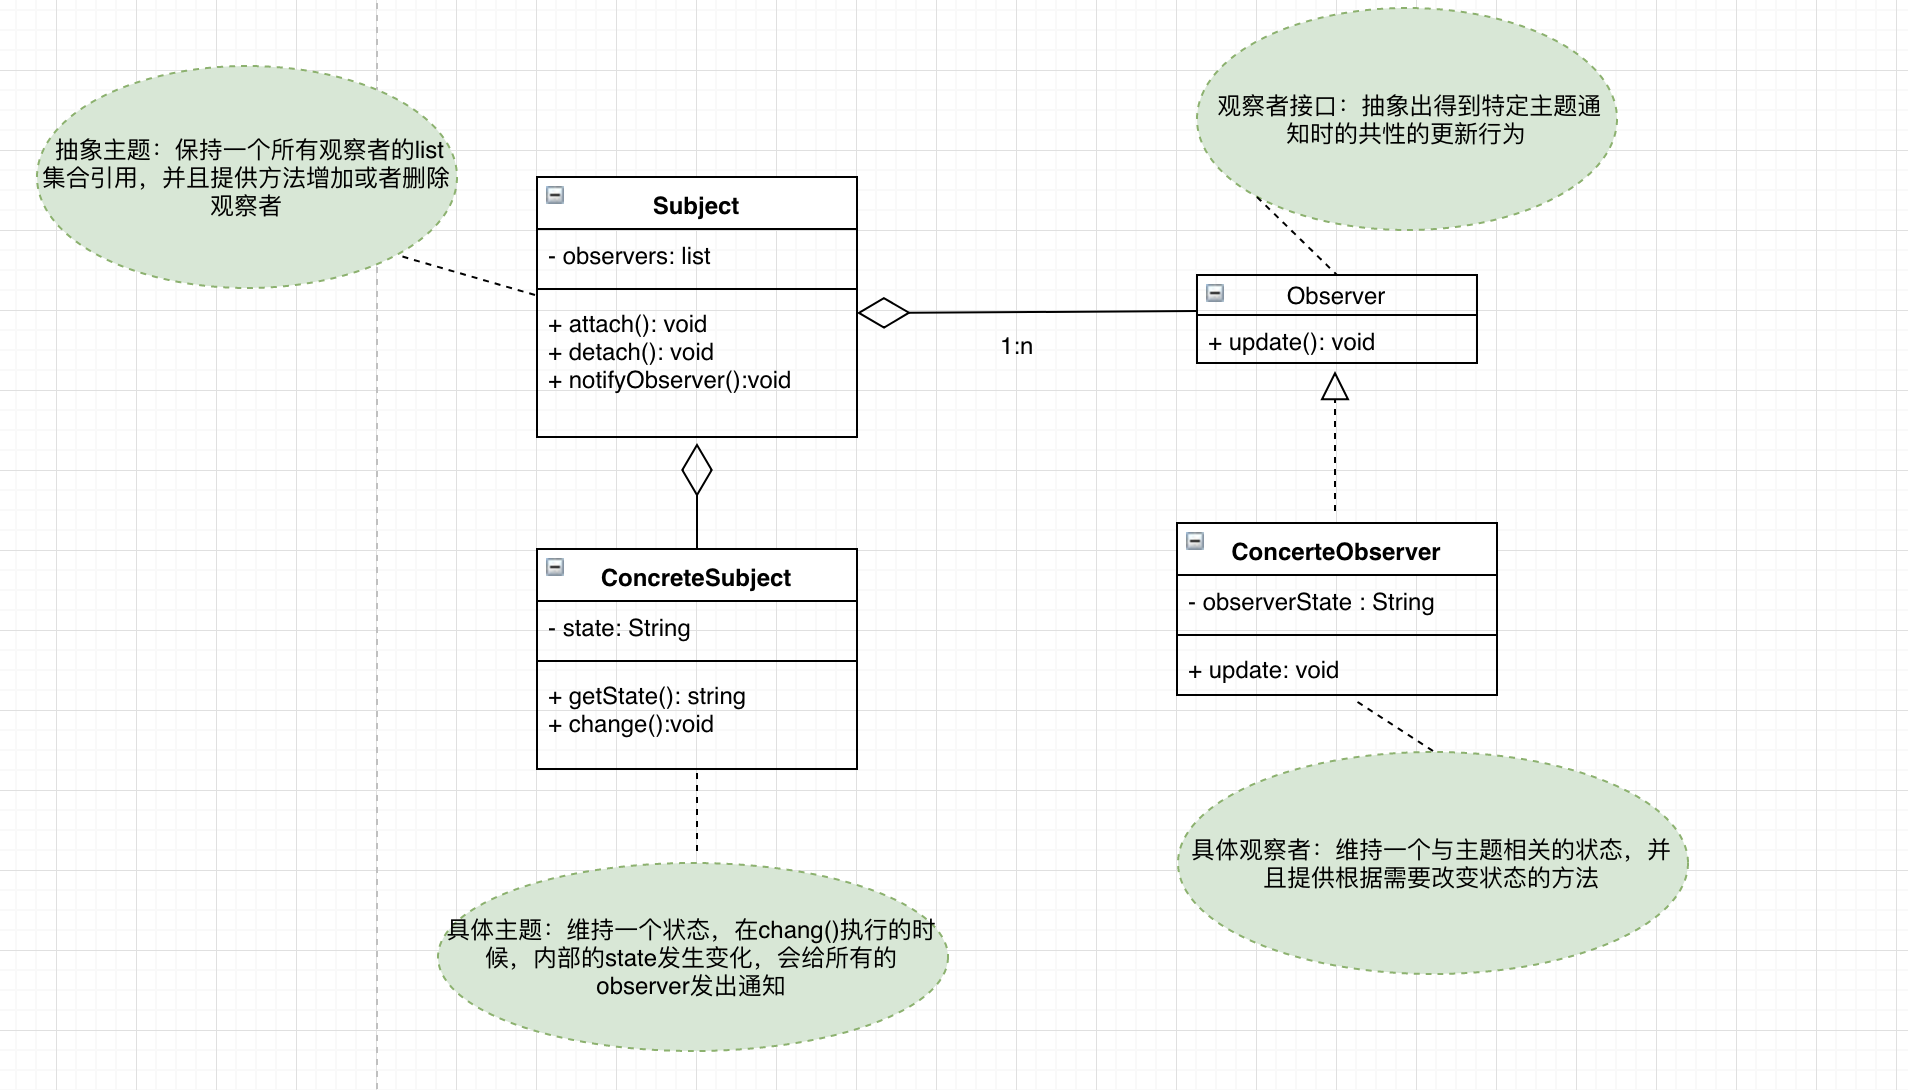
Spring的事件监听(也称事件驱动)是观察者模式的一种实现,比较常见的有发布-订阅模型。通常我们利用消息队列来实现不同系统之间的解耦,如用户注册完成后,可以向消息队列发布一条消息,然后订阅了此topic的子系统(如邮件服务,积分服务)收到发布的消息之后,就会做相应的处理。这样做的好处是避免了在注册服务里耦合其他服务的代码,并且,执行子系统的业务将会异步执行,互不影响。下图是一个经典的观察者模式的结构。

以下为上述观察者模式的java简单实现:
(1)Subject.java
 1 package observerPattern;
 2
 3 import java.util.ArrayList;
 4 import java.util.List;
 5
 6 /**
 7  * Created by jy on 2018/11/28.
 8  */
 9 public abstract class Subject {
10
11     //维护一个所有观察者集合
12     private List<Observer> list = new ArrayList<>();
13
14     //新注册一个观察者
15     public void attach(Observer observer){
16         list.add(observer);
17         System.out.println("新注册一个观察者");
18     }
19
20     //删除一个已注册的观察者
21     public void detach(Observer observer){
22         list.remove(observer);
23         System.out.println("删除一个已注册的观察者");
24     }
25
26
27     //通知所有已经注册的观察者
28     public void notifyObservers(String state){
29         for (int i = 0; i < list.size(); i++) {
30             list.get(i).update(state);
31         }
32     }
33 }
(2)Observer.java
 1 package observerPattern;
 2
 3 /**
 4  * Created by jy on 2018/11/28.
 5  */
 6 public interface Observer {
 7
 8     // 抽象出的更新行为
 9     public void update(String state);
10 }
(3)ConcreteSubject.java
 1 package observerPattern;
 2
 3 /**
 4  * Created by jy on 2018/11/28.
 5  */
 6 public class ConcreteSubject extends Subject{
 7
 8     //真实主题内维护一个状态
 9     private String state;
10
11     public String getState() {
12         return state;
13     }
14
15     public void change(String state){
16         this.state = state;
17         System.out.println("真实主题状态变化为:"+state);
18         this.notifyObservers(state);
19     }
20 }
(4)ConcreteObserver.java
 1 package observerPattern;
 2
 3 /**
 4  * Created by jy on 2018/11/28.
 5  */
 6 public class ConcreteObserver implements Observer {
 7
 8     //具体观察者的状态
 9     private String observerState;
10
11     @Override
12     public void update(String state) {
13         //这里可以根据传递过来的主题的状态作出相应的业务
14       observerState = state;
15         System.out.println("观察者的状态跟着变化为:"+observerState);
16     }
17 }
(5)Main.java
 1 package observerPattern;
 2
 3 /**
 4  * Created by jy on 2018/11/28.
 5  */
 6 public class Main {
 7     public static void main(String[] args) {
 8         //真实主题
 9         ConcreteSubject concreteSubject = new ConcreteSubject();
10         //真实观察者
11         ConcreteObserver concreteObserver = new ConcreteObserver();
12         //观察者先注册
13         concreteSubject.attach(concreteObserver);
14
15         //改变真实主题状态
16         concreteSubject.change("2");
17
18     }
19 }
结果:在执行了main方法之后,我们可以看到控制台输出结果,表明,真实观察者的状态是会根据真实主题的状态变化而变化的:

2. Spring事件监听
spring也对事件驱动模型提供了支持,该模型主要由三部分组成:
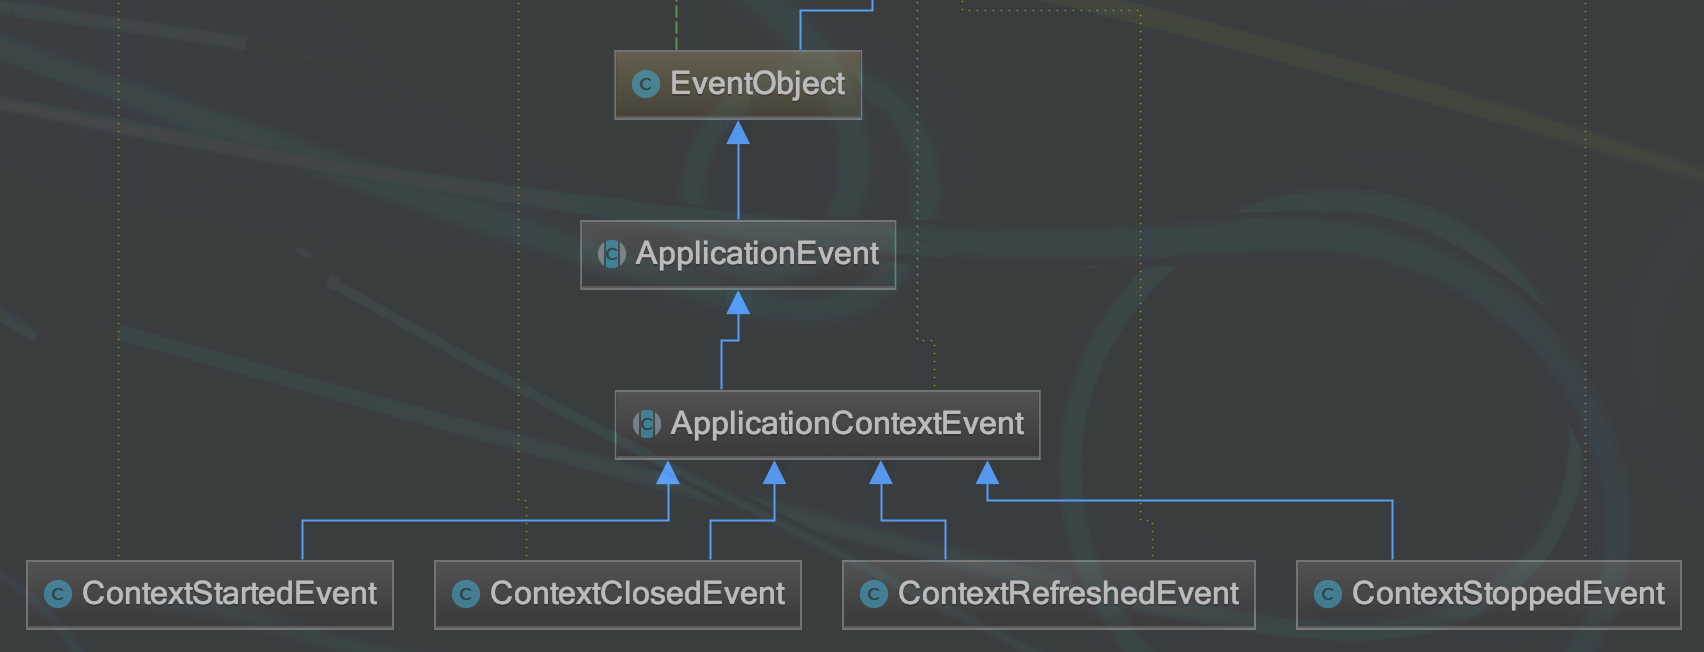
(1) 事件(ApplicationEvent):继承了jdk的EventObject,在spring项目中可以继承ApplicationEvent,来自定义自己的事件。
spring容器内部对ApplicationEvent有着下面几个实现,通过名字可以很清楚事件所描述的行为。

(2)发布者(ApplicationEventPublisher):实现这个接口,就可以使得spring组件有发布事件的能力。
可以看到,ApplicationContext实现了此接口,因此,可以spring组件可以通过实现ApplicationContextAware接口,注入ApplicationContext,然后,通过ApplicationContext的publishEvent()方法来实现事件传播,
当然,也可以直接实现ApplicationEventPublisher接口,重写publishEvent()方法,同样可以实现事件传播。

通过阅读源码发现,在AbstractApplicationContext类中,定义了针对观察者的增加,get,注册等方法。下面代码中的addApplicationListener()是向ApplicationEventMulticaster类中维护的一个set中添加listener。这个set存储了该发布者所有的观察者(listener)。
 1 @Override
 2     public void addApplicationListener(ApplicationListener<?> listener) {
 3         Assert.notNull(listener, "ApplicationListener must not be null");
 4         //listener传入持有的一个的applicationEventMulticaster类中
 5         if (this.applicationEventMulticaster != null) {
 6             this.applicationEventMulticaster.addApplicationListener(listener);
 7         }
 8         this.applicationListeners.add(listener);
 9     }
10
11 //省略部分代码
12
13 protected void registerListeners() {
14         // Register statically specified listeners first.
15         for (ApplicationListener<?> listener : getApplicationListeners()) {
16             getApplicationEventMulticaster().addApplicationListener(listener);
17         }
18
19         // Do not initialize FactoryBeans here: We need to leave all regular beans
20         // uninitialized to let post-processors apply to them!
21         String[] listenerBeanNames = getBeanNamesForType(ApplicationListener.class, true, false);
22         for (String listenerBeanName : listenerBeanNames) {
23             getApplicationEventMulticaster().addApplicationListenerBean(listenerBeanName);
24         }
25
26         // Publish early application events now that we finally have a multicaster...
27         Set<ApplicationEvent> earlyEventsToProcess = this.earlyApplicationEvents;
28         this.earlyApplicationEvents = null;
29         if (earlyEventsToProcess != null) {
30             for (ApplicationEvent earlyEvent : earlyEventsToProcess) {
31                 getApplicationEventMulticaster().multicastEvent(earlyEvent);
32             }
33         }
34     }
在AbstractApplicationContext中publishEvent:
 1 protected void publishEvent(Object event, @Nullable ResolvableType eventType) {
 2         //.....
 3         // Multicast right now if possible - or lazily once the multicaster is initialized
 4         if (this.earlyApplicationEvents != null) {
 5             this.earlyApplicationEvents.add(applicationEvent);
 6         }
 7         else {
 8             getApplicationEventMulticaster().multicastEvent(applicationEvent, eventType);  //事件广播
10         //....
11     }
具体的发布事件的方法都在上面提到的ApplicationEventMulticaster这个类型的类中去实现的,在AbstractApplicationContext中,会先尝试从ConfigurableListableBeanFactory中去加载这个类,如果不存在,则会默认new 一个SimpleApplicationEventMulticaster:
 1 protected void initApplicationEventMulticaster() {
 2         ConfigurableListableBeanFactory beanFactory = getBeanFactory();
 3         if (beanFactory.containsLocalBean(APPLICATION_EVENT_MULTICASTER_BEAN_NAME)) {   //尝试加载
 4             this.applicationEventMulticaster =
 5                     beanFactory.getBean(APPLICATION_EVENT_MULTICASTER_BEAN_NAME, ApplicationEventMulticaster.class);
 6             if (logger.isTraceEnabled()) {
 7                 logger.trace("Using ApplicationEventMulticaster [" + this.applicationEventMulticaster + "]");
 8             }
 9         }
10         else {
11             this.applicationEventMulticaster = new SimpleApplicationEventMulticaster(beanFactory);   //不存在则默认使用SimpleApplicationEventMulticaster

12             beanFactory.registerSingleton(APPLICATION_EVENT_MULTICASTER_BEAN_NAME, this.applicationEventMulticaster);
看看SimpleApplicationEventMulticaster 是怎么广播事件的,由代码可知,在线程池不为空的情况下,异步发布特定类型的事件。
 1 @Override
 2     public void multicastEvent(final ApplicationEvent event, @Nullable ResolvableType eventType) {
 3         ResolvableType type = (eventType != null ? eventType : resolveDefaultEventType(event));
 4         for (final ApplicationListener<?> listener : getApplicationListeners(event, type)) {
 5             Executor executor = getTaskExecutor();
 6             if (executor != null) {
 7                 executor.execute(() -> invokeListener(listener, event));
 8             }
 9             else {
10                 invokeListener(listener, event);
11             }
12         }
13     //....
将invokeListener方法点击到最后,发现调用了listener的onApplicationEvent(),实现了事件的发布。
1 private void doInvokeListener(ApplicationListener listener, ApplicationEvent event) {
2         try {
3             listener.onApplicationEvent(event);
4         }
5         catch (ClassCastException ex) {
6             //....
7         }
8     }
(3)事件订阅者(ApplicationListener):实现这个接口,就可以监听ApplicationListener发布的特定的事件。

实现ApplicationListener这个接口,重写onApplicationEvent()方法,来处理监听到的ApplicationEvent,这里可以监听特定类型的事件。
3. 基于注解的事件监听
spring也为发布者和监听者提供了相应的注解支持,只需要在对应的观察者类的对应方法上加上@EventListener:

对于发布者,可以直接在service通过@Autowired注入ApplicationEventPublisher。
4.小结
文章主要介绍了spring中事件驱动的模型。主要运用了观察者模式的思想,随后介绍了spring中事件发布的机制。


