
JAVA进阶
1 对象序列化
1.1 对象要序列化要实现Serializable接口
1.2 然后通过ObjectInputStream 对象读入流来读入一个对象
new ObjectOutputStream(new xxOutputStream(""))
new的时候传入一个读入流
1.3 需要申明一个序列化版本号
private static final long serialVersionUID = ;
//用于协商该类的版本,序列化和反序列的版本号不一致时,会异常。修订后应该修改版本号,这样之前序列化的对象进行反序列的时候会失败,抛异常。
//序列化对象
ObjectOutputStream oos = new ObjectOutputStream(new FileOutputStream(""));
//写入
oos.writeObject();


ObjectInputStream ois = new ObjectInputStream(new FileInputStream(""));
//读进
Object o = ois.readObject();
2 打印流
2.1 所用类及方法
类:PrintStream
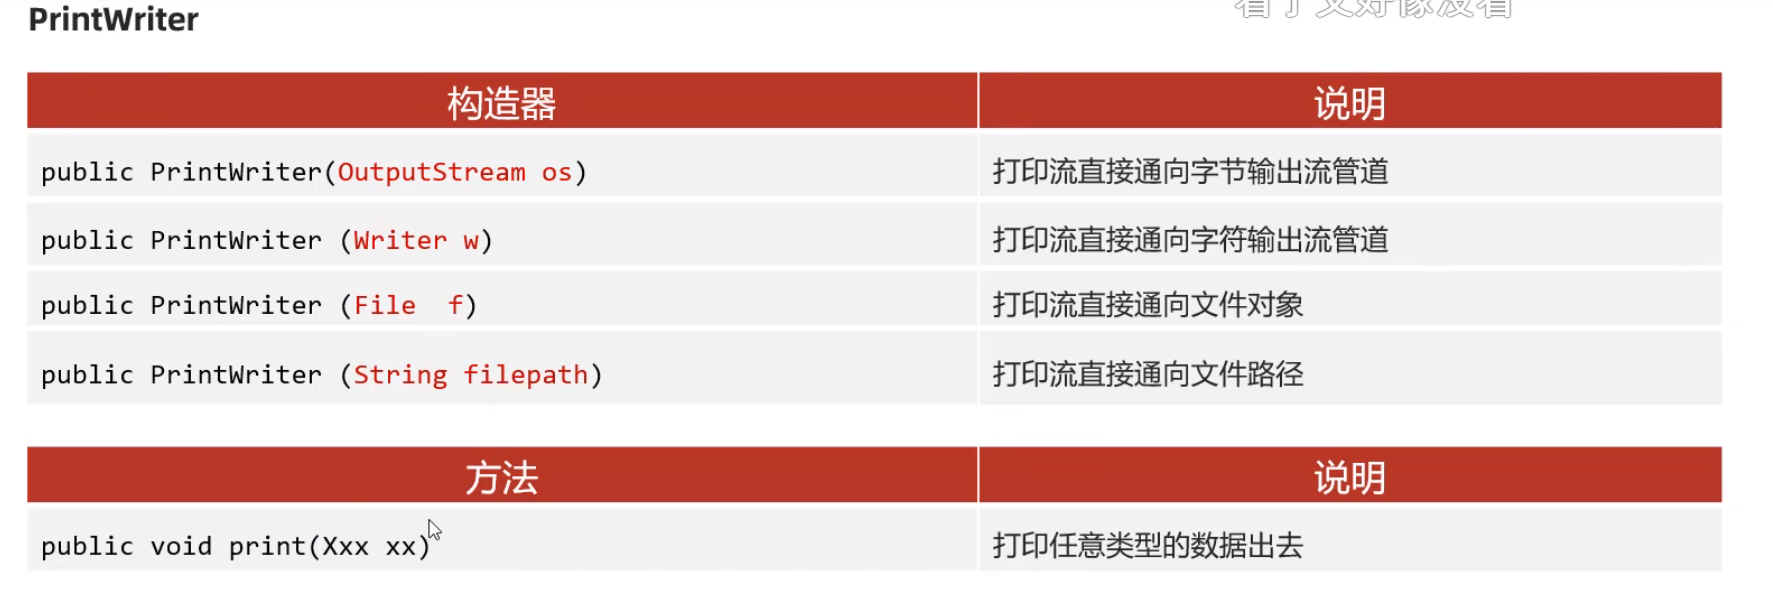
改变输出语句到文件
 PrintStream printStream = new PrintStream("2.txt");
        System.out.println("1111");
        System.out.println("1111");
        System.setOut(printStream);
        System.out.println("2222");
        System.out.println(2222);
2.2 读取Properties
案例
//写配置文件
Properties properties = new Properties();
properties.setProperty("admin","123456");


//参数一 保存管道,字符输出流管道,  参数二  保存的注解
properties.store(new FileWriter("123.properties"),"");

//加载配置文件
properties.load(new FileInputStream("123.properties"));

String admin = properties.getProperty("admin");
System.out.println(admin);
2.3 commons-io库
封装了常用的IO操作类库 , 提高开发效率
2.3.1 导入依赖
<dependency>
    <groupId>commons-io</groupId>
    <artifactId>commons-io</artifactId>
    <version>2.11.0</version>
</dependency>
2.3.2 FileUtils作用

2.3.3常用工具类
FileUtils
IOUtils
3 线程
3.1 定义
thread - 一个程序内部的一条执行路径
main方法的执行就是一条单独的执行路径
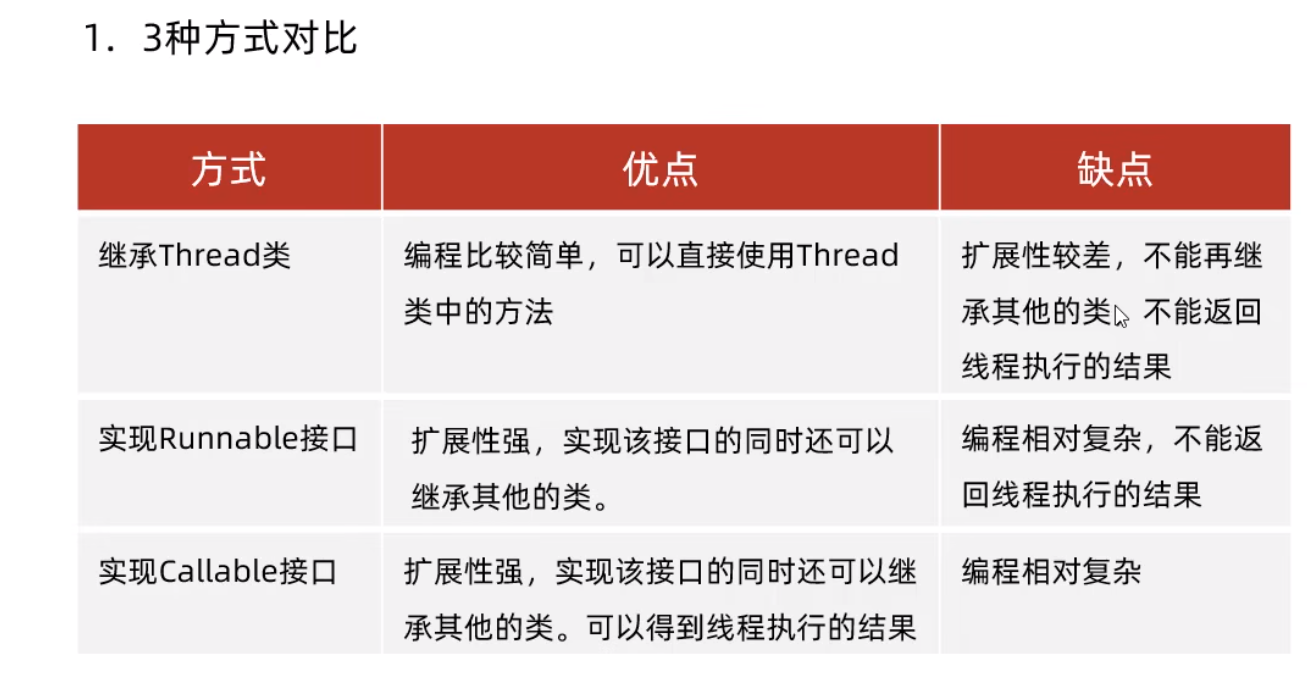
3.2 三种方式创建多线程
3.2.1 继承Thread类
便于构建, 只需要重写run方法, 但是已经继承了一个类了 ,不利于拓展
3.2.1.1样例
public class ThreadDemo1 {
    public static void main(String[] args) {
        Thread t = new MyThread();

        //调用start方法启用线程
        t.start();
        for (int i = 0; i < 5; i++) {
            System.out.println("主线程"+i);
        }
    }
}

class MyThread extends Thread{
    /**
     * 重写run方法
     */
    @Override
    public void run() {
        for (int i = 0; i < 5; i++) {
            System.out.println("子线程"+i);
        }
    }
}
3.2.2 实现Runnable接口
3.2.2.1样例
public class ThreadDemo2 {
    public static void main(String[] args) {
        //任务对象
        Runnable target = new MyRunnable();
        //任务交给Thread处理
        Thread t = new Thread(target);

        t.start();

        for (int i = 0; i < 5; i++) {
            System.out.println("主线程"+i);
        }
    }
}

class MyRunnable implements Runnable{

    @Override
    public void run() {
        for (int i = 0; i < 5; i++) {
            System.out.println("子线程"+i);
        }
    }
}
使用匿名类实现
     new Thread(){
            @Override
            public void run() {
                for (int i = 0; i < 5; i++) {
                    System.out.println("子1线程"+i);
                }
            }
        }.start();
//使用Runnable
    new Thread(new Runnable() {
            @Override
            public void run() {
                for (int i = 0; i < 5; i++) {
                    System.out.println("子2线程"+i);
                }
            }
        }).start();
使用Lambada表达式优化
//条件:需要代替的类是一个接口,且有且仅有一个需要被替代的方法,仅有一个参数省去小括号,仅有一条语句省去大括号
new Thread(()->{
            for (int i = 0; i < 5; i++) {
                System.out.println("子3线程"+i);
            }
        }).start();
3.2.3 实现Callable接口 , 结合FutureTask
优点-可以获取返回值
3.2.3.1 样例
public class ThreadDemo3 {
    public static void main(String[] args) {
        Callable<String> call = new MyCallable(3);

        FutureTask<String> f1 = new FutureTask<>(call);
        Thread t1 = new Thread(f1);
        t1.start();
        String s = null;
        try {
            //线程执行完毕,才会提取结果
            s = f1.get();
            System.out.println(s);
        } catch (InterruptedException e) {
            e.printStackTrace();
        } catch (ExecutionException e) {
            e.printStackTrace();
        }
        System.out.println("...");
    }
}

class MyCallable implements Callable<String>{
    private int n;

    public MyCallable(int n) {
        this.n = n;
    }


    @Override
    public String call() throws Exception {
//        System.out.println(Thread.getAllStackTraces());
//        System.out.println(Thread.activeCount());
//        System.out.println(Thread.currentThread().getName());
//        Thread.sleep(5000);
        return String.valueOf(n+1);
    }
}
3.2.4 三种方式对比
3.2.5Thread常用方法
sleep - 静态方法
Thread.currentThread() - 获取当前线程

3.3 加锁
3.3.1 同步代码块 - - synchronized
解决线程同步问题 - 线程安全
idea中 - 选中代码块 快捷键: Ctrl + Alt + T
将代码块放到同步代码块里
       synchronized ("hhh") {
            System.out.println("aaa");
            System.out.println("aaa");
            System.out.println("aaa");
        }
对于实例方法 使用this作为锁 - 一个账户的调用
     synchronized (this) {
            System.out.println("aaa");
            System.out.println("aaa");
            System.out.println("aaa");
        }
对于静态方法,使用字节码 类名.class作为锁 - 所有线程一起调用的 所以需要用这个整个类的调用作为锁
     synchronized (xx.class) {
            System.out.println("aaa");
            System.out.println("aaa");
            System.out.println("aaa");
        }
3.3.2 同步方法
同步方法底层也是有隐式锁的,锁的范围是整个方法的代码
如果方法是实例方法,默认用this作为锁对象
如果是静态方法,默认用类名.class 作为锁对象
public synchronized void xx(){

}
3.3.3 Lock锁
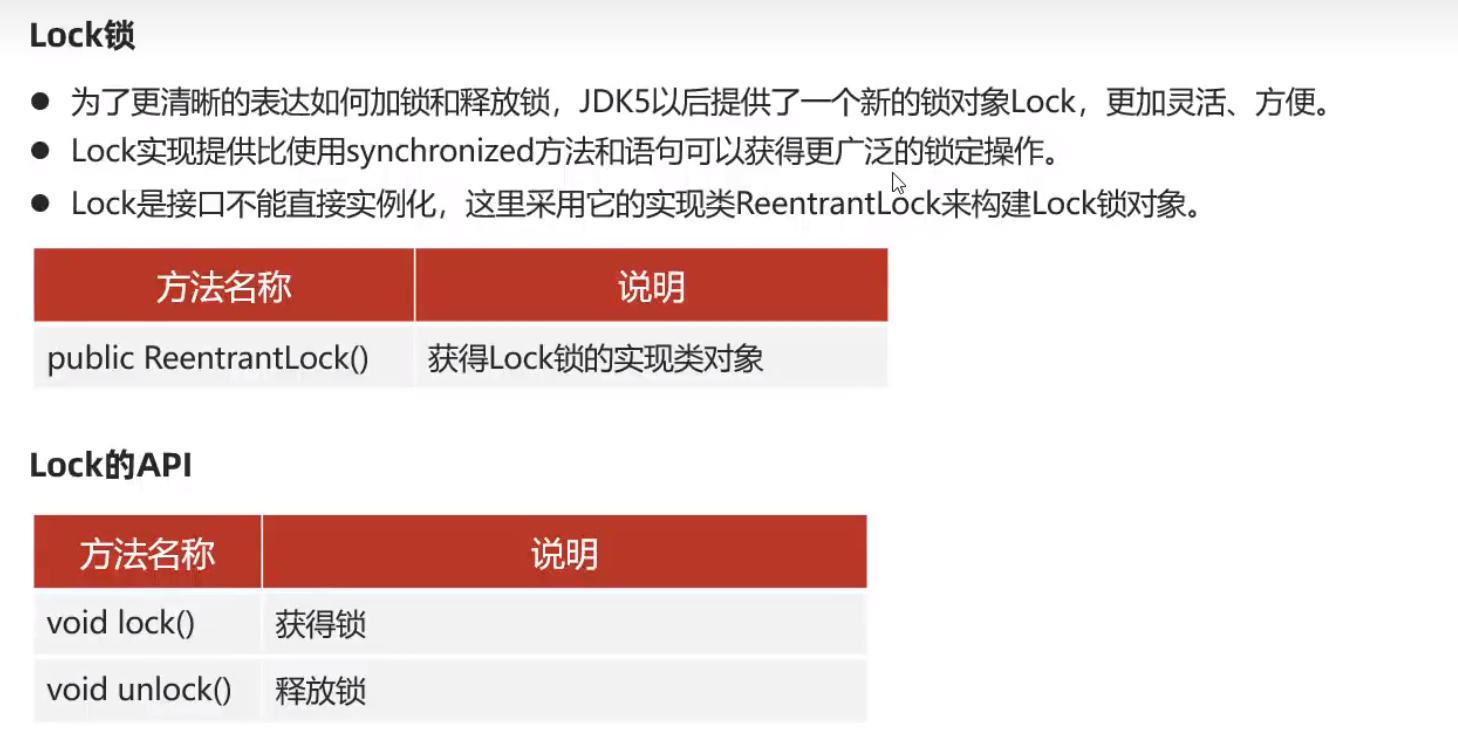
class Account{
    //一个实例一把锁
    private static Lock lock = new ReentrantLock();

    public void doSomeThing(){
        lock.lock();//上锁

        //一定要保证能够解锁
        try{
            System.out.println(11);
        }finally {
            lock.unlock();//解锁
        }

    }
}


public class LockDemo4 {

    public static void main(String[] args) {
        Lock lock = new ReentrantLock();
    }
}
3.3.4 线程通信
线程间互相发送数据 - 通过共享一个数据
生产者生产数据后,唤醒消费者,等待自己 消费者消费数据后,唤醒生产者,等待自己
(this.notifyAll();this.wait()😉
操作同一个变量的方法应该加上synchronize 变成同步方法 加锁
3.4线程池
设定固定数量的线程- 重复利用这些线程来执行任务
防止资源耗尽
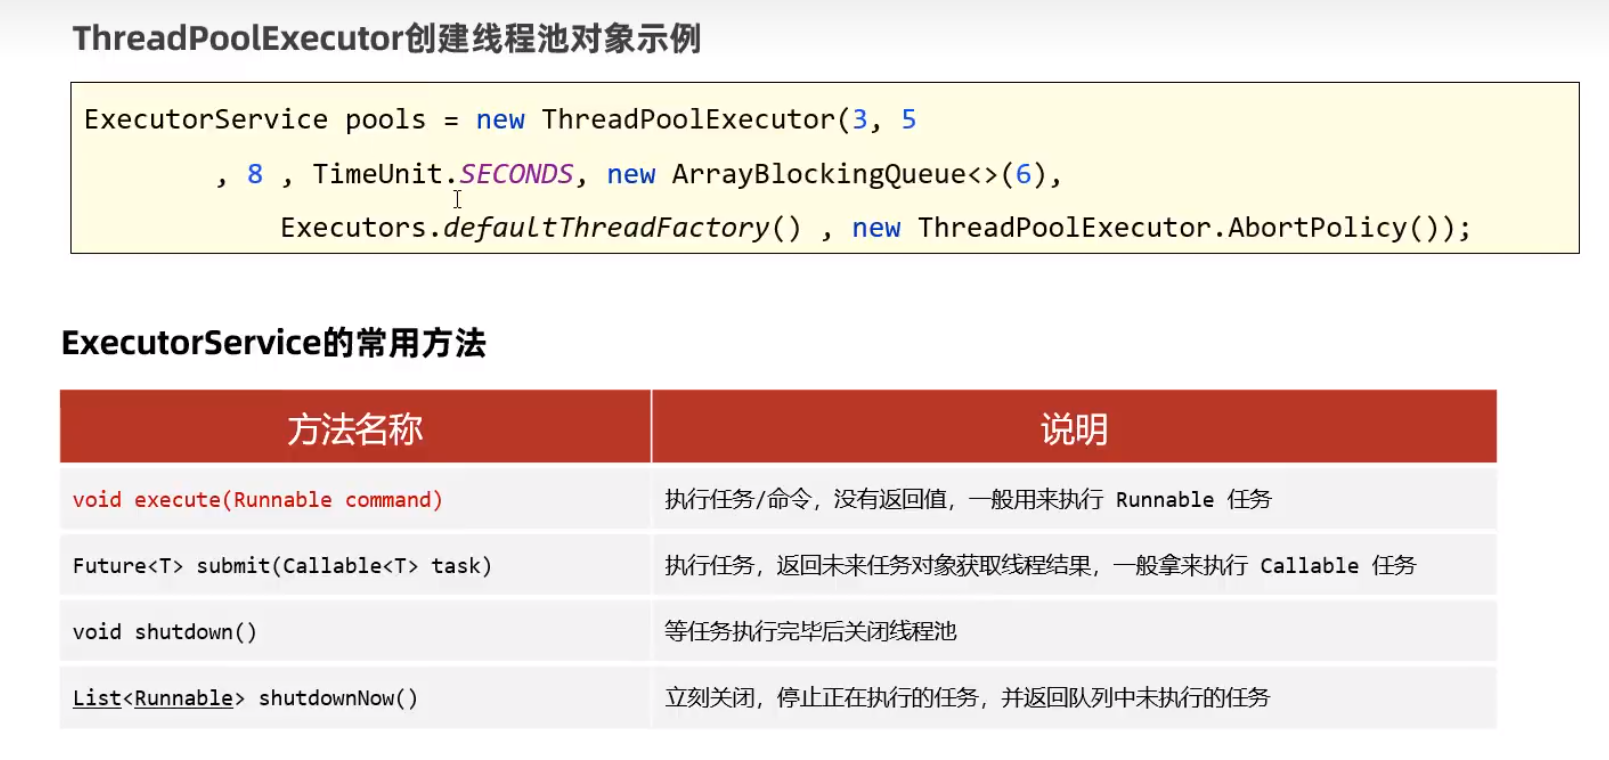
3.4.1 创建线程池

3.4.2 线程池构造器
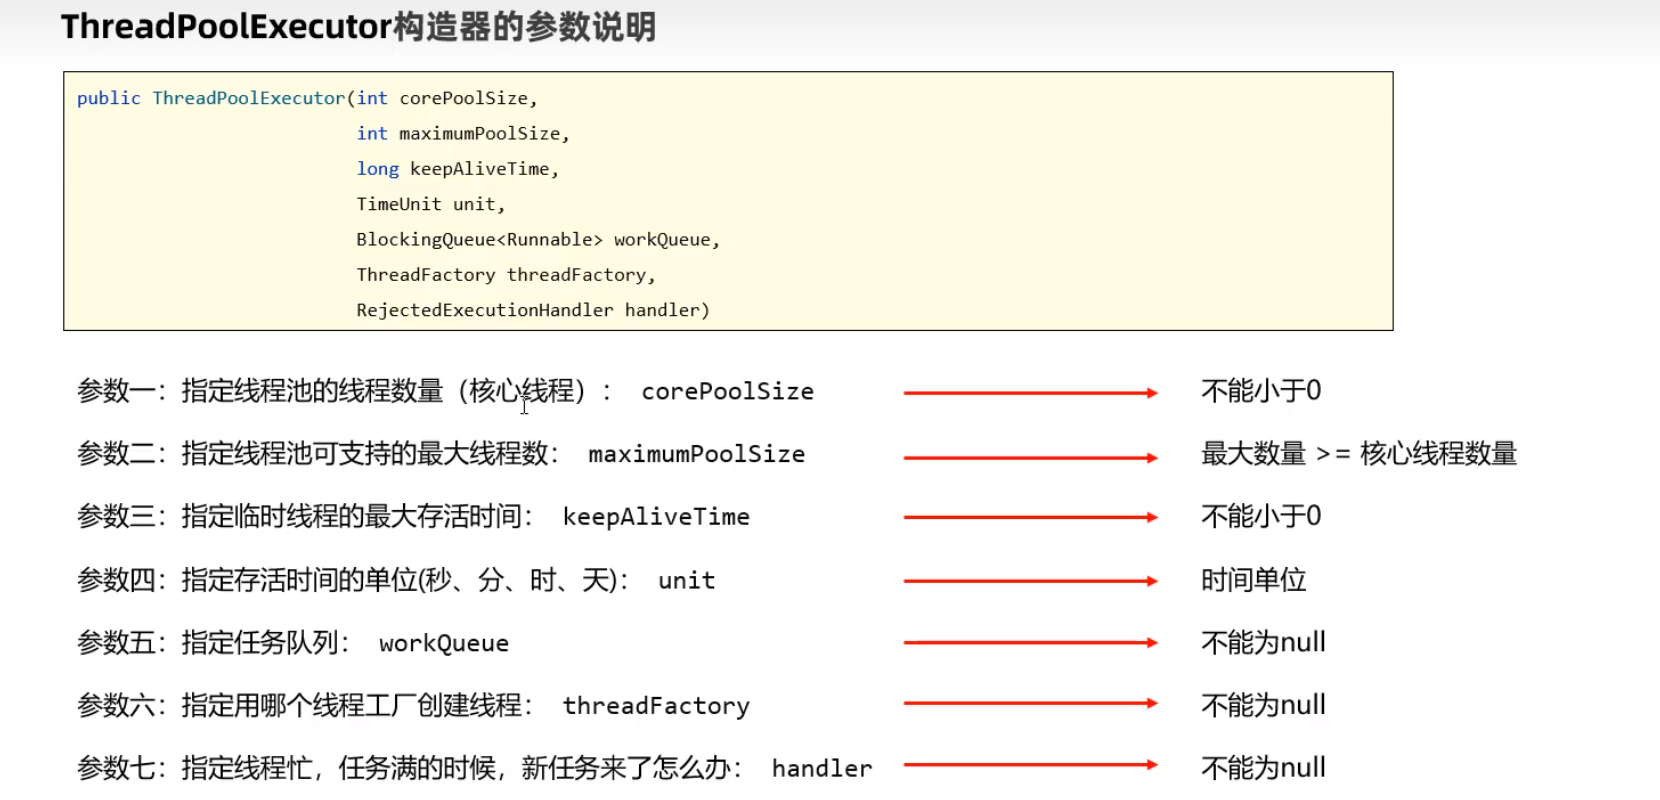
import java.util.concurrent.ArrayBlockingQueue;
import java.util.concurrent.ThreadPoolExecutor;
import java.util.concurrent.TimeUnit;
public class ThreadDemo {
public static void main(String[] args) {
ThreadPoolExecutor pool = new ThreadPoolExecutor(
3,5,6, TimeUnit.SECONDS,
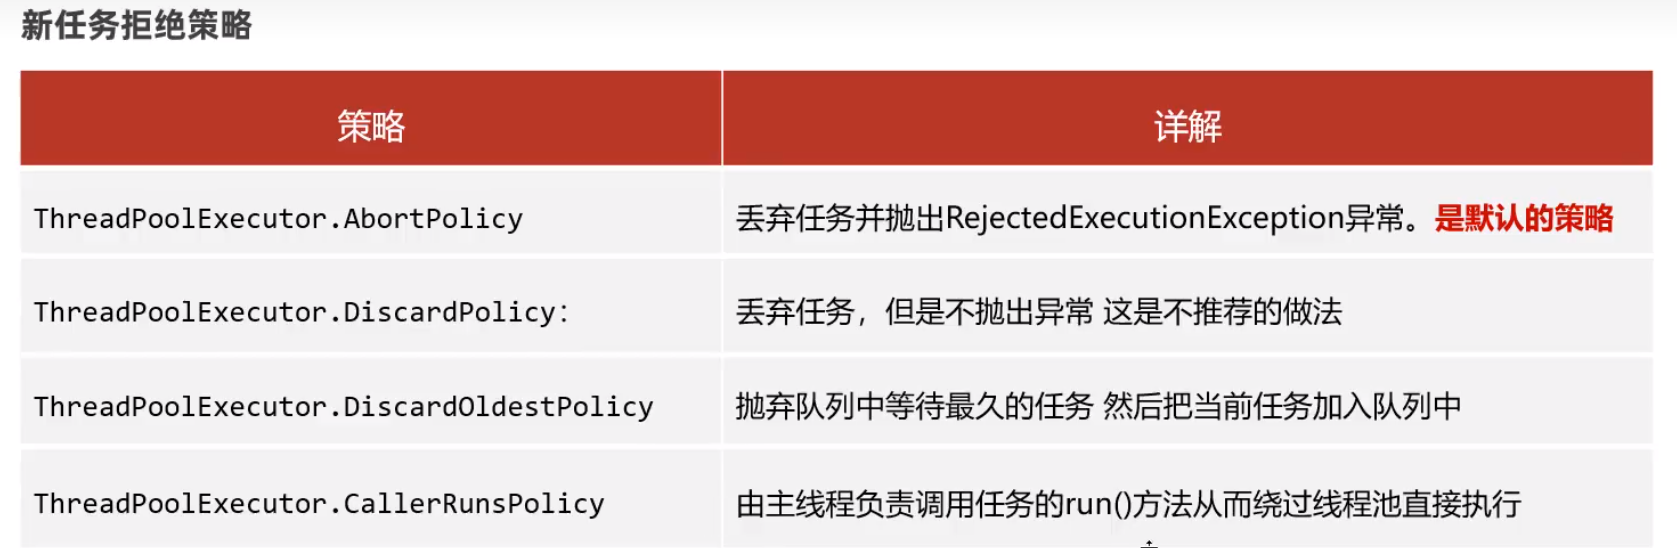
new ArrayBlockingQueue<>(5),new ThreadPoolExecutor.AbortPolicy()
);
MyRunnable target = new MyRunnable();
pool.execute(target);
pool.execute(target);
pool.execute(target);
pool.execute(target);
pool.execute(target);
}
}
任务执行 - 核心线程数+ 任务队列最大数 = 3+5 = 8 线程执行数超过8 , 则会开始在核心线程数3的基础上,创建临时线程
如果执行数量大于线程池的线程数5 + 等待队列大小5 则新开的线程会执行相应的拒绝策略

     	//核心线程执行
        pool.execute(target);
        pool.execute(target);
        pool.execute(target);

        //队列等待
        pool.execute(target);
        pool.execute(target);
        pool.execute(target);
        pool.execute(target);
        pool.execute(target);

        //临时线程可创建  5  - 3 = 2
        pool.execute(target);
        pool.execute(target);

        //多余线程
        pool.execute(target);
关闭线程池
线程池在一般状态是不会主动关闭的, 所以主线程执行完并不会停止程序
在任务没执行完时关闭线程池会抛出异常,但是线程池能够关闭
pool.shutdownNow();//强制关闭
pool.shutdown(); //任务执行完 有序关闭
3.4.3 新任务拒绝策略
3.4.4 ExcutorService
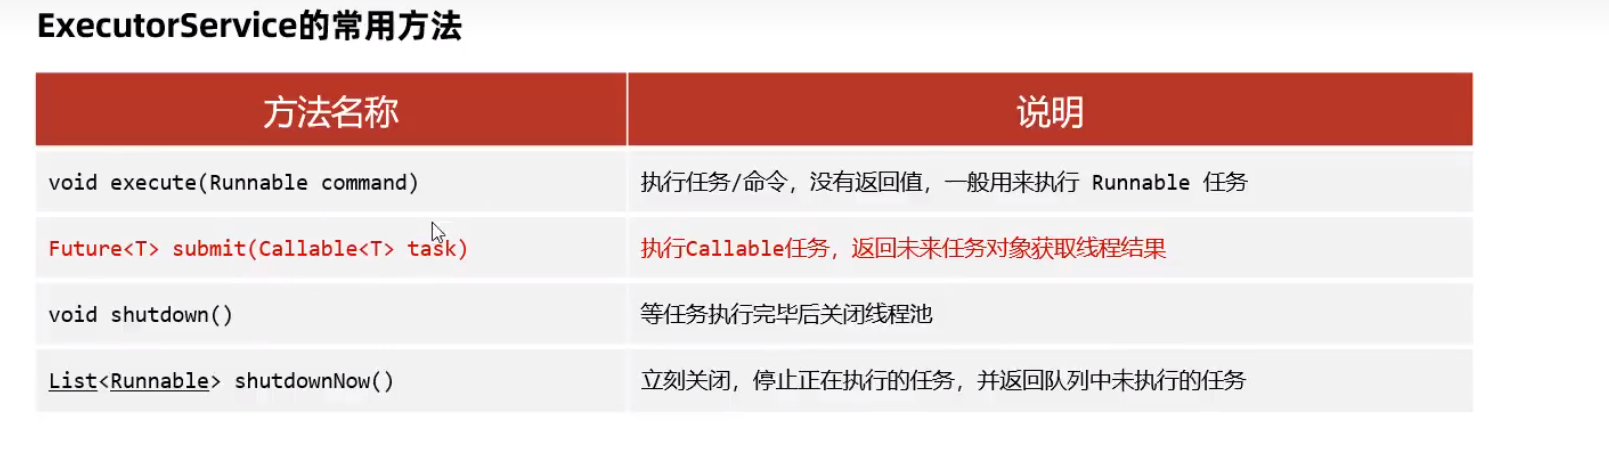
3.4.4.1实现执行Callable接口的线程池
class MyCallable implements Callable<String>{
    private int n;

    public MyCallable(int n) {
        this.n = n;
    }


    @Override
    public String call() throws Exception {
//        System.out.println(Thread.getAllStackTraces());
//        System.out.println(Thread.activeCount());
//        System.out.println(Thread.currentThread().getName());
//        Thread.sleep(5000);
        return String.valueOf(n+1);
    }
}
ExecutorService pool = new ThreadPoolExecutor(
          3,5,6, TimeUnit.SECONDS,
          new ArrayBlockingQueue<>(5),new ThreadPoolExecutor.AbortPolicy()
        );

        Future<String> f1 = pool.submit(new MyCallable(100));
        Future<String> f2 = pool.submit(new MyCallable(200));
        Future<String> f3 = pool.submit(new MyCallable(300));
        Future<String> f4 = pool.submit(new MyCallable(400));

        System.out.println(f1.get());
        System.out.println(f2.get());
        System.out.println(f3.get());
        System.out.println(f4.get());
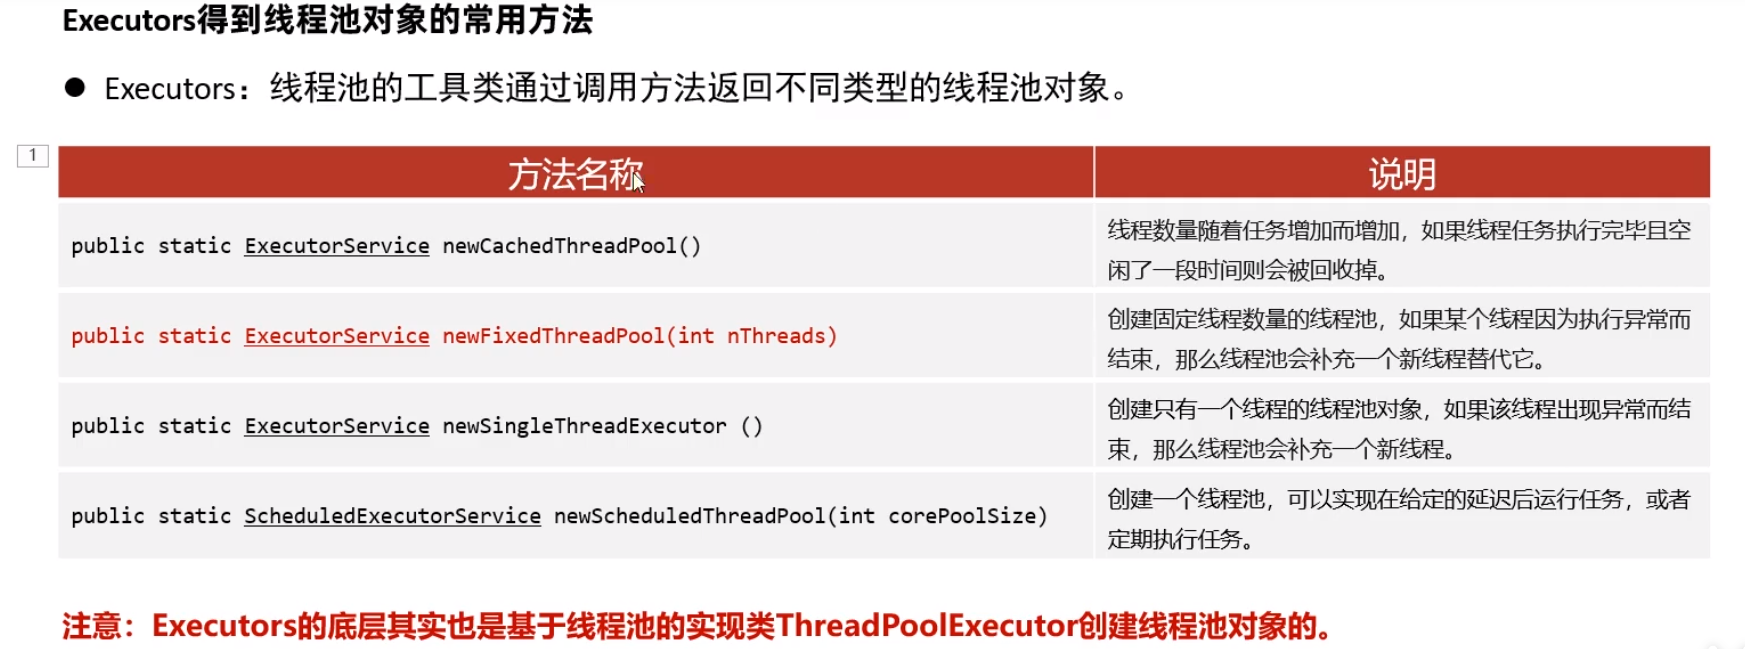
3.4.4.2Excutors工具类构建线程池
3.5 定时器
Timer定时器
public class TimerDemo {
    public static void main(String[] args) {
        //定时器本来就是个单线程
        Timer timer = new Timer();

        //调用方法 处理定时任务
        timer.schedule(new TimerTask() {
            @Override
            public void run() {
                System.out.println(Thread.currentThread().getName()+"执行");
            }
        },3000,2000);
    }
}
3.5.1 Timer引入多线程--ScheduledExecutorService
 ScheduledExecutorService pool = Executors.newScheduledThreadPool(3);

        pool.scheduleAtFixedRate(() -> {
            System.out.println(111);
        },0,10, TimeUnit.SECONDS);
3.6 并发与并行
正在运行的程序就是一个独立的进程 吗, 线程是属于进程的 , 多个线程是并发与并行同时进行的
3.6.1 并发
- CPU同时处理的线程数量有限
- CPU会轮询为系统的每个线程服务,由于CPU的切换速度很快(时间片) , 给我们的感觉这些线程在同时执行,这就是并发
同一个核心一个时间点只能执行一个线程 - 执行完这个线程立马切换到下一个线程的任务 -- 并发
3.6.2 并行
n个线程能够同时执行
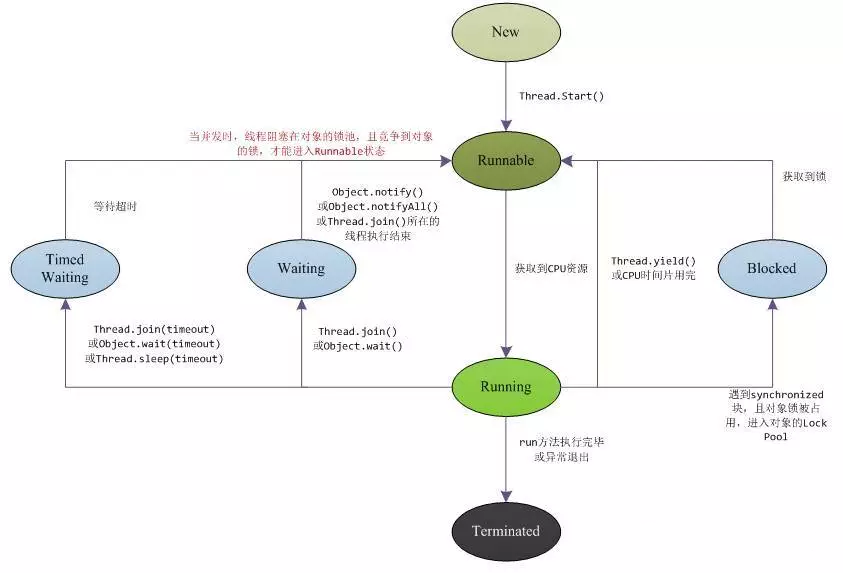
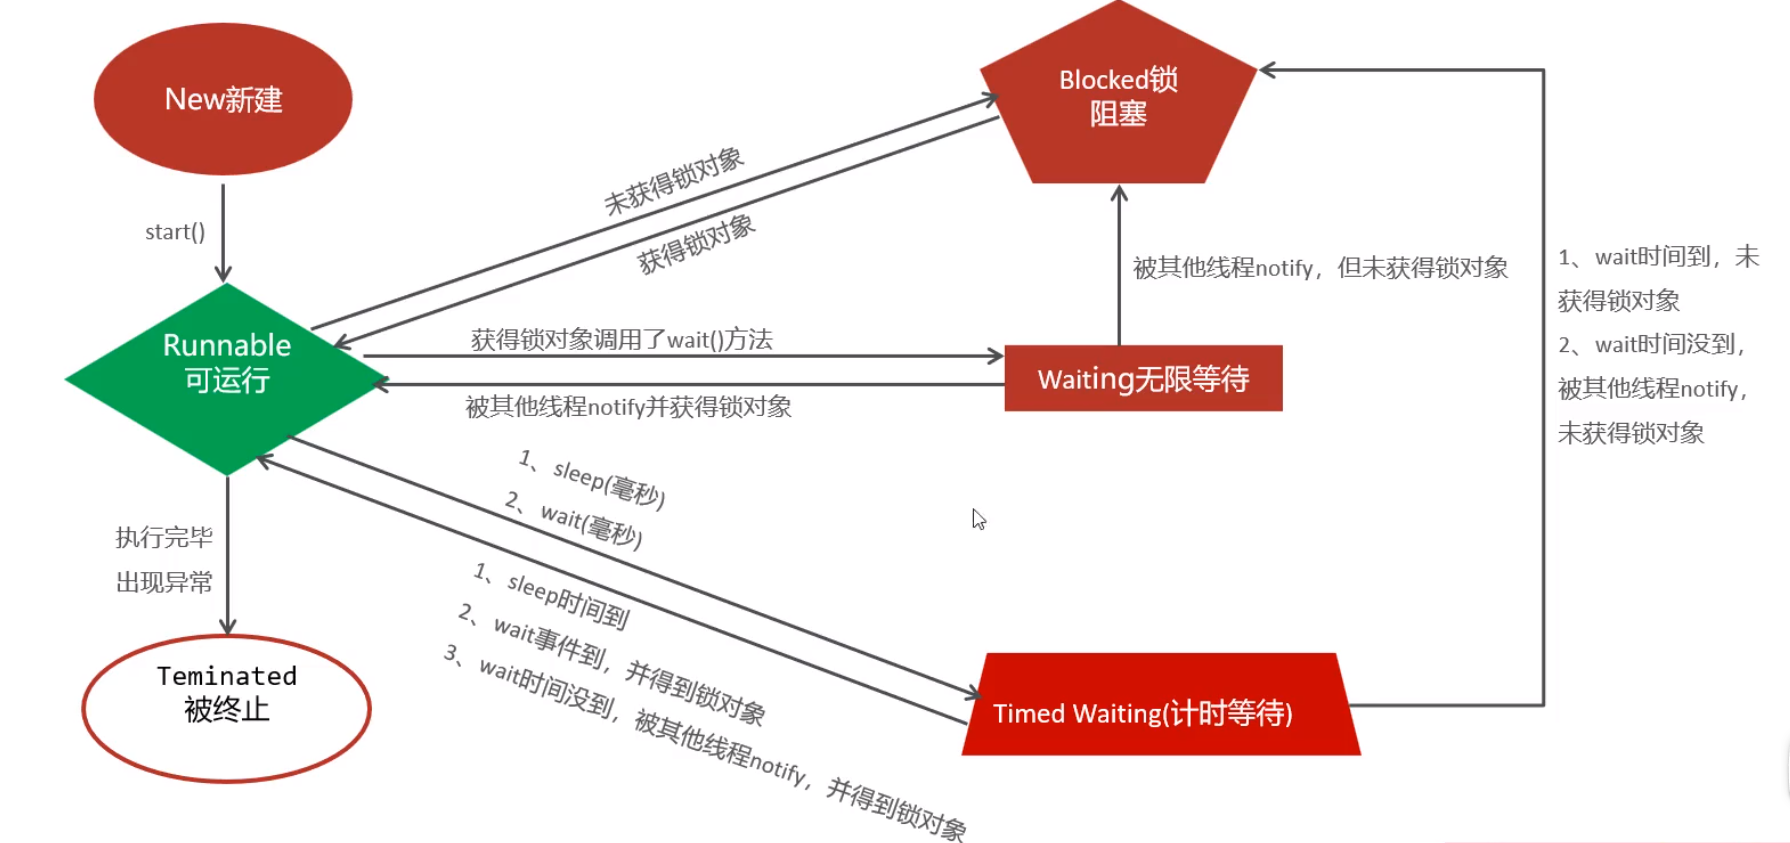
3.7 线程的生命周期
New - 新建状态
Runnable 可运行状态
Teminated 被终止状态
4 网络通信
常见的通信模式为 CS Client-Server 、
Browser/Server
4.1 获取IP对象
public class Network {
    public static void main(String[] args) throws IOException {
        //获取本地IP地址
//        InetAddress IP类
        InetAddress localHost = InetAddress.getLocalHost();

        System.out.println(localHost.getHostName());
        System.out.println(localHost.getHostAddress());

        InetAddress ip2 = InetAddress.getByName("www.baidu.com");
        System.out.println(ip2.getHostAddress());
        System.out.println(ip2.getHostName());

        InetAddress ip3 = InetAddress.getByName("163.177.151.109");
        System.out.println(ip3.getHostName());
        System.out.println(ip3.getHostAddress());

        //是否能连通  5s测试
        System.out.println(ip3.isReachable(5000));
    }
}
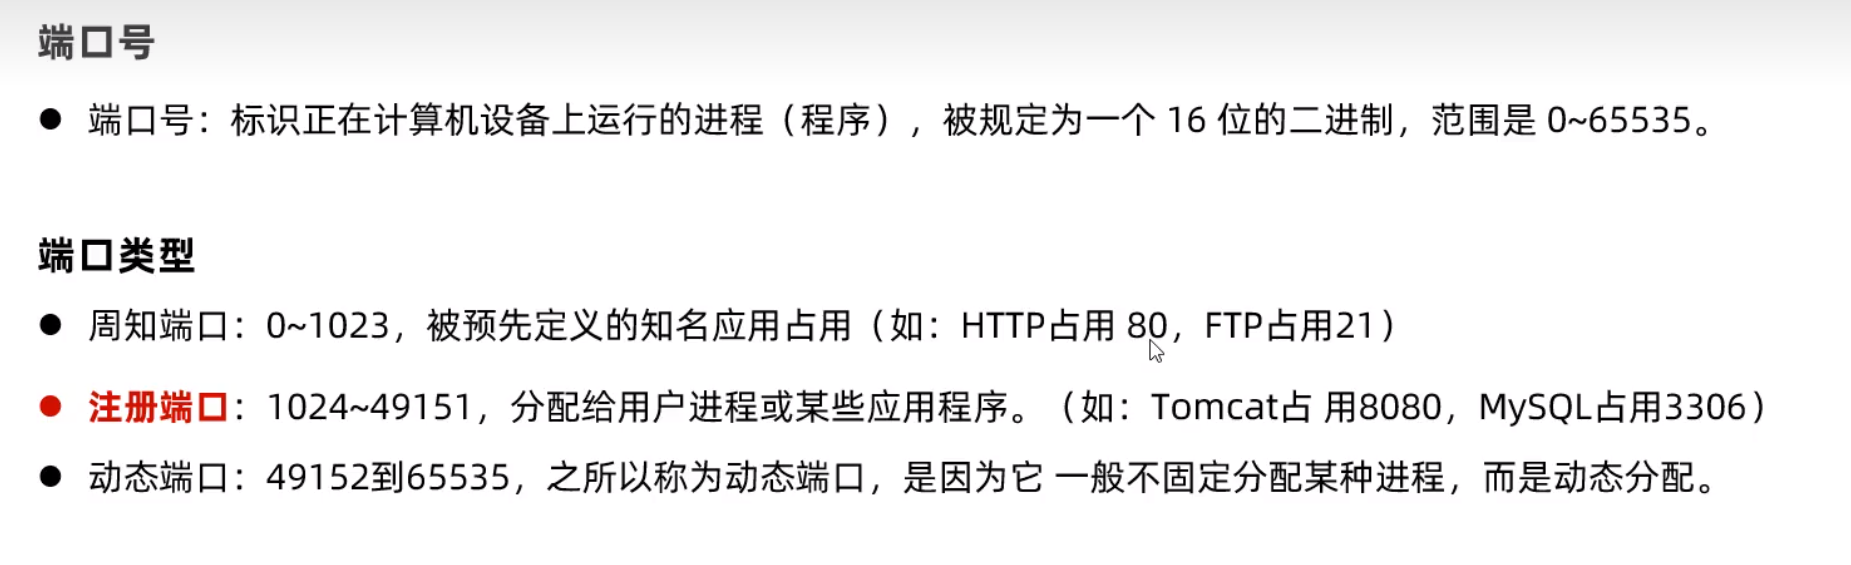
4.2 端口类型
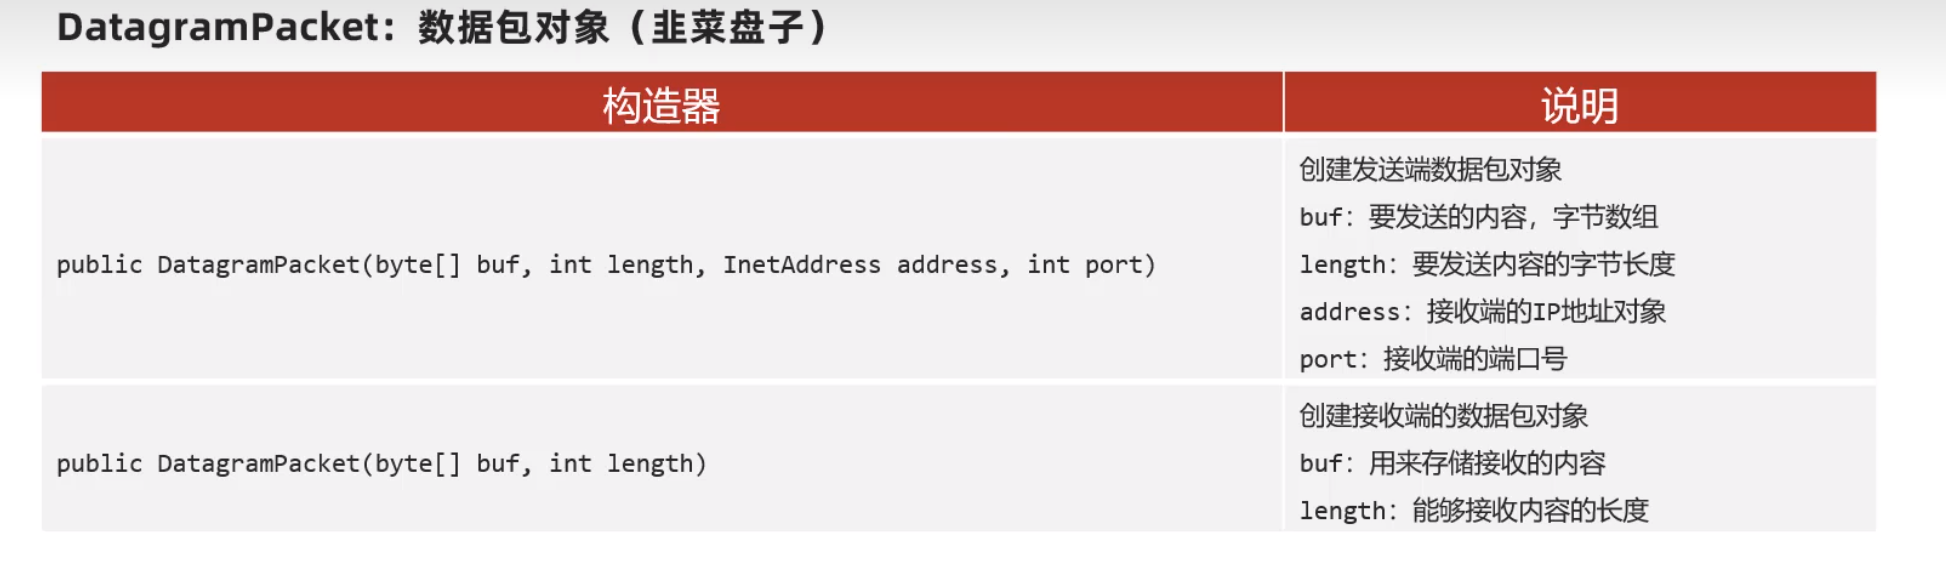
4.3 数据包对象
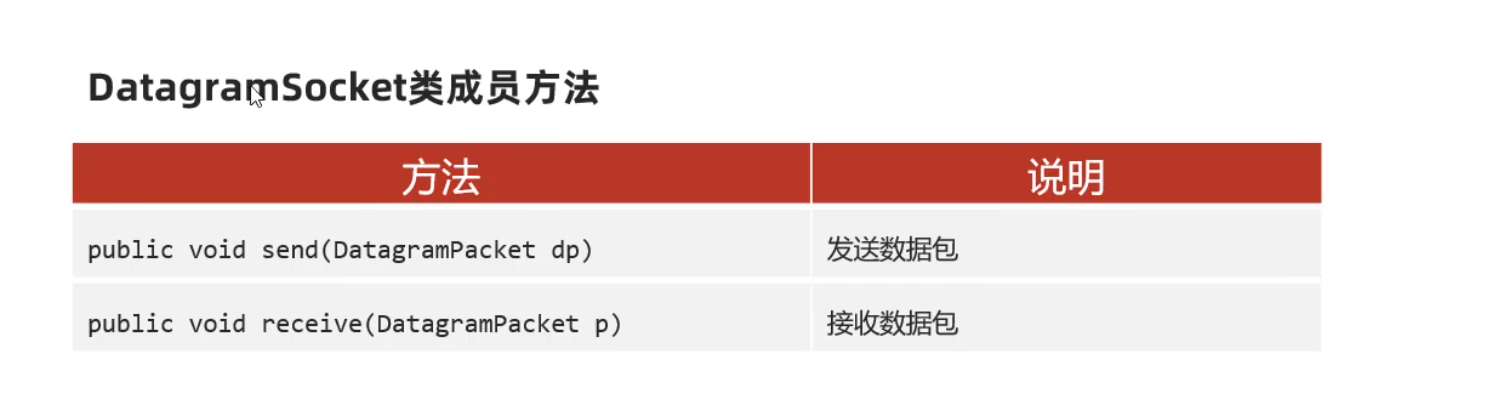
4.4 发送端和接收端对象
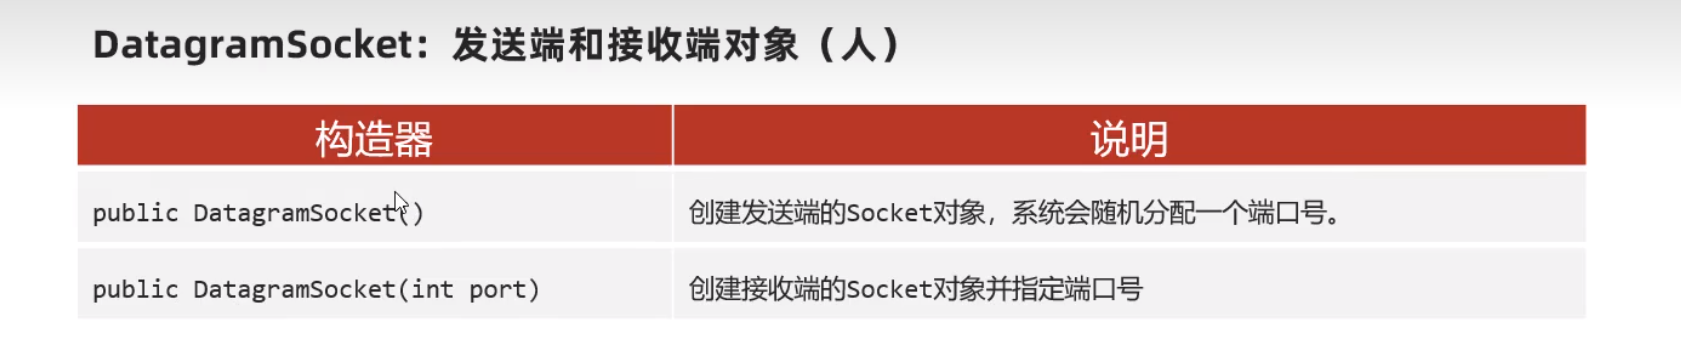
4.5 UDP通信 - JAVA实现
4.5.1 接收端
public class NetWork_Server_Demo3 {
    public static void main(String[] args) throws IOException {
        DatagramSocket socket = new DatagramSocket(8888);

        byte[] bytes = new byte[1024 * 64];
        DatagramPacket packet = new DatagramPacket(bytes, bytes.length);

        socket.receive(packet);
        int len = packet.getLength();
        System.out.println(new String(bytes,0,len));

        socket.close();
    }
}
4.5.2 发送端
public class NetWork_Client_Demo2 {
    public static void main(String[] args) throws IOException {
        //创建发送端对象
        DatagramSocket socket = new DatagramSocket();

        //创建数据包对象
        /**
         * (byte buf[], int offset, int length,
         *                           InetAddress address, int port) {
         */
        byte[] bytes = "sbsbsbsbsbsbbsb".getBytes();
        DatagramPacket packet = new DatagramPacket(
                bytes,//数据
                bytes.length,//发送长度
                InetAddress.getLocalHost(),//IP类 目标IP
                8888//端口
                );

        socket.send(packet);

        socket.close();
    }
}
4.5.3 三种通信方式
4.5.3.1 单播
4.5.3.2 广播
端口一致 发送的IP 255.255.255.255
4.5.3.3组播
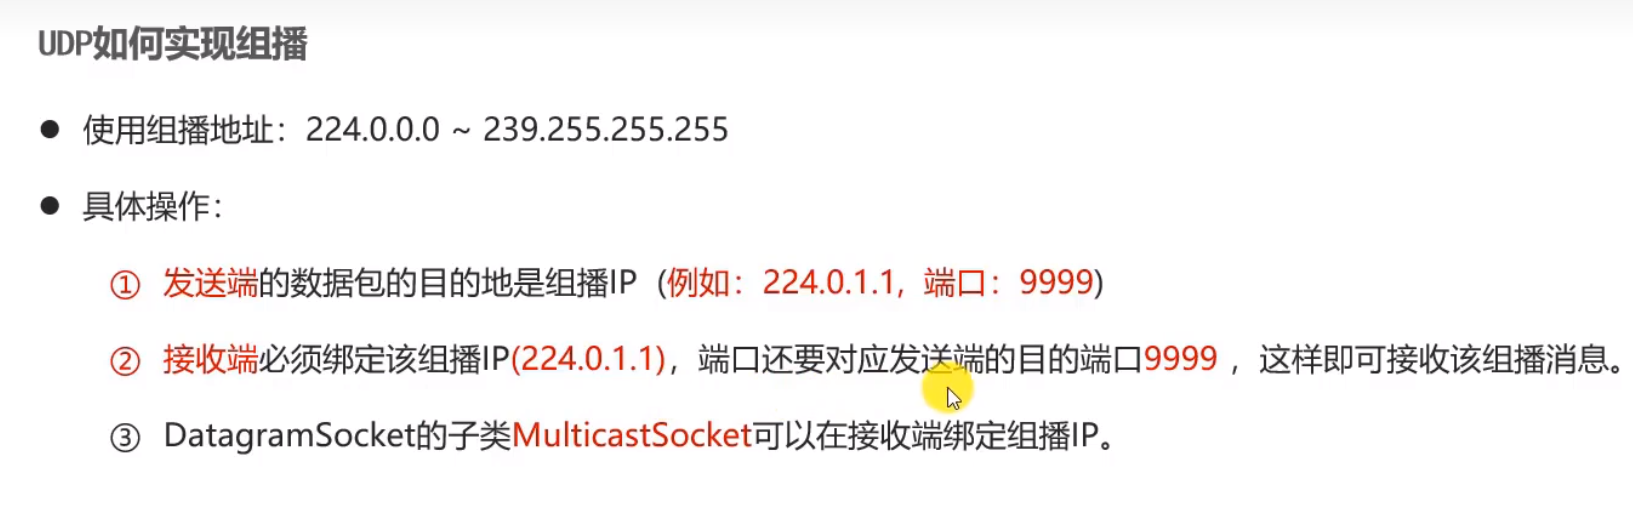
MulticastSocket multicastSocket = new MulticastSocket(8888);

        //jdk14后废弃
       multicastSocket.joinGroup(InetAddress.getByName("224.0.0.1"));


        multicastSocket.joinGroup(new
                                  InetSocketAddress("224.0.0.1",8888),
                NetworkInterface.getByInetAddress(InetAddress.getLocalHost()));
4.6 TCP通信
4.6.1 客户端
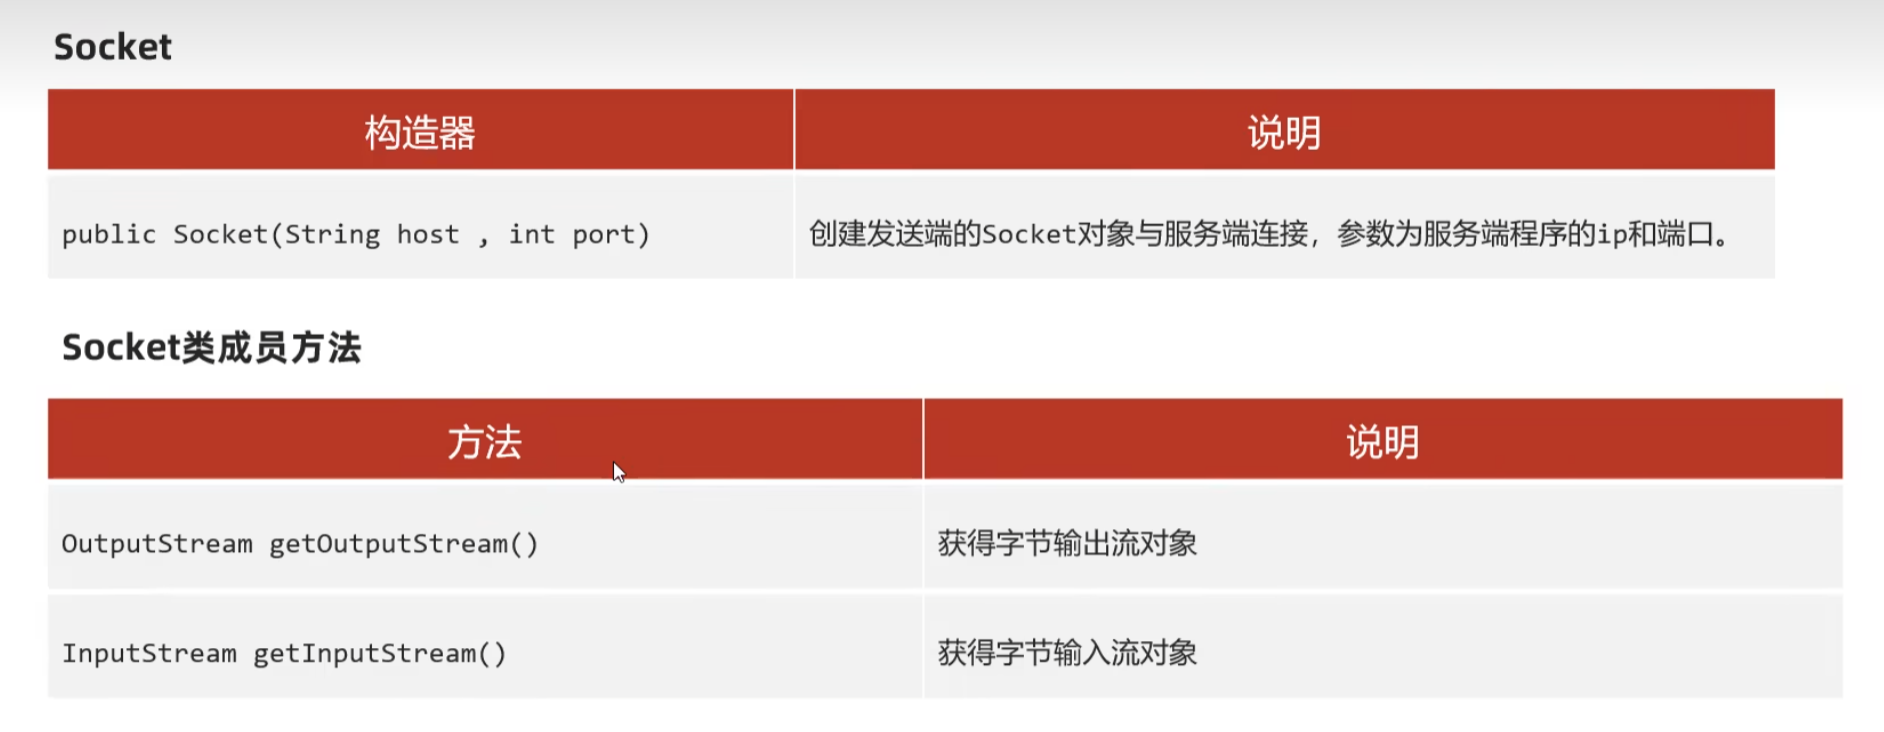
public class NetWork_TCP_Client_Demo4 {
    public static void main(String[] args) {
        //创建Socket通信管道请求有服务端的连接

        try{
            Socket socket = new Socket("127.0.0.1", 7777);

            OutputStream os = socket.getOutputStream();

            PrintStream ps = new PrintStream(os);

            ps.println("我是TCP客户端");
//            ps.flush();
        }catch (Exception e){
            e.printStackTrace();
        }


    }
}
4.6.2 服务端
public class NetWork_TCP_Server_Demo5 {
    public static void main(String[] args) {
        try {
            //注册端口
            ServerSocket serverSocket = new ServerSocket(7777);
            //等待客户端的socket连接请求,建立通信管道
            Socket socket = serverSocket.accept();

            //从socket中获取字节输入流
            InputStream inputStream = socket.getInputStream();

            //包装成字符输入流
            BufferedReader reader = new BufferedReader(new InputStreamReader(inputStream));

            //读取消息
            String msg;
            if ((msg=reader.readLine())!=null){
                System.out.println("收到  "+socket.getRemoteSocketAddress()+" : "+msg);
            }
        } catch (IOException e) {
            e.printStackTrace();
        }

    }

}
4.6.3 多发多收 -- 多线程
4.6.3.1 Client
public class NetWork_TCP_Thread_ClientDemo6 {
    public static void main(String[] args) {
        //创建Socket通信管道请求有服务端的连接

        try{
            Socket socket = new Socket("127.0.0.1", 7777);

            OutputStream os = socket.getOutputStream();

            PrintStream ps = new PrintStream(os);

            Scanner sc = new Scanner(System.in);
            while (true){
                System.out.print("请输入:");
                String s = sc.nextLine();
                ps.println(s);

//                ps.flush();
            }

        }catch (Exception e){
            e.printStackTrace();
        }

    }
}
4.6.3.2 Server -- 开启多线程来接受socket
public class NetWork_TCP_Thread_ServerDemo7 {
    public static void main(String[] args) {
        try {
            //注册端口
            ServerSocket serverSocket = new ServerSocket(7777);
            while (true){
                //等待客户端的socket连接请求,建立通信管道
                Socket socket = serverSocket.accept();

                new ServerReaderThread(socket).start();

            }
        } catch (IOException e) {
            e.printStackTrace();
        }

    }
}
4.6.3.4 实现接受socket的线程类
public class ServerReaderThread extends Thread{

    private Socket socket;

    public ServerReaderThread(Socket socket) {
        this.socket = socket;
    }

    @Override
    public void run() {

        try {
            //从socket中获取字节输入流
            InputStream inputStream = socket.getInputStream();

            //包装成字符输入流
            BufferedReader reader = new BufferedReader(new InputStreamReader(inputStream));

            //读取消息
            String msg;

            while ((msg=reader.readLine())!=null){
                System.out.println("收到  "+socket.getRemoteSocketAddress()+" : "+msg);
            }
        } catch (IOException e) {
            System.out.println(socket.getRemoteSocketAddress()+"下线了");
        }
    }
}
4.6.4使用线程池实现
4.6.4.1 Server
public class NetWork_TCP_Thread_ServerDemo7 {

    //使用静态变量记住一个线程池对象
    private static ExecutorService pool = new ThreadPoolExecutor(
            3,5,6, TimeUnit.SECONDS,
            new ArrayBlockingQueue<>(2),
            Executors.defaultThreadFactory(),
            new ThreadPoolExecutor.AbortPolicy()
    );

    public static void main(String[] args) {
        try {
            //注册端口
            ServerSocket serverSocket = new ServerSocket(7777);
            while (true){
                //等待客户端的socket连接请求,建立通信管道
                Socket socket = serverSocket.accept();

                ServerReaderRunnable target = new ServerReaderRunnable(socket);
                pool.execute(target);
            }
        } catch (IOException e) {
            e.printStackTrace();
        }

    }
}
4.6.4.2 Runnable任务类
public class ServerReaderRunnable implements Runnable{
    private Socket socket;

    public ServerReaderRunnable(Socket socket) {
        this.socket = socket;
    }

    @Override
    public void run() {
        try {
            //从socket中获取字节输入流
            InputStream inputStream = socket.getInputStream();

            //包装成字符输入流
            BufferedReader reader = new BufferedReader(new InputStreamReader(inputStream));

            //读取消息
            String msg;

            while ((msg=reader.readLine())!=null){
                System.out.println("收到  "+socket.getRemoteSocketAddress()+" : "+msg);
            }
        } catch (IOException e) {
            System.out.println(socket.getRemoteSocketAddress()+"下线了");
        }
    }
}
5 反射
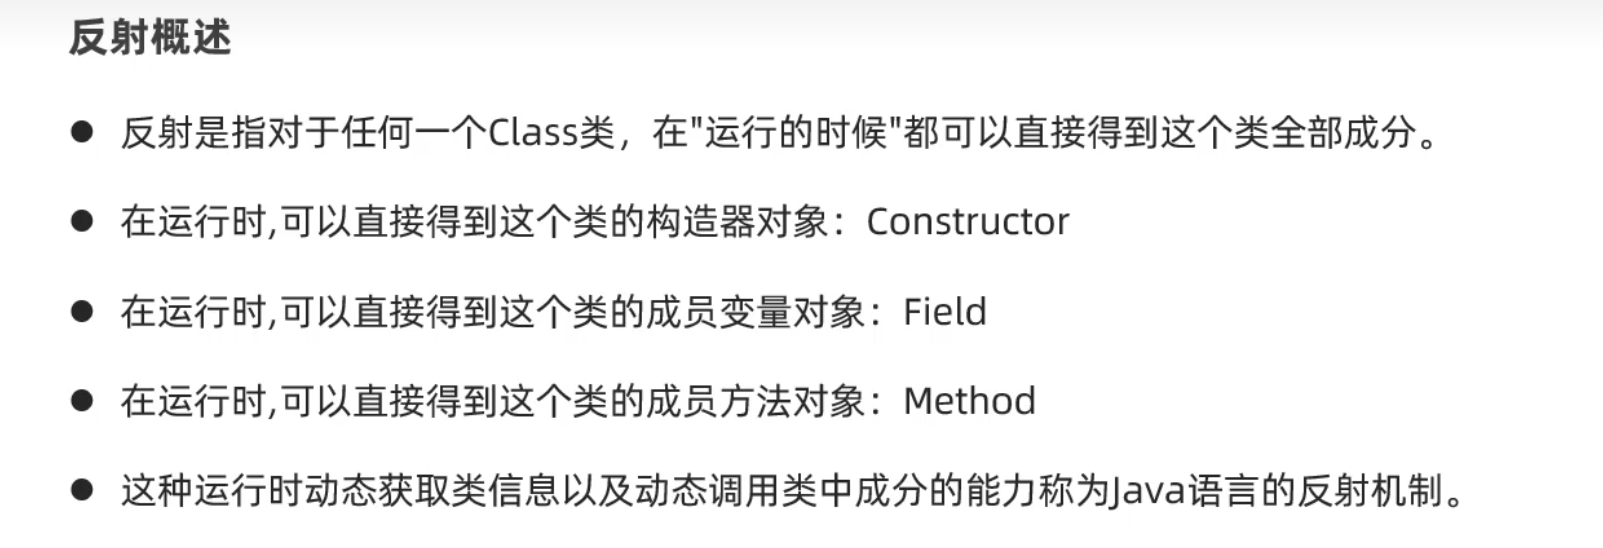
5.1 三种获取Class对象的方法
public class GetClass {
    public static void main(String[] args) throws ClassNotFoundException {
        Class c = Class.forName("com.example.springbootdemo.domain.Author");
        System.out.println(c);

        Class c1 = Author.class;

        Author author = new Author();
        Class c3 = author.getClass();


    }
}
5.2 获取构造器对象
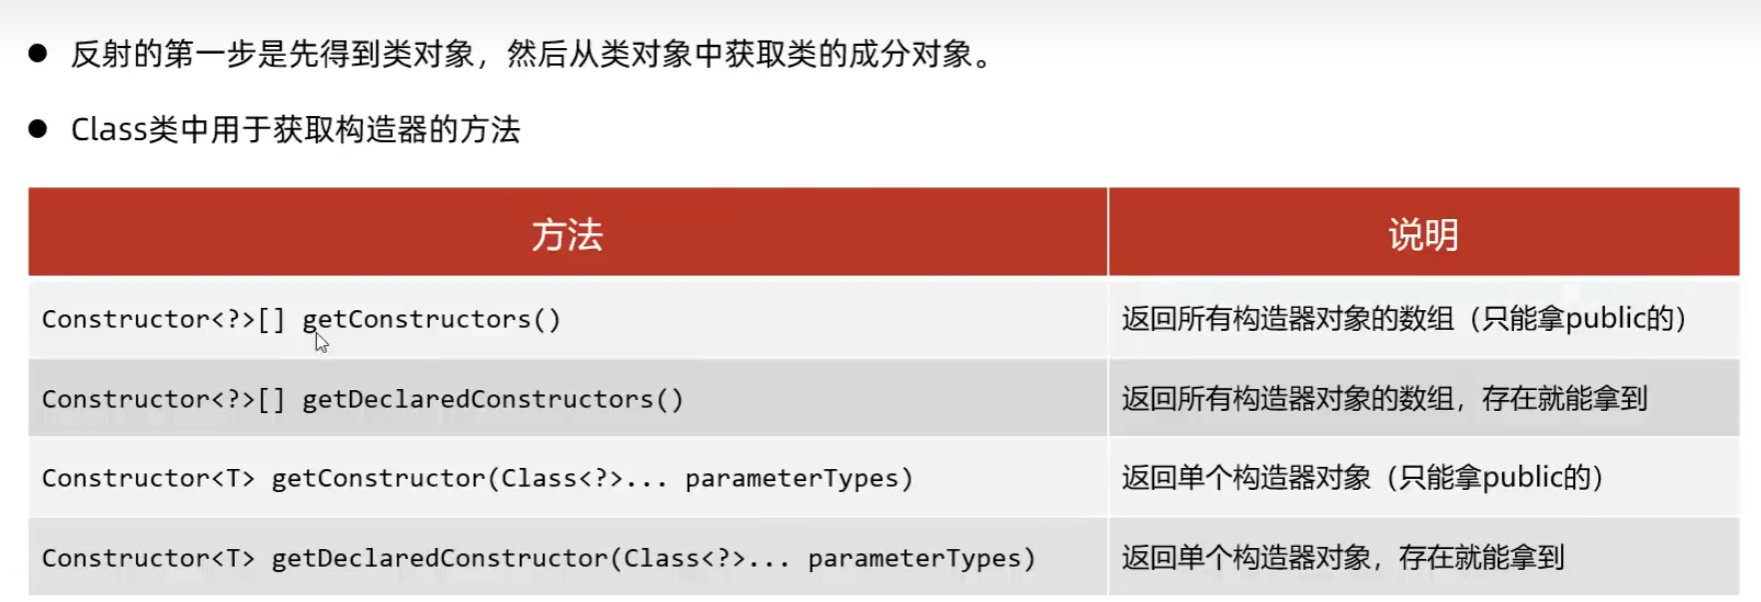
public class GetClassConsrtructorDemo {
    public static void main(String[] args) throws NoSuchMethodException {
        Class c = Author.class;

        //public的构造器
        Constructor[] constructors = c.getConstructors();
        for (Constructor constructor : constructors) {
            System.out.println(constructor.getParameterCount());
        }

        //全部构造器
        Constructor[] constructors2 = c.getDeclaredConstructors();
        for (Constructor constructor : constructors2) {
            System.out.println(constructor.getParameterCount());
        }

        //单个构造器 无参
        Constructor constructor1 = c.getConstructor();
        System.out.println(constructor1.getParameterCount());

        //获取全参构造器, 与构造器的参数的类型一一对应
        Constructor constructor2 = c.getConstructor(Long.class, String.class, Integer.class, String.class, List.class);
        System.out.println(constructor2.getParameterCount());
    }

}
5.3 暴力打开权限,获取私有对象构造器
public class UseClassConstructorDemo {
    public static void main(String[] args) throws NoSuchMethodException, InvocationTargetException, InstantiationException, IllegalAccessException {
        Class c = Author.class;
        //无参构造器
        Constructor constructors1 = c.getDeclaredConstructor();

        //遇到了私有的构造器可以暴力反射
        //打开权限 其实是取消权限检查控制, 使private也能被访问到
        constructors1.setAccessible(true);

        Author author = (Author) constructors1.newInstance();
        System.out.println(author);

        //获取全参构造器, 与构造器的参数的类型一一对应
        Constructor constructor2 = c.getDeclaredConstructor(Long.class, String.class, Integer.class, String.class, List.class);
        System.out.println(constructor2.getParameterCount());

    }
}
5.4 获取字段
        Class c = Author.class;

        Field[] fields = c.getDeclaredFields();

        for (Field field : fields) {
            System.out.println(field.getName()+"===>"+field.getType());
        }

        Field id = c.getDeclaredField("id");
        //打开权限
        id.setAccessible(true);
        Author author = new Author();
        //通过反射暴力修改值
        id.set(author,111L);
        System.out.println(author);
        //获取id
        Object o = id.get(author);
        System.out.println(o);
5.5 反射的作用 绕过编译阶段
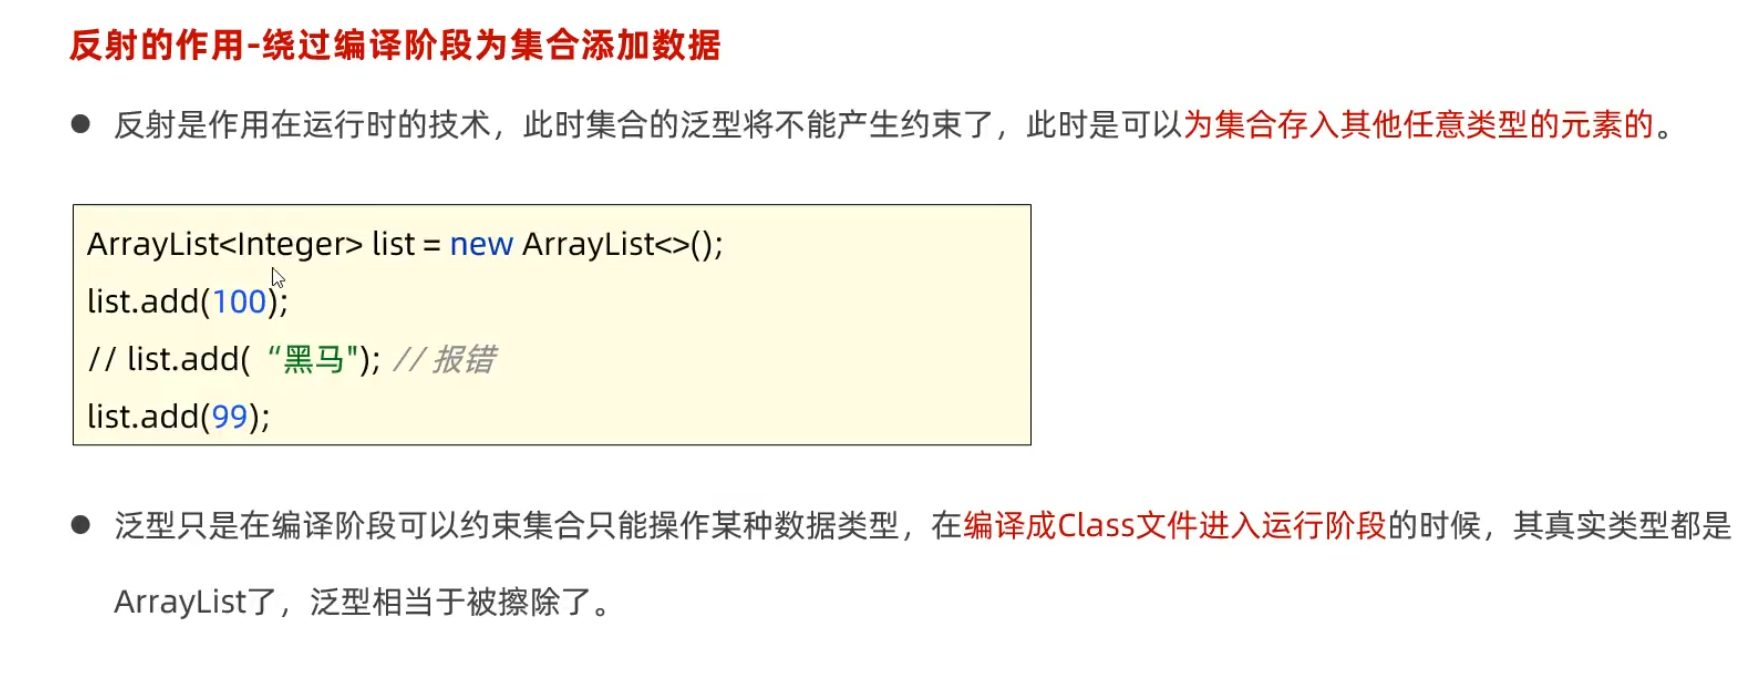
public class ReflectDemo {
    public static void main(String[] args) throws NoSuchMethodException, InvocationTargetException, IllegalAccessException {
        ArrayList<Integer> list = new ArrayList<>();
        list.add(1);
        list.add(3);

        Class c = list.getClass();
        Method add = c.getMethod("add",Object.class);
        Object invoke = add.invoke(list, "我不当人啦!");
        System.out.println(Arrays.toString(list.stream().toArray()));
    }
}
5.6 反射做通用框架
public class ReflectMybatisUtilDemo {
    public static void save(Object o) throws IllegalAccessException, FileNotFoundException {
        PrintStream ps = new PrintStream(new FileOutputStream("D:/Springboot/test/data.txt"));
        Class c = o.getClass();
        ps.println("========"+c.getSimpleName()+"=========");
        Field[] fields = c.getDeclaredFields();
        for (Field field : fields) {
            String name  = field.getName();

            //开启权限
            field.setAccessible(true);
            String value = field.get(o)+"";
            ps.println(name + " = "+value);
        }
        System.out.println("成功");
    }

    public static void main(String[] args) {
        try {
            save(new Book(1,"xxxx123"));
        } catch (IllegalAccessException | FileNotFoundException e) {
            e.printStackTrace();
        }
    }
}
7 注解
7.1 定义

7.2 自定义注解
7.2.1 格式
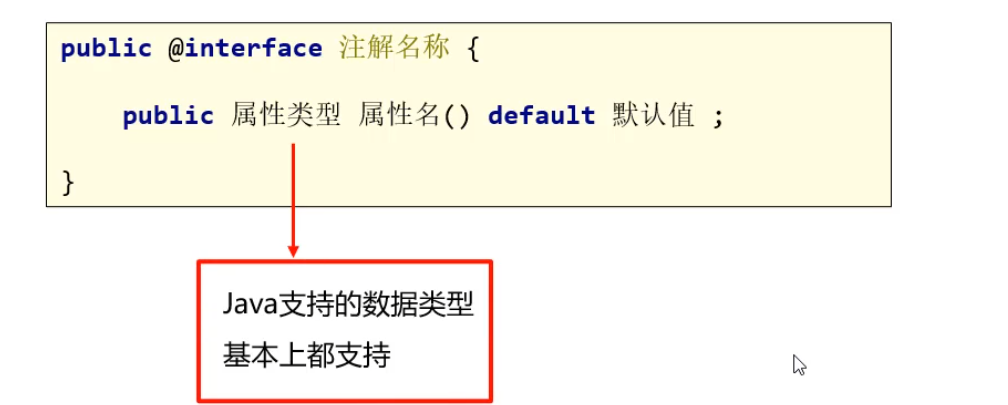
7.2.2 实现
public @interface MyBook {
    String name() default "";
    String[] authors();
    double price();
}
7.2.3 可标注在类 、 方法 、 属性上
@MyBook(name = "《精通JAVASE",authors = {"11","22"},price = 182.0)
public class AnnotationDemo1 {
    @MyBook(name = "《精通JAVASE",authors = {"11","22"},price = 182.0)
    private AnnotationDemo1(){

    }

    public static void main(String[] args) {
        @MyBook(name = "《精通JAVASE",authors = {"11","22"},price = 182.0)
        int age = 1;
    }
}
7.3 元注解

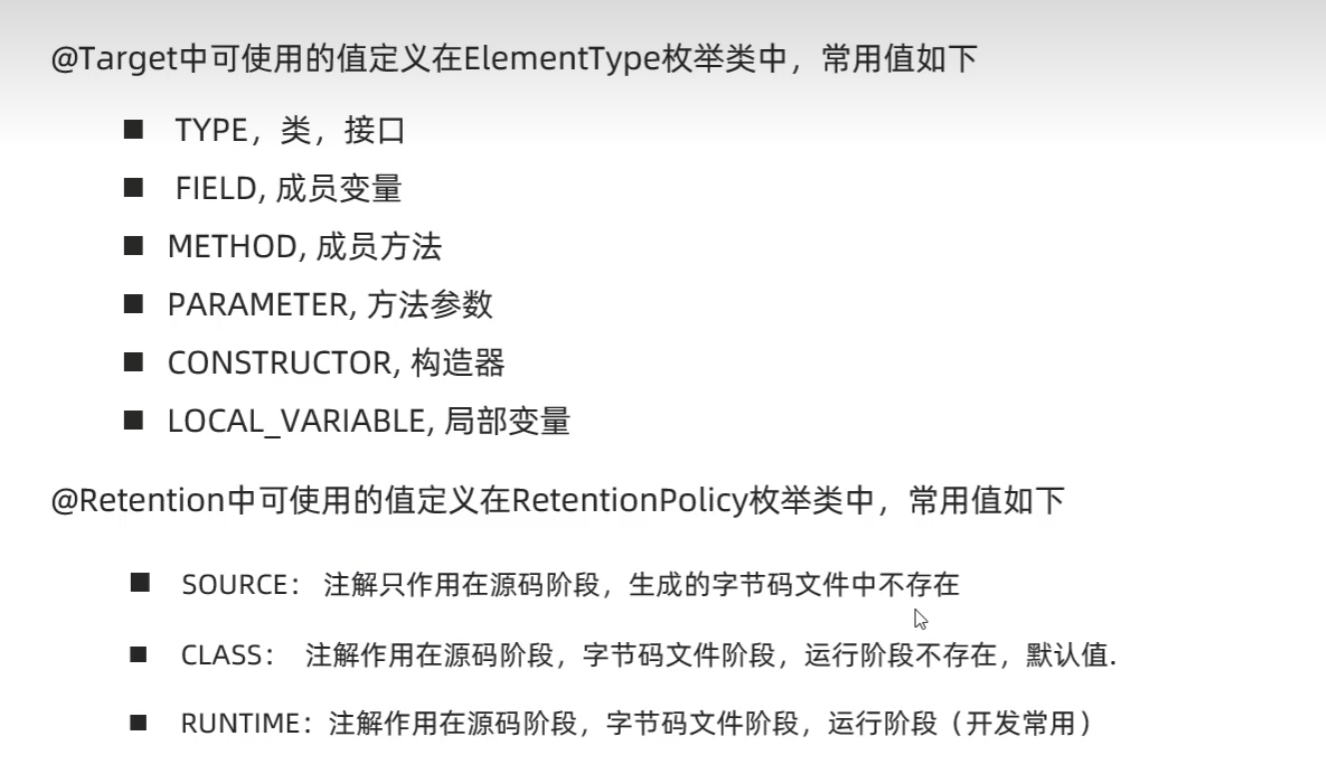
@Target({ElementType.METHOD,ElementType.FIELD})
@Retention(RetentionPolicy.RUNTIME)
public @interface MyTest {
}
7.4 解析注解

@MyBook(name = "类",authors = {"11","22"},price = 182.0)
public class AnnotationDemo1 {
    @MyBook(name = "《精通JAVASE",authors = {"11","22"},price = 182.0)
    int age = 1;

    @MyBook(name = "《精通JAVASE",authors = {"11","22"},price = 182.0)
    public AnnotationDemo1(){

    }
    @MyBook(name = "test方法",authors = {"11","22"},price = 182.0)
    public void test(){

    }

    public static void main(String[] args) throws NoSuchMethodException {
        Class c = AnnotationDemo1.class;
        Method m = c.getDeclaredMethod("test");
        if(m.isAnnotationPresent(MyBook.class)){
            MyBook book = (MyBook) m.getDeclaredAnnotation(MyBook.class);
            System.out.println(Arrays.toString(book.authors()));
            System.out.println(book.price());
            System.out.println(book.name());
        }

        if (c.isAnnotationPresent(MyBook.class)) {
            MyBook book =(MyBook) c.getDeclaredAnnotation(MyBook.class);
            System.out.println(Arrays.toString(book.authors()));
            System.out.println(book.price());
            System.out.println(book.name());
        }
    }

}
7.5 模拟Junit框架
7.5.1 注解类
@Retention(RetentionPolicy.RUNTIME)
@Target({ElementType.METHOD})
public @interface MyTest {
}
7.5.2 解析注解类
public class AnnotationTestDemo {
    @MyTest
    public void test1(){
        System.out.println("test1");
    }
    public void test2(){
        System.out.println("test2");
    }
    @MyTest
    public void test3(){
        System.out.println("test3");
    }


    /**
     * 调用有注解的菜单
     */
    public static void main(String[] args) throws InvocationTargetException, IllegalAccessException {
        AnnotationTestDemo annotationTestDemo = new AnnotationTestDemo();
        Class c = AnnotationTestDemo.class;
        Method[] methods = c.getDeclaredMethods();
        for (Method method : methods) {
            if (method.isAnnotationPresent(MyTest.class)){
                method.invoke(annotationTestDemo);
            }
        }
    }
}
8 动态代理
8.1 功能类
public interface Skill {
    void jump();

    void sing();
}
public class Star implements Skill{
    private String name;


    public Star(String name) {
        this.name = name;
    }


    @Override
    public void jump() {
        System.out.println("跳舞..");
    }

    @Override
    public void sing() {
        System.out.println("唱歌..");
    }
}
8.2 代理类
public class StarAgentProxy {
    public static Skill getProxy(Star s){
        //生成一个代理对象
        return (Skill) Proxy.newProxyInstance(
                s.getClass().getClassLoader(), //类加载器
                s.getClass().getInterfaces(),//需要代理的方法的接口
                new InvocationHandler() {
                    @Override
                    public Object invoke(Object proxy, Method method, Object[] args) throws Throwable {
                        System.out.println("收首付款");
                        //method - 正在调用的方法对象
                        Object rs = method.invoke(s, args);
                        System.out.println("收尾款");
                        return rs;
                    }
                } //
        );
    }
}
8.3 测试代理对象
public class Test {
    public static void main(String[] args) {
        Star s = new Star("xxx");

        Skill s2 = StarAgentProxy.getProxy(s);

        s2.jump();
        s2.sing();
    }
}
8.4 业务层对象动态代理 - 类似AOP
8.4.1 动态代理工具类 - 生成代理对象
public class ProxyUtil {
    public static UserService getProxy(UserService obj){
        return (UserService) Proxy.newProxyInstance(
                obj.getClass().getClassLoader(),
                obj.getClass().getInterfaces(),
                new InvocationHandler() {
                    @Override
                    public Object invoke(Object proxy, Method method, Object[] args) throws Throwable {
                        long startTime = System.currentTimeMillis();

                        Object rs = method.invoke(obj, args);

                        long endTime = System.currentTimeMillis();
                        System.out.println(method.getName()+"耗时" + (endTime - startTime) /1000.0 + "s");
                        return rs;
                    }
                }
        );
    }
}
8.4.2 改造成泛型 - 为任意类对象进行代理
public static <T> T getProxy(T obj){
        return (T)
8.4.3 执行测试
 public static void main(String[] args) {
        UserService userService2 = ProxyUtil.getProxy(new UserServiceImpl());
        userService2.deleteUsers();
        userService2.selectUsers();
        userService2.login("admin","123456");
    }
9 XML
XML是可扩展标记语言的缩写,是一种数据表示格式,可以描述非常复杂的数据结构,常用语传输和存储数据
9.1 XML的几个特点和使用场景
- 一是纯文本,默认使用UTF-8 而是可嵌套
- XML存储为文件,则为.xml文件
- xml使用场景: XML内容经常被当成消息进行网络传输,或者作为配置文件用于存储系统的信息
9.2 解决特定结构冲突
"<" -> <
"&" -> &
<![CDTA[任意数据]]>
9.3 导入dtd文件对xml的格式进行约束

9.4 Schema约束
.xsd
dtd约束 -> schema(本身是个xml) -> xml
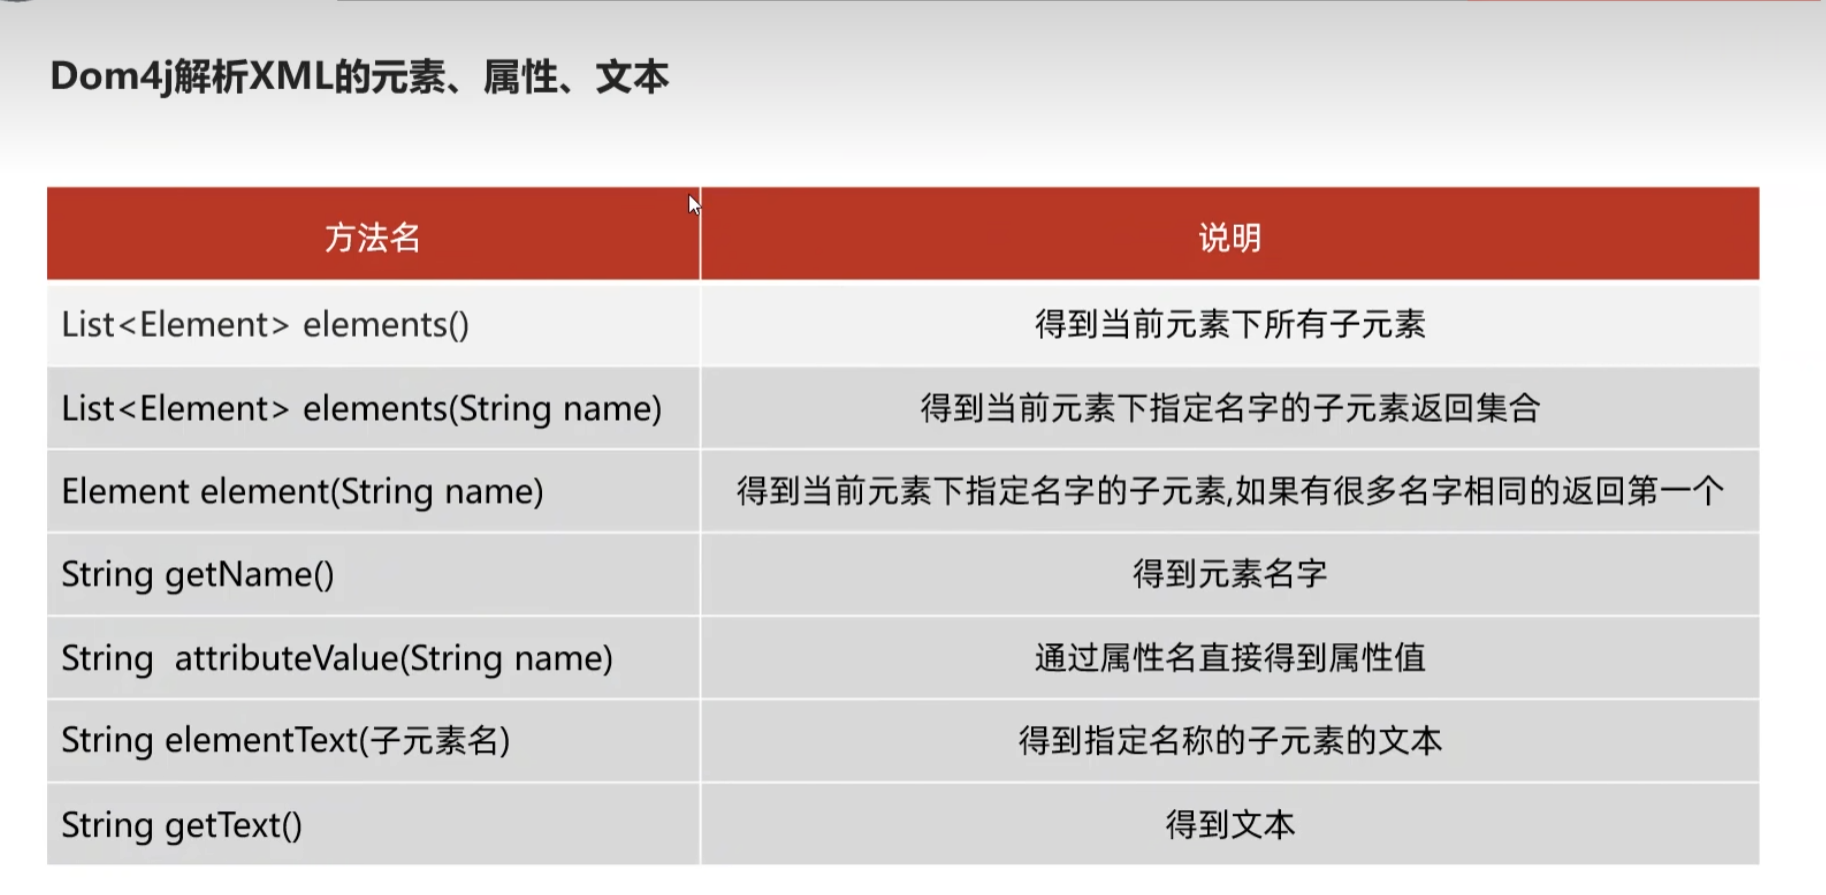
9.5 解析
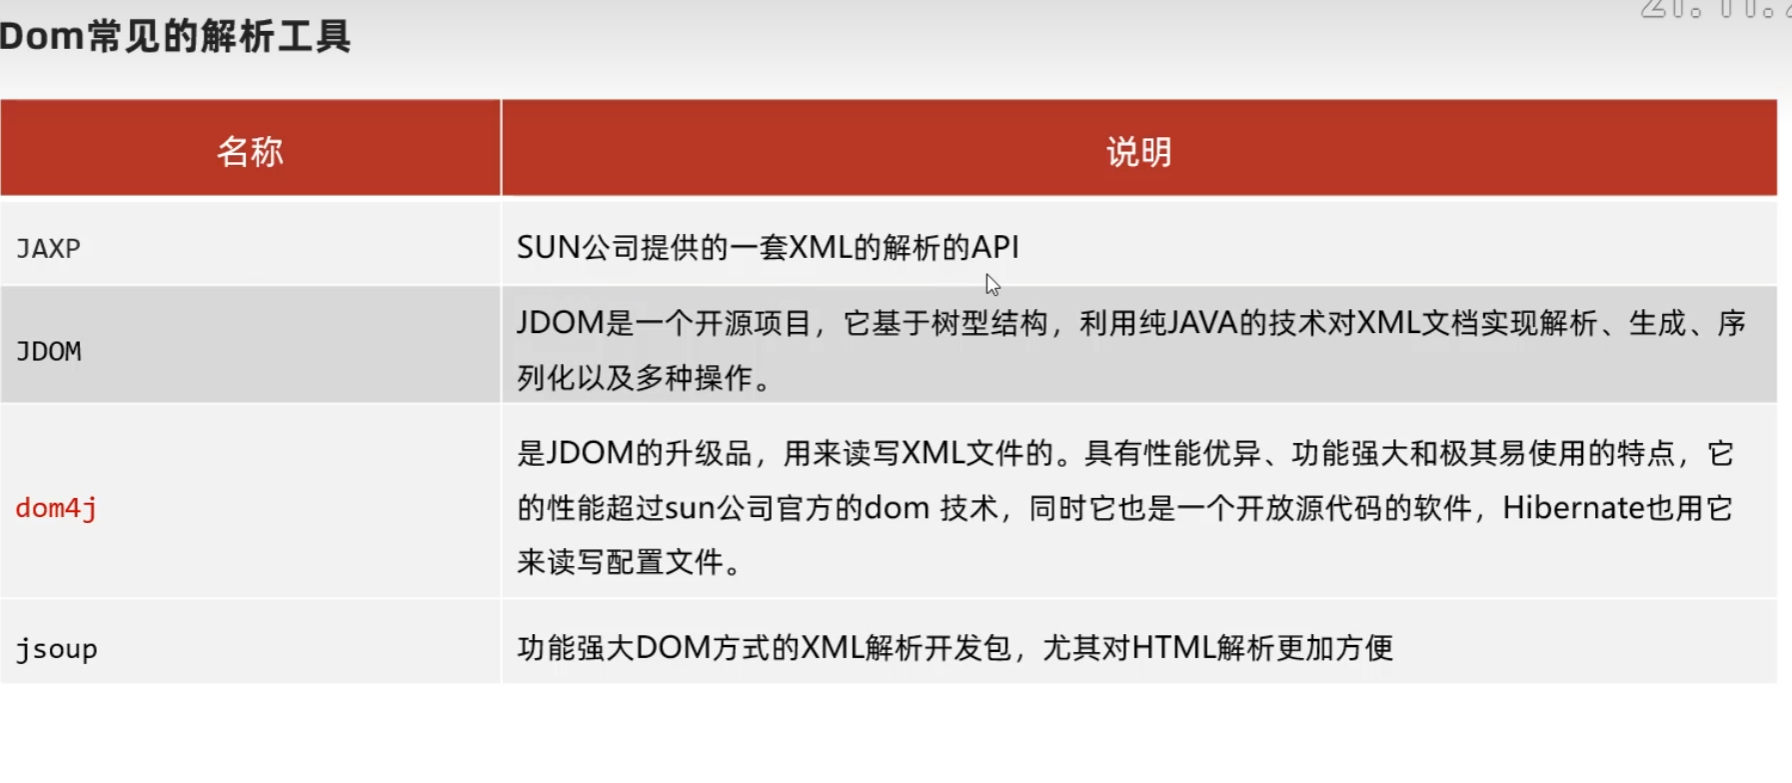
9.5.1 Dom常见解析文件
9.5.2 解析文件
9.5.3 解析的api
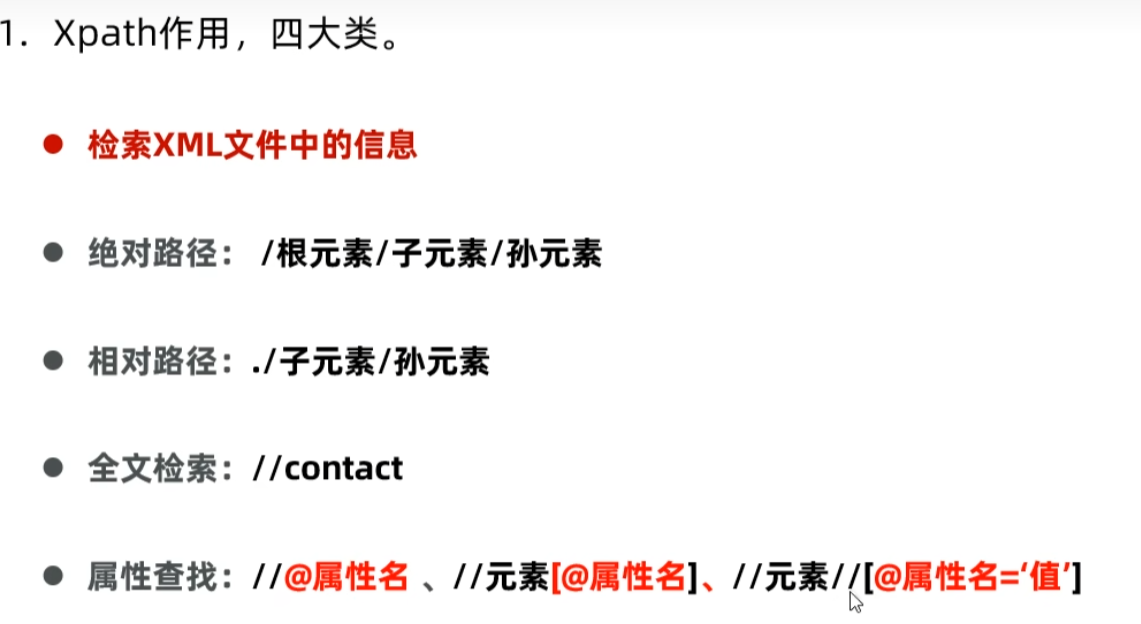
9.5.4 Xpath四大类
10 工厂模式、装饰模式
10.1 工厂模式
用工厂对象来创建对象
public static XX xx(String info){
   switch(info){
       case "x":
           Zz one = new Zz();
           one.setXx(1);
           one.setYy(2);
           return x1;
       case "y":
           XX one = new Yy();
           one.setXx(3);
           one.setYy(4);
           return x1;
       default:
           return null;
   }
}
- 工厂的方法可以封装对象的创建细节 (比如线程池中的Excutors)。
- 实现类与类之间的解耦操作。
10.2 装饰模式
创建一个新类,包装原始类 , 从而在新类中提升原来类的功能

1、定义父类
2、定义原始类 , 继承父类 , 定义功能
3、定义装饰类, 继承父类 , 包装原始类 , 增强功能
 posted on

 浙公网安备 33010602011771号