IntelliJ IDEA License Server本地搭建教程
2016年3月20日更新支持自定义端口及用户名,详见
http://blog.lanyus.com/archives/189.html
2016年7月13日更新支持自定义浏览器打开页面,详见
http://blog.lanyus.com/archives/228.html
2016年7月15日更新完善自定义用户名功能,详见
http://blog.lanyus.com/archives/231.html
1、下载下面的文件
1017端口版:
链接: http://download.csdn.net/detail/lanyu19950216/9465577
备用链接: https://drive.google.com/file/d/0Bx7wGDIg2K-7MTJ1TGN1V1IzTVk/view?usp=sharing
备用链接: https://pan.baidu.com/s/1hqVTze8 密码: pf5n
41017端口版:
链接:http://download.csdn.net/detail/lanyu19950216/9465792
备用链接: https://drive.google.com/file/d/0Bx7wGDIg2K-7T2JNRjhMNTZ6bGc/view?usp=sharing
最新版:
磁力链接: magnet:?xt=urn:btih:2289E4F8CEB346AC44E54C8C0DA706CC537301AA
2、找到自己操作系统的版本,我这里使用IntelliJIDEALicenseServer_windows_amd64.exe,双击打开运行
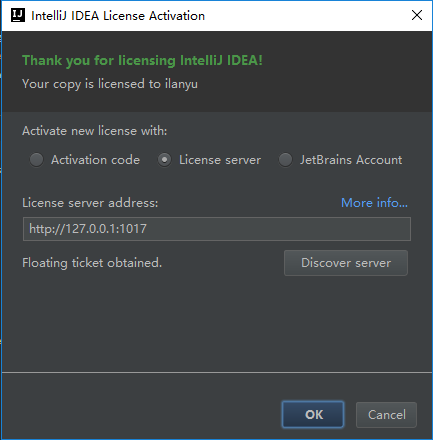
3、在idea注册界面选择授权服务器,填写http://127.0.0.1:1017,然后点击“OK”,如图


