Spring Boot 2.x 整合 Mybatis 3.x
步骤1:加入依赖(starter 依赖,对应数据库的驱动包依赖,第三方数据源依赖)
<!-- 引入starter-->
<dependency>
    <groupId>org.mybatis.spring.boot</groupId>
    <artifactId>mybatis-spring-boot-starter</artifactId>
    <version>1.3.2</version>
    <scope>runtime</scope>
</dependency>

<!-- MySQL的JDBC驱动包
<dependency>
    <groupId>mysql</groupId>
    <artifactId>mysql-connector-java</artifactId>
    <scope>runtime</scope>
</dependency>
-->

<!-- Oracle的JDBC驱动包,注意:Oracle驱动包无法在maven公共仓库下载,这里的依赖是本人nexus私服上的地址  -->
<dependency>
    <groupId>com.oracle</groupId>
    <artifactId>ojdbc6</artifactId>
    <version>11.2.0.1.0</version>
</dependency>

<!-- 引入第三方数据源
<dependency>
    <groupId>com.alibaba</groupId>
    <artifactId>druid</artifactId>
    <version>1.1.6</version>
</dependency>
-->
注意:
1)数据源可以使用 Spring Boot 自带的数据源,可以不用第三方数据源
2)Oracle 驱动包无法在 maven 公共仓库下载,这里的依赖是本人发布在 nexus 私服上的依赖,请不要照搬
mybatis-spring-boot-starter 对应的 maven 仓库地址:http://mvnrepository.com/artifact/org.mybatis.spring.boot/mybatis-spring-boot-starter
步骤2:配置文件中设置数据源信息
#可以自动识别,所以可以不用指定
#spring.datasource.driver-class-name=oracle.jdbc.driver.OracleDriver

spring.datasource.url=jdbc:oracle:thin:@localhost:1521:orcl
spring.datasource.username=developer
spring.datasource.password=developer
#如果不使用第三方数据源,则 Spring Boot 使用默认的数据源:com.zaxxer.hikari.HikariDataSource
#spring.datasource.type=com.alibaba.druid.pool.DruidDataSource
加载配置,注入 SqlSessionFactory 等都是 Spring Boot 帮我们完成。
步骤3:开发 mapper
public interface UserMapper {
  //推荐使用#{}取值,不要用${},因为存在注入的风险
  @Insert("INSERT INTO user_info(id,name,phone,create_time,age) VALUES(#{id},#{name}, #{phone}, #{createTime},#{age})")
  //@Options(useGeneratedKeys=true, keyProperty="id", keyColumn="id")   //keyProperty java对象的属性;keyColumn表示数据库的字段
  int insert(User user);
}
注意:oracle数据库不提供自增主键,所以必须手动插入主键
User 类
public class User {
    private int id;
    private String name;
    private String phone;
    private int age;
    //省略getter、setter方法
}
建表SQL
create table user_info(
    id INTEGER    primary key,
    name varchar2(20),
    phone varchar2(16),
    create_time DATE,
    age INTEGER
)
步骤4:启动类增加 mapper 扫描
@SpringBootApplication
@MapperScan("com.jwen.base_project.mapper")
public class BaseProjectApplication {
    public static void main(String[] args) {
        SpringApplication.run(BaseProjectApplication.class, args);
    }
}
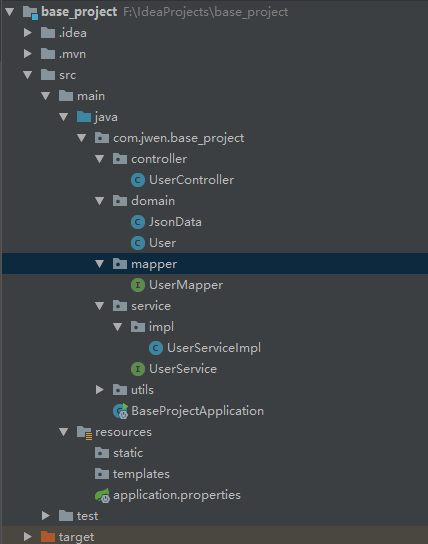
项目目录结构如下
步骤5:进行测试
@Service
public class UserServiceImpl implements UserService{
  @Autowired
  private UserMapper userMapper;

    @Override
    public int add(User user) {
    userMapper.insert(user);
    int id = user.getId();
    return id;
    }
}
Controller
@RestController
@RequestMapping("/api/v1/user")
public class UserController {

  @Autowired
  private UserService userService;

  @GetMapping("add")
  public Object add(){
    User user = new User();
    user.setId(2);
    user.setAge(22);
    user.setCreateTime(new Date());
    user.setName("张三");
    user.setPhone("10010000");
    int id = userService.add(user);

       return JsonData.buildSuccess(id);
  }
}
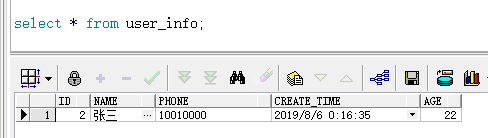
浏览器地址栏输入:http://localhost:8080/api/v1/user/add

数据库的结果
其余的如:查询、删除、修改也是一样的操作
@Select("SELECT * FROM user")
@Results({
  @Result(column = "create_time",property = "createTime")  //javaType = java.util.Date.class
})
List<User> getAll();

@Select("SELECT * FROM user WHERE id = #{id}")
@Results({
  @Result(column = "create_time",property = "createTime")
})
User findById(Long id);

@Update("UPDATE user SET name=#{name} WHERE id =#{id}")
void update(User user);

@Delete("DELETE FROM user WHERE id =#{userId}")
void delete(Long userId);
如果想在控制台打印sql语句,可以在配置文件中添加以下配置
#增加打印sql语句,一般用于本地开发测试
mybatis.configuration.log-impl=org.apache.ibatis.logging.stdout.StdOutImpl
如果想要引入事务,可以在方法上添加注解@Transactional,如下代码所示,发生异常时,事务回滚。
@Override
@Transactional(propagation=Propagation.REQUIRED)
public int addAccount() {
  User user = new User();
  user.setID(4);
  user.setAge(9);
  user.setCreateTime(new Date());
  user.setName("事务测试");
  user.setPhone("000121212");
  userMapper.insert(user);
  int a = 1/0;

  return user.getId();
}
Mybatis参考资料:
http://www.mybatis.org/mybatis-3/zh/java-api.html
http://www.mybatis.org/spring-boot-starter/mybatis-spring-boot-autoconfigure/#Configuration
https://github.com/mybatis/spring-boot-starter/tree/master/mybatis-spring-boot-samples
整合问题集合:

