
spring--IoC
IoC 容器
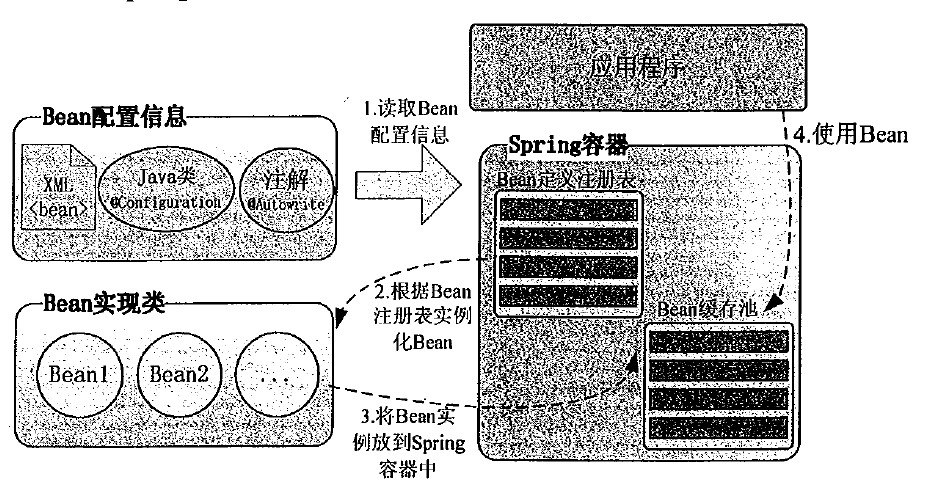
Ioc(控制反转)是Inversion of Control的缩写,把对象的创建交托给spring负责,而不是在代码中通过new实现,IoC容器是Spring 框架的核心。容器通过读取 XML、Java类或注解方式来实例化、定位、配置应用程序中的对象及建立这些对象间的依赖。
依赖注入(DI):主要是组装对象,实现对象属性注入,是建立在IoC基础之上。
Spring 提供了以下两种不同类型的容器:
BeanFactory 容器:
这是一个最简单的容器,它主要的功能是为依赖注入 (DI) 提供支持,这个容器接口在 org.springframework.beans.factory.BeanFactor 中被定义。BeanFactory 和相关的接口,比如BeanFactoryAware、DisposableBean、InitializingBean,仍旧保留在 Spring 中,主要目的是向后兼容已经存在的和那些 Spring 整合在一起的第三方框架。
在 Spring 中,有大量对 BeanFactory 接口的实现。其中,最常被使用的是 XmlBeanFactory 类。这个容器从一个 XML 文件中读取配置元数据,由这些元数据来生成一个被配置化的系统或者应用。
在资源宝贵的移动设备或者基于 applet 的应用当中, BeanFactory 会被优先选择。否则,一般使用的是 ApplicationContext,除非你有更好的理由选择 BeanFactory。
ApplicationContext 容器:
Application Context 是 BeanFactory 的子接口,也被成为 Spring 上下文。
Application Context 是 spring 中较高级的容器。和 BeanFactory 类似,它可以加载配置文件中定义的 bean,将所有的 bean 集中在一起,当有请求的时候分配 bean。 另外,它增加了企业所需要的功能,比如,从属性文件中解析文本信息和将事件传递给所指定的监听器。这个容器在 org.springframework.context.ApplicationContext interface 接口中定义。
ApplicationContext 包含 BeanFactory 所有的功能,一般情况下,相对于 BeanFactory,ApplicationContext 会更加优秀。当然,BeanFactory 仍可以在轻量级应用中使用,比如移动设备或者基于 applet 的应用程序。
最常被使用的 ApplicationContext 接口实现:
-
FileSystemXmlApplicationContext:该容器从 XML 文件中加载已被定义的 bean。在这里,你需要提供给构造器 XML 文件的完整路径。
-
ClassPathXmlApplicationContext:该容器从 XML 文件中加载已被定义的 bean。在这里,你不需要提供 XML 文件的完整路径,只需正确配置 CLASSPATH 环境变量即可,因为,容器会从 CLASSPATH 中搜索 bean 配置文件。
- WebXmlApplicationContext:该容器会在一个 web 应用程序的范围内加载在 XML 文件中已被定义的 bean。
Bean 定义:
class:这个属性是强制性的,并且指定用来创建 bean 的 bean 类。
name:这个属性指定唯一的 bean 标识符。在基于 XML 的配置元数据中,你可以使用 ID 和/或 name 属性来指定 bean 标识符。id的值不可以有特殊字符,name的值没有限制(兼容第三方框架,eg:struts1)。
scope:这个属性指定由特定的 bean 定义创建的对象的作用域,作用域有5种,具体说明如下。
singleton:默认值。在spring IoC容器仅存在一个Bean实例,Bean以单例方式存在。在创建起容器时就同时自动创建了一个bean的对象,不管你是否使用,他都存在了。
prototype:每次从容器中调用Bean时,都返回一个新的实例,即每次调用getBean()时,相当于执行newXxxBean()。Prototype是原型类型,它在我们创建容器的时候并没有实例化,而是当我们获取bean的时候才会去创建一个对象,而且我们每次获取到的对象都不是同一个对象。
request:每次HTTP请求都会创建一个新的Bean,该作用域仅适用于WebApplicationContext环境。
session:同一个HTTP Session共享一个Bean,不同Session使用不同的Bean,仅适用于WebApplicationContext环境。
global-session:一般用于Portlet应用环境,该运用域仅适用于WebApplicationContext环境。
constructor-arg、properties、autowiring mode:这是用来注入依赖关系的。
lazy-initialization mode:延迟初始化bean,告诉 IoC 容器在它第一次被请求时实例化,而不是在启动时去创建一个 bean 实例。
initialization 方法:在 bean 的所有必需的属性被容器设置之后,调用回调方法。
destruction 方法:当包含该 bean 的容器被销毁时,使用回调方法。
引入依赖的包
<dependency>
    <groupId>org.springframework</groupId>
    <artifactId>spring-beans</artifactId>
    <version>4.3.12.RELEASE</version>
</dependency>
<dependency>
    <groupId>org.springframework</groupId>
    <artifactId>spring-context</artifactId>
    <version>4.3.12.RELEASE</version>
</dependency>
<dependency>
    <groupId>org.springframework</groupId>
    <artifactId>spring-core</artifactId>
    <version>4.3.12.RELEASE</version>
</dependency>
方式一:通过xml配置文件方式注入bean
import java.util.List;
import java.util.Map;
import java.util.Properties;

public class Teacher {
    //简单对象注入
    private String name;
    //复杂对象注入
    private List list;
    private Map map;
    private Properties properties;
    //引用对象注入
    private Student student;

    public void run(){
        System.out.println("name:"+name);
        System.out.println("list:"+list);
        System.out.println("map:"+map);
        System.out.println("properties:"+properties);
        student.run();
    }
  //此处省略setter方法。。。
}
public class Student {
    public void run(){
        System.out.println("student...");
    }
}
xml配置如下:
<?xml version="1.0" encoding="UTF-8"?>
<!-- 引入相关约束,否则没有提示信息-->
<beans xmlns="http://www.springframework.org/schema/beans"
       xmlns:xsi="http://www.w3.org/2001/XMLSchema-instance"
       xsi:schemaLocation="http://www.springframework.org/schema/beans
    http://www.springframework.org/schema/beans/spring-beans-3.0.xsd">
    <!-- 默认通过无参构造器实例化-->
    <bean id="student" class="com.springbean.Student">
    </bean>
    <bean id="teacher" class="com.springbean.Teacher">
        <!-- name的值要和类中属性保持一致-->
        <property name="name" value="Jams"/>
        <!-- 数组或者list注入-->
        <property name="list">
            <list>
                <value>aaa</value>
                <value>bbb</value>
            </list>
        </property>
        <!-- map注入-->
        <property name="map">
            <map>
                <entry key="aa" value="11"/>
                <entry key="bb" value="22"/>
            </map>
        </property>
        <!-- properties注入-->
        <property name="properties">
            <props>
                <prop key="aa">11</prop>
                <prop key="bb">22</prop>
            </props>
        </property>
        <!-- 外部对象注入-->
        <property name="student" ref="student"></property>
    </bean>
</beans>
新增测试类:
import org.springframework.context.ApplicationContext;
import org.springframework.context.support.ClassPathXmlApplicationContext;

public class Test {
    public static void main(String[] args) {
        ApplicationContext context=new ClassPathXmlApplicationContext("bean1.xml");
        Teacher teacher= (Teacher) context.getBean("teacher");
        teacher.run();
    }
}
运行结果:
name:Jams
list:[aaa, bbb]
map:{aa=11, bb=22}
properties:{aa=11, bb=22}
student...
方式二:通过注解方式注入bean
import org.springframework.beans.factory.annotation.Autowired;
import org.springframework.stereotype.Component;

import javax.annotation.Resource;
@Component
public class Teacher {
    @Autowired  //方式一
    private Student student;
    @Resource  //方式二
    private Student student2;

    public void run(){
        System.out.println("teacher run...");
        student.run();
        student2.run();
    }
}
import org.springframework.stereotype.Component;

@Component
public class Student {
    public void run(){
        System.out.println("student...");
    }
}
xml配置启动注解
<?xml version="1.0" encoding="UTF-8"?>
<beans xmlns="http://www.springframework.org/schema/beans"
       xmlns:context="http://www.springframework.org/schema/context"
       xmlns:xsi="http://www.w3.org/2001/XMLSchema-instance"
       xsi:schemaLocation="http://www.springframework.org/schema/beans
      http://www.springframework.org/schema/beans/spring-beans-3.0.xsd
      http://www.springframework.org/schema/context
      http://www.springframework.org/schema/context/spring-context.xsd">

    <!-- 启动注解扫描-->
    <context:component-scan base-package="com.springanno"/>
</beans>
测试类:
import org.springframework.context.ApplicationContext;
import org.springframework.context.support.ClassPathXmlApplicationContext;

public class Test {
    public static void main(String[] args) {
        ApplicationContext context=new ClassPathXmlApplicationContext("bean2.xml");
        Teacher teacher= (Teacher) context.getBean("teacher");
        teacher.run();
    }
}
运行结果:
teacher run...
student...
student...

 浙公网安备 33010602011771号