搭建hadoop
搭建hadoop
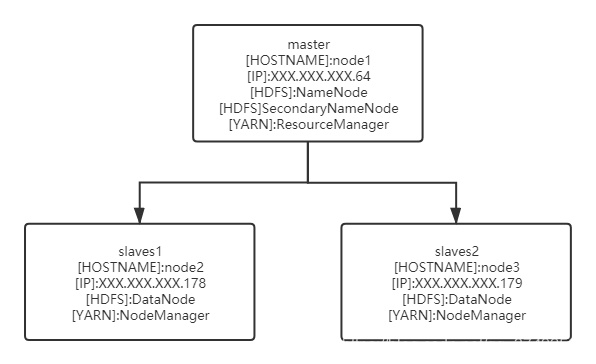
总体架构

官方文档
https://hadoop.apache.org/docs/current/hadoop-project-dist/hadoop-common/core-default.xml
https://hadoop.apache.org/docs/current/hadoop-project-dist/hadoop-hdfs/hdfs-default.xml
https://hadoop.apache.org/docs/current/hadoop-mapreduce-client/hadoop-mapreduce-client-core/mapred-default.xml
https://hadoop.apache.org/docs/current/hadoop-yarn/hadoop-yarn-common/yarn-default.xml
1、软件下载
java: java version "1.8.0_141"
hadoop: https://hadoop.apache.org/
下载了hadoop-3.2.0.tar.gz
2、环境准备
在三台机器上都需要操作
1.创建hadoop用户
2.su - hadoop 在第一台上SSH生成密钥,将公钥地址复制到三台的/home/hadoop/.ssh/authorized_keys内
3.写入hosts
$ cat /etc/hosts
172.17.5.204 hadoop1
172.17.6.162 node-0001
172.17.5.173 node-0002
4.写入Hadoop环境变量
$ cat /etc/profile
export HADOOP_HOME=/opt/hadoop
export HADOOP_CONF_DIR=$HADOOP_HOME/etc/hadoop
export PATH=$HADOOP_HOME/bin:$HADOOP_HOME/sbin:$PATH
export LD_LIBRARY_PATH=$HADOOP_HOME/lib/native
$ source /etc/profile
3.安装配置
将Hadoop软件包上传至第一台机器/opt下,解压
[hadoop@ecs-6735-0328886 hadoop]$ cd /opt/hadoop/etc/hadoop
[hadoop@ecs-6735-0328886 hadoop]$ ls
capacity-scheduler.xml            kms-log4j.properties
configuration.xsl                 kms-site.xml
container-executor.cfg            log4j.properties
core-site.xml                     mapred-env.cmd
hadoop-env.cmd                    mapred-env.sh
hadoop-env.sh                     mapred-queues.xml.template
hadoop-metrics2.properties        mapred-site.xml
hadoop-policy.xml                 shellprofile.d
hadoop-user-functions.sh.example  ssl-client.xml.example
hdfs-site.xml                     ssl-server.xml.example
httpfs-env.sh                     user_ec_policies.xml.template
httpfs-log4j.properties           workers
httpfs-signature.secret           yarn-env.cmd
httpfs-site.xml                   yarn-env.sh
kms-acls.xml                      yarnservice-log4j.properties
kms-env.sh                        yarn-site.xml
配置Java
$ cat hadoop-env.sh | grep JAVA_HOME
export JAVA_HOME="/opt/jdk"
验证
$ hadoop version
Hadoop 3.2.0
Source code repository https://github.com/apache/hadoop.git -r e97acb3bd8f3befd27418996fa5d4b50bf2e17bf
Compiled by sunilg on 2019-01-08T06:08Z
Compiled with protoc 2.5.0
From source with checksum d3f0795ed0d9dc378e2c785d3668f39
This command was run using /opt/hadoop/share/hadoop/common/hadoop-common-3.2.0.jar
配置文件
core-site.xml
$ cat core-site.xml
<?xml version="1.0" encoding="UTF-8"?>
<?xml-stylesheet type="text/xsl" href="configuration.xsl"?>
<configuration>
    <property>
        <name>fs.defaultFS</name>
        <value>hdfs://hadoop1:8020</value>
    </property>
    <property>
        <name>hadoop.tmp.dir</name>
        <value>/opt/hadoop/tmp</value>
    </property>
    <property>
        <name>hadoop.proxyuser.hadoop.hosts</name>
        <value>*</value>
    </property>
    <property>
        <name>hadoop.proxyuser.hadoop.groups</name>
        <value>*</value>
    </property>
</configuration>
hdfs-site.xml
$ cat hdfs-site.xml
<?xml version="1.0" encoding="UTF-8"?>
<?xml-stylesheet type="text/xsl" href="configuration.xsl"?>

<configuration>
    <property>
        <name>dfs.namenode.http-address</name>
        <value>hadoop1:50070</value>
    </property>
    <property>
        <name>dfs.namenode.secondary.http-address</name>
        <value>hadoop1:50090</value>
    </property>
    <property>
        <name>dfs.namenode.name.dir</name>
        <value>file:/opt/hadoop/dfs/name</value>
    </property>
    <property>
        <name>dfs.datanode.data.dir</name>
        <value>file:/opt/hadoop/dfs/data</value>
    </property>
    <property>
        <name>dfs.replication</name>
        <value>3</value>
    </property>
    <property>
        <name>dfs.permissions</name>
        <value>false</value>
    </property>
</configuration>
workers
$ cat workers
hadoop1
node-0001
node-0002
4、分发配置
将配置好的包分发到另外两台机器上
$ scp -r /opt/hadoop hadoop@node-0001:/opt
$ scp -r /opt/hadoop hadoop@node-0002:/opt
5、启动
执行HDFS的格式化命令来格式化工作空间
$ hdfs namenode -format
启动
$ cd /opt/hadoop/sbin
$ ./start-dfs.sh
Starting namenodes on [hadoop1]
Starting datanodes
Starting secondary namenodes [hadoop1]
$ ./start-yarn.sh
Starting resourcemanager
Starting nodemanagers
检查进程
$ jps
721 ResourceManager
450 SecondaryNameNode
876 NodeManager
32524 NameNode
18730 DataNode
10814 Jps
$ jps
23232 DataNode
13222 NodeManager
5979 Jps
关闭
$ stop-all.sh
6、测试
测试上传文件到hdfs
[hadoop@ecs-6735-0328886 ~]$ touch cst_test
[hadoop@ecs-6735-0328886 ~]$ echo > cst_test << EOF
> hello world!!
> It's a lovely day!
> EOF
[hadoop@ecs-6735-0328886 ~]$ hdfs dfs -mkdir /test1
[hadoop@ecs-6735-0328886 ~]$ hdfs dfs -ls /
Found 1 items
drwxr-xr-x   - hadoop supergroup          0 2022-06-22 15:31 /test1
[hadoop@ecs-6735-0328886 ~]$ hdfs dfs -put ./cst_test /test1
[hadoop@ecs-6735-0328886 ~]$
[hadoop@ecs-6735-0328886 ~]$ hdfs dfs -ls /test1
Found 1 items
-rw-r--r--   3 hadoop supergroup          1 2022-06-22 15:32 /test1/cst_test
[hadoop@ecs-6735-0328886 ~]$


