linux安装nginx以及相关环境配置
安装nginx
- 环境准备
yum install gcc gcc-c++ automake pcre pcre-devel zlip zlib-devel openssl openssl-devel
解释:
gcc为GNU Compiler Collection的缩写,可以编译C和C++源代码等,
gcc-c++也能编译C源代码,只不过把会把它当成C++源代码,后缀为.c的,gcc把它当作是C程序,而g++当作是c++程序;后缀为.cpp的,两者都会认为是c++程序,注意,虽然c++是c的超集,但是两者对语法的要求是有区别的。
automake是一个从Makefile.am文件自动生成Makefile.in的工具。为了生成Makefile.in,automake还需用到perl,由于automake创建的发布完全遵循GNU标准,所以在创建中不需要perl。libtool是一款方便生成各种程序库的工具。
pcre pcre-devel:在Nginx编译需要 PCRE(Perl Compatible Regular Expression),因为Nginx 的Rewrite模块和HTTP 核心模块会使用到PCRE正则表达式语法。
zlip zlib-devel:nginx启用压缩功能的时候,需要此模块的支持。
openssl openssl-devel:开启SSL的时候需要此模块的支持。
2.下载nginx 安装包: 官网地址:http://nginx.org/
没有安装wget的话先安装wget:yum install -y wget
[root@localhost ~]# wget http://nginx.org/download/nginx-1.8.1.tar.gz
- 解压安装包
tar -xzvf nginx-1.8.1.tar.gz
- 编译nginx:make
编译是为了检查系统环境是否符合编译安装的要求,比如是否有gcc编译工具,是否支持编译参数当中的模块,并根据开启的参数等生成Makefile文件为下一步做准备:
编译前:

编译:
[root@localhost nginx-1.8.1]# ./configure --prefix=/usr/local/nginx --sbin-path=/usr/local/nginx/sbin/nginx --conf-path=/usr/local/nginx/conf/nginx.conf --error-log-path=/var/log/nginx/error.log --http-log-path=/var/log/nginx/access.log --pid-path=/var/run/nginx/nginx.pid --lock-path=/var/lock/nginx.lock --user=nginx --group=nginx --with-http_ssl_module --with-http_stub_status_module --with-http_gzip_static_module --http-client-body-temp-path=/var/tmp/nginx/client/ --http-proxy-temp-path=/var/tmp/nginx/proxy/ --http-fastcgi-temp-path=/var/tmp/nginx/fcgi/ --http-uwsgi-temp-path=/var/tmp/nginx/uwsgi --http-scgi-temp-path=/var/tmp/nginx/scgi --with-pcre
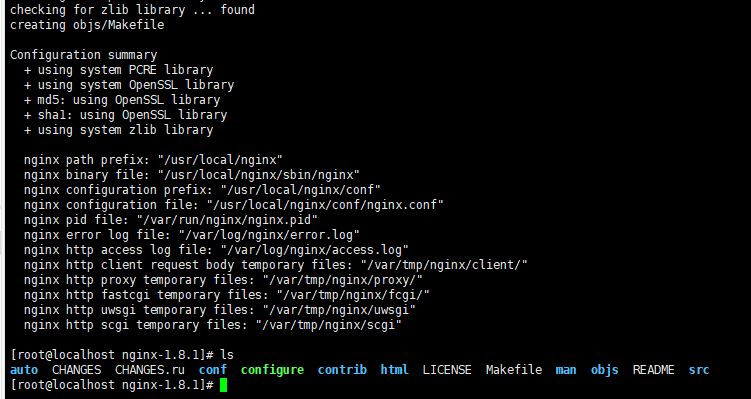
编译后:

可以查看objs目录,看到makefile文件

5、生成脚本及配置文件:make
编译步骤,根据Makefile文件生成相应的模块
6、安装:make install
创建目录,并将生成的模块和文件复制到相应的目录:
[root@localhost nginx-1.8.1]# make install
make -f objs/Makefile install
make[1]: 进入目录“/root/nginx-1.8.1”
test -d '/usr/local/nginx' || mkdir -p '/usr/local/nginx'
test -d '/usr/local/nginx/sbin' 		|| mkdir -p '/usr/local/nginx/sbin'
test ! -f '/usr/local/nginx/sbin/nginx' 		|| mv '/usr/local/nginx/sbin/nginx' 			'/usr/local/nginx/sbin/nginx.old'
cp objs/nginx '/usr/local/nginx/sbin/nginx'
test -d '/usr/local/nginx/conf' 		|| mkdir -p '/usr/local/nginx/conf'
cp conf/koi-win '/usr/local/nginx/conf'
cp conf/koi-utf '/usr/local/nginx/conf'
cp conf/win-utf '/usr/local/nginx/conf'
test -f '/usr/local/nginx/conf/mime.types' 		|| cp conf/mime.types '/usr/local/nginx/conf'
cp conf/mime.types '/usr/local/nginx/conf/mime.types.default'
test -f '/usr/local/nginx/conf/fastcgi_params' 		|| cp conf/fastcgi_params '/usr/local/nginx/conf'
cp conf/fastcgi_params 		'/usr/local/nginx/conf/fastcgi_params.default'
test -f '/usr/local/nginx/conf/fastcgi.conf' 		|| cp conf/fastcgi.conf '/usr/local/nginx/conf'
cp conf/fastcgi.conf '/usr/local/nginx/conf/fastcgi.conf.default'
test -f '/usr/local/nginx/conf/uwsgi_params' 		|| cp conf/uwsgi_params '/usr/local/nginx/conf'
cp conf/uwsgi_params 		'/usr/local/nginx/conf/uwsgi_params.default'
test -f '/usr/local/nginx/conf/scgi_params' 		|| cp conf/scgi_params '/usr/local/nginx/conf'
cp conf/scgi_params 		'/usr/local/nginx/conf/scgi_params.default'
test -f '/usr/local/nginx/conf/nginx.conf' 		|| cp conf/nginx.conf '/usr/local/nginx/conf/nginx.conf'
cp conf/nginx.conf '/usr/local/nginx/conf/nginx.conf.default'
test -d '/var/run/nginx' 		|| mkdir -p '/var/run/nginx'
test -d '/var/log/nginx' || 		mkdir -p '/var/log/nginx'
test -d '/usr/local/nginx/html' 		|| cp -R html '/usr/local/nginx'
test -d '/var/log/nginx' || 		mkdir -p '/var/log/nginx'
make[1]: 离开目录“/root/nginx-1.8.1”
备注:nginx完成安装以后,有四个主要的目录:
conf:保存nginx所有的配置文件,其中nginx.conf是nginx服务器的最核心最主要的配置文件,其他的.conf则是用来配置nginx相关的功能的,例如fastcgi功能使用的是fastcgi.conf和fastcgi_params两个文件,配置文件一般都有个样板配置文件,是文件名.default结尾,使用的使用将其复制为并将default去掉即可。
html目录中保存了nginx服务器的web文件,但是可以更改为其他目录保存web文件,另外还有一个50x的web文件是默认的错误页面提示页面。
logs:用来保存nginx服务器的访问日志错误日志等日志,logs目录可以放在其他路径,比如/var/logs/nginx里面。
sbin:保存nginx二进制启动脚本,可以接受不同的参数以实现不同的功能。
安装完nginx后的问题:
- 启动nginx
输入nginx启动,报错未找到命令!!
[root@localhost nginx-1.8.1]# nginx
-bash: nginx: 未找到命令
解决方法:配置nginx的环境变量
进入 vim /etc/profile 文件,最后添加
PATH=$PATH:/usr/local/nginx/sbin
export PATH
- 继续nginx启动,报错!!!
[root@localhost ~]# nginx
nginx: [emerg] getpwnam("nginx") failed
没有安装nginx用户导致的无法启动,需要添加nginx用户
[root@localhost ~]# useradd -s /sbin/nologin -M nginx
[root@localhost ~]# id nginx
uid=1000(nginx) gid=1000(nginx) 组=1000(nginx)
- 继续nginx启动:报错!!!
[root@localhost ~]# nginx
nginx: [emerg] mkdir() "/var/tmp/nginx/client/" failed (2: No such file or directory)
解决方法:继续创建文件路径吧
[root@localhost tmp]# mkdir -p /var/tmp/nginx
[root@localhost tmp]# nginx
[root@localhost tmp]# ps -ef | grep nginx
root      18555      1  0 14:59 ?        00:00:00 nginx: master process nginx
nginx     18556  18555  0 14:59 ?        00:00:00 nginx: worker process
root      18565  18490  0 15:00 pts/2    00:00:00 grep --color=auto nginx
最后启动成功:使用 wget http://127.0.0.1 获取到了html文件
[root@localhost ~]# wget http://127.0.0.1
--2020-11-12 15:01:39--  http://127.0.0.1/
正在连接 127.0.0.1:80... 已连接。
已发出 HTTP 请求,正在等待回应... 200 OK
长度:612 [text/html]
正在保存至: “index.html”

100%[================================================================================>] 612         --.-K/s 用时 0s

2020-11-12 15:01:39 (45.2 MB/s) - 已保存 “index.html” [612/612])

[root@localhost ~]# cat index.html
<!DOCTYPE html>
<html>
<head>
<title>Welcome to nginx!</title>
<style>
    body {
        width: 35em;
        margin: 0 auto;
        font-family: Tahoma, Verdana, Arial, sans-serif;
    }
</style>
</head>
<body>
<h1>Welcome to nginx!</h1>
<p>If you see this page, the nginx web server is successfully installed and
working. Further configuration is required.</p>

<p>For online documentation and support please refer to
<a href="http://nginx.org/">nginx.org</a>.<br/>
Commercial support is available at
<a href="http://nginx.com/">nginx.com</a>.</p>

<p><em>Thank you for using nginx.</em></p>
</body>
</html>
在客户端使用wget方式访问相当于下载了该地址的文件(根据文件内容我们可以判断nginx启动成功),如果我们通过浏览器访问呢,结果是一直转圈圈,这是为什么呢?
每个计算机都有防火墙firewall来保护我们的计算机不受到外界恶意攻击,当我们在另一台电脑访问该计算机时,需要该计算机开放出对应的端口才能进行访问。否则只能通过本机的客户端访问。
所以我们需要关闭防火墙,或者开放对应的端口才可以通过浏览器访问另一台电脑的nginx服务。
防火墙的操作:
//查看防火墙的状态
[root@localhost ~]# systemctl status firewalld
● firewalld.service - firewalld - dynamic firewall daemon
   Loaded: loaded (/usr/lib/systemd/system/firewalld.service; enabled; vendor preset: enabled)
   Active: active (running) since 四 2020-11-12 10:56:52 CST; 4h 34min ago
     Docs: man:firewalld(1)
 Main PID: 6232 (firewalld)
   CGroup: /system.slice/firewalld.service
           └─6232 /usr/bin/python -Es /usr/sbin/firewalld --nofork --nopid

11月 12 10:56:51 localhost.134 systemd[1]: Starting firewalld - dynamic firewall daemon...
11月 12 10:56:52 localhost.134 systemd[1]: Started firewalld - dynamic firewall daemon.

//关闭防火墙
[root@localhost ~]# systemctl stop firewalld
[root@localhost ~]# systemctl status firewalld
● firewalld.service - firewalld - dynamic firewall daemon
   Loaded: loaded (/usr/lib/systemd/system/firewalld.service; enabled; vendor preset: enabled)
   Active: inactive (dead) since 四 2020-11-12 15:45:50 CST; 1s ago
     Docs: man:firewalld(1)
  Process: 20962 ExecStart=/usr/sbin/firewalld --nofork --nopid $FIREWALLD_ARGS (code=exited, status=0/SUCCESS)
 Main PID: 20962 (code=exited, status=0/SUCCESS)

11月 12 15:45:26 localhost.134 systemd[1]: Starting firewalld - dynamic firewall daemon...
11月 12 15:45:26 localhost.134 systemd[1]: Started firewalld - dynamic firewall daemon.
11月 12 15:45:48 localhost.134 systemd[1]: Stopping firewalld - dynamic firewall daemon...
11月 12 15:45:50 localhost.134 systemd[1]: Stopped firewalld - dynamic firewall daemon.

重启防火墙

[root@localhost ~]# systemctl restart firewalld
[root@localhost ~]# systemctl status firewalld
● firewalld.service - firewalld - dynamic firewall daemon
   Loaded: loaded (/usr/lib/systemd/system/firewalld.service; enabled; vendor preset: enabled)
   Active: active (running) since 四 2020-11-12 15:46:28 CST; 1s ago
     Docs: man:firewalld(1)
 Main PID: 21295 (firewalld)
   CGroup: /system.slice/firewalld.service
           └─21295 /usr/bin/python -Es /usr/sbin/firewalld --nofork --nopid

11月 12 15:46:28 localhost.134 systemd[1]: Starting firewalld - dynamic firewall daemon...
11月 12 15:46:28 localhost.134 systemd[1]: Started firewalld - dynamic firewall daemon.


开放端口:
firewall-cmd --zone=public --add-port=80/tcp --permanent
 命令含义:
--zone #作用域
--add-port=80/tcp  #添加端口,格式为:端口/通讯协议
--permanent  #永久生效,没有此参数重启后失效
更新防火墙规则:
firewall-cmd --reload
查看80端口
[root@localhost ~]# firewall-cmd --zone=public --query-port=80/tcp
yes

查看所有打开的端口:
firewall-cmd --zone=public --list-ports
删除80端口,记得更新防火墙规则
firewall-cmd --zone=public --remove-port=80/tcp --permanent

以上当查询到80端口后就可以通过浏览器访问nginx服务啦

查看端口号
netstat -ntlp   //查看当前所有tcp端口·
netstat -ntulp |grep 1935   //查看所有1935端口使用情况
更加详细的开放端口操作,借阅:https://blog.csdn.net/s_p_j/article/details/80979450
netstat方式查看端口情况
安装netstat
yum -y install net-tools    (可以生成ifconfig命令,netstat命令)
netstat -ntlp   //查看当前所有tcp端口

[root@localhost ~]# netstat -ntlp
Active Internet connections (only servers)
Proto Recv-Q Send-Q Local Address           Foreign Address         State       PID/Program name
tcp        0      0 0.0.0.0:80              0.0.0.0:*               LISTEN      18555/nginx: master
tcp        0      0 0.0.0.0:22              0.0.0.0:*               LISTEN      6724/sshd
tcp6       0      0 :::22                   :::*                    LISTEN      6724/sshd

netstat -ntulp |grep 80   //查看所有80端口使用情况
losf查看端口使用情况
安装losf
[root@localhost ~]# yum install lsof

[root@localhost ~]# lsof -i:80
COMMAND   PID  USER   FD   TYPE DEVICE SIZE/OFF NODE NAME
nginx   18555  root    6u  IPv4  71770      0t0  TCP *:http (LISTEN)
nginx   18556 nginx    6u  IPv4  71770      0t0  TCP *:http (LISTEN)
总结:查看端口是否开启和使用情况方式有 losf -i:port, netstat -ntlp |grep 80, firewall-cmd --zone=public --query-port=80/tcp。
查看nginx进程并kill该进程
[root@localhost ~]# ps -ef | grep nginx
root      23089      1  0 16:14 ?        00:00:00 nginx: master process nginx
nginx     23090  23089  0 16:14 ?        00:00:00 nginx: worker process
root      23099  18369  0 16:14 pts/1    00:00:00 grep --color=auto nginx
[root@localhost ~]# kill 23089
[root@localhost ~]# ps -ef | grep nginx
root      23204  18369  0 16:17 pts/1    00:00:00 grep --color=auto nginx

// 强制杀死进程
kill -9 进程号
对nginx.conf的一些认识:
worker_processes 1; #可以指定启动的固定nginx进程数,或使用auto,auto是启动与当前CPU 线程相同的进程数,如CPU是四核八线程的就启动八个进程的Nginx工作进程。
查看CPU的核心数量:
[root@localhost ~]# grep process /proc/cpuinfo  | wc -l
4

Nginx默认没有开启利用多核CPU,我们可以通过增加worker_cpu_affinity配置参数来充分利用多核CPU。CPU是任务处理,计算最关键的资源,CPU核越多,性能就越好。

配置Nginx多核CPU,worker_cpu_affinity使用方法和范例
参考该博客可以查看多核CPU进程配置。
https://www.cnblogs.com/pangbing/p/6537188.html
nginx配置详细参考:https://www.cnblogs.com/yy-cola/p/10399219.html


