Git教程
创建版本库和时光穿梭
git init 文件名    #创建git仓库
git add 文件名    #添加文件到暂存区
git commit -m "注释"    #添加暂存区文件到版本库(本地仓库)
git commit -a -m "注释"    #直接将工作区文件添加到版本库
git status    #查看当前仓库的状态
管理修改
git diff 文件名    #检查文件内容做了什么修改
git diff HEAD -- 文件名    #查看工作区和版本库里面最新版本的区别
git log    #查看文件提交的版本日志
git log --pretty=oneline    #简单显示提交日志
git reset --hard HEAD^    #版本回退到上一个版本
git reset --hard 1099e    #指定回到哪个版本
git reflog    #查看历史命令
撤销修改
git checkout -- 文件名    #把在工作区的修改全部撤销
git reset HEAD 文件名    #git reset回退HEAD最新版本
删除文件
git rm 文件名    #从版本库中删除文件,并且git commit -m "remove file"
远程仓库
使自己的机器与GitHub关联
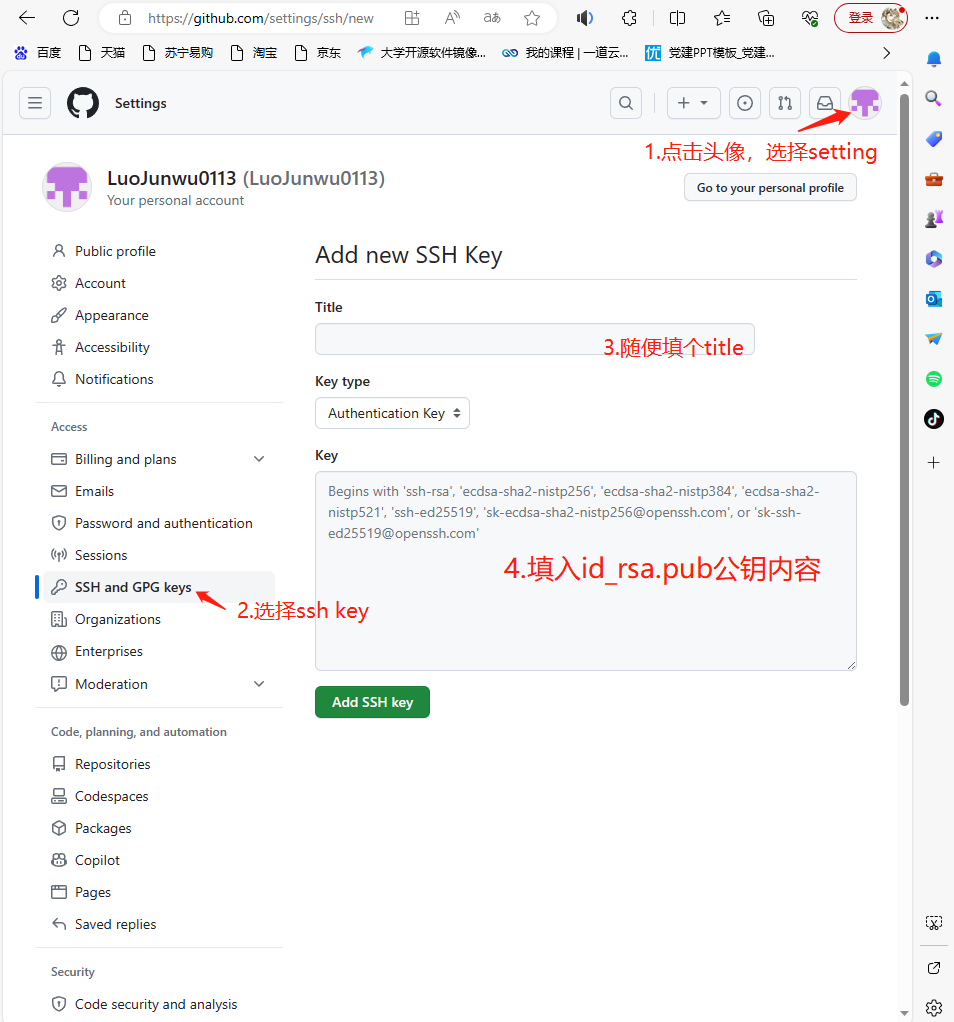
第1步:创建SSH Key
ssh-keysgen -t rsa -C "youremail@example.com"
第2步:登陆GitHub,打开“Account settings”,“SSH Keys”页面:
然后,点“Add SSH Key”,填上任意Title,在Key文本框里粘贴id_rsa.pub文件的内容:

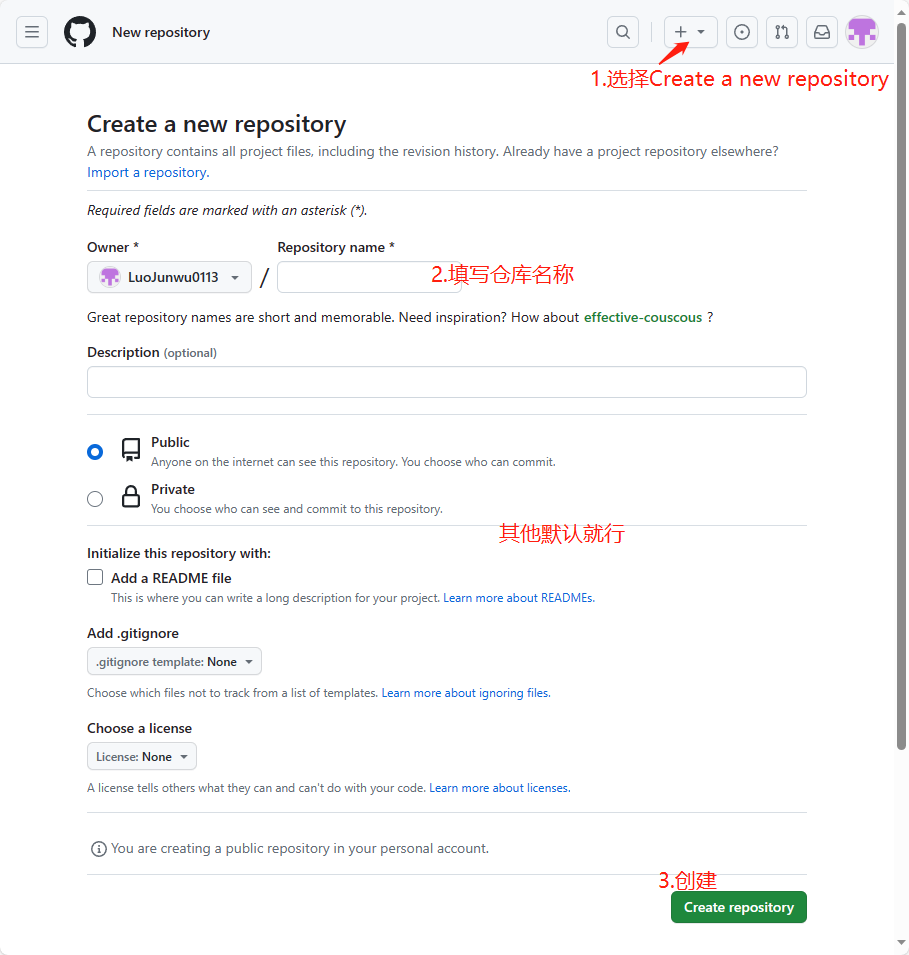
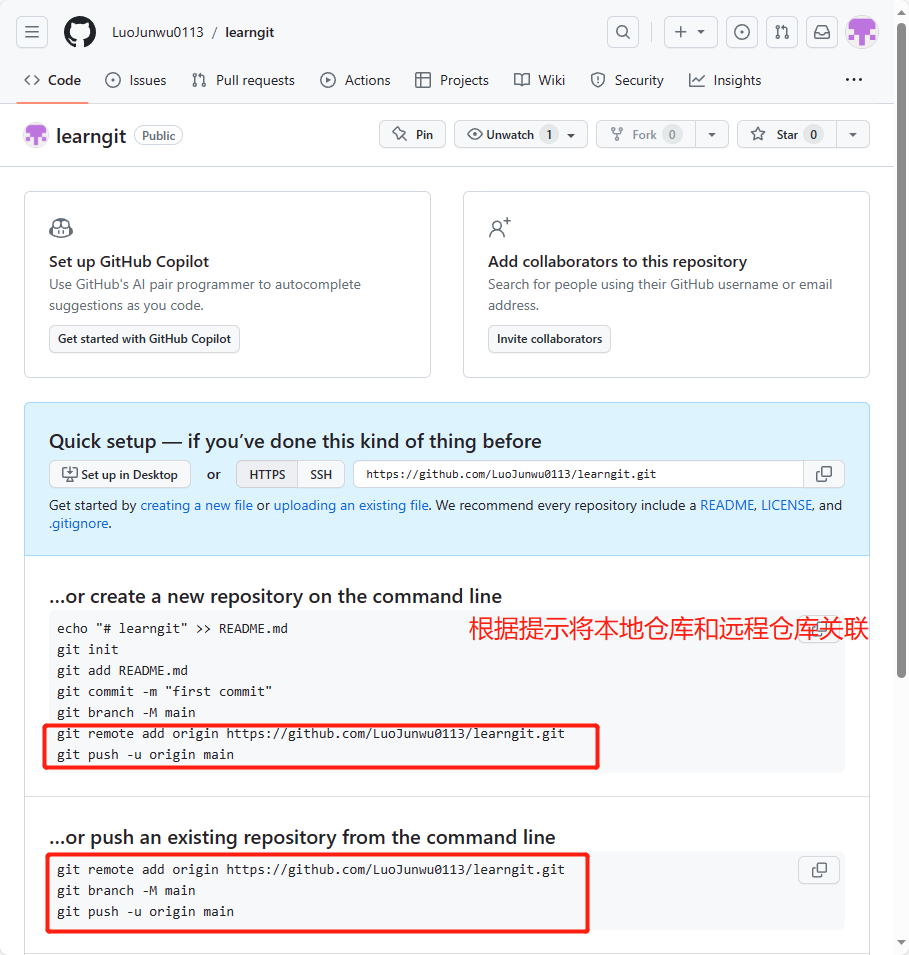
添加远程仓库


第一次推送master分支时,加上了-u参数,Git不但会把本地的master分支内容推送的远程新的master分支,还会把本地的master分支和远程的master分支关联起来,
[root@zabbix-server learngit]# git remote add origin git@github.com:Luojunwu0113/learngi.git
[root@zabbix-server learngit]# git push -u origin master

从现在起,只要本地作了提交,就可以通过命令:
git push origin master
删除远程库
如果添加的时候地址写错了,或者就是想删除远程库,可以用git remote rm <name>命令。使用前,建议先用git remote -v查看远程库信息:
[root@zabbix-server learngit]# git remote -v
origin    git@github.com:Luojunwu0113/learngit.git (fetch)
origin    git@github.com:Luojunwu0113/learngit.git (push)
right    git@github.com:Luojunwu0113/learn.git (fetch)
right    git@github.com:Luojunwu0113/learn.git (push)
然后,根据名字删除,比如删除right:
[root@zabbix-server learngit]# git remote rm right
从远程仓库克隆
##克隆远程的learngit仓库,
[root@zabbix-server learngit]# git clone git@github.com:Luojunwu0113/learngit.git
Cloning into 'learngit'...
remote: Enumerating objects: 15, done.
remote: Counting objects: 100% (15/15), done.
remote: Compressing objects: 100% (8/8), done.
remote: Total 15 (delta 0), reused 12 (delta 0), pack-reused 0
Receiving objects: 100% (15/15), done.
##此时文件中多了个learngit仓库
[root@zabbix-server learngit]# ls
\  learngit  readme
[root@zabbix-server learngit]# cd learngit/
[root@zabbix-server learngit]# ls
gitclone  readme
[root@zabbix-server learngit]# pwd
/opt/learngit/learngit
分支管理
查看分支:git branch
创建分支:git branch <name>
切换分支:git checkout <name>或者git switch <name>
前两步相当于创建+切换分支:git checkout -b <name>或者git switch -c <name>
合并某分支到当前分支:git merge <name>
删除分支:git branch -d <name>
现在在dev分支上操作
[root@zabbix-server learngit]# echo "create a new branch" > readme/test.txt
[root@zabbix-server learngit]# git add readme/test.txt
[root@zabbix-server learngit]# git commit -m "create branch"
[dev eae92b2] create branch
 1 file changed, 1 insertion(+), 2 deletions(-)
[root@zabbix-server learngit]# cat readme/test.txt
create a new branch
然后切换到master分支,进行合并分支
[root@zabbix-server learngit]# git checkout master
Switched to branch 'master'
[root@zabbix-server learngit]# cat readme/test.txt
Git is a version control system.
Git is free software.
[root@zabbix-server learngit]# git merge dev
Updating fa8d28d..eae92b2
Fast-forward
 readme/test.txt | 3 +--
 1 file changed, 1 insertion(+), 2 deletions(-)
[root@zabbix-server learngit]# cat readme/test.txt
create a new branch
合并完成后,就可以放心地删除dev分支了
[root@zabbix-server learngit]# git branch -d dev
Deleted branch dev (was eae92b2).
[root@zabbix-server learngit]# git branch
* master
因为创建、合并和删除分支非常快,所以Git鼓励你使用分支完成某个任务,合并后再删掉分支,这和直接在master分支上工作效果是一样的,但过程更安全。
switch
我们注意到切换分支使用git checkout <branch>,而前面讲过的撤销修改则是git checkout -- <file>,同一个命令,有两种作用,确实有点令人迷惑。
实际上,切换分支这个动作,用switch更科学。因此,最新版本的Git提供了新的git switch命令来切换分支:
创建并切换到新的dev分支,可以使用:
git switch -c dev
直接切换到已有的master分支,可以使用:
git switch master
解决分支冲突
准备新的feature分支:
git checkout -b featureone
修改test.txt内容:
echo "this is featureone branch about merge" > readme/test.txt
在feature分支上提交:
[root@zabbix-server learngit]# git commit -a -m "featureone branch about merge"
[featureone b6dd4c6] a new branch feature
 1 file changed, 1 insertion(+)
切换到master分支:
git checkout master
在master分支上把readme.txt文件的最后一行改为:
echo "this is master branch about merge" > readme/test.txt
提交:
git commit -a -m "master branch"
master分支和feature1分支各自都分别有新的提交,这种情况下,Git无法执行“快速合并”,只能试图把各自的修改合并起来,但这种合并就可能会有冲突:
[root@zabbix-server learngit]# git merge featureone
Auto-merging readme/test.txt
CONFLICT (content): Merge conflict in readme/test.txt
Automatic merge failed; fix conflicts and then commit the result.
果然冲突了!Git告诉我们,readme.txt文件存在冲突,必须手动解决冲突后再提交。git status也可以告诉我们冲突的文件:
[root@zabbix-server learngit]# git status
On branch master
You have unmerged paths.
  (fix conflicts and run "git commit")
  (use "git merge --abort" to abort the merge)

Unmerged paths:
  (use "git add <file>..." to mark resolution)

    both modified:   readme/test.txt

no changes added to commit (use "git add" and/or "git commit -a")
查看test.txt内容:
[root@zabbix-server learngit]# cat readme/test.txt
<<<<<<< HEAD
this is master branch about merge
=======
this is featureone branch about merge
>>>>>>> featureone
Git用<<<<<<<,=======,>>>>>>>标记出不同分支的内容,我们修改如下后保存:
[root@zabbix-server learngit]# cat readme/test.txt
this is master branch about merge
this is featureone branch about merge
再提交:
[root@zabbix-server learngit]# git commit -a -m "conflict fixed"
[master 549a671] conflict fixed
用带参数的git log也可以看到分支的合并情况:
[root@zabbix-server learngit]# git log --graph --pretty=oneline
*   549a671905712df3b01250f67fbd6a89c0ffa198 conflict fixed
|\
| * 60851601f67eda72cdddca6e9e817b2d2ca02f51 featureone branch about merge
* | a869f384141dea40dc71261b4cebe838e6b1ba89 master branch about merge
* | a1d345b6046a8674c637c3a692dc0e53fe27ff04 master branch
* |   9d7caa2960c63da27a95e395ec5087f8e08004ee a new branch feature
|\ \
| |/
| * 9542131687abc6736f2f95396231fd9bef7ba109 feature add
* | e495d1b31a400b299779939dff9ec71b3394eeaa second add
|/
* b6dd4c6e99641ebef5250519704b6269d7ad33cd a new branch feature
* a8fe628c657f2d4ce3488d30f88b54361aa9791d first add
最后,删除feature分支:
[root@zabbix-server learngit]# git branch -d featureone
Deleted branch featureone (was 6085160).
分支管理策略
通常,我们使用git merge 分支时,Git会用Fast formward模式,在这种模式下,删除分支后,会丢掉分支信息。
我们需要禁用Fast forward模式,Git会在merge时生成一个新的commit,这样我们就能在分支历史上查看到分支信息。
git merge --no-ff实战:
标签管理
命令git tag <tagname>用于新建一个标签,默认为HEAD,也可以指定一个commit id;

git tag v0.9 f43sd42

命令git tag -a <tagname> -m "blablabla..."可以指定标签信息;

命令git tag可以查看所有标签;

git tag -d <tagname>可以删除标签

命令git push origin <tagname>可以推送一个本地标签;

命令git push origin --tags可以推送全部未推送过的本地标签;

命令git tag -d <tagname>可以删除一个本地标签;

命令git push origin :refs/tags/<tagname>可以删除一个远程标签。


