
Nginx安装配置
Nginx如今分为商业版,开源版,支持Linux与Windows平台下载使用
nginx.com  商业版
nginx.org  开源版
https://tengine.taobao.org/
【环境准备】
操作系统:CentOS Linux release 7.3.1611 (Core)
GCC编译环境:yum install -y gcc gcc-c++ autoconf automake make
模块依赖性:Nginx支持的功能模块需要有第三方的库支持,例如gzip的zlib库,rewrite重写需要的pcre库,HTTPS需要的openssl库等等。
yum install zlib zlib-devel openssl openssl-devel pcre pcre-devel wget httpd-tools vim

系统基础开发环境:yum groupinstall "Development Tools" "Basic Web Server"

确保防火墙关闭  iptables -F
关闭selinux
yum源配置正确
网络连接状态正常
【Nginx下载】
- yum自动安装,不支持自由扩展第三方功能
- 源码编译安装(此次搭建选择编译安装)
1.下载Nginx安装包  nginx.org官网
[root@junwu_client ~]# wget https://nginx.org/download/nginx-1.23.4.tar.gz
2.解压缩Nginx源代码
[root@junwu_client ~]# tar -zxvf nginx-1.23.4.tar.gz
3.复制nginx默认提供的vim语法插件
[root@junwu_client ~]# mkdir ./.vim
[root@junwu_client nginx-1.23.4]# cp -r contrib/vim/* ~/.vim
4.Nginx源代码目录介绍
auto 检测系统模块
CHANGES nginx更改记录文件
conf 存放nginx配置文件
configure 释放编译文件的定制脚本
contrib 提供了perl与vim插件
html 存放标准html页面语法
src 存放nginx源码
5.开始编译Nginx,扩展编译模块
#列出Nginx的编译选项,如制定安装路径,配置文件、日志文件等路径,指定开启模块功能等
[root@junwu_client nginx-1.23.4]# ./configure --help
##第一曲:按照功能需要,添加编译模块
[root@junwu_client nginx-1.23.4]# ./configure --prefix=/home/Nginx-1.23.4 --with-http_ssl_module --with-file-aio --with-http_gzip_static_module --with-http_flv_module --with-http_stub_status_module --with-threads
6.第二曲:执行make编译
[root@junwu_client nginx-1.23.4]# make
7.第三曲:编译安装,生成nginx的可执行命令
[root@junwu_client nginx-1.23.4]# make install
8.检查--prefix指定的安装目录
[root@junwu_client nginx-1.23.4]# ls /home/
Nginx-1.23.4
[root@junwu_client nginx-1.23.4]# ls /home/Nginx-1.23.4/
conf  html  logs  sbin
依次是配置文件,静态文件,日志,二进制命令目录
10.创建nginx的环境变量文件,修改如下,创建/etc/profile.d/nginx.sh脚本文件便于以后维护
[root@junwu_client ~]# cat /etc/profile.d/nginx.sh
export PATH=/home/Nginx-1.23.4/sbin:$PATH
[root@junwu_client ~]# echo $PATH
/usr/local/sbin:/usr/local/bin:/usr/sbin:/usr/bin:/root/bin
11.刷新/etc/profile文件,此时可以正常使用nginx
[root@junwu_client ~]# source /etc/profile
[root@junwu_client ~]# echo $PATH
/home/Nginx-1.23.4/sbin:/usr/local/sbin:/usr/local/bin:/usr/sbin:/usr/bin:/root/bin
12.检查nginx模块信息
[root@junwu_client ~]# nginx -V
nginx version: nginx/1.23.4
built by gcc 4.8.5 20150623 (Red Hat 4.8.5-44) (GCC)
built with OpenSSL 1.0.2k-fips  26 Jan 2017
TLS SNI support enabled
configure arguments: --prefix=/home/Nginx-1.23.4 --with-http_ssl_module --with-file-aio --with-http_gzip_static_module --with-http_flv_module --with-http_stub_status_module --with-threads
nginx.conf重要的指令块
核心功能都在于http{}指令块里,http{}块还包含了以下指令
- server{} 指令块 ,对应一个站点配置,反向代理,静态资源站点
- location{} ,对应一个url
- upstream{} ,定义上游服务,负载均衡池
Nginx命令行
-
启停指令
- nginx -s stop
- nginx -s reload
- nginx 首次输入表示启动
-
nginx帮助指令
[root@junwu_client ~]# nginx -h
nginx version: nginx/1.23.4
Usage: nginx [-?hvVtTq] [-s signal] [-p prefix]
             [-e filename] [-c filename] [-g directives]

Options:
  -?,-h         : this help  #帮助信息
  -v            : show version and exit  #显示版本
  -V            : show version and configure options then exit  #显示编译信息和版本
  -t            : test configuration and exit  #测试配置文件语法
  -T            : test configuration, dump it and exit  #测试语法且输出内容
  -q            : suppress non-error messages during configuration testing
  -s signal     : send signal to a master process: stop, quit, reopen, reload #发出信号
stop立即停止,quit优雅停止,reload重读配置文件,reopen重新记录日志-p prefix : set prefix path (default: /home/Nginx-1.23.4/)
-e filename : set error log file (default: logs/error.log)
-c filename : set configuration file (default: conf/nginx.conf) #使用指定配置文件
-g directives : set global directives out of configuration file #覆盖默认参数
Nginx-master信号
1.master不处理请求,而是分配worker进程,负责重启,热部署,重载等功能。
2.master根据worker_processes 定义开始的workers数量
3.worker运行后,master处于挂起状态,等待信号
4.可以发送kill,或者nginx -s 参数发出信号
信号集
| nginx -s 对应参数 | 信号 | 含义 | English |
|---|---|---|---|
| stop | TERM | 强制关闭整个服务 | Shut down quickly. |
| null | INT | 强制关闭整个服务 | Shut down quickly. |
| quit | QUIT | 优雅地关闭整个服务 | Shut down gracefully. |
| reopen | USR1 | 重新打开日志记录 | Reopen log files. |
| reload | HUP | 重新读取配置文件,并且优雅地退出老的worker | Reload configuration, start the new worker process with a new configuration, and gracefully shut down old worker processes. |
| null | USR2 | 平滑升级到新版本 | Upgrade the nginx executable on the fly. |
| null | WINCH | 优雅地关闭worker(在热更新的时候必用) | Shut down worker processes gracefully. |
热部署
nginx作为一个优秀的反向代理服务器,同时具备高可用的特性,Nginx也支持热部署。
热部署指的是在不重启或关闭进程情况下,新应用直接替换掉旧的应用
热部署大致流程
1.备份旧的二进制文件
2.编译安装新的二进制文件,覆盖旧的二进制文件
3.发送USR2信号给旧master进程
4.发送WINCH信号给旧master进程
5.发送QUIT信号给旧master进程
环境准备:
1.旧nginx版本:nginx version: nginx/1.23.4
2.新nginx版本:nginx version: nginx/1.22.1
nginx工作模式是master-worker
刚才所说的nginx支持reload重载仅仅是nginx的master进程,检查配置文件语法是否正确,错则返回错误、正确也不会改变已经建立连接的worker,只得等待worker处理完毕请求之后,杀死旧配置文件的worker,启动新配置文件的worker。
但是Nginx这里提提供了热部署功能,就是在不影响用户体验下,进行软件版本升级,也就是不主动杀死worker,替换软件的二进制文件。
[root@junwu_client ~]# ps -ef |grep nginx
root      34878      1  0 07:58 ?        00:00:00 nginx: master process nginx
nobody    34879  34878  0 07:58 ?        00:00:00 nginx: worker process
root      34917   1310  0 08:20 pts/0    00:00:00 grep --color=auto nginx
[root@junwu_client ~]# curl 127.0.0.1
<!DOCTYPE html>
<html>
<head>
<title>Welcome to nginx!</title>
<style>
html { color-scheme: light dark; }
body { width: 35em; margin: 0 auto;
font-family: Tahoma, Verdana, Arial, sans-serif; }
</style>
</head>
<body>
<h1>Welcome to nginx!</h1>
<p>If you see this page, the nginx web server is successfully installed and
working. Further configuration is required.</p>

<p>For online documentation and support please refer to
<a href="http://nginx.org/">nginx.org</a>.<br/>
Commercial support is available at
<a href="http://nginx.com/">nginx.com</a>.</p>

<p><em>Thank you for using nginx.</em></p>
</body>
</html>
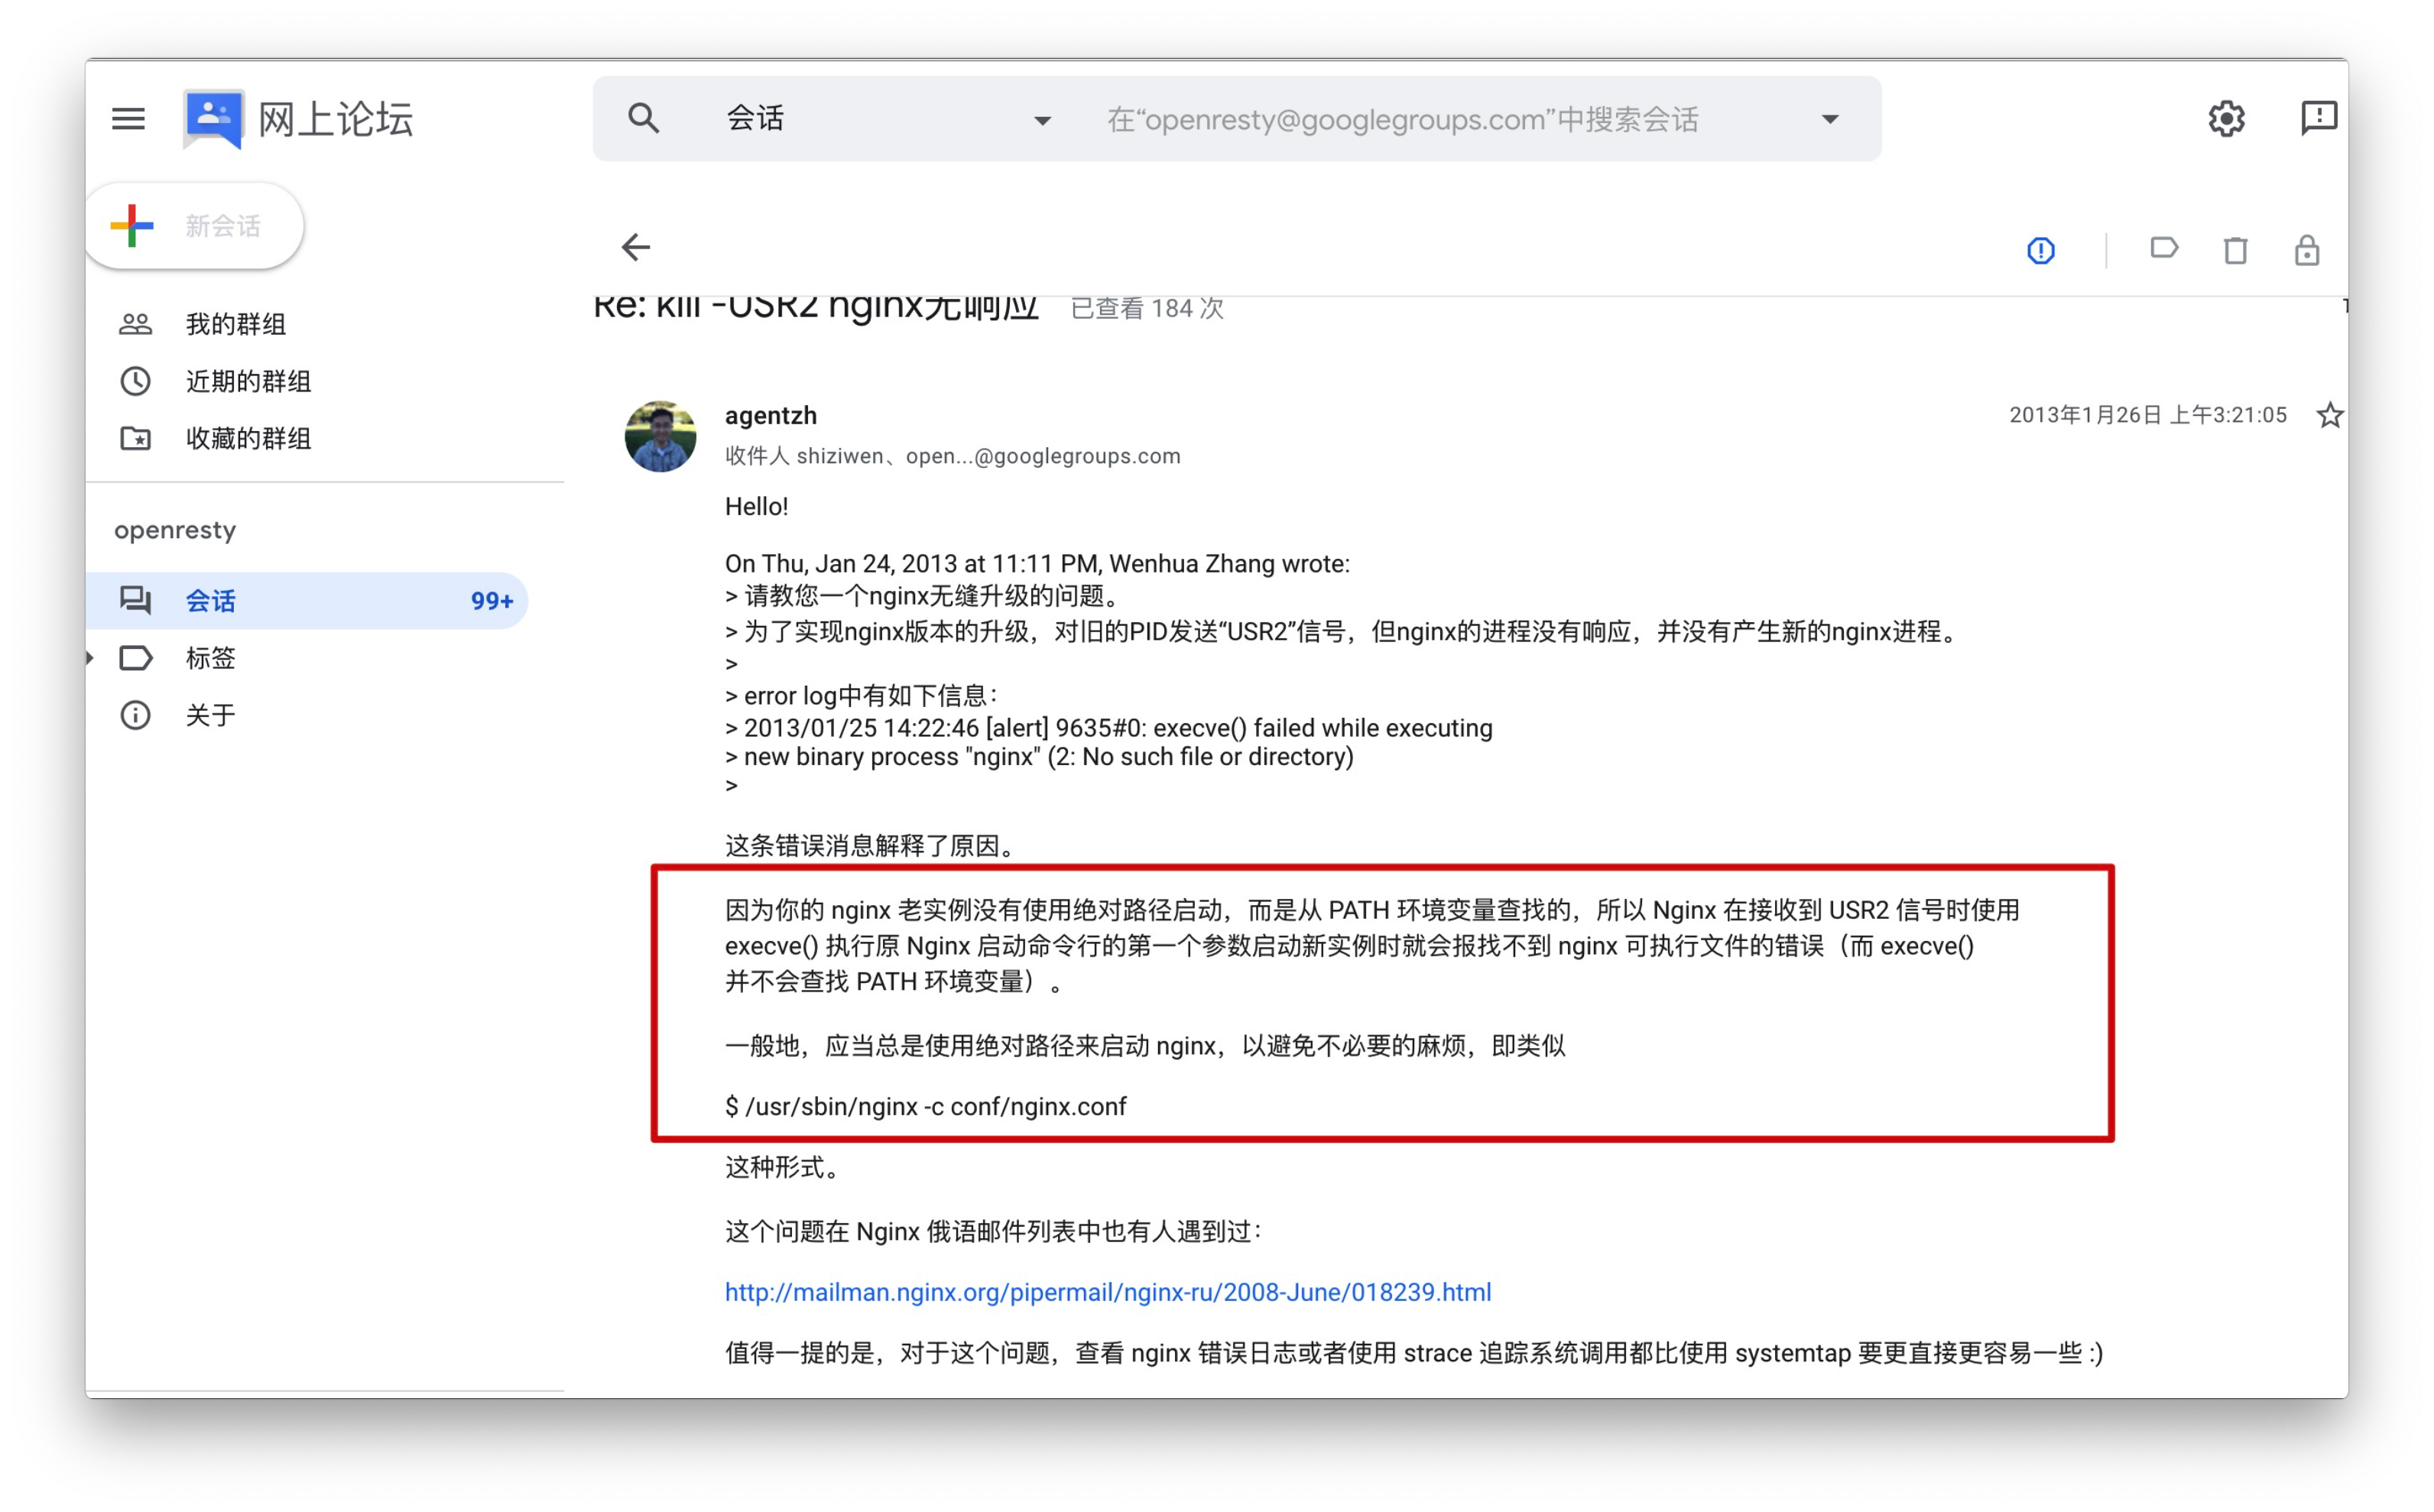
热部署的坑
如果出现发送 kill -USR2信号后,未出现新的master进程
是因为:
旧的nginx必须用绝对路径启动,然后再发送kill -USR2信号
具体解释看图
热部署具体操作
1.备份旧版本的nginx二进制文件
[root@junwu_client sbin]# pwd
/home/Nginx-1.23.4/sbin
[root@junwu_client sbin]# ls
nginx
[root@junwu_client sbin]# mv nginx nginx.old_version
[root@junwu_client sbin]# ls
nginx.old_version
2.检查旧版本nginx的编译参数
[root@junwu_client sbin]# nginx.old_version -V
nginx version: nginx/1.23.4
built by gcc 4.8.5 20150623 (Red Hat 4.8.5-44) (GCC)
built with OpenSSL 1.0.2k-fips  26 Jan 2017
TLS SNI support enabled
configure arguments: --prefix=/home/Nginx-1.23.4 --with-http_ssl_module --with-file-aio --with-http_gzip_static_module --with-http_flv_module --with-http_stub_status_module --with-threads
3.编译安装新版本nginx
[root@junwu_client sbin]# wget https://nginx.org/download/nginx-1.22.1.tar.gz
##解压缩文件
[root@junwu_client ~]# tar -zxvf nginx-1.22.1.tar.gz
##第一曲:./configure
[root@junwu_client nginx-1.22.1]# ls
auto  CHANGES  CHANGES.ru  conf  configure  contrib  html  LICENSE  Makefile  man  objs  README  src
[root@junwu_client nginx-1.22.1]# ls
auto  CHANGES  CHANGES.ru  conf  configure  contrib  html  LICENSE  Makefile  man  objs  README  src
##将nginx-1.22.1编译到/home/Nginx-1.23.4目录下
[root@junwu_client nginx-1.22.1]# ./configure --prefix=/home/Nginx-1.23.4 --with-http_ssl_module --with-http_flv_module --with-http_gzip_static_module --with-http_stub_status_module --with-threads --with-file-aio
##第二曲、第三曲编译安装:
[root@junwu_client nginx-1.22.1]# make && make install
4.此时发现已存在2个版本nginx程序
[root@junwu_client sbin]# pwd
/home/Nginx-1.23.4/sbin
[root@junwu_client sbin]# ls
nginx  nginx.old_version
5.替换旧的nginx可执行文件
[root@junwu_client sbin]# cp -a ~/nginx-1.22.1/objs/nginx /home/Nginx-1.23.4/sbin/nginx
5.1 注意:一定要停掉nginx,然后重启,否则无法加载新版本的nginx进程
[root@junwu_client sbin]# nginx -s stop
[root@junwu_client sbin]# nginx -s reload
nginx: [error] open() "/home/Nginx-1.23.4/logs/nginx.pid" failed (2: No such file or directory)
[root@junwu_client sbin]# nginx
6.检查nginx状态,注意这里的PID和PPID(pid是当前进程的id号,ppid是启动该进程的pid,也就是父ID,可知该pid由谁启动)
[root@junwu_client sbin]# ps -ef |grep nginx
root      43496      1  0 09:38 ?        00:00:00 nginx: master process nginx
nobody    43497  43496  0 09:38 ?        00:00:00 nginx: worker process
root      43499   1310  0 09:39 pts/0    00:00:00 grep --color=auto nginx
6.发送USR2信号给旧版本主进程,使得nginx旧版本停止接收请求,切换为新nginx版本
[root@junwu_client sbin]# kill -USR2 `cat /home/Nginx-1.23.4/logs/nginx.pid`
7.检查此时的nginx进程nginx-master首先会重命名pid文件,在文件后面添加.oldbin后缀然后会再启动一个新的master进程以及worker,且使用的是新版Nginx nginx能够自动将新来的请求,过度到新版master进程下,实现平滑过度
[root@junwu_client sbin]# ps -ef |grep nginx
root      43496      1  0 09:38 ?        00:00:00 nginx: master process nginx
nobody    43497  43496  0 09:38 ?        00:00:00 nginx: worker process
root      43506  43496  0 09:40 ?        00:00:00 nginx: master process nginx
nobody    43507  43506  0 09:40 ?        00:00:00 nginx: worker process
root      43509   1310  0 09:40 pts/0    00:00:00 grep --color=auto nginx
[root@junwu_client sbin]# ls ../logs/
access.log        error.log         nginx.pid         nginx.pid.oldbin
8.发送WINCH信号给旧master进程,优雅的关闭旧worker进程
[root@junwu_client sbin]# kill -WINCH `cat ../logs/nginx.pid.oldbin`
[root@junwu_client sbin]# ps -ef |grep nginx
root      43496      1  0 09:38 ?        00:00:00 nginx: master process nginx
root      43506  43496  0 09:40 ?        00:00:00 nginx: master process nginx
nobody    43507  43506  0 09:40 ?        00:00:00 nginx: worker process
root      43631   1310  0 10:01 pts/0    00:00:00 grep --color=auto nginx
9.此时旧版本的nginx的master下已经没有了worker进程了,已经是无效的了,可以kill -43496
nginx日志切割
日志切割是线上很常见的操作,控制单个文件大小,便于管理日志
1.查看当前nginx日志
[root@junwu_client logs]# pwd
/home/Nginx-1.23.4/logs
[root@junwu_client logs]# ls
access.log error.log nginx.pid
#大致看下日志内容
[root@junwu_client logs]# tail -f access.log
127.0.0.1 - - [10/Apr/2023:08:20:55 -0400] "GET / HTTP/1.1" 200 615 "-" "curl/7.29.0"
10.0.0.1 - - [10/Apr/2023:10:05:09 -0400] "GET / HTTP/1.1" 200 615 "-" "Mozilla/5.0 (Windows NT 10.0; Win64; x64) AppleWebKit/537.36 (KHTML, like Gecko) Chrome/112.0.0.0 Safari/537.36 Edg/112.0.1722.34"
10.0.0.1 - - [10/Apr/2023:10:05:10 -0400] "GET /favicon.ico HTTP/1.1" 404 555 "http://10.0.0.15/" "Mozilla/5.0 (Windows NT 10.0; Win64; x64) AppleWebKit/537.36 (KHTML, like Gecko) Chrome/112.0.0.0 Safari/537.36 Edg/112.0.1722.34"
2.给文件重命名,注意用mv而不是cp(涉及到文件inode知识)
[root@junwu_client logs]# mv access.log access.log$(date +"%y-%m-%d--%H:%M:%S")
[root@junwu_client logs]# ll
total 12
-rw-r--r-- 1 root root  519 Apr 10 10:05 access.log23-04-11--10:37:23
-rw-r--r-- 1 root root 2473 Apr 10 10:05 error.log
-rw-r--r-- 1 root root    5 Apr 11 10:33 nginx.pid
3.发送USR1信号给nginx-master,重新打开日志记录,生成新的日志文件
[root@junwu_client logs]# nginx -s reopen    #等同于 Kill -USR1 nginx.pid
4.注意,在以上的nginx重命名日志切割,不要着急立即对文件修改,且要sleep 等待1秒
由于nginx的工作模式,master下发指令给worker只是做了标记,当业务量大的时候,这个修改操作可能会慢一点,不会理解生效
5.在生产环境下,主要以crontab形式,执行cut_nginx_log.sh脚本
[root@junwu_client sbin]# pwd
/home/Nginx-1.23.4/sbin
[root@junwu_client sbin]# cat cut_nginx_log.sh
#!/bin/bash
#脚本写入crontab,每天0点执行,这是一个nginx日志切割脚本

#nginx日志存放点
logs_path="/home/Nginx-1.23.4/logs/"
mkdir -p ${log_path}$(date -d "yesterday" +"%Y")/$(date -d "yesterday" + "%m")
mv ${logs_path}access.log ${logs_path}$(date -d "yesterday" + "%Y")/$(date -d "yesterday" + "%m")/access_$(date -d "yesterday" + "%Y-%m-%d").log
6.重新打开日志记录
[root@junwu_client sbin]# kill -USR1 `cat /home/Nginx-1.23.4/logs/nginx.pid`
7.写入crontab
[root@junwu_client sbin]# crontab -l
0 0 * * * /bin/bash /home/Nginx-1.23.4/sbin/cut_nginx_log.sh
Nginx静态资源站点
Nginx虚拟主机
虚拟主机指的就是一个独立的站点,具有独立的域名,有完整的www服务,例如网站、FTP、邮件等。
Nginx支持多虚拟主机,在一台机器上可以运行完全独立的多个站点。

nginx.conf主配置文件中,最简单的一段虚拟主机配置如下
http {
server {
        listen       80;    #监听端口
        server_name  localhost;    #域名匹配,多域名配置

        #charset koi8-r;    #字符格式

        #access_log  logs/host.access.log  main;    #访问日志

        location / {    #url匹配
            root   html;
            index  index.html index.htm;
        }
}
搭建一个静态资源网站
修改nginx.conf,自上而下找到第一个server{}指令块,修改如下
1.准备好资源文件目录,内容自定义
[root@junwu_client website]# pwd
/opt/website
[root@junwu_client website]# ls
index.html  科比自画像.jpg
2.修改nginx.conf配置文件
server {
        listen       80;
        server_name  localhost;

        #charset koi8-r;

        #access_log  logs/host.access.log  main;

        location / {
            root   /website/;
            index  index.html index.htm;
        }
3.重新加载nginx.conf
[root@junwu_client conf]# nginx -s reload
访问网站首页
10.0.0.15 #或者10.0.0.15/index.html

访问静态图片资源
10.0.0.15/科比自画像.jpg
静态资源压缩
nginx支持gzip对资源压缩传输,经过gzip压缩后的页面大小可以为原本的30%甚至更小,用户浏览体验会快很多。
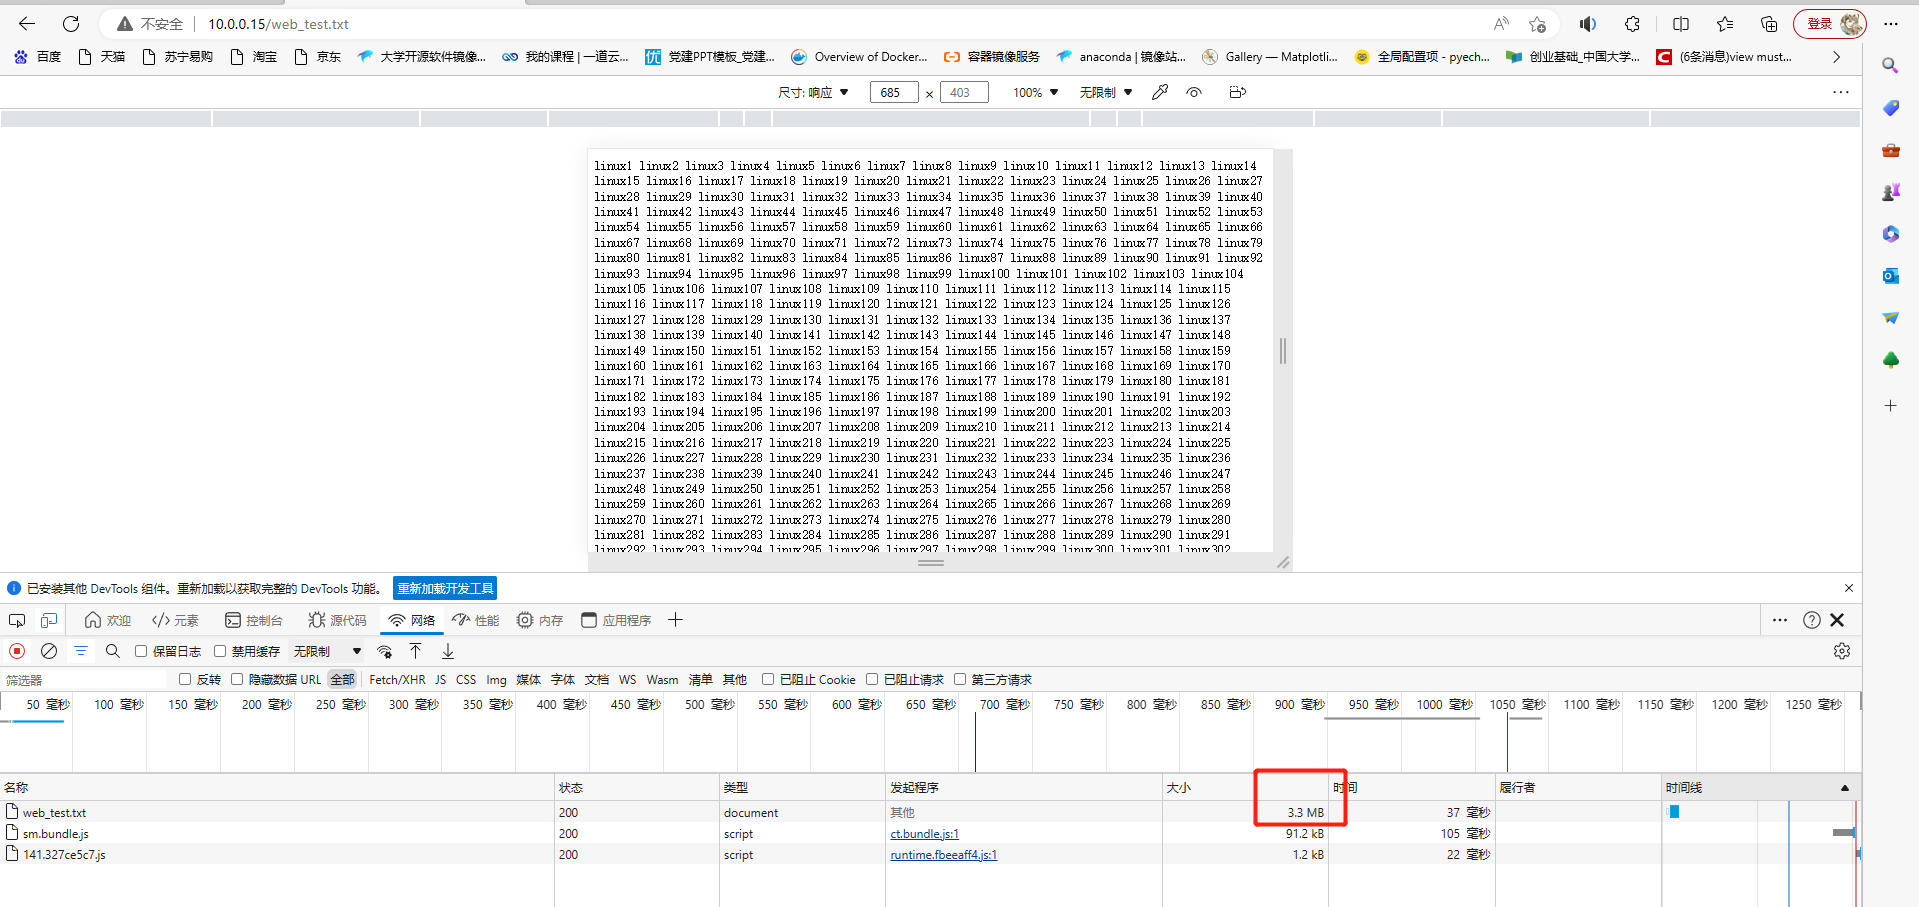
准备好nginx静态资源
[root@junwu_client website]# echo linux{1..100000} >> web_test.txt
[root@junwu_client website]# ll -h
total 6.2M
-rw-r--r-- 1 root root 131 Apr 13 09:34 index.html
-rw-r--r-- 1 root root 3.2M Apr 13 10:14 web_test.txt
开启gzip前,静态资源加载如下
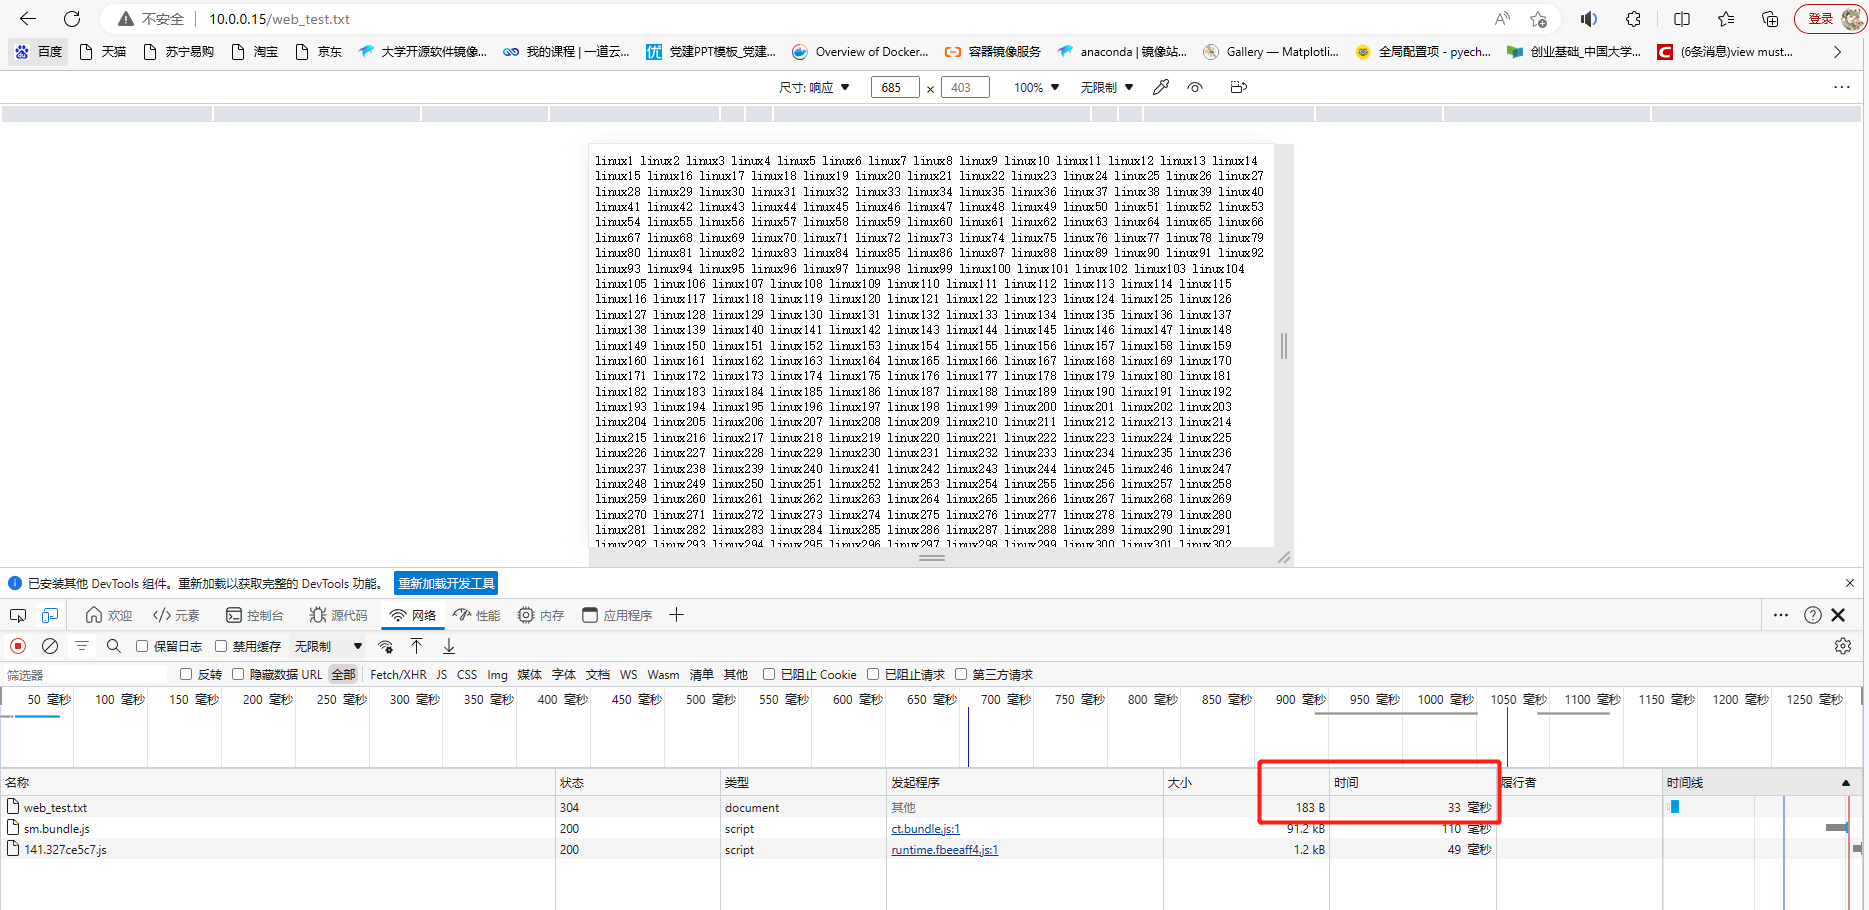
nginx.conf开启gzip压缩功能,添加至全局配置中,针对静态资源压缩

        gzip on;
        gzip_http_version 1.1;
        gzip_comp_level 4;
        gzip_types text/plain application/javascript application/x-javascript text/css application/xml text/javascript application/x-httpd-php image/jpeg image/gif image/png;

#重载nginx
nginx -s reload
基于IP多虚拟主机
Linux操作系统都能够支持给网卡绑定多个IP地址,可以使得一块网卡上运行多个基于IP的虚拟主机。
环境准备
添加ip别名
[root@junwu_client conf]# ip addr add 10.0.0.80/24 dev ens33
[root@junwu_client conf]# ifconfig ens33:1 10.0.0.85 broadcast 10.0.0.255 netmask 255.255.255.0 up
[root@junwu_client conf]# ifconfig ens33:2 10.0.0.90 broadcast 10.0.0.255 netmask 255.255.255.0 up
[root@junwu_client conf]# ip add show
1: lo: <LOOPBACK,UP,LOWER_UP> mtu 65536 qdisc noqueue state UNKNOWN group default qlen 1000
    link/loopback 00:00:00:00:00:00 brd 00:00:00:00:00:00
    inet 127.0.0.1/8 scope host lo
       valid_lft forever preferred_lft forever
    inet6 ::1/128 scope host
       valid_lft forever preferred_lft forever
2: ens33: <BROADCAST,MULTICAST,UP,LOWER_UP> mtu 1500 qdisc pfifo_fast state UP group default qlen 1000
    link/ether 00:0c:29:e1:26:7b brd ff:ff:ff:ff:ff:ff
    inet 10.0.0.15/24 brd 10.0.0.255 scope global noprefixroute ens33
       valid_lft forever preferred_lft forever
    inet 10.0.0.80/24 scope global secondary ens33
       valid_lft forever preferred_lft forever
    inet 10.0.0.85/24 brd 10.0.0.255 scope global secondary ens33:1
       valid_lft forever preferred_lft forever
    inet 10.0.0.90/24 brd 10.0.0.255 scope global secondary ens33:2
       valid_lft forever preferred_lft forever
[root@junwu_client conf]# curl 10.0.0.80
<meta http-equiv="Content-Type" content="text/html;charset=utf-8"/>
<h1>服务器测试成功,已经可以正常访问了</h1>


[root@junwu_client conf]# curl 10.0.0.85
<meta http-equiv="Content-Type" content="text/html;charset=utf-8"/>
<h1>服务器测试成功,已经可以正常访问了</h1>


[root@junwu_client conf]# curl 10.0.0.90
<meta http-equiv="Content-Type" content="text/html;charset=utf-8"/>
<h1>服务器测试成功,已经可以正常访问了</h1>
修改nginx.conf支持多虚拟主机
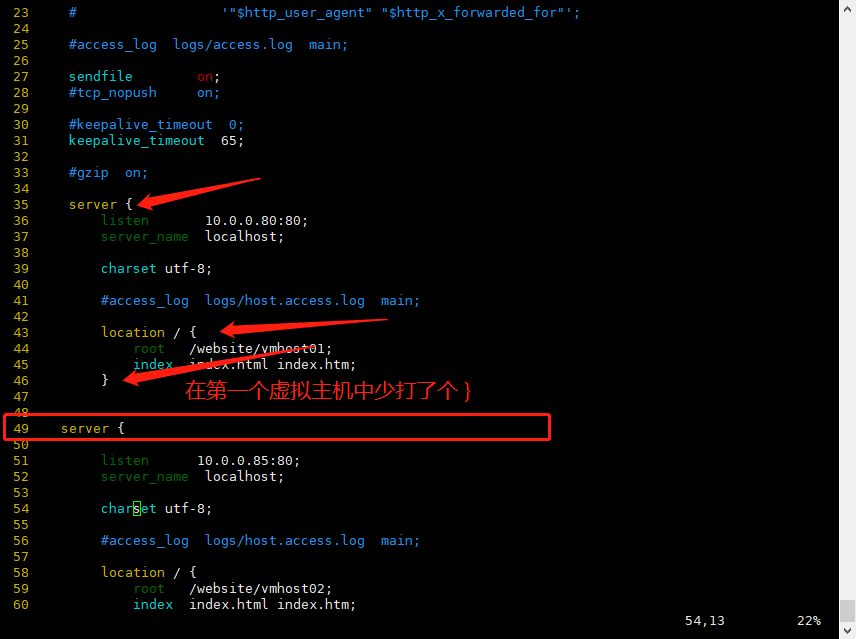
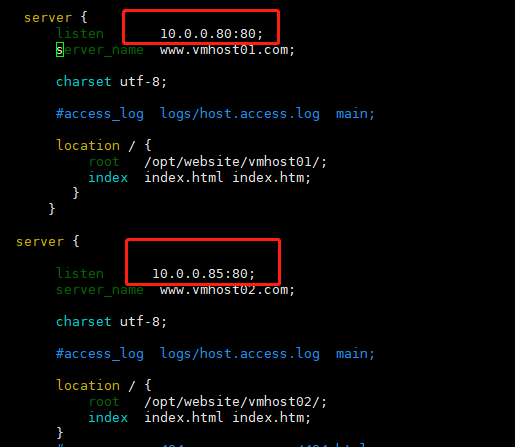
#第一个虚拟主机
 server {
        listen       10.0.0.80:80;
        server_name  localhost;

        charset utf-8;

        #access_log  logs/host.access.log  main;

        location / {
            root   /website/vmhost01;    #html文件存放目录
            index  index.html index.htm;
        }

#第二个虚拟主机
   server {

        listen      10.0.0.85:80;
        server_name  localhost;

        charset utf-8;

        #access_log  logs/host.access.log  main;

        location / {
            root   /website/vmhost02;
            index  index.html index.htm;
        }
分别准备好网站资源
[root@junwu_client conf]# echo "我是来自10.0.0.80的vmhost01虚拟主机" > /opt/website/vmhost01/index.html
[root@junwu_client conf]# echo "我是来自10.0.0.85的vmhost02虚拟主机" > /opt/website/vmhost02/index.html
重启发现nginx.conf在49行报错,检查一下49行
[root@junwu_client conf]# nginx -s reload
nginx: [emerg] "server" directive is not allowed here in /home/Nginx-1.23.4/conf/nginx.conf:49
测试访问页面,基于不同ip的虚拟主机


基于域名的多虚拟主机
基于多IP的虚拟主机可能会造成IP地址不足的问题,如果没有特殊需求,更常用的是基于多域名的形式。
只需要你单独配置DNS服务器,将主机名对应到正确的IP地址,修改Nginx配置,可以识别到不同的主机即可,这样就可以使得多个虚拟主机用同一个IP,解决了IP不足的隐患。
在本地hosts文件中,添加对应的解析记录,由于测试使用
[root@junwu_client conf]# cat /etc/hosts
127.0.0.1   localhost localhost.localdomain localhost4 localhost4.localdomain4
::1         localhost localhost.localdomain localhost6 localhost6.localdomain6
127.0.0.1 www.vmhost01.com
127.0.0.1 www.vmhost02.com
修改nginx.conf支持多域名的虚拟主机
1.第一个server{}指令块的配置
server {
        listen       10.0.0.80:80;
        server_name  vmhost01;    #主机域名

        charset utf-8;

        #access_log  logs/host.access.log  main;

        location / {
            root   /opt/website/vmhost01/;
            index  index.html index.htm;
          }
       }

   server {

        listen      10.0.0.85:80;
        server_name  vmhost02;    #主机域名

        charset utf-8;

        #access_log  logs/host.access.log  main;

        location / {
            root   /opt/website/vmhost02/;
            index  index.html index.htm;
        }
2.生成网站首页
[root@junwu_client conf]# echo "我是多域名主机vmhost01" > /opt/website/vmhost01/index.html
[root@junwu_client conf]# echo "我是多域名主机vmhost02" > /opt/website/vmhost02/index.html
3.重启nginx
[root@junwu_client conf]# nginx -s reload
4.测试访问多域名主机
curl: (7) Failed connect to www.vmhost02.com:80; Connection refused
[root@junwu_client conf]# curl www.vmhost01.com
curl: (7) Failed connect to www.vmhost01.com:80; Connection refused
[root@junwu_client conf]# systemctl restart network
[root@junwu_client conf]# curl www.vmhost01.com
#连接被拒绝,但是curl IP可以
[root@junwu_client conf]# curl 10.0.0.80
我是多域名主机vmhost01
[root@junwu_client conf]# curl 10.0.0.85
我是多域名主机vmhost02
怀疑是域名解析的问题
发现一个问题:curl域名被连接拒绝
分析:这个域名不存在?或者说域名无法正向解析成对应的IP

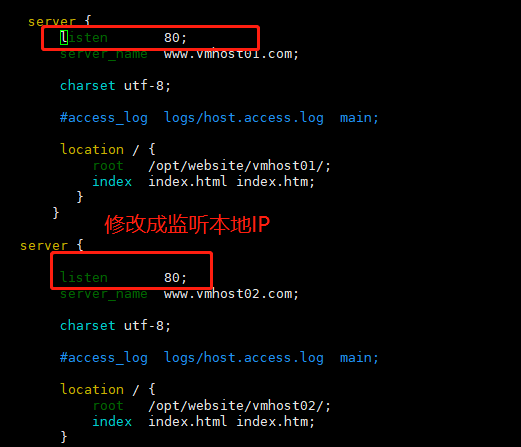
此时的nginx.conf配置文件中使用的多域名虚拟主机映射的IP不是本机IP地址,所以/etc/hosts文件中的域名解析是无效的,而且curl的本质是访问一个服务器网站,并将其页面加载出来,而我们在curl本地的的hosts域名,其实就是在curl 127.0.0.1,也就是本机,而本主机并不是一个服务器,只有在nginx.conf配置文件中映射成本机IP地址,本机才能被看做一台服务器。
解决办法:
再试一下,成功
[root@junwu_client conf]# curl www.vmhost01.com
我是多域名主机vmhost01
[root@junwu_client conf]# curl www.vmhost02.com
我是多域名主机vmhost02
基于端口的多虚拟主机
基于端口的配置在生产环境比较少见,用于特殊场景,例如公司内部测试平台网站,使用特殊端口的后台,OA系统、网站后台,CRM后台等。
案例:运行基于80、81端口的虚拟主机运行
1.第一个虚拟主机
server {
        listen       80;    #监听80端口
        server_name  www.vmhost01.com;

        charset utf-8;
        access_log logs/www.vmhost01.log;
        #access_log  logs/host.access.log  main;

        location / {
            root   /opt/website/vmhost01;
               # autoindex on;
            index  index.html index.htm;
          }
       }
2.第二个虚拟主机
server {

        listen       81;    #监听81端口
        server_name  www.vmhost02.com;

        charset utf-8;
        access_log logs/www.vmhost02.log;
        #access_log  logs/host.access.log  main;

        location / {
            root   /opt/website/vmhost02/;
            index  index.html index.htm;
        }
3.重启nginx
[root@junwu_client conf]# nginx -t
nginx: the configuration file /home/Nginx-1.23.4/conf/nginx.conf syntax is ok
nginx: configuration file /home/Nginx-1.23.4/conf/nginx.conf test is successful
4.访问80、81端口
[root@junwu_client conf]# nginx -s reload
[root@junwu_client conf]# curl 10.0.0.15:80
我是多域名主机vmhost01
[root@junwu_client conf]# curl 10.0.0.15:81
我是多域名主机vmhost02
Nginx访客日志功能
日志对于程序员很重要,可用于问题排错,记录程序运行状态,一个好的日志能够给与精确的问题定位。
Nginx日志功能需要在nginx.conf中打开相关指令log_format,设置日志格式,以及设置日志的存储位置access_log,指定日志的格式,路径,缓存大小。
nginx.conf中有关访客日志定义如下
  #log_format  main  '$remote_addr - $remote_user [$time_local]     "$request" '
    #                  '$status $body_bytes_sent "$http_referer" '
    #                  '"$http_user_agent" "$http_x_forwarded_for"';

    #access_log  logs/access.log  main;
参数解释
$remote_addr :记录访问网站的客户端地址
$remote_user :记录远程客户端用户名称
$time_local :记录访问时间与时区
$request :记录用户的 http 请求起始行信息
$status :记录 http 状态码,即请求返回的状态,例如 200 、404 、502 等
$body_bytes_sent :记录服务器发送给客户端的响应 body 字节数
$http_referer :记录此次请求是从哪个链接访问过来的,可以根据 referer 进行防盗链设置
$http_user_agent :记录客户端访问信息,如浏览器、手机客户端等
$http_x_forwarded_for :当前端有代理服务器时,设置 Web 节点记录客户端地址的配置,此参数生效的前提是代理服务器上也进行了相关的 x_forwarded_for 设置
查看日志格式
[root@junwu_client conf]# tail -f ../logs/access.log
10.0.0.1 - - [17/Apr/2023:01:41:43 -0400] "GET / HTTP/1.1" 200 64 "-" "Mozilla/5.0 (Windows NT 10.0; Win64; x64) AppleWebKit/537.36 (KHTML, like Gecko) Chrome/112.0.0.0 Safari/537.36 Edg/112.0.1722.48"
10.0.0.1 - - [17/Apr/2023:01:41:43 -0400] "GET /favicon.ico HTTP/1.1" 404 184 "http://10.0.0.15/" "Mozilla/5.0 (Windows NT 10.0; Win64; x64) AppleWebKit/537.36 (KHTML, like Gecko) Chrome/112.0.0.0 Safari/537.36 Edg/112.0.1722.48"
多虚拟主机定义日志
由于Nginx支持多虚拟主机,日志功能也是可以区分开的,用access_log定义存储位置。
日志指令语法
access_log  path  [format  buffer=size  | off]
path代表日志存放路径
【关闭日志】
access_log off;
【多虚拟主机的访客日志】
1.虚拟主机1
server {
        listen       80;
        server_name  www.vmhost01.com;

        charset utf-8;
        access_log logs/www.vmhost01.log;    #自定义日志存放点
        #access_log  logs/host.access.log  main;

        location / {
            root   /opt/website/vmhost01/;
                # autoindex on;
            index  index.html index.htm;
          }
       }
2.虚拟主机2
   server {

        listen       80;
        server_name  www.vmhost02.com;

        charset utf-8;
        access_log logs/www.vmhost02.log;    #自定义日志存放点
        #access_log  logs/host.access.log  main;

        location / {
            root   /opt/website/vmhost02/;
            index  index.html index.htm;
        }
3.重启nginx
nginx -s reload
4.分别发送请求,检测日志功能
[root@junwu_client logs]# curl www.vmhost01.com
我是多域名主机vmhost01
[root@junwu_client logs]# curl www.vmhost02.com
我是多域名主机vmhost02
[root@junwu_client logs]# tail -f www.vmhost01.log
127.0.0.1 - - [21/Apr/2023:10:05:38 -0400] "GET / HTTP/1.1" 200 30 "-" "curl/7.29.0"
[root@junwu_client logs]# tail -f www.vmhost02.log
127.0.0.1 - - [21/Apr/2023:10:05:42 -0400] "GET / HTTP/1.1" 200 30 "-" "curl/7.29.0"
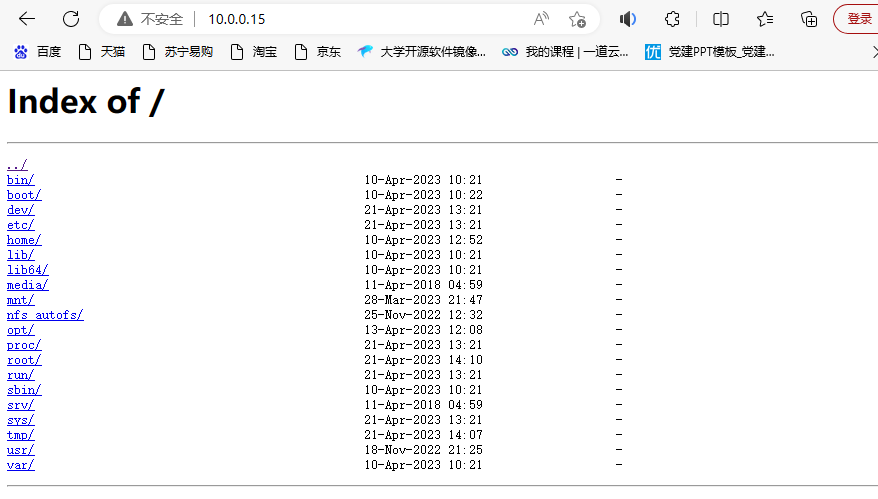
Nginx目录浏览功能
例如将你电脑的资料共享出来,方便快速访问
server {
        listen       80;
        server_name  localhost;

        charset utf-8;
        #access_log logs/www.vmhost01.log;
        #access_log  logs/host.access.log  main;

        location / {
            root   /;
                 autoindex on;    #开启目录索引功能
            index  index.html index.htm;
          }
       }
对于Nginx的使用,需要反复修改Nginx.conf,修改次数多了之后,就难以观看了,Nginx提供了include指令,可以将其他目录的配置文件,导入进主配置文件nginx.conf中。
思路可以根据虚拟主机域名或是功能别名,创建配置文件,例如
- bbs.conf
- crm.conf
- blog.conf
然后使用include指令
include        mime.types;
include        fastcgi_params;
include        vhosts/*.conf;
Nginx优化配置文件案例
nginx.conf主配置文件,修改为如下简略信息
1.创建统一管理配置文件目录
[root@junwu_client conf]# mkdir -p /opt/nginx/conf/extra
2.读取nginx.conf配置文件,将第一个server{}虚拟主机配置导出为vmhost01.conf
[root@junwu_client conf]# sed -n '59,72p' nginx.conf > /opt/nginx/conf/extra/vmhost01.conf
[root@junwu_client conf]# cat /opt/nginx/conf/extra/vmhost01.conf
    server {
        listen       80;
        server_name  www.vmhost01.com;

        charset utf-8;
    access_log logs/www.vmhost01.log;
        #access_log  logs/host.access.log  main;

        location / {
            root   /opt/website/vmhost01/;
        # autoindex on;
            index  index.html index.htm;
          }
       }
3.删除原有的配置
[root@junwu_client conf]# sed -i '59,72d' nginx.conf
5.主配置文件,添加include配置
http {
    include       /opt/nginx/conf/extra/*.conf;    #添加include配置,注意要写绝对路径
    include       mime.types;
    default_type  application/octet-stream;
6.重启nginx
[root@junwu_client conf]# nginx -s reload
7.此时虚拟主机1依然可以用
[root@junwu_client conf]# curl www.vmhost01.com
我是多域名主机vmhost01
Nginx状态信息功能
Nginx状态信息(status)配置及信息详解 nginx与php-fpm一样内建了一个状态页,对于想了解nginx的状态以及监控nginx非常有帮助。为了后续的zabbix监控,我们需要先了解一下nginx的状态页。
Nginx状态信息(status)介绍 Nginx软件在编译时又一个with-http_stub_status_module模块,这个模块功能是记录Nginx的基本访问状态信息,让使用者了解Nginx的工作状态。 要想使用状态模块,在编译时必须增加--with-http_stub_status_module参数。
检测nginx是否开启此功能
[root@junwu_client Nginx-1.23.4]# nginx -V
nginx version: nginx/1.22.1
built by gcc 4.8.5 20150623 (Red Hat 4.8.5-44) (GCC)
built with OpenSSL 1.0.2k-fips  26 Jan 2017
TLS SNI support enabled
configure arguments: --prefix=/home/Nginx-1.23.4 --with-http_ssl_module --with-http_flv_module --with-http_gzip_static_module --with-http_stub_status_module --with-threads --with-file-aio
修改nginx下的配置文件,支持此功能
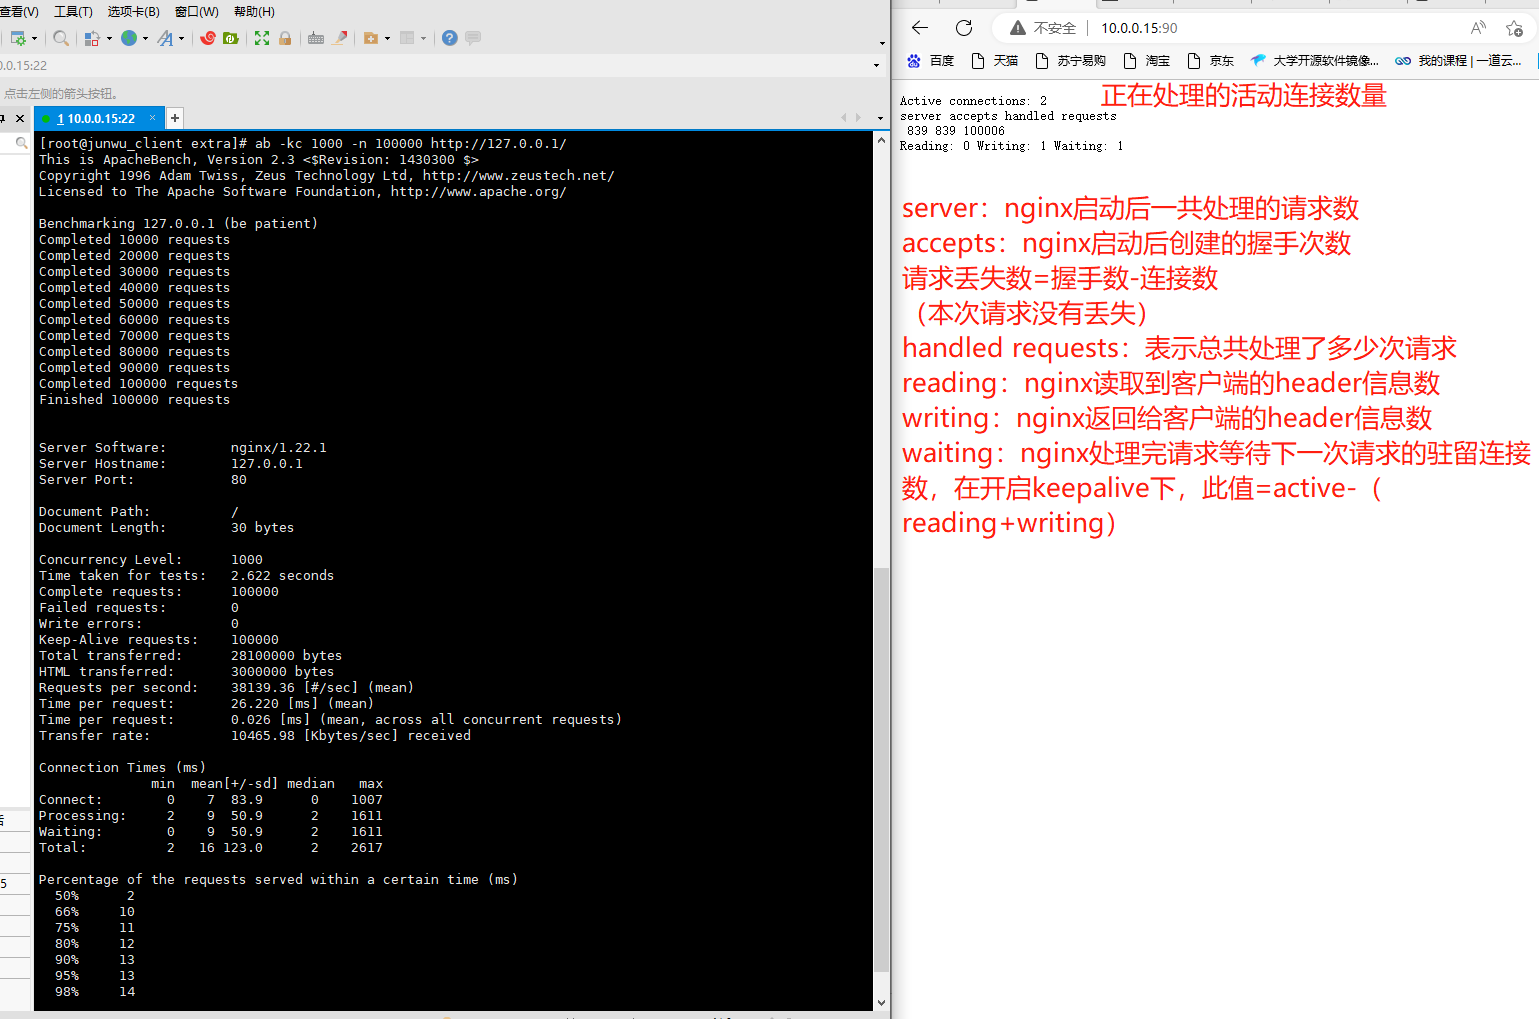
[root@junwu_client extra]# cat staus.conf
server {
listen 90;
location / {
    stub_status on;
    access_log off;
}
}

[root@junwu_client extra]# nginx -s reload
使用ab命令,进行nginx压力测试
##安装ab命令工具
[root@junwu_client extra]# yum -y install httpd-tools
##开启会话保持,1000个并发,发送100000个请求
[root@junwu_client extra]# ab -kc 1000 -n 100000 http://127.0.0.1/
-n requests #执行的请求数,即一共发起多少请求。
-c concurrency #请求并发数。
-k #启用HTTP KeepAlive功能,即在一个HTTP会话中执行多个请求。
Nginx错误日志
Nginx能够将自身运行故障的信息也写入到指定的日志文件中。对于错误信息的调试,是维护Nginx的重要手段,指令是error_log,可以放在http{}全局中,也可以单独为虚拟主机记录。
语法:
error_log file  level;

日志级别在乎debug|info|notice|warn|error|crit|alert|emerg
级别越高,日志记录越少,生产常用模式是warn|error|crit级别
日志的记录,会给服务器增加额外大量的IO消耗,按需修改
nginx.conf修改如下,针对虚拟主机添加错误日志
    server {
        listen       80;
        server_name  www.vmhost01.com;

        charset utf-8;
        access_log /home/Nginx-1.23.4/logs/www.vmhost01.log;
        error_log /home/Nginx-1.23.4/logs/www.vmhost01_error.log; #添加本行即可
        #access_log  logs/host.access.log  main;

        location / {
            root   /opt/website/vmhost01/;
                # autoindex on;
            index  index.html index.htm;
          }
       }
重启nginx后,会在自定义的目录下生成www.vmhost01_error.log文件
[root@junwu_client extra]# nginx -s reload
[root@junwu_client logs]# ls
access.log                    error.log  www.vmhost01_error.log  www.vmhost02.log
access.log23-04-11--10:37:23  nginx.pid  www.vmhost01.log
Nginx location作用
Nginx的locaiton作用是根据用户请求的URI不同,来执行不同的应用。
针对用户请求的网站URL进行匹配,匹配成功后进行对应的操作。
nginx.conf中server{}指令块的location指令如下
location / {
            root   /opt/website/vmhost02/;
            index  index.html index.htm;
        }
        #error_page  404              /404.html;

        # redirect server error pages to the static page /50x.html
        #
        error_page   500 502 503 504  /50x.html;
        location = /50x.html {
            root   html;
        }
语法
location [ = | ~| ~* | ^~ ]  url {
    #指定对应的动作
}

#正则表达式解释
匹配符 匹配规则 优先级
=    精确匹配    1
^~    以某个字符串开头,不做正则    2
~*    正则匹配    3
/blog/ 匹配常规字符串,有正则就优先正则 4
/    通用匹配,不符合其他location的默认匹配    5
实际演练
| 请求url | 完整url | 匹配后动作 |
|---|---|---|
| / | http://192.168.178.134/ | 配置A |
| /index.html | http://192.168.178.134/index.html | 配置B |
| /blog/blog.html | http://192.168.178.134/blog/blog.html | 配置C |
| /img/1.jpg | http://192.168.178.134/1.jpg | 配置D |
| /blog/1.jpg | http://192.168.178.134/blog/1.jpg | 配置E |
#用户请求的url为空或者有一个/
[root@junwu_client extra]# curl  -s -o /dev/null -I -w "%{http_code}\n" 127.0.0.1:83
402
[root@junwu_client extra]# curl  -s -o /dev/null -I -w "%{http_code}\n" 127.0.0.1:83/
402
#用户请求存在index.html或者其他任意不符合其他location的字符串
[root@junwu_client extra]# curl  -s -o /dev/null -I -w "%{http_code}\n" 127.0.0.1:83/index.html
401
#访问以/blog/开头的url
[root@junwu_client extra]# curl  -s -o /dev/null -I -w "%{http_code}\n" 127.0.0.1:83/blog/index.html
403
#访问以/img/开头的url
[root@junwu_client extra]# curl  -s -o /dev/null -I -w "%{http_code}\n" 127.0.0.1:83/img/2.gif
404
#匹配以gif结尾的url,由于/blog/优先级最低,因此匹配1.gif的规则
[root@junwu_client extra]# curl  -s -o /dev/null -I -w "%{http_code}\n" 127.0.0.1:83/blog/1.gif
500
[root@junwu_client extra]# curl  -s -o /dev/null -I -w "%{http_code}\n" 127.0.0.1:83/img/1.gif
404
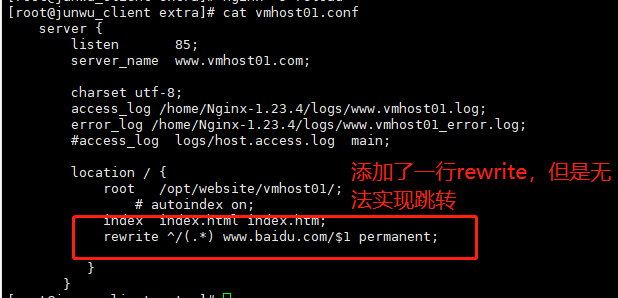
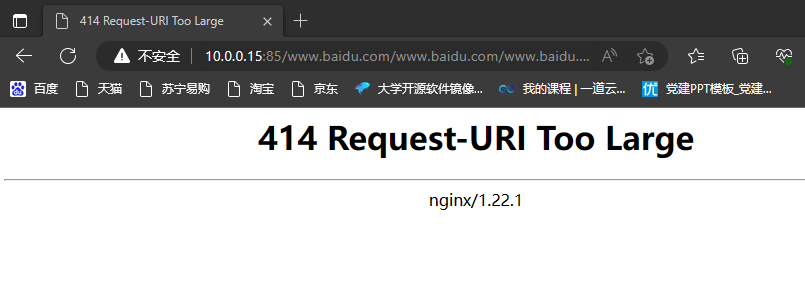
Nginx地址重写
语法
rewrite ^/(.*) http://10.0.0.15/$1 permanent;
#解释
rewrite是指令,开启一个跳转规则
正则是 ^/(.*) 表示匹配所有,匹配成功后跳转到后面的url地址
$1 表示取出前面正则括号里的内容
permanent表示 301 重定向的标记
【rewrite的结尾参数 flag标记】
| 标记 | 解释a |
|---|---|
| last | 规则匹配完成后,继续向下匹配新的Locaiton |
| break | 本条规则完成匹配后,立即停止 |
| redirect | 返回302临时重定向,浏览器地址栏显示跳转后的URL |
| permanent | 返回301永久重定向,浏览器地址显示跳转后的URL |
last和break用于实现URL重写,浏览器地址栏不发生变化
redirect和permanent用于实现URL跳转,浏览器地址栏跳转新的URL
Nginx访问认证
htpasswd是Apache密码生成工具,Nginx支持auth_basic认证,因此我门可以将生成的密码用于Nginx中,输入一行命令即可安装:yum -y install httpd-tools ,参数如下:

-c 创建passwdfile.如果passwdfile 已经存在,那么它会重新写入并删去原有内容.
-n 不更新passwordfile,直接显示密码
-m 使用MD5加密(默认)
-d 使用CRYPT加密(默认)
-p 使用普通文本格式的密码
-s 使用SHA加密
-b 命令行中一并输入用户名和密码而不是根据提示输入密码,可以看见明文,不需要交互
-D 删除指定的用户

#接认证文件,htpasswd -bc .access username password  #在当前目录生成.access文件,用户名username,密码:password,默认采用MD5加密方式。
nginx的认证模块指令,语法:
location / {

    auth_basic "string"; 可以填写off或是string
    auth_basic_user_file conf/htpasswd;
}
案例
[root@junwu_client extra]# cat auth.conf
server {
listen 90;
server_name _;
charset utf-8;
location / {
root /opt/website/auth_htpasswd/;
index index.html index.htm;
auth_basic "string"; #auth_basic,启用使用“HTTP基本身份验证”协议验证用户名和密码。使用语法是auth_basic string | off,默认是off
#nginx会去这个文件中验证账号密码
auth_basic_user_file /home/Nginx-1.23.4/conf/htpasswd;
}
}
#只有输入正确的账号密码才能查看此页面
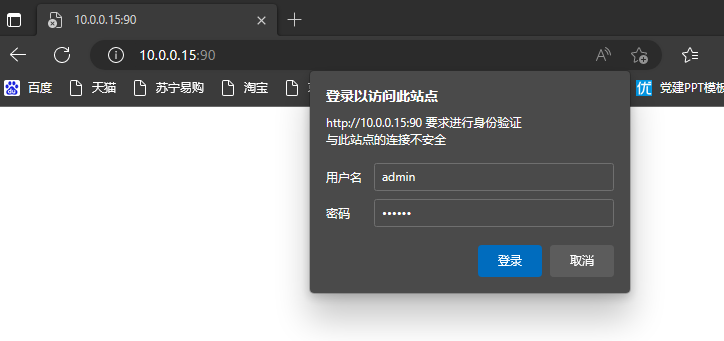
[root@junwu_client website]# cat auth_htpasswd/index.html
<meta charset=utf8>
只有正确输入了账号密码,才能看到此页面

生成密码文件
[root@junwu_client extra]# htpasswd -bc /home/Nginx-1.23.4/conf/htpasswd admin 123456
Adding password for user admin
访问测试
LNMP黄金架构
首先,安装Nginx
1.下载Nginx安装包  nginx.org官网
[root@junwu_client ~]# wget https://nginx.org/download/nginx-1.23.4.tar.gz
2.解压缩Nginx源代码
[root@junwu_client ~]# tar -zxvf nginx-1.23.4.tar.gz
3.复制nginx默认提供的vim语法插件
[root@junwu_client ~]# mkdir ./.vim
[root@junwu_client nginx-1.23.4]# cp -r contrib/vim/* ~/.vim
4.Nginx源代码目录介绍
auto 检测系统模块
CHANGES nginx更改记录文件
conf 存放nginx配置文件
configure 释放编译文件的定制脚本
contrib 提供了perl与vim插件
html 存放标准html页面语法
src 存放nginx源码
5.开始编译Nginx,扩展编译模块
#列出Nginx的编译选项,如制定安装路径,配置文件、日志文件等路径,指定开启模块功能等
[root@junwu_client nginx-1.23.4]# ./configure --help
##第一曲:按照功能需要,添加编译模块
[root@junwu_client nginx-1.23.4]# ./configure --prefix=/home/Nginx-1.23.4 --with-http_ssl_module --with-file-aio --with-http_gzip_static_module --with-http_flv_module --with-http_stub_status_module --with-threads
6.第二曲:执行make编译
[root@junwu_client nginx-1.23.4]# make
7.第三曲:编译安装,生成nginx的可执行命令
[root@junwu_client nginx-1.23.4]# make install
8.检查--prefix指定的安装目录
[root@junwu_client nginx-1.23.4]# ls /home/
Nginx-1.23.4
[root@junwu_client nginx-1.23.4]# ls /home/Nginx-1.23.4/
conf  html  logs  sbin
依次是配置文件,静态文件,日志,二进制命令目录
10.创建nginx的环境变量文件,修改如下,创建/etc/profile.d/nginx.sh脚本文件便于以后维护
[root@junwu_client ~]# cat /etc/profile.d/nginx.sh
export PATH=/home/Nginx-1.23.4/sbin:$PATH
[root@junwu_client ~]# echo $PATH
/usr/local/sbin:/usr/local/bin:/usr/sbin:/usr/bin:/root/bin
11.刷新/etc/profile文件,此时可以正常使用nginx
[root@junwu_client ~]# source /etc/profile
[root@junwu_client ~]# echo $PATH
/home/Nginx-1.23.4/sbin:/usr/local/sbin:/usr/local/bin:/usr/sbin:/usr/bin:/root/bin
12.检查nginx模块信息
[root@junwu_client ~]# nginx -V
nginx version: nginx/1.23.4
built by gcc 4.8.5 20150623 (Red Hat 4.8.5-44) (GCC)
built with OpenSSL 1.0.2k-fips  26 Jan 2017
TLS SNI support enabled
configure arguments: --prefix=/home/Nginx-1.23.4 --with-http_ssl_module --with-file-aio --with-http_gzip_static_module --with-http_flv_module --with-http_stub_status_module --with-threads
13.设置软连接,生产环境常用操作,便于运维、测试、开发使用,已经日后nginx升级
[root@junwu_server nginx1.23.3]# ln -s /opt/nginx1.23.3/ /opt/nginx
[root@junwu_server opt]# ll
total 168752
lrwxrwxrwx   1 root      root            17 May  7 08:21 nginx -> /opt/nginx1.23.3/
drwxr-xr-x  11 root      root           151 Mar 13 11:45 nginx1.23.3
安装Mysql
安装方式我们可以选择多种
- Yum/rpm包安装,简单、快速、无法定制化、新手推荐使用
- 二进制安装,解压缩后直接简单配置即可使用,速度较快,专业DBA常用
- 源码编译安装,特点是可以定制化安装需求,缺点过程较为复杂
为了解决源码包的这些问题,在 Linux 中就出现了二进制包,也就是源码包经过编译之后的包。
源码包的优点如下:
开源。如果你有足够的能力,则可以修改源代码。
可以自由选择所需的功能。
因为软件是编译安装的,所以更加适合自己的系统,更加稳定,效率也更高。
卸载方便。
源码包的缺点如下:
安装过程步骤较多,尤其是在安装较大的软件集合时(如 LAMP 环境搭建),容易出现拼写错误。
编译时间较长,安装时间比二进制安装要长。
因为软件是编译安装的,所以在安装过程中一旦报错,新手很难解决。
RPM 包的优点如下:
包管理系统简单,只通过几个命令就可以实现包的安装、升级、査询和卸载。
安装速度比源码包安装快得多。
RPM 包的缺点如下:
经过编译,不能在看到源代码。
功能选择不如源码包灵活。
依赖性。
1.确保有mysql用户
[root@junwu_server ~]# id mysql
uid=27(mysql) gid=27(mysql) groups=27(mysql)
2.下载mysql二进制软件包,提前配置好yum源,下载wget命令
[root@junwu_server opt]# mkdir mysql
[root@junwu_server mysql]# wget https://mirrors.aliyun.com/mysql/MySQL-5.7/mysql-5.7.36-linux-glibc2.12-x86_64.tar.gz
补充:MySQL源码包
https://mirrors.aliyun.com/mysql/
http://mirrors.sohu.com/mysql/
国内开元镜像站点汇总:
https://segmentfault.com/a/1190000000375848
[root@junwu_server opt]# mv mysql-5.7.36-linux-glibc2.12-x86_64/ /opt/mysql-5.7.36
2.生成软连接
[root@junwu_server opt]# ln -s mysql-5.7.36 mysql
[root@junwu_server opt]# ll -a mysql
lrwxrwxrwx 1 root root 12 May  7 09:00 mysql -> mysql-5.7.36
3.卸载centos7自带的mariadb库,防止冲突
[root@junwu_server opt]# rpm -e --nodeps mariadb-libs
4.手动创建mysql配置文件 vim /etc/my.cnf
[root@junwu_server opt]# cat /etc/my.cnf
[mysqld]
basedir=/opt/mysql/
datadir=/opt/mysql/data
socket=/tmp/mysql.sock
server_id=1
port=3306
log_error=/opt/mysql/data/mysql_erro.log

[mysql]
socket=/tmp/mysql.sock
初始mysql数据库文件
1.卸载系统自带的centos7 mariadb-libs,且安装mysql的依赖环境
[root@junwu_server opt]# rpm -qa mariadb-libs
[root@junwu_server opt]# yum install libaio-devel -y
2.创建mysql数据文件夹且授权
[root@junwu_server opt]# mkdir -p /opt/mysql/data
[root@junwu_server opt]# ll mysql
lrwxrwxrwx 1 root root 12 May  7 09:00 mysql -> mysql-5.7.36
[root@junwu_server opt]# chown -R mysql.mysql mysql
3.初始化数据库
[root@junwu_server opt]# /opt/mysql/bin/mysqld --initialize-insecure --user=mysql --basedir=/opt/mysql/ --datadir=/opt/mysql/data/
# 参数解释
--user=mysql 指定用户
--basedir 指定mysql安装目录
--datadir=/opt/mysql/data 指定数据文件夹
--initialize-insecure 关闭mysql安全策略
--initialize 开启mysql安全模式
配置mysql客户端
[root@junwu_server opt]# cat /etc/systemd/system/mysqld.service
[Unit]
Description=MySQL server
Documentation=man:mysqld(8)
Documentation=http://dev.mysql.com/doc/refman/en/using-systemd.html
After=network.target
After=syslog.target
[Install]
WantedBy=multi-user.target
[Service]
User=mysql
Group=mysql
ExecStart=/opt/mysql/bin/mysqld --defaults-file=/etc/my.cnf
LimitNOFILE=5000
启动mysql数据库
[root@junwu_server opt]# systemctl start mysqld
[root@junwu_server opt]# systemctl status mysqld
● mysqld.service - MySQL server
   Loaded: loaded (/etc/systemd/system/mysqld.service; disabled; vendor preset: disabled)
   Active: active (running) since Sun 2023-05-07 09:58:05 EDT; 11s ago
     Docs: man:mysqld(8)
           http://dev.mysql.com/doc/refman/en/using-systemd.html
 Main PID: 2152 (mysqld)
   CGroup: /system.slice/mysqld.service
           └─2152 /opt/mysql/bin/mysqld --defaults-file=/etc/my.cnf

May 07 09:58:05 junwu_server systemd[1]: Started MySQL server.
检查mysql启动状态
[root@junwu_server opt]# netstat -tunlp |grep mysql
tcp6       0      0 :::3306                 :::*                    LISTEN      2152/mysqld
[root@junwu_server opt]# ps -ef |grep mysql
mysql      2152      1  0 09:58 ?        00:00:00 /opt/mysql/bin/mysqld --defaults-file=/etc/my.cnf
root       2198   1238  0 10:00 pts/0    00:00:00 grep --color=auto mysql
配置mysql命令环境变量
[root@junwu_server profile.d]# echo "export PATH=/opt/mysql/bin:$PATH" >> ./mysql.sh
[root@junwu_server profile.d]# echo $PATH
/opt/nginx1.23.3/sbin:/opt/nginx1.23.3/sbin:/usr/local/sbin:/usr/local/bin:/usr/sbin:/usr/bin:/root/bin
[root@junwu_server profile.d]# source /etc/profile
[root@junwu_server profile.d]# echo $PATH
/opt/nginx1.23.3/sbin:/opt/mysql/bin:/opt/nginx1.23.3/sbin:/opt/nginx1.23.3/sbin:/usr/local/sbin:/usr/local/bin:/usr/sbin:/usr/bin:/root/bin
登录mysql
默认无须输入密码直接进入mysql数据库,且身份是root
[root@junwu_server profile.d]# mysql
Welcome to the MySQL monitor.  Commands end with ; or \g.
Your MySQL connection id is 2
Server version: 5.7.36 MySQL Community Server (GPL)

Copyright (c) 2000, 2021, Oracle and/or its affiliates.

Oracle is a registered trademark of Oracle Corporation and/or its
affiliates. Other names may be trademarks of their respective
owners.

Type 'help;' or '\h' for help. Type '\c' to clear the current input statement.

mysql> show databases;
+--------------------+
| Database           |
+--------------------+
| information_schema |
| mysql              |
| performance_schema |
| sys                |
+--------------------+
4 rows in set (0.00 sec)

mysql> select user();
+----------------+
| user()         |
+----------------+
| root@localhost |
+----------------+
1 row in set (0.00 sec)

mysql> select user,authentication_string,host from mysql.user;
+---------------+-------------------------------------------+-----------+
| user          | authentication_string                     | host      |
+---------------+-------------------------------------------+-----------+
| root          |                                           | localhost |
| mysql.session | *THISISNOTAVALIDPASSWORDTHATCANBEUSEDHERE | localhost |
| mysql.sys     | *THISISNOTAVALIDPASSWORDTHATCANBEUSEDHERE | localhost |
+---------------+-------------------------------------------+-----------+
3 rows in set (0.00 sec)
默认mysql账号root是没有密码的,我们给其设置密码,加大安全性
#此处会提示明文密码不安全
[root@junwu_server profile.d]# mysqladmin -uroot password '123456'
mysqladmin: [Warning] Using a password on the command line interface can be insecure.
Warning: Since password will be sent to server in plain text, use ssl connection to ensure password safety.
# 再次登录,输入密码
[root@junwu_server profile.d]# mysql -uroot -p
Enter password:
Welcome to the MySQL monitor.  Commands end with ; or \g.
Your MySQL connection id is 4
Server version: 5.7.36 MySQL Community Server (GPL)

Copyright (c) 2000, 2021, Oracle and/or its affiliates.

Oracle is a registered trademark of Oracle Corporation and/or its
affiliates. Other names may be trademarks of their respective
owners.

Type 'help;' or '\h' for help. Type '\c' to clear the current input statement.

mysql>
FastCGI部署(本地部署)
1.检查Nginx和mysql的安装路径
[root@junwu_server opt]# nginx -V
nginx version: nginx/1.23.3
built by gcc 4.8.5 20150623 (Red Hat 4.8.5-44) (GCC)
configure arguments: --prefix=/opt/nginx1.23.3/
[root@junwu_server opt]# mysql -V
mysql  Ver 14.14 Distrib 5.7.36, for linux-glibc2.12 (x86_64) using  EditLine wrapper
2.确保nginx、mysql都启动了
[root@junwu_server opt]# netstat -tunlp|grep -E "nginx|mysql"
tcp        0      0 0.0.0.0:80              0.0.0.0:*               LISTEN      1322/nginx: master
tcp6       0      0 :::3306                 :::*                    LISTEN      2152/mysqld
3.安装部署PHP程序所需的系统库,不要求必须安装,而是安装上之后,可以扩展php更多功能
[root@junwu_server opt]# yum install gcc gcc-c++ make zlib-devel libxml2-devel libjpeg-devel libjpeg-turbo-devel libiconv-devel freetype-devel libpng-devel gd-devel libcurl-devel libxslt-devel libxslt-devel sqlite-devel -y
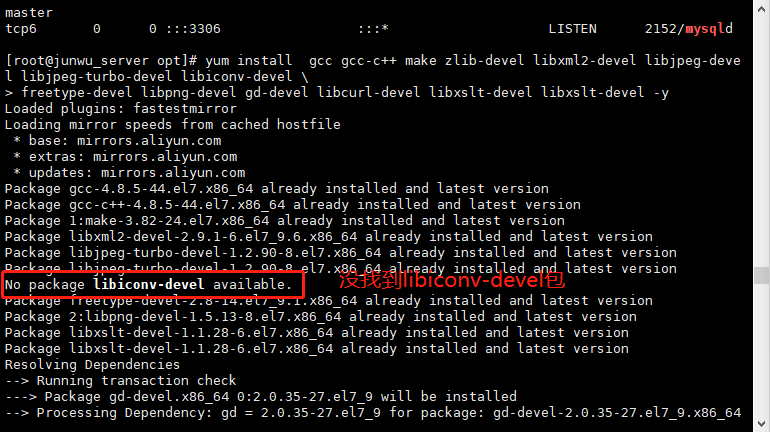
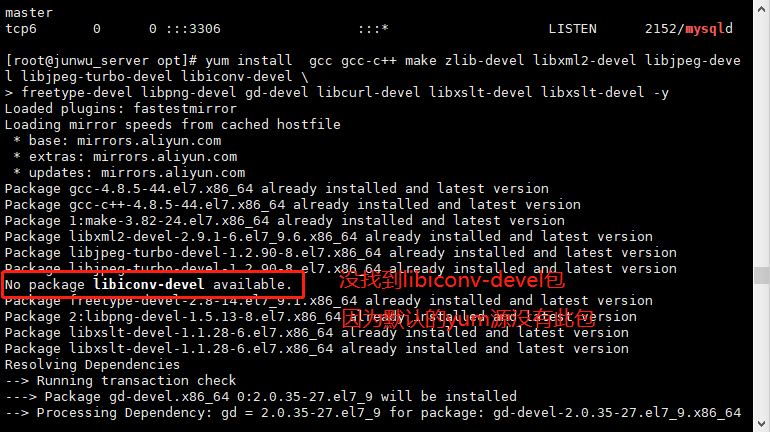
4. 默认yum源中缺少libiconv-devel软件包,需要编译安装,用于php的编码转换
[root@junwu_server opt]# wget -P /opt/ https://ftp.gnu.org/pub/gnu/libiconv/libiconv-1.17.tar.gz
[root@junwu_server opt]# tar -zxf libiconv-1.17.tar.gz
[root@junwu_server opt]# cd libiconv-1.17
[root@junwu_server libiconv-1.17]# ./configure --prefix=/opt/libiconv
[root@junwu_server libiconv-1.17]# make && make install
安装PHP(FastCGI形式)
1.下载获取php软件包
[root@junwu_server opt]# wget http://mirrors.sohu.com/php/php-8.0.17.tar.gz
2.解压缩php源码包,编译安装
[root@junwu_server opt]# tar -zxf php-8.0.17.tar.gz
[root@junwu_server opt]# cd php-8.0.17
[root@junwu_server ~]# ./configure --prefix=/opt/php-8.0.17 --enable-mysqlnd --with-mysqli=mysqlnd --with-pdo-mysql=mysqlnd --with-iconv-dir=/opt/libiconv --with-freetype-dir --with-jpeg-dir --with-png-dir --with-zlib --with-libxml-dir=/usr --enable-xml --disable-rpath --enable-bcmath --enable-shmop --enable-sysvsem --enable-inline-optimization --with-curl --enable-mbregex --enable-fpm --enable-mbstring --with-gd --with-openssl --with-mhash --enable-pcntl --enable-sockets --with-xmlrpc --enable-soap --enable-short-tags --enable-static --with-xsl --with-fpm-user=nginx --with-fpm-group=nginx --enable-ftp --enable-opcache=no
编译失败,发现没有安装一个包
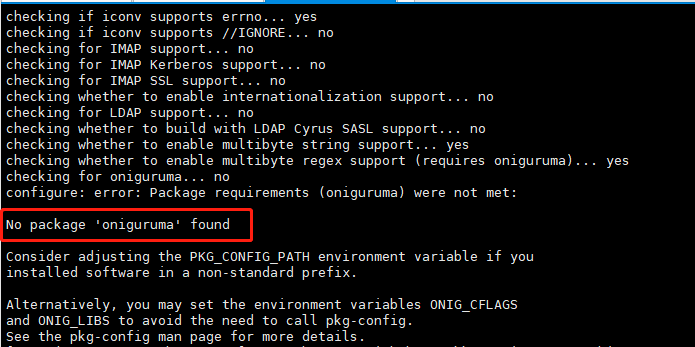
网上查一下,需要安装如下软件包
[root@junwu_server opt]# yum install oniguruma oniguruma-devel -y
重新编译成功!
对于如上的参数,根据自己实际工作环境优化增删即可
部分参数解释
--prefix=  指定php安装路径
--enable-mysqlnd 使用php自带的mysql相关软件包
--with-fpm-user=nginx  指定PHP-FPM程序的用户是nginx,和nginx服务保持统一
--enable-fpm 激活php-fpm方式,以FastCGI形式运行php程序
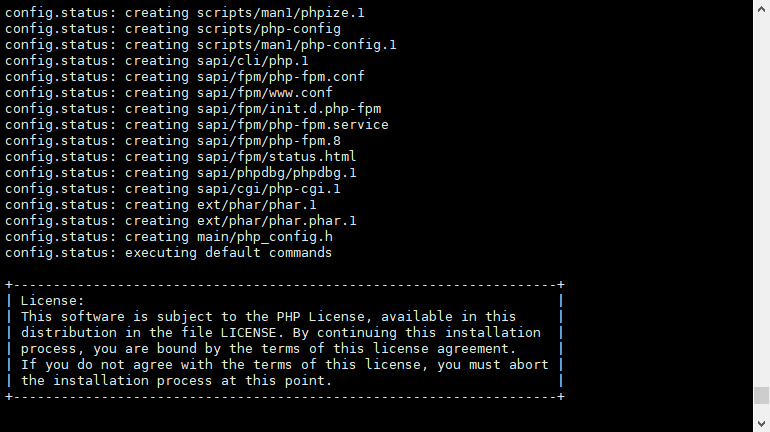
3.在执行完编译脚本文件后,开始执行编译安装
[root@junwu_server php-8.0.17]# make && make install
[root@junwu_server php-8.0.17]# echo $?
0

【编译安装结束后,配置环境变量】
[root@junwu_server php-8.0.17]# ln -s /opt/php-8.0.17 /opt/php
php配置文件
配置文件路径
[root@junwu_server php-8.0.17]# ls php.ini*
php.ini-development  php.ini-production
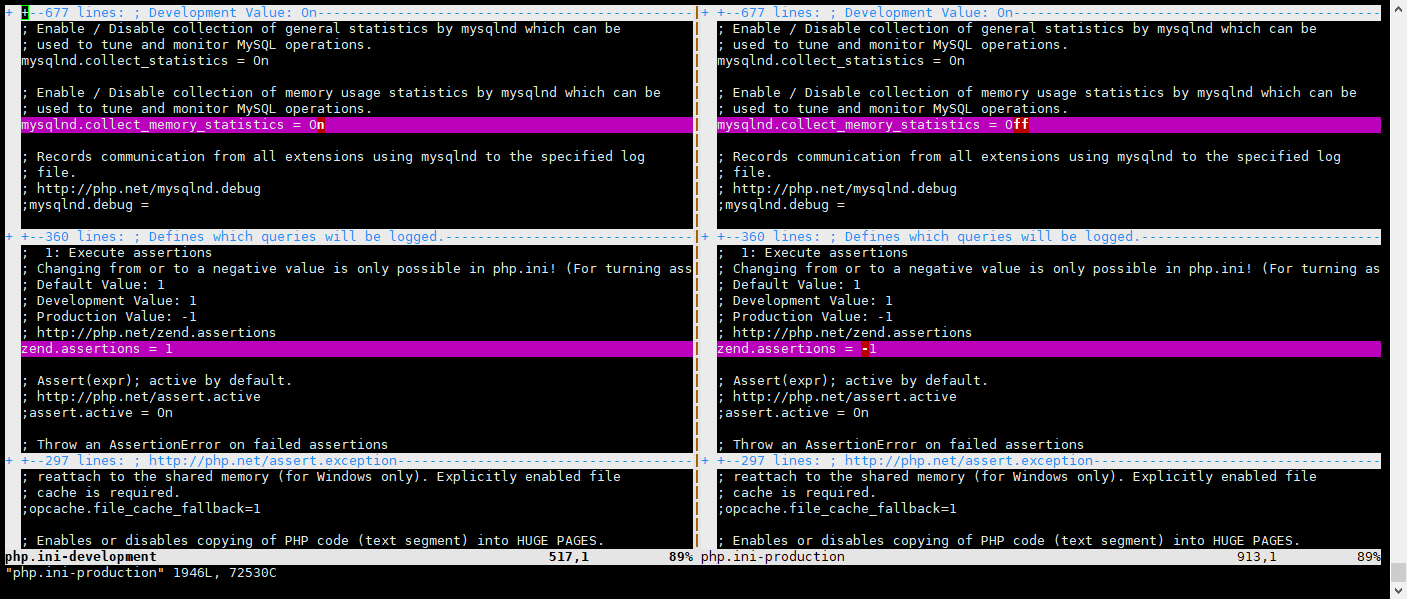
分别默认用于开发环境,生成环境,配置参数有所不同
# 可以用如下命令对比文件区别
[root@junwu_server php-8.0.17]# vimdiff php.ini-development php.ini-production
开发环境下开起了更多的日志、调试信息,生产环境该参数都关闭了
拷贝php配置文件到php默认目录,且改名
[root@junwu_server php-8.0.17]# cp php.ini-development /opt/php/lib/php.ini
FastCGI的配置文件
1.默认FastCGI的配置文件路径
[root@junwu_server etc]# pwd
/opt/php/etc
[root@junwu_server etc]# ls
php-fpm.conf.default  php-fpm.d
2.生成2个php-frpm的配置文件,先用默认配置,后续可以再后话
[root@junwu_server etc]# cp php-fpm.conf.default php-fpm.conf
[root@junwu_server etc]# cp php-fpm.d/www.conf.default php-fpm.d/www.conf
启动PHP服务(FastCGI模式)
# 启动服务,并且检查状态
[root@junwu_server etc]# /opt/php/sbin/php-fpm
[root@junwu_server etc]# netstat -tunlp |grep php
tcp        0      0 127.0.0.1:9000          0.0.0.0:*               LISTEN      20951/php-fpm: mast
修改Nginx支持PHP
1.修改nginx配置文件,在最底行添加 包含文件参数,建议删除nginx.conf原有的server配置
[root@junwu_server conf]# vim /opt/nginx/conf/nginx.conf
    include extra/01_www.conf;
    include extra/02_bbs.conf;
    include extra/03_blog.conf;
    include extra/04_status.conf;
【配置PHP的解析配置文件】
[root@junwu_server conf]# mkdir extra
[root@junwu_server conf]# vim extra/03_blog.conf
[root@junwu_server conf]# cat extra/03_blog.conf
server {
listen 80;
server_name blog.com;
location / {
    root html/blog;
    index index.html;
}

#添加有关php程序的解析
location ~ .*\.(php|php5)?$ {
    root html/blog;
    fastcgi_pass 127.0.0.1:9000;
    fastcgi_index index.php;
    include fastcgi.conf;
}
}
检查且启动nginx
[root@junwu_server conf]# touch extra/01_www.conf
[root@junwu_server conf]# touch extra/02_bbs.conf
[root@junwu_server conf]# touch extra/03_status.conf
[root@junwu_server conf]# nginx -t
nginx: [emerg] open() "/opt/nginx1.23.3//conf/extra/04_status.conf" failed (2: No such file or directory) in /opt/nginx1.23.3//conf/nginx.conf:38
nginx: configuration file /opt/nginx1.23.3//conf/nginx.conf test failed

##报错,没有此文件/opt/nginx1.23.3//conf/extra/04_status.conf
[root@junwu_server conf]# touch extra/04_status.conf
[root@junwu_server conf]# nginx -t
nginx: the configuration file /opt/nginx1.23.3//conf/nginx.conf syntax is ok
nginx: configuration file /opt/nginx1.23.3//conf/nginx.conf test is successful
测试LNMP环境
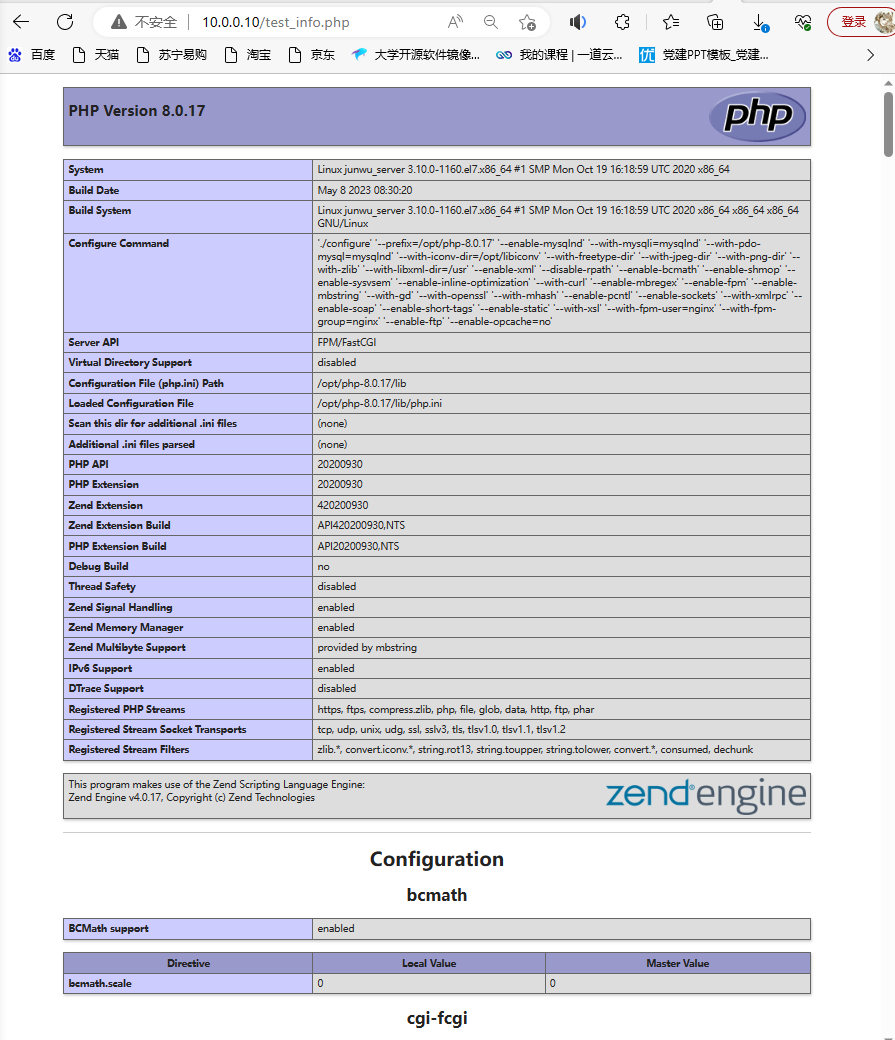
[root@junwu_server conf]# mkdir -p /opt/nginx/html/blog
[root@junwu_server conf]# echo "<?php phpinfo();?>" > ../html/blog/test_info.php
当看见如下页面,表示lnmp环境已经能够正确解析了
##重新加载nginx配置文件
[root@junwu_server conf]# nginx -s reload
测试正确后,保证服务器安全,就得删除该test_info.php文件了
测试php访问mysql
php的代码,直接在网页中解析即可
[root@junwu_server conf]# vim ../html/blog/test_mysql.php
[root@junwu_server conf]# cat ../html/blog/test_mysql.php
<?php
$link_id=mysqli_connect('localhost','root','123456') or mysql_error();
if($link_id){

    echo "mysql test successful.\n";
}else {

    echo mysql_error();
}
?>
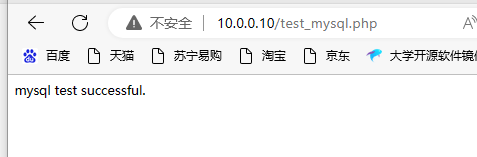
nginx+php+mysql搭建完成。

 浙公网安备 33010602011771号