
LAMP架构之Apache
Apache(音译为阿帕奇)是世界使用排名第一的Web服务器软件。它可以运行在几乎所有广泛使用的计算机平台上,由于其跨平台和安全性被广泛使用,是最流行的Web服务器端软件之一。它快速、可靠并且可通过简单的API扩充,将Perl/Python等解释器编译到服务器中。
- Apache
- Nginx
- IIS
- lighttpd
安装Apache
- 源代码编译
- rpm包安装
- yum⾃动化安装
[root@junwu_server ~]# yum install httpd -y
[root@junwu_server ~]# systemctl start httpd
[root@junwu_server ~]# systemctl enable httpd
[root@junwu_server ~]# netstat -tunlp|grep httpd
tcp6 0 0 :::80 :::* LISTEN 912/httpd

[root@junwu_server ~]# ps -ef|grep httpd
root 912 1 0 15:11 ? 00:00:00 /usr/sbin/httpd -DFOREGROUND
apache 1009 912 0 15:11 ? 00:00:00 /usr/sbin/httpd -DFOREGROUND
apache 1010 912 0 15:11 ? 00:00:00 /usr/sbin/httpd -DFOREGROUND
apache 1011 912 0 15:11 ? 00:00:00 /usr/sbin/httpd -DFOREGROUND
apache 1012 912 0 15:11 ? 00:00:00 /usr/sbin/httpd -DFOREGROUND
apache 1013 912 0 15:11 ? 00:00:00 /usr/sbin/httpd -DFOREGROUND
root 1206 1184 0 15:18 pts/0 00:00:00 grep --color=auto httpd
http://10.0.0.10/
|
⽂件路径
|
作⽤
|
|
/etc/httpd/conf/httpd.conf
|
apache主配置⽂件
|
|
/etc/httpd
|
apache主配置⽬录
|
|
/etc/httpd/conf.d/*.conf
|
apache⼦配置⽂件
|
|
/usr/sbin/httpd
|
⼆进制脚本
|
|
/var/log/httpd/
|
⽇志路径access_log、
error_log
|
|
/var/www/html
|
站点资源⽬录
|
|
/usr/lib/systemd/system/httpd.service
|
httpd服务脚本⽂件
|
|
/usr/lib64/httpd/modules/
|
httpd模块⽂件路径
|
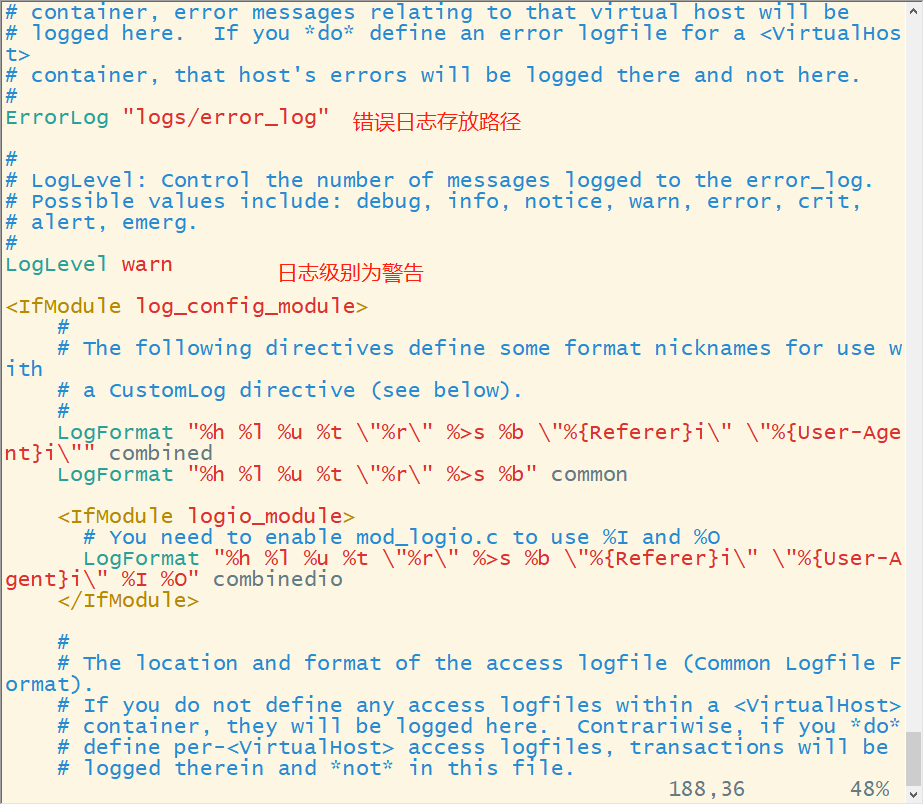
/etc/httpd/conf/httpd.conf
##过滤注释、空白行
[root@junwu_server ~]# grep -Ev '^[# ]|^$' /etc/httpd/conf/httpd.conf
ServerRoot "/etc/httpd"
Listen 80
Include conf.modules.d/*.conf
User apache
Group apache
ServerAdmin root@localhost
<Directory />
</Directory>
DocumentRoot "/var/www/html"
<Directory "/var/www">
</Directory>
<Directory "/var/www/html">
</Directory>
<IfModule dir_module>
</IfModule>
<Files ".ht*">
</Files>
ErrorLog "logs/error_log"
LogLevel warn
<IfModule log_config_module>
</IfModule>
<IfModule alias_module>
</IfModule>
<Directory "/var/www/cgi-bin">
</Directory>
<IfModule mime_module>
</IfModule>
AddDefaultCharset UTF-8
<IfModule mime_magic_module>
</IfModule>
EnableSendfile on
IncludeOptional conf.d/*.conf
- 全局配置,全局性
- 主服务器配置
- 虚拟主机
|
参数
|
解析
|
|
ServerRoot "/etc/httpd"
|
定义服务⼯作⽬录
|
|
ServerAdmin root@localhost
|
管理员邮箱地址
|
|
User apache
|
运⾏服务的⽤户信息
|
| Group apache | 运⾏服务的⽤户组 |
| ServerName www.example.com:80 | 填写服务器域名 |
| DocumentRoot "/var/www/html" | 定义⽹站根⽬录 |
| <Directory "/var/www">
AllowOverride None |
定义⽹站数据⽬录的权
限
|
| Listen | 监听的IP地址和端⼝号 |
| DirectoryIndex index.html | 默认的⾸⻚⻚⾯⽂件 |
| ErrorLog "logs/error_log" | 定义错误⽇志位置 |
| CustomLog "logs/access_log"
combined
|
定义访问⽇志路径 |
Apache常见配置
[root@junwu_server ~]# vim /var/www/html/index.html

[root@junwu_server ~]# curl 10.0.0.10
<meta charset=utf-8>
一起来学习Apache!!!

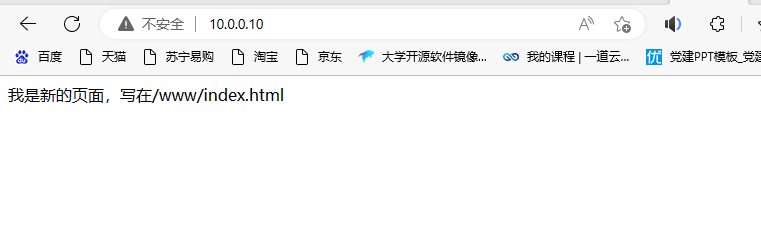
1、修改配置文件如下,两处修改

[root@junwu_server ~]# cat /etc/httpd/conf/httpd.conf

DocumentRoot "/www"

#
# Relax access to content within /var/www.
#
<Directory "/www">
AllowOverride None
# Allow open access:
Require all granted
</Directory>

2、创建资源目录,创建html文件

[root@junwu_server ~]# touch /www/index.html

[root@junwu_server ~]# curl 10.0.0.10
<meta charset=utf-8>
我是新的页面,写在/www/index.html

3、修改完配置文件,记得重启服务,如果提示报错,重新检查配置文件或者查看是否存在/www目录

[root@junwu_server ~]# systemctl restart httpd

##此时可以访问新资源目录中的内容了

[root@junwu_server ~]# sed -i 's/Listen 80/Listen 81/' /etc/httpd/conf/httpd.conf
[root@junwu_server ~]# grep -i '^listen' /etc/httpd/conf/httpd.conf
Listen 81

[root@junwu_server ~]# systemctl restart httpd
[root@junwu_server ~]# curl 10.0.0.10
curl: (7) Failed connect to 10.0.0.10:80; Connection refused
[root@junwu_server ~]# curl 10.0.0.10:81
<meta charset=utf-8>
我是新的页面,写在/www/index.html

[root@junwu_server ~]# httpd -V|grep -i 'server mpm'
AH00558: httpd: Could not reliably determine the server's fully qualified domain name, using fe80::84df:f9df:14ff:2fc8. Set the 'ServerName' directive globally to suppress this message
Server MPM: prefork
--with-mpm=prefork|worker|event
1、Prefork MPM
Prefork MPM实现了一个非线程的、预派生的web服务器。它在Apache启动之初,就先预派生一些子进程,然后等待连接;
优点:可以减少频繁创建和销毁进程的开销,每个子进程只有一个线程,在一个时间点内,只能处理一个请求。这是一个成熟稳定,可以兼容新老模块,也不需要担心线程安全问题,
缺点:一个进程相对占用资源,消耗大量内存,不擅长处理高并发的场景。
2、Worker MPM
和prefork模式相比,worker使用了多进程和多线程的混合模式,worker模式也同样会先预派生一些子进程,然后每个子进程创建一些线程,同时包括一个监听线程,每个请求过来会被分配到一个线程来服务。
优点:内存的占用会减少一些,在高并发的场景下会比prefork有更多可用的线程,表现会更优秀一些;
缺点:由于用到多进程多线程,需要考虑到线程的安全了,在使用keep-alive长连接的时候,某个线程会一直被占用,即使中间没有请求,需要等待到超时才会被释放(该问题在prefork模式下也存在)。
3、Event MPM
这是Apache最新的工作模式,它和worker模式很像,不同的是在于它解决了keep-alive长连接的时候占用线程资源被浪费的问题,在event工作模式中,会有一些专门的线程用来管理这些keep-alive类型的线程,当有真实请求过来的时候,将请求传递给服务器的线程,执行完毕后,又允许它释放。这增强了在高并发场景下的请求处理。
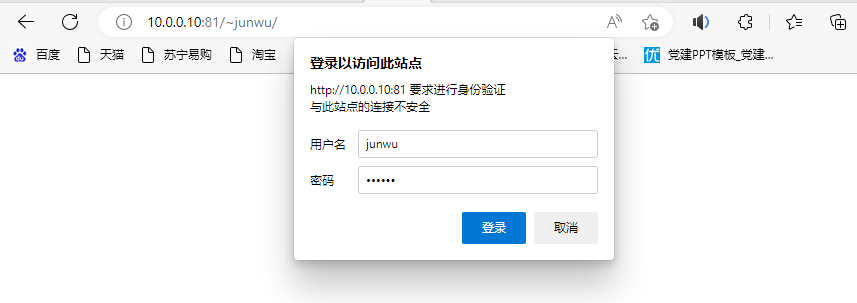
##修改/etc/httpd/conf.d/userdir.conf
 1、启用userdir

<IfModule mod_userdir.c>
#
# UserDir is disabled by default since it can confirm the presence
# of a username on the system (depending on home directory
# permissions).
#
#UserDir disabled

#
# To enable requests to /~user/ to serve the user's public_html
# directory, remove the "UserDir disabled" line above, and uncomment
# the following line instead:
#
UserDir public_html
</IfModule>

#
# Control access to UserDir directories. The following is an example
# for a site where these directories are restricted to read-only.
#
<Directory "/home/*/public_html">
#AllowOverride FileInfo AuthConfig Limit Indexes
AllowOverride all
authuserfile "/etc/httpd/passwd"
authname "input your account"
authtype basic
require user junwu
#Options MultiViews Indexes SymLinksIfOwnerMatch IncludesNoExec
#Require method GET POST OPTIONS
</Directory>

 2、创建网站数据文件夹,注意权限

[root@junwu_server ~]# mkdir /home/junwu/public_html/

3、创建首页文件

[root@junwu_server ~]# su -junwu

[junwu@junwu_server ~]$ echo 'apache中的userdir模块' > public_html/index.html

4、设置权限

[root@junwu_server ~]# chmod -Rf 755 /home/junwu/

5、创建需要验证的账户密码,生成数据库文件

[root@junwu_server ~]# htpasswd -c /etc/httpd/passwd junwu
New password:
Re-type new password:
Adding password for user junwu

6、退回到root用户,重启http服务

[root@junwu_server public_html]# systemctl restart httpd

7、使用浏览器访问http://10.0.0.10/~junwu   (格式:ip:端口号/~用户名)
【虚拟主机】
虚拟主机(Virtual Host),又称虚拟服务器、主机空间或是网页空间,是一种网络技术,可以让多个主机名称,在一个单一的服务器上运作,而且可以分开支持每个单一的主机名称。
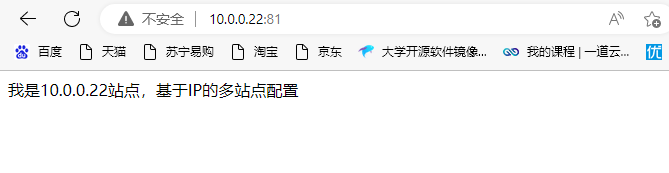
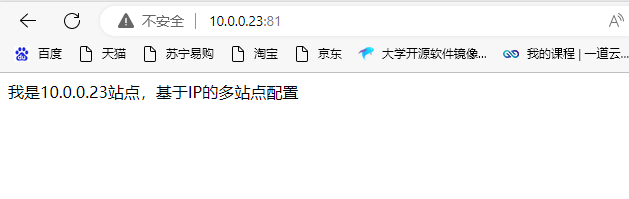
基于IP的多站点配置
1、服务器绑定多个IP地址

[root@junwu_server ~]# ip address add 10.0.0.22 dev ens33
[root@junwu_server ~]# ip address add 10.0.0.23 dev ens33
[root@junwu_server ~]# ip add|grep 'inet'
inet 127.0.0.1/8 scope host lo
inet6 ::1/128 scope host
inet 10.0.0.10/24 brd 10.0.0.255 scope global noprefixroute ens33
inet 10.0.0.22/32 scope global ens33
inet 10.0.0.23/32 scope global ens33

2、配置IP站点对应的文件夹资料,用于访问(默认Apache会访问文件夹下的index.html文件)

[root@junwu_server ~]# mkdir -p /www/{test_one,test_two}

[root@junwu_server ~]# echo '我是10.0.0.22站点,基于IP的多站点配 置' > /www/test_one/index.html
[root@junwu_server ~]# echo '我是10.0.0.23站点,基于IP的多站点配 置' > /www/test_two/index.html

3、修改http.conf主配置文件

[root@junwu_server ~]# tail -17 /etc/httpd/conf/httpd.conf

<VirtualHost 10.0.0.22>
DocumentRoot /www/test_one
#ServerName
<Directory /www/test_one>
AllowOverride None
Require all granted
</Directory>
</VirtualHost>
<VirtualHost 10.0.0.23>
DocumentRoot /www/test_two
#ServerName
<Directory /www/test_two>
AllowOverride None
Require all granted
</Directory>
</VirtualHost>
4、重启httpd服务
基于域名的多站点配置
1、配置hosts本地域名解析

[root@junwu_server ~]# cat /etc/hosts
127.0.0.1 localhost localhost.localdomain localhost4 localhost4.localdomain4
::1 localhost localhost.localdomain localhost6 localhost6.localdomain6
10.0.0.22 www.test_dns1.com www.test_dns2.com

2、分别创建不同的虚拟主机站点,且创建前端⽂件

[root@junwu_server ~]# more /www/test_one/index.html /www/test_two/index.html
::::::::::::::
/www/test_one/index.html
::::::::::::::
#我是10.0.0.22站点,基于IP的多站点配置
我是多域名www.test_dns1.com站点
::::::::::::::
/www/test_two/index.html
::::::::::::::
#我是10.0.0.23站点,基于IP的多站点配置
我是www.test_dns2.com站点测试

3、修改apache配置文件参数如下

[root@junwu_server ~]# tail -16 /etc/httpd/conf/httpd.conf
<VirtualHost 10.0.0.22>
DocumentRoot /www/test_one
ServerName www.test_dns1.com
<Directory /www/test_one>
AllowOverride None
Require all granted
</Directory>
</VirtualHost>
<VirtualHost 10.0.0.22>
DocumentRoot /www/test_two
ServerName www.test_dns2.com
<Directory /www/test_two>
AllowOverride None
Require all granted
</Directory>
</VirtualHost>

4、检测页面内容

[root@junwu_server ~]# curl 10.0.0.22
#我是10.0.0.22站点,基于IP的多站点配置
我是多域名www.test_dns1.com站点
[root@junwu_server ~]# curl www.test_dns1.com
<!DOCTYPE HTML PUBLIC "-//IETF//DTD HTML 2.0//EN">
<html><head>
<title>400 Bad Request</title>
</head><body>
<h1>Bad Request</h1>
<p>Your browser sent a request that this server could not understand.<br />
</p>
<p>Additionally, a 400 Bad Request
error was encountered while trying to use an ErrorDocument to handle the request.</p>
</body></html>
[root@junwu_server ~]# curl www.test_dns2.com
<!DOCTYPE HTML PUBLIC "-//IETF//DTD HTML 2.0//EN">
<html><head>
<title>400 Bad Request</title>
</head><body>
<h1>Bad Request</h1>
<p>Your browser sent a request that this server could not understand.<br />
</p>
<p>Additionally, a 400 Bad Request
error was encountered while trying to use an ErrorDocument to handle the request.</p>
</body></html>
疑问:有没有小伙伴知道上面是什么问题啊
基于端口的多站点配置
1、⽣成多个数据⽂件夹

[root@junwu_server ~]# echo '端口81的主机' > /www/jjj/index.html
[root@junwu_server ~]# echo '端口82的主机' > /www/hhh/index.html

2、修改配置⽂件,⽀持多端⼝的虚拟主机(在配置文件中添加监听端口81、82)

[root@junwu_server ~]# grep -i '^listen' /etc/httpd/conf/httpd.conf
Listen 80
Listen 81
Listen 82

[root@junwu_server ~]# tail -n -16 /etc/httpd/conf/httpd.conf
<VirtualHost 10.0.0.25:81>
DocumentRoot /www/jjj
ServerName www.test_dns1.com
<Directory /www/jjj>
AllowOverride None
Require all granted
</Directory>
</VirtualHost>
<VirtualHost 10.0.0.25:82>
DocumentRoot /www/hhh
ServerName www.test_dns2.com
<Directory /www/hhh>
AllowOverride None
Require all granted
</Directory>
</VirtualHost>

3、重启httpd

[root@junwu_server ~]# systemctl restart httpd

4、测试

[root@junwu_server ~]# curl 10.0.0.25:81
端口81的主机
[root@junwu_server ~]# curl 10.0.0.25:82
端口82的主机
【Apache资源限制访问与Access日志】
Order Deny,allow
Allow from 192.168.178.190
Require all granted # 允许所有ip访问
Require ip 192.168.178.190 #只允许某个ip访问
Require ip 192.168.178.0/24 # 允许某个我那⽹段访问
1、Allow参数
Allow指令的作⽤与其英⽂单词的含义⼀致,⽤于设置允许访问当前⽬录(及其⼦目录)
<VirtualHost 10.0.0.30>
DocumentRoot /www/allow
#ServerName
<Directory /www/allow>
#AllowOverride None
#Require all granted
#只允许192.168.10.0网段IP访问/www/allow/目录
Allow from 192.168.10.0/24
</Directory>

2、Deny指令
同样的,Deny指令的作⽤就是“Deny(拒绝)”,⽤于设置拒绝访问当前⽬录或⽂件
3、Order指令
在Apache的配置⽂件中,Order指令⽤于控制Allow指令和Deny指令的⽣效顺序。
在Apache中,Allow指令和Deny指令在同⼀配置段中都可以有多条。不过,对于
下⾯,我们同样参考⼏个具体的例⼦以帮助⼤家理解:
<Directory /web>
Order Allow,Deny
Allow from all
Deny from 112.2.10.2
#先允许所有⽤户访问,再拒绝112.2.10.2
#总结:允许除IP为112.2.10.2外的所有⽤户访问
</Directory>
<Directory /web>
Order Allow,Deny
Deny from 112.2.10.2
Allow from all
#先允许所有⽤户访问,再拒绝112.2.10.2
#总结:允许除IP为112.2.10.2外的所有⽤户访问
#(即使Deny指令在Allow指令之前,但是根据Order Allow,Deny语句,仍然先看Allow
</Directory>
<Directory /web>
Order Deny,Allow
Deny from 112.2.10.2
Allow from all
Deny from 123.10.10.1
#先拒绝112.2.10.2访问
#再拒绝123.10.10.1访问
#最后允许所有⽤户访问
#总结:允许所有⽤户访问
#(即使Allow指令在Deny指令前,但是根据Order Deny,Allow语句,仍然先看Deny
</Directory>
【日志级别】
| emerg | 紧急 - 系统无法使用 | "Child cannot open lock file. Exiting" |
| alert | 必须立即采取措施 | "getpwuid: couldn’t determine user name from uid" |
| crit | 致命情况 | "socket: Failed to get a socket, exiting child" |
| error | 错误情况 | "Premature end of script headers" |
| warn | 警告情况 | "child process 1234 did not exit, sending another SIGHUP" |
| notice | 一般重要情况 | "httpd: caught SIGBUS, attempting to dump core in ..." |
| info | 普通信息 | "Server seems busy, (you may need to increase StartServers, or Min/MaxSpareServers)..." |
| debug | 出错级别信息 | "Opening config file ..." |
【⽇志格式 】
LogFormat "%h %l %u %t \"%r\" %>s %b \"%{Referer}i\" \"%{User-Agent}i\"" combined
LogFormat "%h %l %u %t \"%r\" %>s %b" common   #通用日志格式

10.0.0.1 - - [19/Dec/2022:03:16:23 -0500] "-" 408 - "-" "-"
10.0.0.1 - - [19/Dec/2022:03:31:07 -0500] "GET / HTTP/1.1" 404 198 "-" "Mozilla/5.0 (Windows NT 10.0; Win64; x64) AppleWebKit/537.36 (KHTML, like Gecko) Chrome/108.0.0.0 Safari/537.36 Edg/108.0.1462.54"
10.0.0.1 - - [19/Dec/2022:03:31:08 -0500] "GET /favicon.ico HTTP/1.1" 404 209 "http://10.0.0.30/" "Mozilla/5.0 (Windows NT 10.0; Win64; x64) AppleWebKit/537.36 (KHTML, like Gecko) Chrome/108.0.0.0 Safari/537.36 Edg/108.0.1462.54"
10.0.0.1 - - [19/Dec/2022:03:31:59 -0500] "-" 408 - "-" "-"
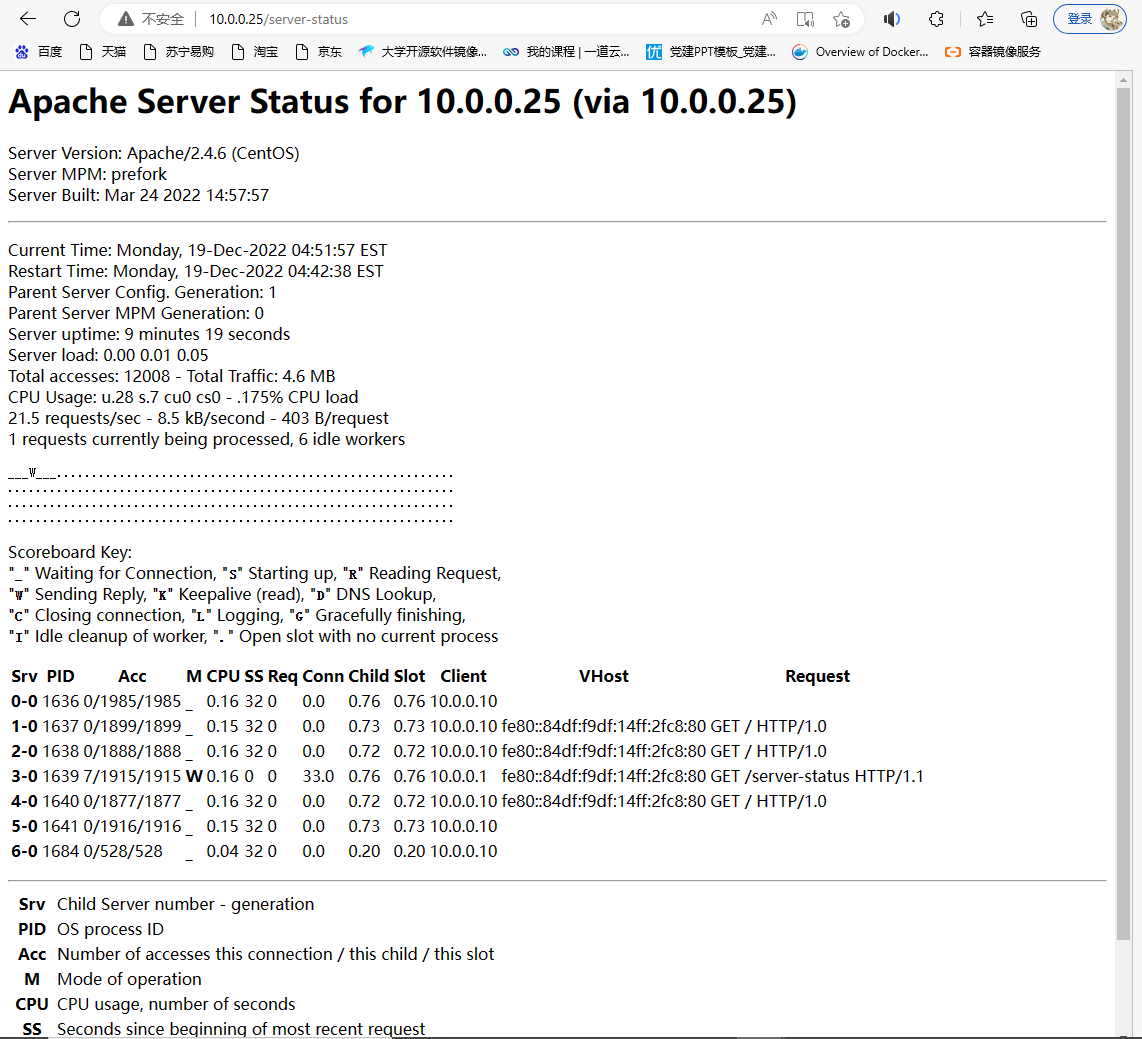
【apache状态页和ab命令】
status状态页可以实时监控httpd运行、负载情况,连接数等。能够更好的掌握服务器情况,需要在编译安装apache的时候,开启mod_status模块 。
#在htt配置文件中添加参数

<Location /server-status>
SetHandler server-status
<RequireAll>
Require ip 10.0.0.0/24   #此IP要设置成跟Apache服务IP同网段才行
</RequireAll>
</Location>
重启httpd服务
访问状态⻚路径
http://10.0.0.10/server-status
#使用ab命令进行压力测试,下载httpd-tools
1、发送100个并发数,总共发出10000个请求
[root@junwu_server httpd]# ab -c 100 -n 10000 http://10.0.0.10/
2、检查状态页信息
3、检查进程数
[root@junwu_server ~]# ps -ef|grep httpd|wc -l
9
-A/--user-agent <string> 设置用户代理发送给服务器

-b/--cookie <name=string/file> cookie字符串或文件读取位置

-c/--cookie-jar <file> 操作结束后把cookie写入到这个文件中

-C/--continue-at <offset> 断点续转

-D/--dump-header <file> 把header信息写入到该文件中

-e/--referer 来源网址

-f/--fail 连接失败时不显示http错误

-o/--output 把输出写到该文件中

-O/--remote-name 把输出写到该文件中,保留远程文件的文件名

-r/--range <range> 检索来自HTTP/1.1或FTP服务器字节范围

-s/--silent 静音模式。不输出任何东西

-T/--upload-file <file> 上传文件

-u/--user <user[:password]> 设置服务器的用户和密码

-w/--write-out [format] 什么输出完成后

-x/--proxy <host[:port]> 在给定的端口上使用HTTP代理

-#/--progress-bar 进度条显示当前的传送状态
1、保存⽹⻚html源代码
#获取网页html源码

[root@junwu_server ~]# curl https://home.cnblogs.com/u/junwured > /tmp/blog_index.html
% Total % Received % Xferd Average Speed Time Time Time Current
Dload Upload Total Spent Left Speed
0 0 0 0 0 0 0 0 --:--:-- --:--:-- --:--:-- 0
2、使用-o参数保存网页
#跟第一条命令作用相同

[root@junwu_server ~]# curl -o /tmp/blog_indexsec.html https://home.cnblogs.com/u/junwured/
3、测试页面返回值
-o 输出内容到⽂件
-s 不输出⻚⾯内容
-w 指定输出内容
[root@junwu_server ~]# curl -o /dev/null -s -w %{http_code} https://home.cnblogs.com/u/junwured/
302
4、保存站点cookie
[root@junwu_server ~]# curl -c /tmp/baidu_cookie.txt www.baidu.com
<!DOCTYPE html>
<!--STATUS OK--><html> <head><meta http-equiv=content-type content=text/html;charset=utf-8><meta http-equiv=X-UA-Compatible content=IE=Edge><meta content=always
5、模拟客户端
#伪装user-agent

#原本客户端地址

Mozilla/5.0 (Linux; Android 6.0; Nexus 5 Build/MRA58N) AppleWebKit/537.36 (KHTML, like Gecko) Chrome/108.0.0.0 Mobile Safari/537.36 Edg/108.0.1462.54

#指定客户端地址

Mozilla/5.0 (iPhone; CPU iPhone OS 13_2_3 like Mac OS X) AppleWebKit/605.1.15 (KHTML, like Gecko) Version/13.0.3 Mobile/15E148 Safari/604.1 Edg/108.0.0.0


[root@junwu_server ~]# curl -A "Mozilla/5.0 (Linux; Android 6.0; Nexus 5 Build/MRA58N) AppleWebKit/537.36 (KHTML, like Gecko) Chrome/108.0.0.0 Mobile Safari/537.36 Edg/108.0.1462.54" https://home.cnblogs.com/u/junwured/

[root@junwu_server ~]# curl -A "Mozilla/5.0 (iPhone; CPU iPhone OS 13_2_3 like Mac OS X) AppleWebKit/605.1.15 (KHTML, like Gecko) Version/13.0.3 Mobile/15E148 Safari/604.1 Edg/108.0.0.0" https://home.cnblogs.com/u/junwured/
6、下载资源
-O⼤写字⺟O参数,直接保存资源到本地,⽤源⽂件名
[root@junwu_server ~]# curl -O https://img2022.cnblogs.com/blog/3042329/202211/3042329-20221123012443231-1456558112.png

7、断点续传,注意使用参数是-C,要使用的话要用自动续传-C - ,后面要加横杠
[root@junwu_server ~]# curl -O -C- https://img2022.cnblogs.com/blog/3042329/202211/3042329-20221123012443231-1456558112.png
** Resuming transfer from byte position 75529
% Total % Received % Xferd Average Speed Time Time Time Current
Dload Upload Total Spent Left Speed
100 194 100 194 0 0 953 0 --:--:-- --:--:-- --:--:-- 955
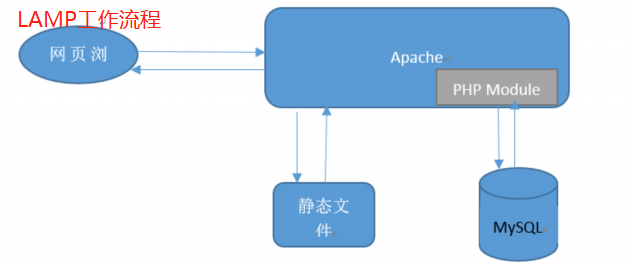
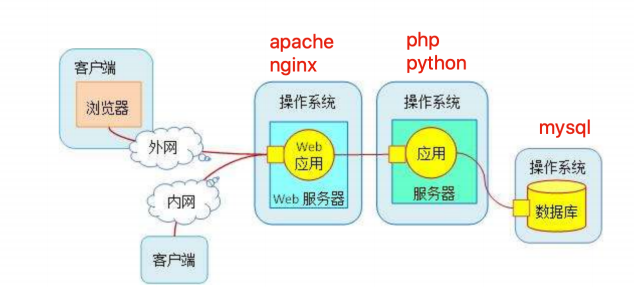
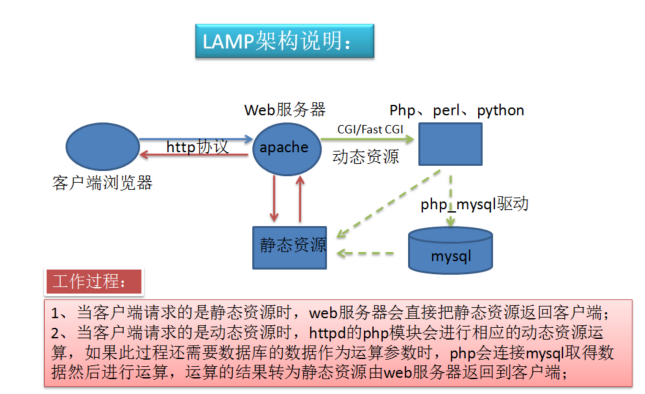
【LAMP架构】
LAMP指的是Linux操作系统,Apache服务器,MySQL(或者MariaDB数据库),PHP或者Python编程语言,是目前国际上主流的Web框架,具有高可用、跨平台、高性能、低价格的优势,并且这些程序大多是开源免费的,因此成为各企业搭建网站的首选。

【Linux操作系统】
【Apache服务器】
【搭建LAMP】
[root@junwu_server ~]# iptables -F
[root@junwu_server ~]# systemctl stop firewalld
[root@junwu_server ~]# getenforce
Disabled
[root@junwu_server ~]# systemctl restart httpd
3、部署MySQL(MariaDB)
[root@junwu_server ~]# yum install mariadb-server mariadb
[root@junwu_server ~]# systemctl start mariadb
[root@junwu_server ~]# netstat -tunlp|grep mysql
tcp 0 0 0.0.0.0:3306 0.0.0.0:* LISTEN 1567/mysqld
[root@junwu_server ~]# ls -l /var/lib/mysql/
total 37852
-rw-rw---- 1 mysql mysql 16384 Dec 20 09:18 aria_log.00000001
-rw-rw---- 1 mysql mysql 52 Dec 20 09:18 aria_log_control
-rw-rw---- 1 mysql mysql 18874368 Dec 20 09:18 ibdata1
-rw-rw---- 1 mysql mysql 5242880 Dec 20 09:18 ib_logfile0
-rw-rw---- 1 mysql mysql 5242880 Dec 20 09:18 ib_logfile1
drwx------ 2 mysql mysql 4096 Dec 20 09:18 mysql
srwxrwxrwx 1 mysql mysql 0 Dec 20 09:18 mysql.sock
drwx------ 2 mysql mysql 4096 Dec 20 09:18 performance_schema
drwx------ 2 mysql mysql 6 Dec 20 09:18 test
#登录mariadb数据库
[root@junwu_server ~]# mysql -uroot -p
Enter password:
Welcome to the MariaDB monitor. Commands end with ; or \g.
Your MariaDB connection id is 2
Server version: 5.5.68-MariaDB MariaDB Server

Copyright (c) 2000, 2018, Oracle, MariaDB Corporation Ab and others.

Type 'help;' or '\h' for help. Type '\c' to clear the current input statement.

MariaDB [(none)]> exit
#设置mariadb数据库用户root的登录密码
[root@junwu_server ~]# mysqladmin -uroot password '123456'

[root@junwu_server ~]# mysql -uroot -p123456
#查看数据库
MariaDB [(none)]> show databases;
+--------------------+
| Database |
+--------------------+
| information_schema |
| mysql |
| performance_schema |
| test |
+--------------------+
4 rows in set (0.00 sec)

MariaDB [(none)]> use mysql;
Reading table information for completion of table and column names
You can turn off this feature to get a quicker startup with -A

Database changed

MariaDB [mysql]> select user,password,host from user;
+------+-------------------------------------------+---------------+
| user | password | host |
+------+-------------------------------------------+---------------+
| root | *6BB4837EB74329105EE4568DDA7DC67ED2CA2AD9 | localhost |
| root | | junwu\_server |
| root | | 127.0.0.1 |
| root | | ::1 |
| | | localhost |
| | | junwu\_server |
+------+-------------------------------------------+---------------+
6 rows in set (0.00 sec)
4、部署PHP
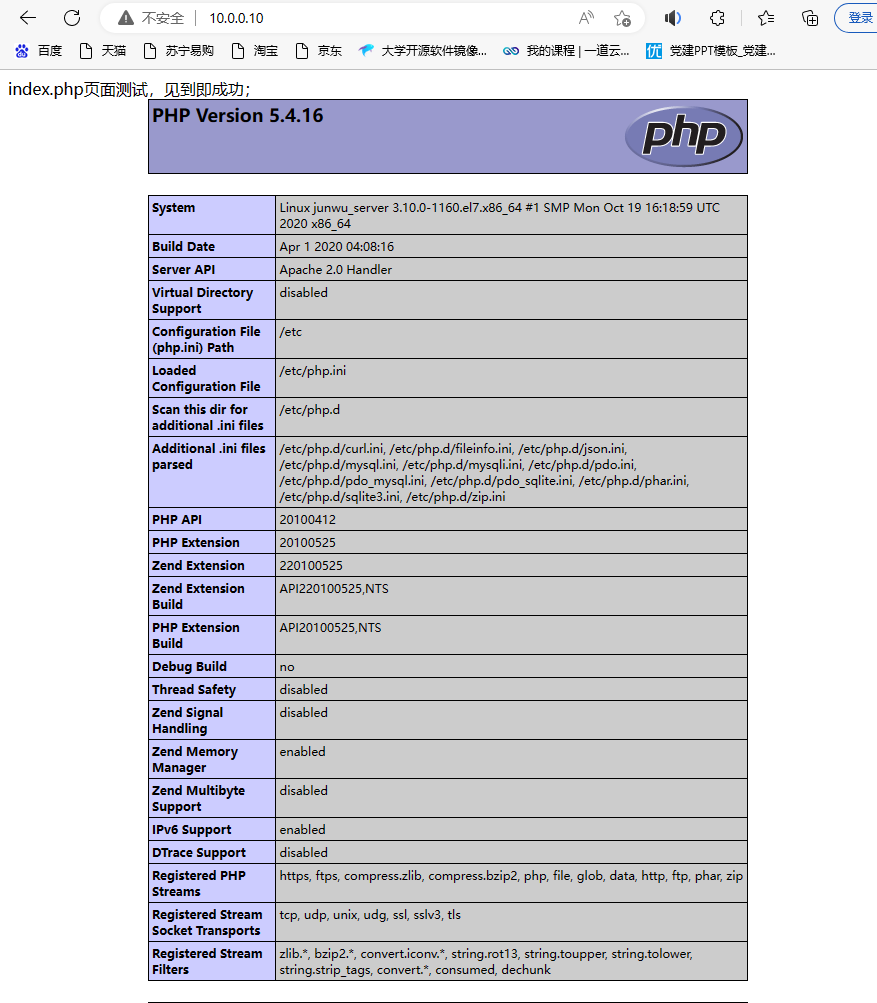
#安装php的依赖环境

[root@junwu_server ~]#  yum install -y zlib-devel libxml2-devel libjpeg-devel libjpeg-devel libpng libpng-devel freetype freetype-devel gmp gmp-devel libmcrypt libmcrypt-devel readline readline-devel libxslt libxslt-devel

#安装php以及php连接mysql的驱动

[root@junwu_server ~]# yum install php php-fpm php-mysql -y

#修改apache配置文件,用来支持php

[root@junwu_server ~]# cat /etc/httpd/conf/httpd.conf

DocumentRoot "/www"
TypesConfig /etc/mime.types
AddType application/x-httpd-php .php
AddType application/x-httpd-php-source .phps
DirectoryIndex index.php index.html

#修改php首页文件内容

[root@junwu_server ~]# cat /www/index.php
<meta charset=utf8>
index.php页面测试,见到即成功;
<?php
phpinfo();

?>

#启动httpd、php进程

[root@junwu_server ~]# systemctl restart httpd

[root@junwu_server ~]# systemctl restart php-fpm

#说明apache已成功支持php扩展了
5、测试php连接MySQL
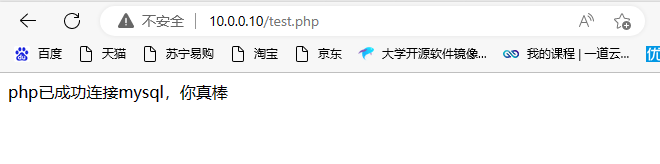
#添加php脚本

[root@junwu_server ~]# cat /www/test.php
<?php
$conn = mysql_connect('localhost','root','123456');
if ($conn)
echo "php已成功连接mysql,你真棒";
else
echo "你咋回事,这都搞不定,仔细检查下吧";
mysql_close();
?>
#使用浏览器访问php脚本,测试是否能够连接msyql数据库
【基于LAMP搭建论坛】
1、下载Discuz安装包

[root@junwu_server ~]# wget https://dznet.dismall.com/down/Discuz_X3.4_SC_UTF8_20221220.zip

2、安装unzip解压缩命令进行解压

[root@junwu_server ~]# mkdir Discuz

[root@junwu_server ~]# mv Discuz_X3.4_SC_UTF8_20221220.zip Discuz

[root@junwu_server Discuz]# unzip Discuz_X3.4_SC_UTF8_20221220.zip

3、把解压出的upload文件拷贝到apache的根目录下

[root@junwu_server Discuz]# cp -r upload/* /www/
cp: overwrite ‘/www/index.php’? y

4、给予权限

[root@junwu_server www]# chmod -R 777 /www/*
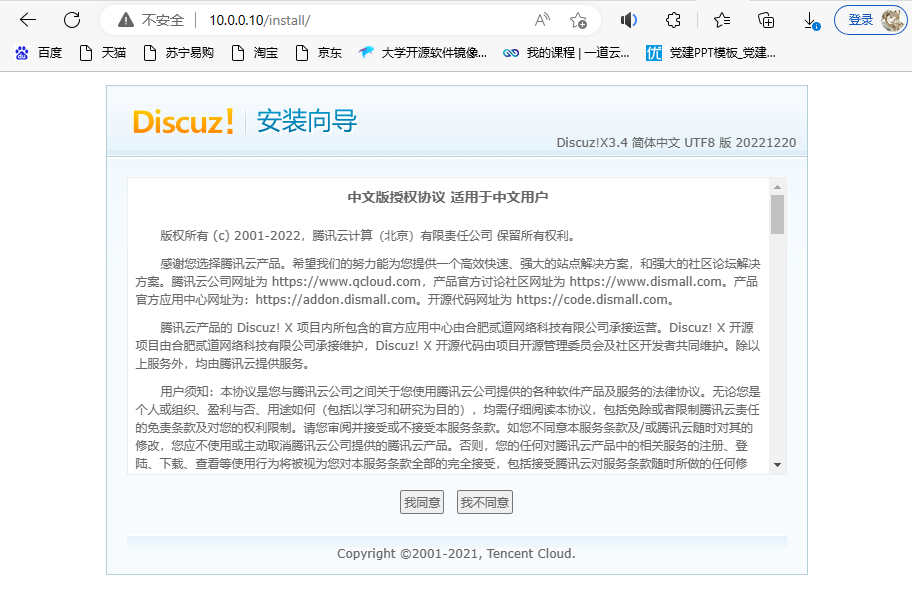
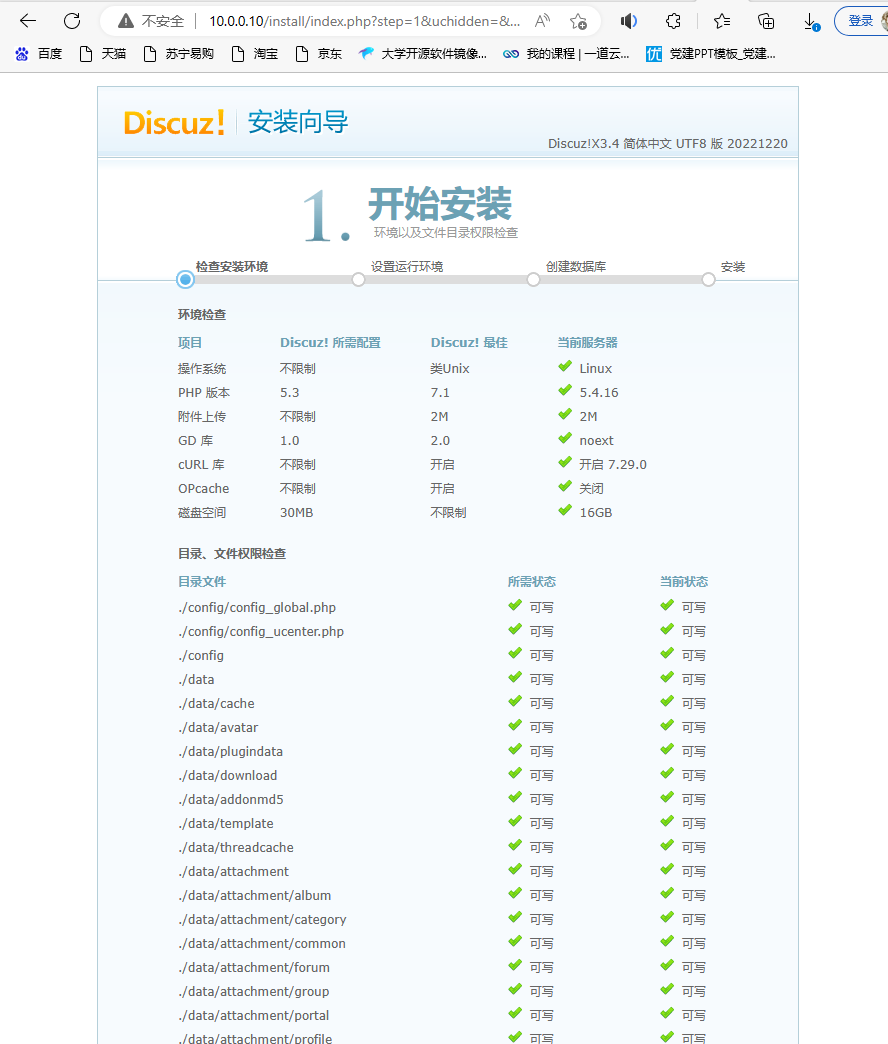
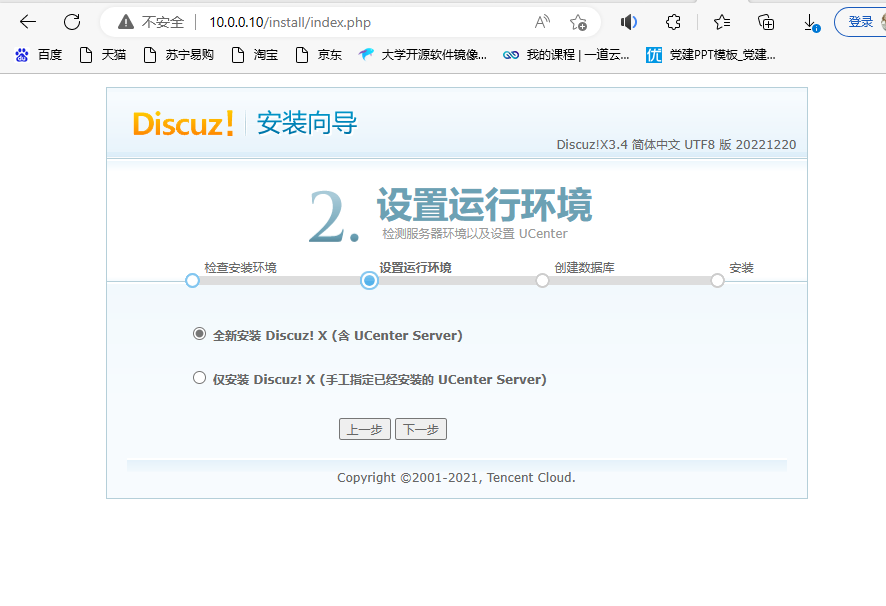
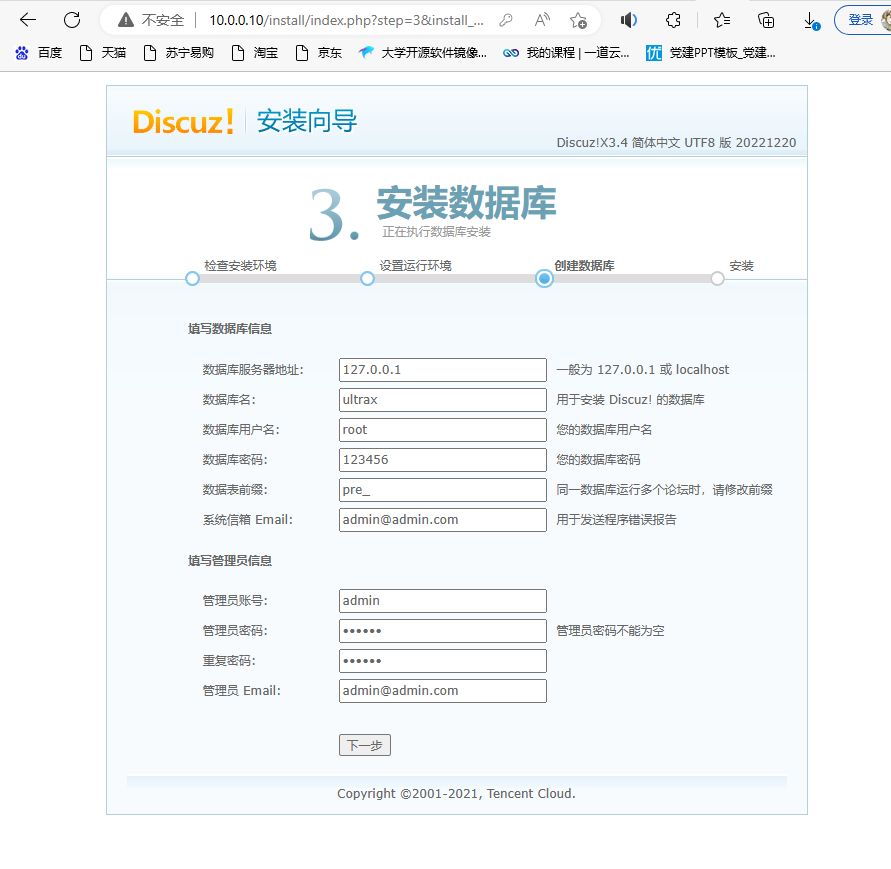
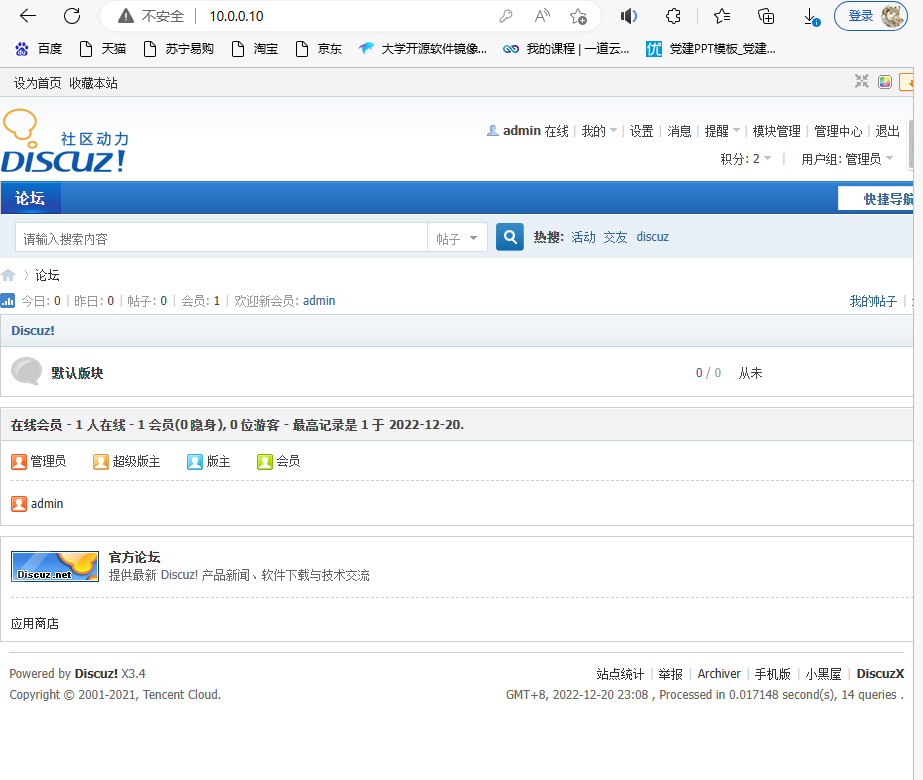
使用LAMP架构搭建的Discuz论坛就搭建成功了!

 浙公网安备 33010602011771号