[Map 3D开发实战系列] Map Resource Explorer 之五--界面设计
目录
[Map 3D开发实战系列] Map Resource Explorer 背景介绍--Kick off
[Map 3D开发实战系列] Map Resource Explorer 之二-- 运行和调试
[Map 3D开发实战系列] Map Resource Explorer 之三-- 添加AutoCAD风格的Palette界面
[Map 3D开发实战系列] Map Resource Explorer 之四-- Map3D开发中的WPF
好了,前面说了那么多,终归是准备工作,现在开始做实际工作,来切实创建一个基于WPF的界面。我们需要创建一个AutoCAD风格的Palett,放置一个TreeView控件用来显示我们的所有资源。然后需要一个ToolBar,加一个刷新按钮。
在Map 3D中支持的资源类型为FeatureSource,LayerDefiniation和SymbolDefinition。同一个文档中可能会有多个FeatureSource,多个图层LayerDefiniation和SymbolDefinition,所有我们可以考虑按照资源类型类组织资源在TreeView中的显示。自然还需要一个Toolbar来放置常用操作按钮,比如刷新显示。
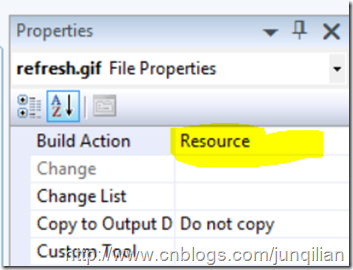
下面来实现上面的界面设计,我们需要添加一个palette并加入一个WPF的用户控件。为了更好的组织项目,我把界面相关的类放置在UI目录里。首先创建一个WPF User Control,拖一个WPF TreeView控件和Toolbar和Context Menu进去。还需要添加一些图片来作为Toolbar按钮上用的图片,并把这些图片编译为资源:
下面是XAML代码:
<UserControl x:Class="MapResourceExplorer.UI.ExplorerForm"
    xmlns="http://schemas.microsoft.com/winfx/2006/xaml/presentation"
    xmlns:x="http://schemas.microsoft.com/winfx/2006/xaml"
    Height="300" Width="300">
    <Grid>
        <TreeView Margin="12,44,12,20" Name="treeView1" PreviewMouseRightButtonDown="treeView1_PreviewMouseRightButtonDown">
            <TreeView.ItemContainerStyle>
                <Style TargetType="{x:Type TreeViewItem}">
                    <EventSetter Event="TreeViewItem.PreviewMouseRightButtonDown" Handler="TreeViewItem_PreviewMouseRightButtonDown"/>
                </Style>
            </TreeView.ItemContainerStyle>
            <TreeView.CommandBindings>


            </TreeView.CommandBindings>
            <TreeView.ContextMenu>
                <ContextMenu Name="ResOpMenu" ContextMenuOpening="ContextMenu_Opening">
                    <MenuItem Header="Show Resource Content" Click="ShowResourceContent_Clicked"/>
                    <MenuItem Header="..."/>
                </ContextMenu>
            </TreeView.ContextMenu>

            <TreeViewItem Header="FeatureSource" >
                <TreeViewItem Header="Library://1....." ToolTip="" ></TreeViewItem>
            </TreeViewItem>
            <TreeViewItem Header="Layer Definition">
                <TreeViewItem Header="Library://1....."></TreeViewItem>
            </TreeViewItem>

        </TreeView>

        <ToolBar Height="26" Margin="12,12,12,0" Name="toolBar1" VerticalAlignment="Top" >
            <Button Name="Refresh"  Click="RefreshButton_Clicked">
                <Image Source="Images\refresh.gif" Height="16" Width="16"></Image>
            </Button>
            <Button Name="EditXml">
                <Image Source="Images\edit-xml.png" Height="16" Width="16"></Image>
            </Button>
            <Button Name="About">
                <Image Source="Images\about.png" Height="16" Width="16"></Image>
            </Button>
            <Button Name="Help">
                <Image Source="Images\help.png" Height="16" Width="16"></Image>
            </Button>
        </ToolBar>

    </Grid>
</UserControl>
为了把WPF用户控件加入到Palette中,可以用前面文章中说的AddVisual方法。这里我用了Add方法,不过这个Add方法只接受System.Windows.Forms.Control类型的控件,所以需要弄一个windows用户控件做为外套。新建一个Windows 用户控件,界面上不用放什么控件,其中用到了System.Windows.Forms.Integration.ElementHost类,需要添加引用PresentationFramework.dll.后台代码如下:
using System;
using System.Collections.Generic;
using System.ComponentModel;
using System.Drawing;
using System.Data;
using System.Linq;
using System.Text;
using System.Windows.Forms;
using System.Windows.Forms.Integration;

namespace MapResourceExplorer.UI
{
    public partial class Panel : UserControl
    {
        private ExplorerForm _form;

        public Panel()
        {
            InitializeComponent();

            // Create the ElementHost control for hosting the
            // WPF UserControl.
            ElementHost host = new ElementHost();
            host.Dock = DockStyle.Fill;

            // Create the WPF UserControl.
            _form = new ExplorerForm();

            // Assign the WPF UserControl to the ElementHost control's
            // Child property.
            host.Child = _form;

            // Add the ElementHost control to the form's
            // collection of child controls.
            this.Controls.Add(host);
        }

        internal ExplorerForm Child
        {
            get
            {
                return _form;
            }
        }
    }
}
然后来创建autoCAD风格的Palette,这里创建了一个ResourceExplorerPalette类,并用Singleton模式来保证只有一个实例。对应Palette的风格样式可以由枚举类型PaletteSetStyles指定:
            //Set the properties of paletteSet
            _paletteSet.Style = PaletteSetStyles.NameEditable |
                PaletteSetStyles.ShowPropertiesMenu |
                PaletteSetStyles.ShowAutoHideButton |
                PaletteSetStyles.UsePaletteNameAsTitleForSingle |
                PaletteSetStyles.Snappable |
                PaletteSetStyles.ShowCloseButton;
在这个类中定义了Show方法,来显示这个自定义的palette。完整的代码如下:
using System;
using System.Collections.Generic;
using System.Linq;
using System.Text;

using Autodesk.AutoCAD.Windows;

namespace MapResourceExplorer.UI
{
    internal class ResourceExplorerPalette
    {
        private static string PaletteName = @"Resource Explorer";

        private PaletteSet _paletteSet;
        private Panel _panel;

        /// <summary>
        /// Using Singleton pattern to make sure there'll be only one instance of this class.
        /// </summary>

        private static ResourceExplorerPalette _instance;
        public static ResourceExplorerPalette Instance
        {
            get
            {
                if (_instance == null)
                {
                    _instance = new ResourceExplorerPalette();

                } return _instance;
            }
        }

        private ResourceExplorerPalette()
        {
            _paletteSet = new PaletteSet(PaletteName);

            //Set the properties of paletteSet
            _paletteSet.Style = PaletteSetStyles.NameEditable |
                PaletteSetStyles.ShowPropertiesMenu |
                PaletteSetStyles.ShowAutoHideButton |
                PaletteSetStyles.UsePaletteNameAsTitleForSingle |
                PaletteSetStyles.Snappable |
                PaletteSetStyles.ShowCloseButton;

            _panel = new Panel();
            _paletteSet.Add(PaletteName, _panel);
        }


        public PaletteSet PaletteSet
        {
            get
            {
                return _paletteSet;
            }

        }


        public ExplorerForm ExplorerForm
        {
            get
            {
                return _panel.Child;
            }

        }

        /// <summary>
        /// Show or hide the UI.
        /// </summary>
        public void Show()
        {
            _paletteSet.Visible = true;
            _paletteSet.KeepFocus = true;

            ExplorerForm.ForceRefresh();

        }


    }
}
好了,基本的架子搭起来了,可以来定义一个命令来显示这个palette界面了,在前文中提到的Commands类里添加一个方法来定义一个自定义的AutoCAD命令,这样通过netload命令加载这个程序集后,就可以通过输入自定义命令来显示这个自定义的palette了:
        [CommandMethod("ShowResourceExplorer")]
        public void ResourceExplorerCommand()
        {
            ResourceExplorerPalette.Instance.Show();
        }
今天先写到这儿,下来再做具体的关于资源操作的实现。
完整代码在google code,你可以在线浏览或者通过SVN下载自己测试一下。http://code.google.com/p/map-resource-explorer/
Cheers,
峻祁连


