Listener(监听器)
Listener 介绍
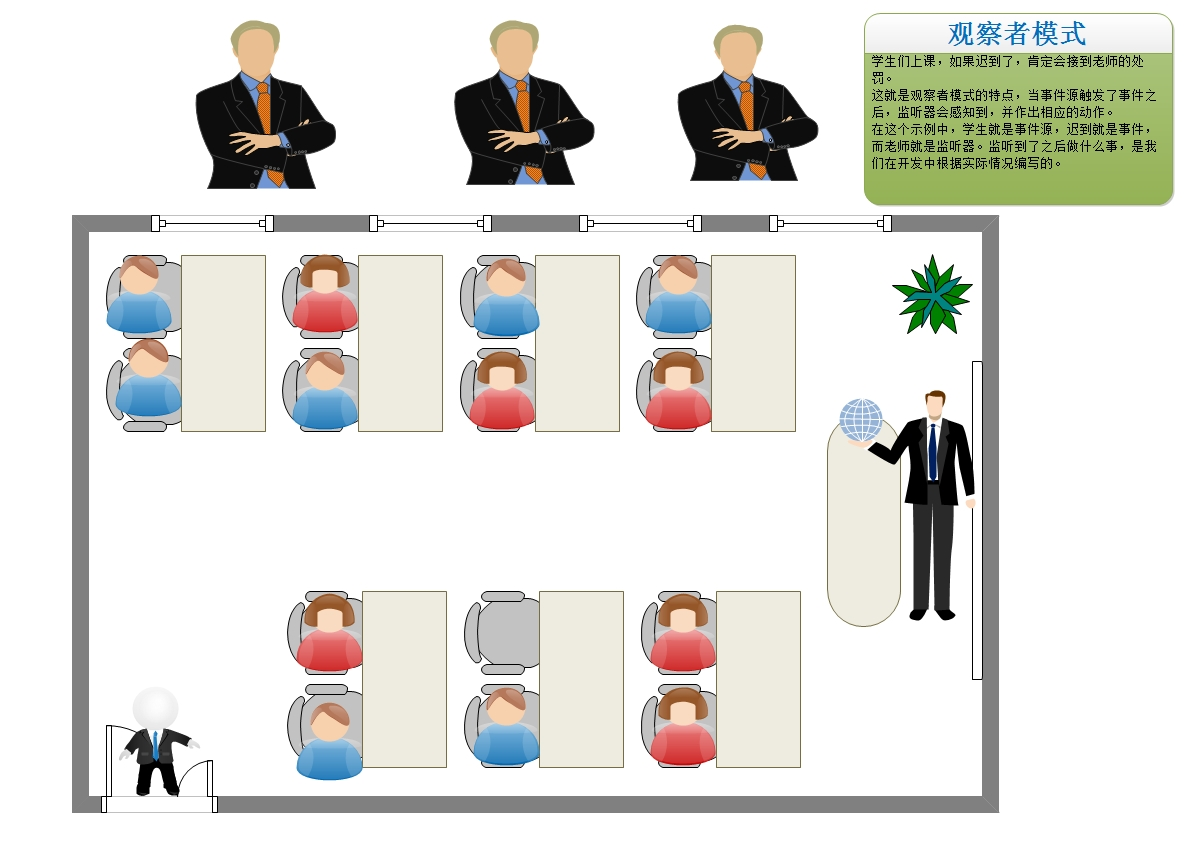
观察者设计模式
在介绍 Listener(监听器)之前,需要先了解观察者设计模式,因为所有的监听器都是观察者设计模式的体现。
那么什么是观察者设计模式呢?
它是事件驱动的一种体现形式。就好比在做什么事情的时候被人盯着,当做了某件事时,就会触发事件。
观察者模式通常由以下三部分组成:
-
事件源:触发事件的对象。 -
事件:触发的动作,里面封装了事件源。 -
监听器:当事件源触发事件时,要做的事情。一般是一个接口,由使用者来实现。(此处还涉及一种设计模式的思想:策略模式)
下图描述了观察者设计模式组成:
Listener 介绍
在程序当中我们可以对以下情况进行监听:对象的创建销毁、域对象中属性的变化、会话相关内容。
Servlet 规范中共计 8 个监听器,监听器都是以接口形式提供的,具体功能需要我们自己来完成。
Listener 配置方式
Listender 有两种配置方法:
-
注解方式
@WebListener -
web.xml 配置方式
    <!-- 配置监听器 -->
    <listener>
        <listener-class>com.listener.ServletContextListenerDemo</listener-class>
    </listener>

    <listener>
        <listener-class>com.listener.ServletContextAttributeListenerDemo</listener-class>
    </listener>
Servlet 规范中的 8 个监听器
-
监听对象的
- ServletContextListener
- HttpSessionListener
- ServletRequestListener
-
监听域中属性变化的
- ServletContextAttributeListener
- HttpSessionAttributeListener
- ServletRequestAttributeListener
-
会话相关的感知型
- HttpSessionBindingListener
- HttpSessionActivationListener
监听对象的监听器
1)ServletContextListener
用于监听 ServletContext 对象的创建和销毁。
核心方法:
| 返回值 | 方法名 | 作用 |
|---|---|---|
| void | contextlnitialized(ServletContextEvent sce) | 对象创建时执行该方法 |
| void | contextDestroyed(ServletContextEvent sce) | 对象销毁时执行该方法 |
ServletContextEvent 参数:代表事件对象
- 事件对象中封装了事件源,也就是 ServletContext
- 直正的事件指的是创建或销毁 ServletContext 对象的操作
2)HttpSessionListener
用于监听 HttpSession 对象的创建和销毁核心方法。
核心方法:
| 返回值 | 方法名 | 作用 |
|---|---|---|
| void | sessionCreated(HttpSessionEventse) | 对象创建时执行该方法 |
| void | sessionDestroyed(HttpSessionEvent se | 对象销毁时执行该方法 |
HttpSessionEvent 参数:代表事件对象
- 事件对象中封装了事件源,也就是 HttpSession
- 真正的事件指的是创建或销毁 HttpSession 对象的操作
3)ServletRequestListener
用于监听 ServletRequest 对象的创建和销毁核心方法。
核心方法:
| 返回值 | 方法名 | 作用 |
|---|---|---|
| void | requestinitialized(ServletRequestEvent sre) | 对象创建时执行该方法 |
| void | requestDestroyed(ServletRequestEvent sre) | 对象销毁时执行该方法 |
ServletRequest5vent 参数:代表事件对象
- 事件对象中封装了事件源,也就是 ServletRequest
- 真正的事件指的是创建或销毁 ServletRequest 对象的操作
监听域中属性变化的监听器
4)ServletContextAttributeListener
用于监听 ServletContext 应用域中属性的变化核心方法。
核心方法:
| 返回值 | 方法名 | 作用 |
|---|---|---|
| void | attributeAdded(ServletContextAttributeEvent scae) | 域中添加属性时执行该方法 |
| void | attributeRemoved(ServletContextAttributeEvent scae) | 域中移除属性时执行该方法 |
| void | attributeReplaced(ServletContextAttributeEvent scae) | 域中替换属性时执行该方法 |
ServletContextAttributeEvent 参数:代表事件对象
- 事件对象中封装了事件源,也就是 ServletContext
- 直正的事件指的是添加、移除、替换应用域中属性的操作
5)HttpSessionAttributeListener
用于监听 HttpSession 会话域中属性的变化。
核心方法:
| 返回值 | 方法名 | 作用 |
|---|---|---|
| void | attributeAdded(HttpSessionBindingEvent se) | 域中添加属性时执行该方法 |
| void | attributeRemoved(HttpSessionBindingEvent se) | 域中移除属性时执行该方法 |
| void | attributeReplaced(HttpSessionBindingEvent se) | 域中替换属性时执行该方法 |
HttpSessionBindingEvent 参数:代表事件对象
- 事件对象中封装了事件源,也就是 HttpSession
- 真正的事件指的是添加、移除、替换会话域中属性的操作
6)ServletRequestAttributeListener
用于监听 ServletRequest 请求域中属性的变化。
核心方法:
| 返回值 | 方法名 | 作用 |
|---|---|---|
| void | attributeAdded(ServletRequestAttributeEvent srae) | 域中添加属性时执行该方法 |
| void | attributeRemoved(ServletRequestAttributeEvent srae) | 域中移除属性时执行该方法 |
| void | attributeReplaced(ServletRequestAttributeEvent srae) | 域中替换属性时执行该方法 |
ServletRequestAttributeEvent 参数:代表事件对象
- 事件对象中封装了事件源,也就是 ServletRequest
- 真正的事件指的是添加、移除、替换请求域中属性的操作
监听会话相关的感知型监听器
注意:监听会话相关的感知型监听器,只要定义了即可使用,无需进行配置。
7)HttpSessionBindingListener
用于感知对象和会话域绑定的监听器。
核心方法:
| 返回值 | 方法名 | 作用 |
|---|---|---|
| void | valueBound(HttpSessionBindingEvent event) | 数据添加到会话域中(绑定)时执行该方法 |
| void | valueUnbound(HttpSessionBindingEvent event) | 数据从会话域中移除(解绑)时执行该方法 |
HttpSessionBindingEvent 参数:代表事件对象
- 事件对象中封装了事件源,也就是 HttpSession
- 直正的事件指的是添加、移除会话域中数据的操作
8)HttpSessionActivationListener
用于感知会话域中对象钝化(序列化)和活化(反序列化)的监听器。
核心方法:
| 返回值 | 方法名 | 作用 |
|---|---|---|
| void | sessionWillPassivate(HttpSessionEvent se) | 会话域中数据钝化时执行该方法 |
| void | sessionDidActivate(HttpSessionEvent se) | 会话域中数据活化时执行该方法 |
HttpSessionEvent 参数:代表事件对象
- 事件对象中封装了事件源,也就是 HttpSession
- 直正的事件指的是会话域中数据钝化、活化的操作
Listener 使用示例
ServletContextListener 使用示例
1)编写监听器:
/**
* 用于监听ServletContext对象创建和销毁的监听器
*/
@WebListener
public class ServletContextListenerDemo implements ServletContextListener {
/**
* 对象创建时,执行此方法
* @param sce
*/
@Override
public void contextInitialized(ServletContextEvent sce) {
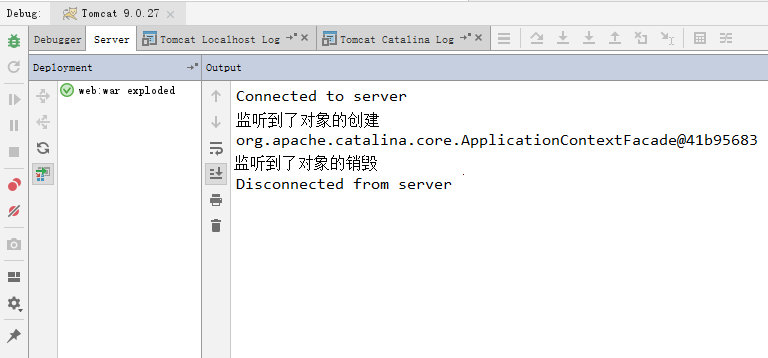
System.out.println("监听到了对象的创建");
// 获取事件源对象
ServletContext servletContext = sce.getServletContext();
System.out.println(servletContext);
}
/**
* 对象销毁时,执行此方法
* @param sce
*/
@Override
public void contextDestroyed(ServletContextEvent sce) {
System.out.println("监听到了对象的销毁");
}
}
2)启动并停止 web 服务:
ServletContextAttributeListener 使用示例
1)编写监听器:
/**
* 监听域中属性发生变化的监听器
*/
public class ServletContextAttributeListenerDemo implements ServletContextAttributeListener {
/**
* 域中添加了数据
* @param scae
*/
@Override
public void attributeAdded(ServletContextAttributeEvent scae) {
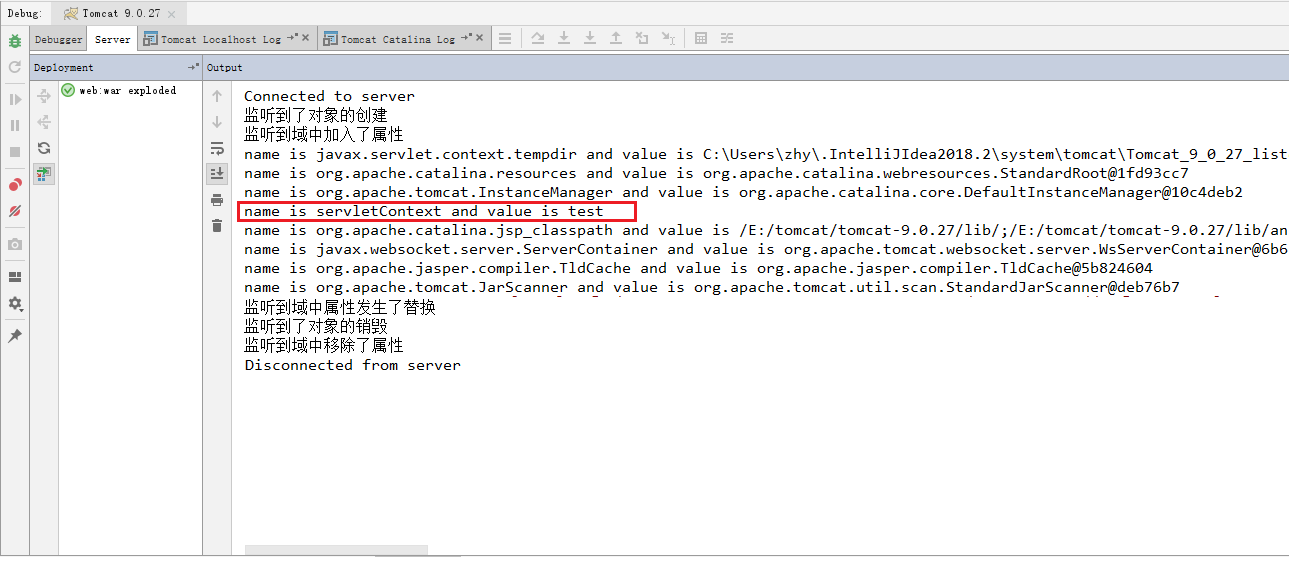
System.out.println("监听到域中加入了属性");
/**
* 由于除了我们往域中添加了数据外,应用在加载时还会自动往域中添加一些属性。
* 我们可以获取域中所有名称的枚举,从而看到域中都有哪些属性
*/
//1.获取事件源对象ServletContext
ServletContext servletContext = scae.getServletContext();
//2.获取域中所有名称的枚举
Enumeration<String> names = servletContext.getAttributeNames();
//3.遍历名称的枚举
while(names.hasMoreElements()){
//4.获取每个名称
String name = names.nextElement();
//5.获取值
Object value = servletContext.getAttribute(name);
//6.输出名称和值
System.out.println("name is "+name+" and value is "+value);
}
}
/**
* 域中移除了数据
* @param scae
*/
@Override
public void attributeRemoved(ServletContextAttributeEvent scae) {
System.out.println("监听到域中移除了属性");
}
/**
* 域中属性发生了替换
* @param scae
*/
@Override
public void attributeReplaced(ServletContextAttributeEvent scae) {
System.out.println("监听到域中属性发生了替换");
}
}
同时,我们还需要借助上个示例的 ServletContextListenerDemo 监听器,往域中存入数据、替换域中的数据以及从域中移除数据,代码如下:
/**
 * 用于监听ServletContext对象创建和销毁的监听器
 */
public class ServletContextListenerDemo implements ServletContextListener {

    /**
     * 对象创建时,执行此方法
     * @param sce
     */
    @Override
    public void contextInitialized(ServletContextEvent sce) {
        System.out.println("监听到了对象的创建");
        //1.获取事件源对象
        ServletContext servletContext = sce.getServletContext();
        //2.往域中加入属性
        servletContext.setAttribute("servletContext","test");
    }

    /**
     * 对象销毁时,执行此方法
     * @param sce
     */
    @Override
    public void contextDestroyed(ServletContextEvent sce) {
        //1.取出事件源对象
        ServletContext servletContext = sce.getServletContext();
        //2.往域中加入属性,但是名称仍采用servletContext,此时就是替换
        servletContext.setAttribute("servletContext","demo");
        System.out.println("监听到了对象的销毁");
        //3.移除属性
        servletContext.removeAttribute("servletContext");
    }
}
2)在 web.xml 中配置监听器:
<!--配置监听器-->
<listener>
    <listener-class>com.listener.ServletContextListenerDemo</listener-class>
</listener>

<!--配置监听器-->
<listener>
    <listener-class>com.listener.ServletContextAttributeListenerDemo</listener-class>
</listener>
3)启动 web 服务:
综合案例
优化需求:
- 解决乱码:使用过滤器统一实现请求和响应乱码问题的解决。
- 检查登录:使用过滤器统一实现身份认证。
- 优化 JSP 页面:使用 EL 表达式和 JSTL 。
1)乱码问题过滤器
import javax.servlet.*;
import javax.servlet.annotation.WebFilter;
import javax.servlet.http.HttpServletRequest;
import javax.servlet.http.HttpServletResponse;
import java.io.IOException;

// 解决全局乱码问题
@WebFilter("/*")
public class EncodingFilter implements Filter {

    @Override
    public void doFilter(ServletRequest request, ServletResponse response, FilterChain chain) throws IOException, ServletException {
        // 将请求和响应对象转换为和HTTP协议相关
        HttpServletRequest httpServletRequest = (HttpServletRequest) request;
        HttpServletResponse httpServletResponse = (HttpServletResponse) response;

        // 设置编码格式
        httpServletRequest.setCharacterEncoding("UTF-8");
        httpServletResponse.setContentType("text/html;charset=UTF-8");

        // 放行
        chain.doFilter(httpServletRequest, httpServletResponse);

    }
}
2)检查登录过滤器
import javax.servlet.*;
import javax.servlet.annotation.WebFilter;
import javax.servlet.http.HttpServletRequest;
import javax.servlet.http.HttpServletResponse;
import java.io.IOException;

// 检查登录态
@WebFilter(value={"/add.jsp", "/queryServlet"})
public class LoginFilter implements Filter {

    @Override
    public void doFilter(ServletRequest request, ServletResponse response, FilterChain chain) throws IOException, ServletException {
        // 将请求和响应对象转换为和HTTP协议相关
        HttpServletRequest httpServletRequest = (HttpServletRequest) request;
        HttpServletResponse httpServletResponse = (HttpServletResponse) response;

        // 判断会话域对象中的身份数据
        Object username = httpServletRequest.getSession().getAttribute("username");
        if ("".equals(username) || username == null) {
            // 重定向到登录页
            httpServletResponse.sendRedirect(httpServletRequest.getContextPath()+"/login.jsp");
            return;
        }

        // 放行
        chain.doFilter(httpServletRequest, httpServletResponse);
    }
}
3)优化 JSP:使用 EL 表达式和 JSTL
- 修改 add.jsp 的虚拟访问路径:
<%@ page contentType="text/html;charset=UTF-8" language="java" %>
<html>
<head>
    <title>添加</title>
</head>
<body>
    <form action="${pageContext.request.contextPath}/addServlet" method="post" autocomplete="off">
        学生姓名:<input type="text" name="username"><br/>
        学生年龄:<input type="number" name="age"><br/>
        学生成绩:<input type="number" name="score"><br/>
        <button type="submit">保存</button>
    </form>
</body>
</html>
- 修改 index.jsp:
<%@ page contentType="text/html;charset=UTF-8" language="java" %>
<%@taglib uri="http://java.sun.com/jsp/jstl/core" prefix="c" %>

<html>
<head>
    <title>学生管理系统首页</title>
</head>
<body>
    <%--
        获取会话域的数据
        如果获取到了,则显示添加和查询功能
        如果获取不到,则显示登录功能
    --%>
    <c:if test="${sessionScope.username eq null}">
        <a href="${pageContext.request.contextPath}/login.jsp">登录<a/>
    </c:if>

    <c:if test="${sessionScope.username ne null}">
        <a href="${pageContext.request.contextPath}/add.jsp">添加<a/>
        <a href="${pageContext.request.contextPath}/queryServlet">查询<a/>
    </c:if>

</body>
</html>
- 修改 query.jsp :
<%@ page import="com.demo.bean.Student" %>
<%@ page import="java.util.ArrayList" %>
<%@ page contentType="text/html;charset=UTF-8" language="java" %>
<%@taglib uri="http://java.sun.com/jsp/jstl/core" prefix="c"%>

<html>
<head>
    <title>学生列表页面</title>
</head>
<body>
  <table width="600px" border="1px">
    <tr>
      <th>学生姓名</th>
      <th>学生年龄</th>
      <th>学生成绩</th>
    </tr>
      <c:forEach items="${students}" var="student">
          <tr align="center">
              <td>${student.username}</td>
              <td>${student.age}</td>
              <td>${student.score}</td>
          <tr/>
      </c:forEach>

  </table>
</body>
</html>
- 修改 login.jsp :
<%@ page contentType="text/html;charset=UTF-8" language="java" %>
<html>
<head>
    <title>登录页面</title>
</head>
<body>
    <form action="${pageContext.request.contextPath}/loginServlet" method="get" autocomplete="off">
        姓名:<input type="text" name="username"><br/>
        密码:<input type="password" name="password"><br/>
        <button type="submit">登录</button>
    </form>
</body>
</html>

 浙公网安备 33010602011771号