Pytest
1. pytest 简介
2. pytest 基础用法
- 2.1 pytest 执行用例的多种方式
- 2.2 pytest 测试报告
- 2.3 失败重跑
- 2.4 setup 和 teardown
- 2.5 控制测试用例的运行顺序
- 2.6 pytest.ini:通过配置文件配置要执行的测试用例
3. @pytest.fixture
4. @pytest.mark
1. pytest 简介
什么是 pytest?
pytest 是 python 的一种单元测试框架,与 python 自带的 unittest 测试框架类似,但是比 unittest 框架使用起来更简洁,效率更高。
根据 pytest 的官方网站介绍,它具有如下特点:
- 非常容易上手,入门简单,文档丰富,文档中有很多实例可以参考。
- 能够支持简单的单元测试和复杂的功能测试。
- 支持参数化。
- 执行测试过程中可以将某些测试跳过,或者对某些预期失败的 case 标记成失败。
- 支持重复执行失败的 case。
- 支持运行由 nose, unittest 编写的测试 case。
- pytest 具有很多第三方插件,并且可以自定义扩展,比较好用的如 pytest-selenium(集成 selenium)、pytest-html(完美 html 测试报告生成)、pytest-rerunfailures(失败 case 重复执行)、pytest-xdist(多 CPU 分发)等。
- 方便的和持续集成工具集成。
安装
pip install pytest 或 pip install -U pytest
pytest 的用例编写规则
- 测试文件以 test_ 开头或以 _test 结尾。注意:若使用命令“pytest py文件”来执行指定 py 文件,则不受此规则限制。
- 测试类以 Test 开头,并且不能带有 __init__ 方法,否则整个类都不会被当作测试类。
- 测试函数以 test_ 开头。
- 断言使用 python 的 assert 即可。
执行报错问题
若执行报错:TypeError: attrib() got an unexpected keyword argument 'convert'
解决方法:pip install attrs==19.1.0
2. pytest 基础用法
2.1 pytest 执行用例的多种方式
pytest 具备以下几种命令行执行方法:
- pytest # 执行当前目录下所有文件的所有测试用例
- pytest test_mod.py # 执行指定文件中的所有测试用例,-s 表示详细打印执行信息
- pytest somepath # 执行指定目录下的所有文件的所有测试用例
- pytest -k stringexpr # 执行符合正则表达式"string expression"的测试用例,测试文件、测试类名、测试方法中包含关键字,均可以被执行
- pytest test_mod.py::test_func # 执行指定层级的测试用例
- e.g "test_mod.py::test_t1" # 执行 test_mod.py 的 test_t1 测试函数
-
- e.g "test_mod.py::Test" # 执行 test_mod.py 的 Test 测试类
- e.g "test_mod.py::TestClass::test_method" # 执行 test_mod.py 中 Test_class 测试类中的 test_method 测试方法
执行参数:
# -q:简单打印,只打印测试用例的执行结果
 pytest -q start.py

# -s:详细打印
 pytest -s start.py

# -x:遇到错误时停止测试
pytest start.py -x

# —maxfail=num:当用例错误个数达到指定数量时,停止测试
pytest start.py --maxfail=1

# -k:匹配用例名称
# 执行测试用例名称包含http的所有用例
pytest -s -k http start.py
# 根据用例名称排除某些用例
pytest -s -k "not http" start.py
# 同时匹配不同的用例名称
pytest -s -k "method or weibo" start.py
2.2 pytest 测试报告
生成测试报告需要安装插件:
pip install pytest-html 或 pip install -U pytest-html
执行用例的命令:
pytest [py文件] --html=report.html
(report.html 为生成的文件名)
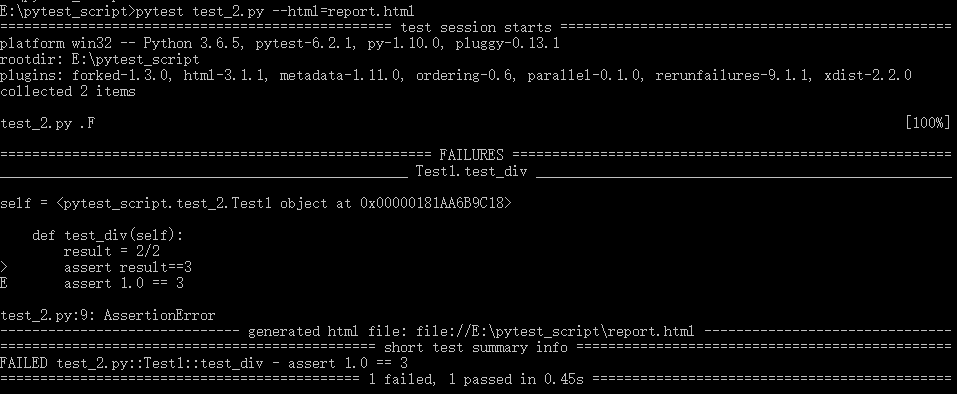
生成的报告如下:

2.3 失败重跑
失败重跑,需要安装插件:
pip install pytest-rerunfailures 或 pip install -U pytest-rerunfailures
运行方式一:pytest [py文件名] --reruns n
其中 n 表示重试的次数(只有失败的用例才会重跑)

运行方式二:在 pytest.ini 配置文件中的命令行参数中增加 --reruns n
addopts = -s --reruns 3
2.4 setup 和 teardown
- setup() 和 teardown():运行一次测试函数就会运行一次 setup 和 teardown 方法,类似于 unittest 的 setup 和 teardown 方法。
- setup_class() 和 teardown_class():一个测试类只运行一次。
- setup_module() 和 teardown_module():一个测试模块只运行一次。
 1 import pytest
 2
 3 def setup_module():
 4     print("setup_module():模块开始时执行")
 5
 6 def teardown_module():
 7     print("teardown_module:模块结束时执行")
 8
 9 def setup_function():
10     print("setup_function():每个函数之前执行")
11
12 def teardown_function():
13     print("teardown_function():每个函数之后执行")
14
15 def test_11():
16     print("test_11")
17
18 def test_12():
19     print("test_12")
20
21 class TestClass(object):
22
23     def setup_class(self):
24         print("setup_class(self):每个类之前执行一次")
25
26     def teardown_class(self):
27         print("teardown_class(self):每个类之后执行一次")
28
29     def setup(self):
30         print("setup(self):每个方法之前执行一次")
31
32     def teardown(self):
33         print("teardown(self):每个方法之后执行一次")
34
35     def test_01(self):
36         print("test_01")
37
38     def test_02(self):
39         print("test_02")
40
41
42 if __name__ == "__main__":
43     pytest.main(["-s", "demo.py"])
执行结果:
setup_module():在模块开始时执行
setup_function():每个函数之前执行
.test_11
teardown_function():每个函数之后执行
setup_function():每个函数之前执行
.test_12
teardown_function():每个函数之后执行
setup_class(self):每个类之前执行一次
setup(self):每个方法之前执行一次
.test_01
teardown(self):每个方法之后执行一次
setup(self):每个方法之前执行一次
.test_02
teardown(self):每个方法之后执行一次
teardown_class(self):每个类之后执行一次
teardown_module:在模块结束时执行
2.5 控制测试用例的运行顺序与依赖关系
- 用例、文件名的默认执行顺序是按照 ASCLL 码排序的(0~9, a~z, A-Z),文件内的用例按照从上往下执行。
- setup_module -> setup_claas -> setup_function -> testcase -> teardown_function -> teardown_claas -> teardown_module
控制用例执行顺序
可以通过第三方插件 pytest-ordering 实现自定义用例执行顺序:pip install pytest-ordering
使用方法:
- 方式一
- 第一个执行:@pytest.mark.first
- 第二个执行:@pytest.mark.second
- 倒数第二个执行:@pytest.mark.second_to_last
- 最后一个执行:@pytest.mark.last
- 方式二
- 第一个执行:@pytest.mark.run('first')
- 第二个执行:@pytest.mark.run('second')
- 倒数第二个执行:@pytest.mark.run('second_to_last')
- 最后一个执行:@pytest.mark.run('last')
- 方式三
- 第一个执行:@pytest.mark.run(order=1)
- 第二个执行:@pytest.mark.run(order=2)
- 倒数第二个执行:@pytest.mark.run(order=-2)
- 最后一个执行:@pytest.mark.run(order=-1)
注意:该方法也能为多个测试文件中的用例进行统一排序。
 1 import pytest
 2
 3 class Test_ST():
 4
 5     @pytest.mark.run(order=3)
 6     def test_001(self):
 7         print("001...")
 8         assert True
 9
10     @pytest.mark.run(order=2)
11     def test_002(self):
12         print("002...")
13         assert True
14
15     @pytest.mark.run(order=1)
16     def test_003(self):
17         print("003...")
18         assert True
执行结果:

2)控制用例之间的依赖关系
安装:pip install pytest-dependency,它是一个 pytest 第三方插件,主要解决用例之间的依赖关系。
dependency 可作用的范围说明
- session:作用于全局,可跨目录调用。
- package:作用于当前目录同级的依赖函数,跨目录无法找到依赖的函数。
- module:不传递scope,默认参数是'module',作用于当前文件,只会查找当前文件的符合条件的文件名,类里同名的方法不会被依赖。
- class:作用于所属的类,外部类不会被关联。
使用步骤
- 首先,需要为被依赖用例打上一个装饰器 @pytest.mark.dependency(),表示将该用例(函数、类)作为主条件,仅当该用例执行成功,关联它的用例才会执行,否则会跳过。
- 在进行依赖的用例上,也打上带参数的装饰器 @pytest.mark.dependency(),depends 接受的参数是被依赖的用例名。
示例
import pytest


@pytest.mark.dependency(name="test_1")
def test_1():
    pass

# test_2 依赖于 test_1
# 只有当 test_1 执行通过时,test_2 才会执行;否则 test_2 会被跳过
@pytest.mark.dependency(name="test_2", depends=["test_1"], scope='module')
def test_2():
    pass
2.6 pytest.ini:通过配置文件配置要执行的测试用例
1)pytest 的配置文件存放位置及命名:
通常放在测试目录下,名称为 pytest.ini,命令行运行时会使用配置文件中的配置。
2)配置 pytest 命令行运行参数:
[pytest]
addopts=-s ... # 以空格分隔,可添加个命令行参数;所以参数均为插件包的参数。
3)配置测试搜索的路径:
[pytest]
testpaths=./scripts # 表示当前目录下的 scripts 目录,srcipts 目录可自定义。
4)配置测试搜索的文件名:
[pytest]
python_files=test_*.py # 表示当前目录下的 scripts 目录下,以 test_ 开头,.py 结尾的所有文件,文件名可自定义。
5)配置测试的测试类名:
[pytest]
python_classes=Test_* # 当前目录下的 scripts 目录下,以 test_ 开头,以 .py 结尾的所有文件中,以 Test_ 开头的类,类可自定义。
6)配置测试的测试函数名:
[pytest]
python_functions=test_* # 当前目录下的 scripts 目录下,以 test_ 开头,以 .py 结尾的所有文件中,以 Test_ 开头的类内,以 test_ 开头的方法,方法可自定义。
示例
目录结构:
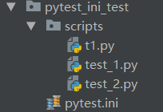
..\pytest_ini_test\pytest.ini
[pytest]
addopts = -s --html=./report/test_report.html  # 若使用allure则为:addopts = -s --alluredir ./report
testpaths = ./scripts
python_files = test_*.py
python_classes = Test_*
python_functions = test_*
..\pytest_ini_test\scripts\t1.py
1 def test_t1():
2     print("test_t1")
3     assert True
..\pytest_ini_test\scripts\test_1.py
1 def test_1():
2     print("test_1")
3     assert True
..\pytest_ini_test\scripts\test_2.py
 1 class Test_2():
 2
 3     def test_2_1(self):
 4         assert True
 5
 6     def test_2_2(self):
 7         assert True
 8
 9     def t_2_3(self):
10         assert True
执行结果

3. @pytest.fixture
pytest 中加入 fixture 装饰器来标记固定的工厂函数,使测试能够可靠、重复地执行。fixture 函数可以在测试执行前和执行后进行必要的准备和清理工作,和 unitest 测试框架中的 setup、teardown 方法类似,但是 pytest fixture 和传统 xUnit 风格的 setup/teardown 方法相比,有了巨大的改进:
- fixture 具有明确的名称,并通过在测试函数、模块、类或整个项目中声明它们的使用来激活。
- fixture 是以模块化的方式实现的,因为每个 fixture 名称都会触发 fixture 函数,其本身也可以使用其他 fixture。
- fixture 管理从简单的单元扩展到复杂的函数测试,允许根据配置和组件选项参数化 fixture 和测试,或者在函数、类、模块或整个测试会话范围内重复使用 fixture。
方法和参数:
@pytest.fixture(scope="function", params=None, autouse=False, ids=None, name=None)
- scope:被标记方法的作用域。
- "function"(default):作用于每个测试方法,每个 test 都运行一次;
- "class":作用于整个类,每个 class 的所有 test 只运行一次;
- "module":作用于整个模块,每个 module 的所有 test 只运行一次;
- "session":作用于整个 session,每个 session 只运行一次(不建议使用,因影响范围大);
- params:(list 类型)提供参数数据,供调用标记方法的函数使用。
- autouse:是否自动执行。默认为 False 不运行,设置为 True 自动运行。
- ids:每个字符串 id 的列表,每个字符串对应于 params,这样他们就是测试ID的一部分;如果没有提供ID它们将从params自动生成。
- name:fixture 的名称。默认为装饰函数的名称(一般不用)。
- 如果 fixture 在定义它的统一模块中使用,那么 fixture 的功能名称将被请求 fixture 的功能 arg 遮蔽,解决这个问题的一种方法是将装饰函数命令 "fixture_<fixturename>" 然后使用 "@pytest.fixture(name='<fixturename>')" 。
3.1 作为参数引用
直接将 pytest.fixture 函数的执行结果,作为参数传递给被测试函数。
 1 import requests
 2 import pytest
 3
 4 @pytest.fixture
 5 def baidu_response():
 6     print("执行fixture")
 7     return requests.get("http://www.baidu.com")
 8
 9 # fixture作为函数参数
10 def test_baidu(baidu_response):
11     response = baidu_response
12     assert response.status_code == 200
执行结果:

3.2 作为函数引用
 1 import pytest
 2
 3
 4 @pytest.fixture()
 5 def before():
 6     print("before执行啦。。。")
 7
 8
 9 @pytest.mark.usefixtures("before")  # 每个测试方法执行前执行,不包括setup、teardown
10 class Test_before():
11
12     def setup(self):
13         print("setup。。。")
14
15     def test_a(self):
16         print("test_a。。。")
17
18     def test_b(self):
19         print("test_b。。。")
20
21
22 @pytest.mark.usefixtures("before")  # 函数执行前执行
23 def test_c():
24     print("test_c。。。")
执行结果:

3.3 设置自动执行
 1 import pytest
 2
 3
 4 @pytest.fixture(autouse=True)
 5 def before():
 6     print("before执行啦。。。")
 7
 8
 9 class Test_before():
10
11     def setup(self):
12         print("setup。。。")
13
14     def test_a(self):
15         print("test_a。。。")
16
17     def test_b(self):
18         print("test_b。。。")
19
20
21 def test_c():
22     print("test_c。。。")
执行结果:
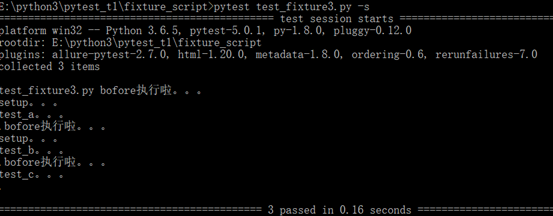
3.4 设置作用域
作用域为 function
每个函数、类中的每个方法都运行一次。
 1 import pytest
 2
 3 @pytest.fixture(scope="function", autouse=True)  # 如果不设置自动运行,将不会被调用
 4 def before():
 5     print("bofore执行啦。。。")
 6
 7 class Test_before():
 8
 9     def setup(self):
10         print("setup。。。")
11
12     def test_a(self):
13         print("test_a。。。")
14
15     def test_b(self):
16         print("test_b。。。")
17
18 def test_c():
19     print("test_c。。。")
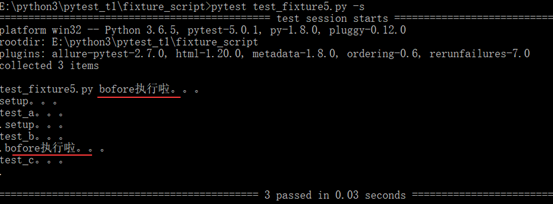
执行结果:
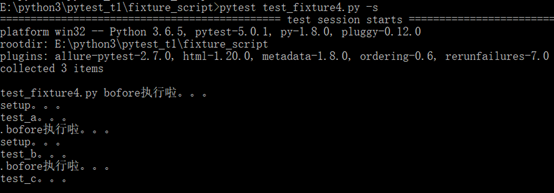
作用域为 class
一个类只运行一次。
 1 import pytest
 2
 3 @pytest.fixture(scope="class",autouse=True)  # 如果不设置自动运行,将不会被调用
 4 def before():
 5     print("bofore执行啦。。。")
 6
 7 class Test_before():
 8
 9     def setup(self):
10         print("setup。。。")
11
12     def test_a(self):
13         print("test_a。。。")
14
15     def test_b(self):
16         print("test_b。。。")
17
18 def test_c():
19 print("test_c。。。")
执行结果:
作用域为 module
一个模块只运行一次。
 1 import pytest
 2
 3 @pytest.fixture(scope="module",autouse=True)  # 如果不设置自动运行,将不会被调用
 4 def before():
 5     print("bofore执行啦。。。")
 6
 7 class Test_before():
 8
 9     def setup(self):
10         print("setup。。。")
11
12     def test_a(self):
13         print("test_a。。。")
14
15     def test_b(self):
16         print("test_b。。。")
17
18 def test_c():
19 print("test_c。。。")
执行结果:

3.5 参数化
 1 import pytest
 2
 3
 4 # 参数化:与ddt作用类似
 5 @pytest.fixture(params=[1,2,3])
 6 def init_xx(request):  # 每次传入一组参数
 7     return request.param  # 每次返回一组参数
 8
 9 class Test_xx:
10
11     def setup_class(self):
12         print("setup_class------")
13
14     def teardown_class(self):
15         print("teardown_class------")
16
17     def test_xx(self, init_xx):  # 每组参数执行一遍
18         print("test_xx------")
19         assert init_xx != 4
20
21     def test_yy(self):  # 只执行一次
22         print("test_yy------")
23         assert True
执行结果:

4. @pytest.mark
4.1 跳过测试函数
使用方法:
@pytest.mark.skipif(condition, reason=None)
- condition:跳过的条件,True(跳过、不执行) \ False(不跳过、执行)
- reason:标注原因
示例1
 1 import pytest
 2
 3 class Test_skip:
 4
 5     def test_a(self):
 6         assert True
 7
 8     @pytest.mark.skipif(2>1,reason="故意的")  # 条件为boolean值,True(跳过)/False(执行)
 9     def test_b(self):
10         assert False
执行结果:

示例2
 1 import pytest
 2
 3 def is_res():
 4     # return False
 5     return True
 6
 7 class Test_skip:
 8     def test_a(self):
 9         assert True
10
11     @pytest.mark.skipif(is_res(), reason="故意的")  # 条件为boolean值,True(跳过) / False(不跳过/执行)
12     def test_b(self):
13         assert True
执行结果:

4.2 预期失败函数
作用:标记测试函数为失败函数。
@pytest.mark.xfail(condition, reason=None)
- condition:失败的条件(True 即为失败)
- reason:标注原因
1 import pytest
2
3 class Test_xfail:
4     def test_a(self):
5         assert True
6
7     @pytest.mark.xfail(True, reason="故意的")
8     def test_b(self):
9         assert True
执行结果:

4.3 参数化函数
@pytest.mark.parametrize(argnames, argvalues, indirect=False, ids=None, scope=None)
- argnames:参数名称
- argvalues:参数对应的值,类型必须为 list
注意:与 fixture 的参数化使用方式不同,比 fixture 更灵活、方便。
示例1:单个参数
1 import pytest
2
3 class Test_para:
4     @pytest.mark.parametrize('name', ["tom", "lisa", "lucy"])
5     def test_p1(self, name):  # 要传参数的名称,且和参数化中定义的名称一致
6         print("name:", name)
7         assert name != "haha"
执行结果:

示例2:多个参数
 1 import pytest
 2 from selenium import webdriver
 3 import time
 4
 5 @pytest.mark.parametrize(
 6     "num, search_key",
 7     [("1", "hiphop"),
 8      ("2", "Selenium"),
 9      ("3", "python"),
10     ],
11     ids = ["case1", "case2", "case3"]  # ids中的数据相当于用例名称
12 )
13 def test_baidu_search(num, search_key):
14     driver = webdriver.Chrome(executable_path="e:\\chromeDriver")
15     driver.get("https://www.baidu.com")
16     time.sleep(2)
17     driver.find_element_by_id("kw").send_keys(search_key)
18     driver.find_element_by_id("su").click()
19     time.sleep(2)
20     assert driver.title == search_key + "_百度搜索"
21     driver.quit()
执行结果:


pytest.ini


【推荐】国内首个AI IDE,深度理解中文开发场景,立即下载体验Trae
【推荐】编程新体验,更懂你的AI,立即体验豆包MarsCode编程助手
【推荐】抖音旗下AI助手豆包,你的智能百科全书,全免费不限次数
【推荐】轻量又高性能的 SSH 工具 IShell:AI 加持,快人一步
· 从 HTTP 原因短语缺失研究 HTTP/2 和 HTTP/3 的设计差异
· AI与.NET技术实操系列:向量存储与相似性搜索在 .NET 中的实现
· 基于Microsoft.Extensions.AI核心库实现RAG应用
· Linux系列:如何用heaptrack跟踪.NET程序的非托管内存泄露
· 开发者必知的日志记录最佳实践
· winform 绘制太阳,地球,月球 运作规律
· 超详细:普通电脑也行Windows部署deepseek R1训练数据并当服务器共享给他人
· TypeScript + Deepseek 打造卜卦网站:技术与玄学的结合
· AI 智能体引爆开源社区「GitHub 热点速览」
· 写一个简单的SQL生成工具