
基于spring生态的后端i18n国际化实现
参考文献:https://www.cnblogs.com/yanghj/p/13692334.html
原理:获取请求中的语言信息,解析需要的语言环境,选取对应的语言文件,就可实现返回不同的语言,实现多语言切换的国际化需求。
步骤一:增加多语言文件
在resources中,新增static.i18n文件夹,在里面新建新建三个文件:注意文件命名格式一定要规范
messages.properties(默认的多语言文件)
messages_zh_CN.properties(中文语言文件)
messages_en_US.properties(英文语言文件)
如图:
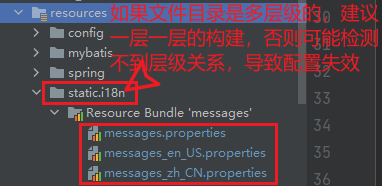
在里面添加上相同键的不同语言翻译值;
如zh_CN中:
user.appname=中文语言
en_US中:
user.appname=China Language
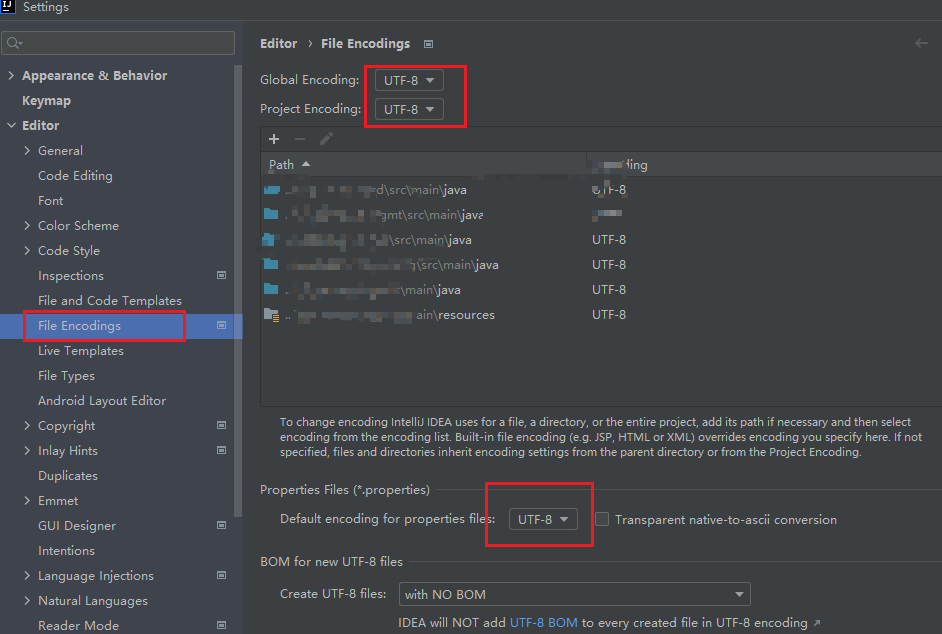
步骤二:IDEA中设置文件的编码为utf-8(重要,一定要设置)
在中文环境中,IDE一般默认配置文件为GBK编码,会导致中文变成乱码,所以需要在IDEA中设置一下
设置--编辑器--文本编码,几处都改成utf-8;如图:
步骤三:配置文件中添加i18n相关配置

步骤四:代码配置部分,用于拦截解析请求的语言信息
1,自定义一个解析器,实现LocaleResolver接口,重写方法
import org.springframework.util.StringUtils;
import org.springframework.web.servlet.LocaleResolver;
import javax.servlet.http.Cookie;
import javax.servlet.http.HttpServletRequest;
import javax.servlet.http.HttpServletResponse;
import java.util.Locale;
/**
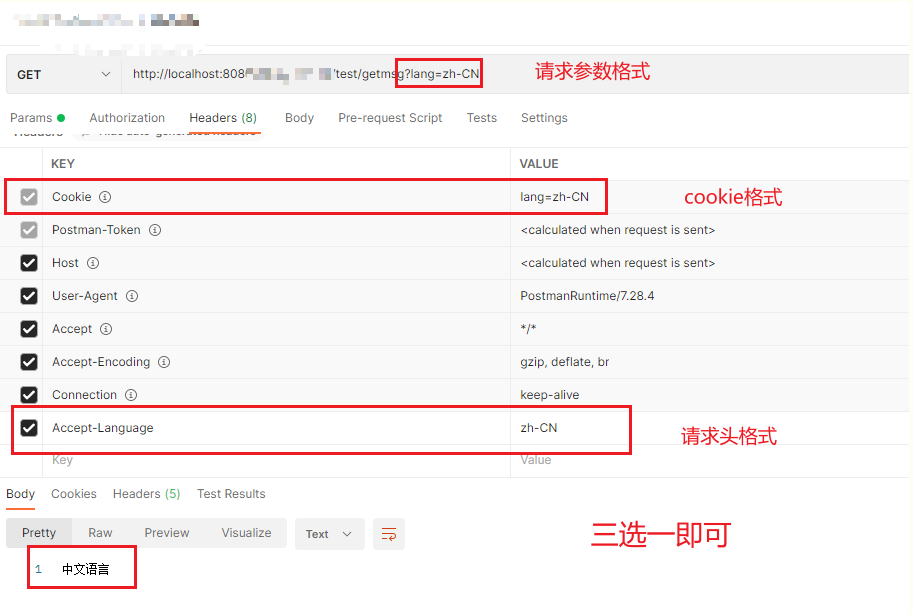
* 此处有三种获取信息途径
* 1,从请求头中获取语言信息
* 2,从cookie中获取语言信息
* 3,从请求参数中获取语言信息
*/
public class MyLocaleResolver implements LocaleResolver {
@Override
public Locale resolveLocale(HttpServletRequest httpServletRequest) {
/*//方式一:得到请求头参数,解析Accept-Language
String header = httpServletRequest.getHeader("Accept-Language");
Locale locale = Locale.getDefault();
if(header != null && header.length()>0){
System.out.println(header);
if (!StringUtils.isEmpty(header)) {
String[] s = header.split("-");
locale = new Locale(s[0],s[1]);
}
}*/
//方式二:得到cookie,解析locale
Cookie[] cookies = httpServletRequest.getCookies();
Locale locale = Locale.getDefault();
if(cookies != null) {
for (Cookie cookie : cookies) {
System.out.println(cookie.getName());
System.out.println(cookie.getValue());
if (cookie.getName().equals("lang")) {
String temp = cookie.getValue();
if (!StringUtils.isEmpty(temp)) {
String[] s = temp.split("-");
locale = new Locale(s[0],s[1]);
}
}
}
}
/*//方式三:通过参数解析locale
String temp = httpServletRequest.getParameter("lang");
Locale locale = Locale.getDefault();
if (!StringUtils.isEmpty(temp)) {
String[] s = temp.split("-");
locale = new Locale(s[0],s[1]);
}*/
return locale;
}
@Override
public void setLocale(HttpServletRequest httpServletRequest, HttpServletResponse httpServletResponse, Locale locale) {
}
}
2,通过@Bean标签,将解析器注入到容器中
@Configuration
@EnableAspectJAutoProxy
public class WebMvcConfig implements WebMvcConfigurer {
  @Bean
    public LocaleResolver localeResolver() {
        return new MyLocaleResolver();
    }
}步骤五:写个工具类,主要是为了方便获取相应语言环境中的键值
import org.springframework.context.MessageSource;
import org.springframework.context.i18n.LocaleContextHolder;
import org.springframework.stereotype.Component;


/**
 * 国际化工具类*/
@Component
public class LocalUtil
{

    private static MessageSource messageSource;

    public LocalUtil(MessageSource messageSource)
    {
        LocalUtil.messageSource = messageSource;
    }

    /**
     * 获取单个国际化翻译值
     */
    public static String get(String msgKey)
    {
        try
        {
            return messageSource.getMessage(msgKey, null, LocaleContextHolder.getLocale());
        }
        catch (Exception e)
        {
            return msgKey;
        }
    }
}
步骤六:使用,在需要的地方,直接调用工具类传入键值即可
@RestController
@RequestMapping("/test")
public class TestController {


    @GetMapping("/getmsg")
    public String language() {
        String message = LocalUtil.get("user.appname");
        return message;
    }
}
步骤七:测试

 浙公网安备 33010602011771号