

死锁检测实现
一、背景
在工作项目使用多进程、多线程过程中,因争夺资源而造成一种资源竞态,所以需加锁处理。如下图所示,线程A想获取线程B的锁,线程B想获取线程C的锁,线程 C 想获取线程D的锁, 线程D想获取线程A的锁,从而构建了一个资源获取环,当进程或者线程申请的锁处于相互交叉锁住的情况,就会出现死锁,它们将无法继续运行。
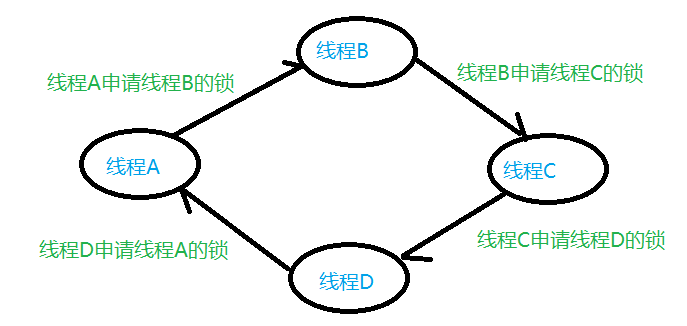
死锁的存在是因为有资源获取环的存在,所以只要能检测出资源获取环,就等同于检测出死锁的存在。
二、原理
在不改变项目源代码的情况下,采用图算法来检测环的存在,使用有向图来存储;如线程A获取线程B已占用的锁(表示线程B获取锁成功),则为线程A指向线程B;启动一个线程定时对图进行检测是否有环的存在。
(1)数据结构
//数据/点
struct node{

    uint64 thread_id;//线程ID
    uint64 lock_id;//锁ID
    int degress;
};

//数据和数据结构分开
struct vertex{

    struct node *d;
    struct vertex *next;
};

struct graph{

    struct vertex list[THREAD_MAX];//存储图的所有节点
    int num;//已经使用了多少个

    struct node locklist[THREAD_MAX];
    int lockidx;

    pthread_mutex_t mutex;//预留:线程安全考虑,在对图修改时加锁
};
(2)图的操作
a.创建图节点
//创建图节点
struct vertex *create_vertex(struct node *d){

    struct vertex *tex =  (struct vertex*)calloc(1,sizeof(struct vertex));
    if(tex == NULL) return NULL;

    tex->d = d;
    tex->next = NULL;
    return tex;
}
b.查找节点
//查找节点,是否存在
int search_vertex(struct node *d){

    int i;
    for (i = 0; i < tg->num; i++)
    {
        if (tg->list[i].d->thread_id == d->thread_id)
        {
            return i;
        }
    }
    return -1;
}
c.添加节点
//添加节点,只是把添加的节点放到list中,还没有确定各节点间的指向,必须通过add_edge添加边来确定
void add_vertex(struct node *d){

    if (search_vertex(d) == -1)
    {
        tg->list[tg->num].d = d;//添加到list中
        tg->list[tg->num].next = NULL;

        tg->num++;//节点数累加
    }
}
d.添加边,指定方向
//添加边,指定方向,谁指向谁
void add_edge(struct node *from, struct node *to){

    add_vertex(from);
    add_vertex(to);

    struct vertex *v = &tg->list[search_vertex(from)];
    while (v->next != NULL)
    {
        v = v->next;
    }
    v->next = create_vertex(to);
}
e.检测节点间是否有边
//检测节点from和to间是否有边连接
int verifty_edge(struct node *from, struct node *to){

    if(tg->num == 0) return 0;

    int idx = search_vertex(from);
    if(idx == -1) return 0;

    struct vertex *v = &(tg->list[idx]);
    while(v != NULL){
        if(v->d->thread_id == to->thread_id) return 1;
        v = v->next;
    }

    return 0;
}
f.删除边
//删除边
void remove_edge(struct node *from, struct node *to){

    int idxi = search_vertex(from);
    int idxj = search_vertex(to);

    if(idxi != -1 && idxj !=-1){
        struct vertex *v = &tg->list[idxi];
        struct vertex *remove;
        while(v->next != NULL){
            if(v->next->d->thread_id == to->thread_id){//找到要删除的节点
                remove = v->next;
                v->next = v->next->next;

                free(remove);
                break;
            }
            v = v->next;
        }
    }
}
(3)图遍历
本文采用图遍历中最为常用的深度优先搜索进行遍历,代码如下。
//dfs深度遍历
int dfs(int idx){

    struct vertex *v = &tg->list[idx];

    if(visited[idx] == 1){//有环
        path[k++] = idx;
        print_deadlock();
        deadlock = 1;
        return 0;
    }

    visited[idx] =1;//被遍历到了,赋值为1,保证同一个节点只能遍历一次
    path[k++] = idx;
    while(v->next !=NULL){
        dfs(search_vertex(v->next->d));
        k--;
        v = v->next;
    }
    return 1;
}

//遍历图,任意从图的一个节点出发,对每一个节点进行dfs遍历
int search_for_cycle(int idx){

    struct vertex *v = &tg->list[idx];
    visited[idx] = 1;
    k = 0;
    path[k++] = idx;

    while(v->next != NULL){
        int i = 0;
        for (; i < tg->num; i++)
        {
            if(i == idx){
                continue;
            }
            visited[i] = 0;
        }

        for(i = 1; i <= THREAD_MAX; i++){
            path[i] = -1;
        }
        k = 1;

        dfs(search_vertex(v->next->d));
        v = v->next;
    }
}
(4)启动检测
启动线程定时检测图是否有环,代码如下。
//从第0个节点开始dfs
void check_dead_lock(){

    int i = 0;
    deadlock = 0;
    for(;i < tg->num; i++){
        if(deadlock == 1) break;
        search_for_cycle(i);
    }
    if(deadlock == 0){
        printf("no deadlock\n");
    }
}

//检测锁线程func
static void *thread_func(void *args){

    while(1){
        sleep(5);
        check_dead_lock();
    }
}

//启动检测锁线程
void start_check(){

    tg = (struct graph*)malloc(sizeof(struct graph));
    tg->num = 0;
    tg->lockidx = 0;

    pthread_t tid;
    pthread_create(&tid,NULL,thread_func,NULL);
}
(5)钩子hook
为了不改变项目原代码,使用hook在应用程序调用系统加锁、解锁API时进行劫持,使其实际调用的是应用程序定义的加锁、解锁API;再进行加锁、解锁前,我们先去理解3个状态,加锁前、加锁后、解锁后,即:lock_before、lock_after、unlock_after,通过这三个函数与图构建起来,具体实现如下。
//1.没有被其他线程占用,不用处理
//2.有被其它线程占用,就要把边构建起来
//    添加边
void lock_before(uint64 thread_id, uint64 lockid){

    int idx = 0;
    for(;idx < tg->lockidx;idx++){
        if(tg->locklist[idx].lock_id == lockid){
            struct node from;
            from.thread_id = thread_id;
            add_vertex(&from);

            struct node to;
            to.thread_id = tg->locklist[idx].thread_id;
            tg->locklist[idx].degress++;
            add_vertex(&to);

            if(!verifty_edge(&from, &to)){
                add_edge(&from, &to);//添加边
            }
        }
    }
}
//1.没有被其它线程占用
//先加入一个节点add_edge
//2.有被占用
//是进不来lock_after的
//
//等unlock_after 释放后
//        mtx没有主人
void lock_after(uint64 threadid, uint64 lockid) {

    int idx = 0;
    if(-1 == (idx = search_lock(lockid))){
        int eidx = search_empty_lock();
        tg->locklist[eidx].thread_id = threadid;
        tg->locklist[eidx].lock_id = lockid;

        inc(&tg->lockidx, 1);
    }else{
        struct node from;
        from.thread_id = threadid;

        struct node to;
        to.thread_id = tg->locklist[idx].thread_id;
        tg->locklist[idx].degress--;

        if(verifty_edge(&from, &to)){
            remove_edge(&from, &to);//不在死锁检测的圈里面了,所以删除边
        }
        tg->locklist[idx].thread_id = threadid;
    }
}
void unlock_after(uint64 threadid, uint64 lockid) {

    int idx = search_lock(lockid);
    if(tg->locklist[idx].degress == 0){
        tg->locklist[idx].thread_id = 0;
        tg->locklist[idx].lock_id = 0;
    }
}
honk钩子主要实现pthread_mutex_lock、pthread_mutex_unlock的劫持,具体实现如下。
int pthread_mutex_lock(pthread_mutex_t *mutex){

    pthread_t selfid = pthread_self();
    lock_before(selfid, (uint64)mutex);
    pthread_mutex_lock_f(mutex);//执行系统加锁的入口函数
    lock_after(selfid, (uint64)mutex);
}


int pthread_mutex_unlock(pthread_mutex_t * mutex){

    pthread_t selfid = pthread_self();
    pthread_mutex_unlock_f(mutex);//执行系统解锁的入口函数
    unlock_after(selfid, (uint64)mutex);
}

static int init_hook(){

    pthread_mutex_lock_f = dlsym(RTLD_NEXT,"pthread_mutex_lock");
    pthread_mutex_unlock_f = dlsym(RTLD_NEXT,"pthread_mutex_unlock");
}
(6)Demo
//测试样例
pthread_mutex_t mtx1 = PTHREAD_MUTEX_INITIALIZER;
pthread_mutex_t mtx2 = PTHREAD_MUTEX_INITIALIZER;
pthread_mutex_t mtx3 = PTHREAD_MUTEX_INITIALIZER;
pthread_mutex_t mtx4 = PTHREAD_MUTEX_INITIALIZER;

void *th_func1(void *arg) {

    pthread_mutex_lock(&mtx1);
    sleep(1);
    pthread_mutex_lock(&mtx2);

    pthread_mutex_unlock(&mtx2);
    pthread_mutex_unlock(&mtx1);
}

void *th_func2(void *arg) {

    pthread_mutex_lock(&mtx2);
    sleep(1);
    pthread_mutex_lock(&mtx3);

    pthread_mutex_unlock(&mtx3);
    pthread_mutex_unlock(&mtx2);
}

void *th_func3(void *arg) {

    pthread_mutex_lock(&mtx3);
    sleep(1);
    pthread_mutex_lock(&mtx1);

    pthread_mutex_unlock(&mtx1);
    pthread_mutex_unlock(&mtx3);

}

void *th_func4(void *arg) {

    pthread_mutex_lock(&mtx2);
    sleep(1);
    pthread_mutex_lock(&mtx3);

    pthread_mutex_unlock(&mtx3);
    pthread_mutex_unlock(&mtx2);
}


int main(){

    init_hook();//初始化hook
    start_check();//启动检测死锁线程
    pthread_t t1,t2,t3,t4;
    pthread_create(&t1,NULL,th_func1,NULL);
    pthread_create(&t2,NULL,th_func2,NULL);
    pthread_create(&t3,NULL,th_func3,NULL);
    pthread_create(&t4,NULL,th_func4,NULL);

    pthread_join(t1,NULL);
    pthread_join(t2,NULL);
    pthread_join(t3,NULL);
    pthread_join(t4,NULL);

    return 0;
}
