Gin框架
快速入门
运行这段代码并在浏览器中访问 http://localhost:8080
package main

import "github.com/gin-gonic/gin"

func main() {
    r := gin.Default()
    r.GET("/ping", func(c *gin.Context) {
        c.JSON(200, gin.H{
            "message": "pong",
        })
    })

r.PUT("/ping", func(c *gin.Context) {
        c.JSON(200, gin.H{
            "message": "pppp",
        })
    })
r.DELETE("/book", func(c *gin.Context) {
		c.JSON(200, gin.H{
			"message": "DELETE",
		})
	})
    r.Run() // listen and serve on 0.0.0.0:8080
}
也可以这么写
package main
import "github.com/gin-gonic/gin"
func sayok(c *gin.Context){            //先定义函数
	c.JSON(200,gin.H{
         //c.JSON(http.StatusOK,gin.H{      //200是个状态码,用这个更好
		"message":"hello word",
	})
}
func main() {
	r:=gin.Default()
	r.GET("/hello",sayok)      //调用函数
	r.Run(":80")
}
RESTful API
REST与技术无关,代表的是一种软件架构风格,REST是Representational State Transfer的简称,中文翻译为“表征状态转移”或“表现层状态转化”。
推荐阅读阮一峰 理解RESTful架构
简单来说,REST的含义就是客户端与Web服务器之间进行交互的时候,使用HTTP协议中的4个请求方法代表不同的动作。
GET用来获取资源
POST用来新建资源
PUT用来更新资源
DELETE用来删除资源。
只要API程序遵循了REST风格,那就可以称其为RESTful API。目前在前后端分离的架构中,前后端基本都是通过RESTful API来进行交互。
只要API程序遵循了REST风格,那就可以称其为RESTful API。目前在前后端分离的架构中,前后端基本都是通过RESTful API来进行交互。
例如,我们现在要编写一个管理书籍的系统,我们可以查询对一本书进行查询、创建、更新和删除等操作,我们在编写程序的时候就要设计客户端浏览器与我们Web服务端交互的方式和路径。按照经验我们通常会设计成如下模式:
请求方法 URL 含义
GET /book 查询书籍信息
POST /create_book 创建书籍记录
POST /update_book 更新书籍信息
POST /delete_book 删除书籍信息
同样的需求我们按照RESTful API设计如下:
请求方法 URL 含义
GET /book 查询书籍信息
POST /book 创建书籍记录
PUT /book 更新书籍信息
DELETE /book 删除书籍信息
Gin框架支持开发RESTful API的开发。
使用 GET, POST, PUT, PATCH, DELETE, OPTIONS
func main() {
    // Disable Console Color
    // gin.DisableConsoleColor()

    // 使用默认中间件创建一个gin路由器
    // logger and recovery (crash-free) 中间件
    router := gin.Default()

    router.GET("/someGet", getting)
    router.POST("/somePost", posting)
    router.PUT("/somePut", putting)
    router.DELETE("/someDelete", deleting)
    router.PATCH("/somePatch", patching)
    router.HEAD("/someHead", head)
    router.OPTIONS("/someOptions", options)

    // 默认启动的是 8080端口,也可以自己定义启动端口
    router.Run()
    // router.Run(":3000") for a hard coded port
}
路由请求的泛绑定
func main() {
	r := gin.Default()
	r.GET("/user/*action",func(c *gin.Context){	//路由请求的泛绑定,所有/user/前缀的请求都会达到一个回调函数里
		c.String(200,"hello word")	//返回的内容
	})
	r.Run(":80")		//运行80口
}
获取GET参数
import (
	"github.com/gin-gonic/gin"
	"net/http"
)

func main() {
	r:=gin.Default()
	r.GET("/test", func(c *gin.Context) {
		fsname:=c.Query("yun")			//获取不带默认值的参数
		lsname:=c.DefaultQuery("moo","last_default_name")//获取默认数据的参数
		c.String(http.StatusOK,"%s ,%s",fsname, lsname)      //以字符串形式输出
	})
	r.Run(":80")
}
curl 测试结果
测试 curl -X GET 'http://127.0.0.1/test?yun=uuuuu'
结果 uuuuu last_default_name
获取Post参数
func main() {
    router := gin.Default()

    router.POST("/form_post", func(c *gin.Context) {
        message := c.PostForm("message")
        nick := c.DefaultPostForm("nick", "anonymous") // 此方法可以设置默认值

        c.JSON(200, gin.H{
            "status":  "posted",
            "message": message,
            "nick":    nick,
        })
    })
    router.Run(":8080")
}
获取请求参数-获取body内容
func main() {
	r:=gin.Default()
	r.POST("/test", func(c *gin.Context) {
		bodyBytes,err:=ioutil.ReadAll(c.Request.Body)
		if err!=nil{
			c.String(http.StatusBadRequest,err.Error())
			c.Abort()			//直接把输出结束,中间件里面有错误如果不想继续后续接口的调用不能直接return,而是应该调用c.Abort()方法
		}
		c.Request.Body=ioutil.NopCloser(bytes.NewBuffer(bodyBytes))
		fsname:=c.PostForm("yun")			//获取不带默认值的参数
		lsname:=c.DefaultPostForm("moo","last_default_name")//获取默认数据的参数
		c.String(http.StatusOK,"%s,%s,%s",fsname,lsname,string(bodyBytes))

	})
	r.Run(":80")
}
测试curl -X POST 'http://127.0.0.5/test' -d 'moo=wang&yun=kai'
结果 kai,wang,moo=wang&yun=kai
http/template初识&模板与渲染
html/template包实现了数据驱动的模板,用于生成可防止代码注入的安全的HTML内容。它提供了和text/template包相同的接口,Go语言中输出HTML的场景都应使用html/template这个包。详参https://www.liwenzhou.com/posts/Go/go_template/#autoid-1-3-0
Go语言的模板引擎
Go语言内置了文本模板引擎text/template和用于HTML文档的html/template。它们的作用机制可以简单归纳如下:
- 模板文件通常定义为.tmpl和.tpl为后缀(也可以使用其他的后缀),必须使用UTF8编码。
- 模板文件中使用{{和}}包裹和标识需要传入的数据。
- 传给模板这样的数据就可以通过点号(.)来访问,如果数据是复杂类型的数据,可以通过{ { .FieldName }}来访问它的字段。
- 除{{和}}包裹的内容外,其他内容均不做修改原样输出。
解析和渲染模板文件
import (
	"fmt"
	"html/template"
	"net/http"
)
func sayhello(w http.ResponseWriter,r *http.Request){
	//定义魔板

	//解析末班
	t,err:=template.ParseFiles("./h.tmpl")      //传入文件
	if err!=nil{
		fmt.Printf("parse template failed ,err:%v",err)
		return
	}
	//渲染模板
	name:="宋江"
	err=t.Execute(w,name)      //写入
	if err!=nil{
		fmt.Printf("parse template failed ,err:%v",err)
		return
	}
}
func main() {
	http.HandleFunc("/",sayhello)
	err:=http.ListenAndServe(":80",nil)
	if err!=nil{
		fmt.Println("http server start falid err=%v",err)
		return
	}
}
h.tmpl代码
<!DOCTYPE html>
<html lang="zh-CN">
<head>
<title>hello</title>
</head>
<body>
<p>hello {{.}}</p>      //特殊标记{{}}
</body>

</html>
结构体 map 渲染
h.tmpl文件
<p>hello {{ .Name }}</p>
<p>hello {{ .Age }}</p>
//<p>hello {{ .name }}</p>      map的写入,不需要大写,map用key
//<p>hello {{ .age }}</p>
      //<p>u1<p>            map和结构体混写
      //<p>hello {{ .u1.Age }}</p>
       //<p>m1<p>            map和结构体混写
      //<p>hello {{ .m1.Age }}</p>
{{/* a comment */}}      //注释
import (
	"fmt"
	"html/template"
	"net/http"
)

type User struct {
	Name string
	Gender string
	Age int
}
func sayhello(w http.ResponseWriter,r *http.Request){
	t,err:=template.ParseFiles("./h.tmpl")
	if err!=nil{
		fmt.Println("parse template faild,err=%v", err)
		return
	}
	u1:=User{
		Name:   "嘻嘻哈哈",
		Gender: "男",
		Age:    23,
	}
m1:=map[string]interface{}{
	"name":"hahah",
		"age":23,
}
	//t.Execute(w,m1)	//map
        //t.Execute(w,map[string]interface{}{      //如果都想把结构体和map传进来
	//	"u1":u1
	//	"m1":m1
	//})
	t.Execute(w,u1)

}
func main() {
	http.HandleFunc("/", sayhello)
	err:=http.ListenAndServe(":80", nil)
	if err!=nil{
		fmt.Println("http server start err,err=%v", err)
		return
	}

}
GIN渲染
HTML渲染
我们首先定义一个存放模板文件的templates文件夹,然后在其内部按照业务分别定义一个posts文件夹和一个users文件夹。 posts/index.html文件的内容如下:
{{define "posts/index.html"}}
<!DOCTYPE html>
<html lang="en">

<head>
    <meta charset="UTF-8">
    <meta name="viewport" content="width=device-width, initial-scale=1.0">
    <meta http-equiv="X-UA-Compatible" content="ie=edge">
    <title>posts/index</title>
</head>
<body>
    {{.title}}
</body>
</html>
{{end}}
users/index.html文件的内容如下:
{{define "users/index.html"}}      ///自定义
<!DOCTYPE html>
<html lang="en">
<head>
    <meta charset="UTF-8">
    <meta name="viewport" content="width=device-width, initial-scale=1.0">
    <meta http-equiv="X-UA-Compatible" content="ie=edge">
    <title>users/index</title>
</head>
<body>
    {{.title}}
</body>
</html>
{{end}}
Gin框架中使用LoadHTMLGlob()或者LoadHTMLFiles()方法进行HTML模板渲染
func main() {
	r := gin.Default()
	r.LoadHTMLGlob("templates/**/*")                        //多个静态网页
	//r.LoadHTMLFiles("templates/posts/index.html", "templates/users/index.html")
	r.GET("/posts/index", func(c *gin.Context) {
		c.HTML(http.StatusOK, "posts/index.html", gin.H{
			"title": "这是一一一一 哈哈哈posts/index",
		})
	})

	r.GET("users/index", func(c *gin.Context) {
		c.HTML(http.StatusOK, "users/index.html", gin.H{
			"title": "这是users/index",
		})
	})

	r.Run(":8080")
}
gin返回json(json渲染)
import (
	"github.com/gin-gonic/gin"
	"net/http"
)

func main() {
	r:=gin.Default()

	r.GET("/json", func(c *gin.Context) {
		//方法一,使用map
		//data:=map[string]interface{}{
		//	"name":"哈哈哈",
		//	"messagne":"你好啊",
		//	"age":18,
		//}
		data:=gin.H{"name":"哈哈哈","message":"heheh","age":18}	//gin.h等同于上面的map[]interface{}的速写
		//返回json,如果返回http就用出c.http()
		c.JSON(http.StatusOK, data)

		// 方法二:使用结构体
		r.GET("/moreJSON", func(c *gin.Context) {
			var msg struct {
				Name    string `json:"user"`
				Message string
				Age     int
			}
			msg.Name = "小王子"
			msg.Message = "Hello world!"
			msg.Age = 18
			c.JSON(http.StatusOK, msg)
		})

	})
	r.Run(":80")
}
xml渲染
func main() {
	r := gin.Default()
	// gin.H 是map[string]interface{}的缩写
	r.GET("/someXML", func(c *gin.Context) {
		// 方式一:自己拼接JSON
		c.XML(http.StatusOK, gin.H{"message": "Hello world!"})
	})
	r.GET("/moreXML", func(c *gin.Context) {
		// 方法二:使用结构体
		type MessageRecord struct {
			Name    string
			Message string
			Age     int
		}
		var msg MessageRecord
		msg.Name = "小王子"
		msg.Message = "Hello world!"
		msg.Age = 18
		c.XML(http.StatusOK, msg)
	})
	r.Run(":8080")
}
YMAL渲染
r.GET("/someYAML", func(c *gin.Context) {
	c.YAML(http.StatusOK, gin.H{"message": "ok", "status": http.StatusOK})
})
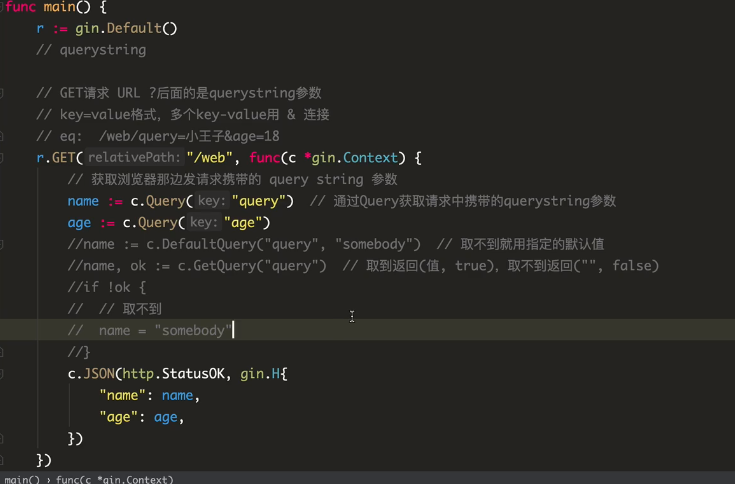
获取querystring参数
querystring指的是URL中?后面携带的参数,例如:/user/search?username=小王子&address=沙河。 获取请求的querystring参数的方法如下
func main() {
	//Default返回一个默认的路由引擎
	r := gin.Default()
	r.GET("/user/search", func(c *gin.Context) {
		username := c.DefaultQuery("username", "小王子")
		//username := c.Query("username")
		address := c.Query("address")
		//输出json结果给调用方
		c.JSON(http.StatusOK, gin.H{
			"message":  "ok",
			"username": username,
			"address":  address,
		})
	})
	r.Run()
}

获取form表单参数和提交
请求的数据通过form表单来提交,例如/user/index发送一个POST请求,获取请求数据的方式如下:index.html
<body>
<form action="/login" method="post" >
    <div>
        <label for="uername">用户名:</label>
        <input type="text" name="username" id="username">
    </div>

<div>
    <label for="pwd">密码pwd</label>
    <input type="text" name="pwd" id="pwd">

</div>
<div>
    <input type="submit" value="登陆">
</div>
</form>
跳转ok.html
<body>
<h1>hello {{ .Name}}</h1>
<h1>您的密码:{{.Password}}</h1>
</body>
主函数代码
func main() {
	r:=gin.Default()
	r.LoadHTMLFiles("./index.html","./ok.html")	//加载文件名
	r.GET("/login", func(c *gin.Context) {	//路由
		c.HTML(http.StatusOK, "index.html", nil)

	r.POST("/login", func(c *gin.Context) {	//点击登陆后,获取表单提交的数据
		//username:=c.PostForm("username")			//获取名密码key对应的是login.html的name字段
		//password:=c.PostForm("pwd")				//取不到返回空字符串
		//第二中方法
		//username:=c.DefaultPostForm("username","默认")
		//password:=c.DefaultPostForm("pwd","默认")
		//第三中
		username,ok:=c.GetPostForm("username")
		if !ok{
			username="sb"
		}
		password,ok:=c.GetPostForm("pwd")
		if !ok{
			password="****"
		}

		c.HTML(http.StatusOK,"ok.html",gin.H{		//返回ok.html
			"Name":username,
			"Password":password,
		})
	})
	})
	r.Run(":80")
}
获取path参数
请求的参数通过URL路径传递,例如:/user/search/小王子/沙河。 获取请求URL路径中的参数的方式如下。
func main() {
	//Default返回一个默认的路由引擎
	r := gin.Default()
	r.GET("/user/search/:username/:address", func(c *gin.Context) {
		username := c.Param("username")
		address := c.Param("address")
		//输出json结果给调用方
		c.JSON(http.StatusOK, gin.H{
			"message":  "ok",
			"username": username,
			"address":  address,
		})
	})

	r.Run(":8080")
}
参数绑定
为了能够更方便的获取请求相关参数,提高开发效率,我们可以基于请求的Content-Type识别请求数据类型并利用反射机制自动提取请求中QueryString、form表单、JSON、XML等参数到结构体中。 下面的示例代码演示了.ShouldBind()强大的功能,它能够基于请求自动提取JSON、form表单和QueryString类型的数据,并把值绑定到指定的结构体对象。
// Binding from JSON
type Login struct {
	User     string `form:"user" json:"user" binding:"required"`
	Password string `form:"password" json:"password" binding:"required"`
}

func main() {
	router := gin.Default()

	// 绑定JSON的示例 ({"user": "q1mi", "password": "123456"})
	router.POST("/loginJSON", func(c *gin.Context) {
		var login Login

		if err := c.ShouldBind(&login); err == nil {
			fmt.Printf("login info:%#v\n", login)
			c.JSON(http.StatusOK, gin.H{
				"user":     login.User,
				"password": login.Password,
			})
		} else {
			c.JSON(http.StatusBadRequest, gin.H{"error": err.Error()})
		}
	})

	// 绑定form表单示例 (user=q1mi&password=123456)
	router.POST("/loginForm", func(c *gin.Context) {
		var login Login
		// ShouldBind()会根据请求的Content-Type自行选择绑定器
		if err := c.ShouldBind(&login); err == nil {
			c.JSON(http.StatusOK, gin.H{
				"user":     login.User,
				"password": login.Password,
			})
		} else {
			c.JSON(http.StatusBadRequest, gin.H{"error": err.Error()})
		}
	})

	// 绑定QueryString示例 (/loginQuery?user=q1mi&password=123456)
	router.GET("/loginForm", func(c *gin.Context) {
		var login Login
		// ShouldBind()会根据请求的Content-Type自行选择绑定器
		if err := c.ShouldBind(&login); err == nil {
			c.JSON(http.StatusOK, gin.H{
				"user":     login.User,
				"password": login.Password,
			})
		} else {
			c.JSON(http.StatusBadRequest, gin.H{"error": err.Error()})
		}
	})

	// Listen and serve on 0.0.0.0:8080
	router.Run(":8080")
}
重定向
func main() {
	r:=gin.Default()
	r.GET("/index", func(c *gin.Context) {
		c.Redirect(http.StatusMovedPermanently,"http://www.bilibili.com")	//http重定向

	} )

	r.GET("/a", func(c *gin.Context) {	//路由重定向HandleContext,跳转内部/b路由
		c.Request.URL.Path= "/b"					//把请求的URL修改
		r.HandleContext(c)							//继续后续处理
	})

	r.GET("/b", func(c *gin.Context) {
		c.JSON(http.StatusOK,gin.H{
			"message":"hello word",
		})

	})
	r.Run(":80")
}
Gin路由
普通路由
r.GET("/index", func(c *gin.Context) {...})
r.GET("/login", func(c *gin.Context) {...})
r.GET("/b", func(c *gin.Context) {
		c.JSON(http.StatusOK,gin.H{
			"message":"hello word",
		})

	})
懒人必备的万能路由Any
r.Any("/test", func(c *gin.Context) {
		switch c.Request.Method {
		case "GET":
			c.JSON(http.StatusOK,gin.H{"method":"get泛"})
		case http.MethodPost:
			c.JSON(http.StatusOK,gin.H{"method":"http.methodpost其实就是POST封装好的而已"})
		}
	})
为没有配置处理函数的路由添加处理程序,默认情况下它返回404代码,下面的代码为没有匹配到路由的请求都返回views/404.html页面。
r.NoRoute(func(c *gin.Context) {
		c.HTML(http.StatusNotFound, "views/404.html", nil)
	})
路由组
我们可以将拥有共同URL前缀的路由划分为一个路由组。习惯性一对{}包裹同组的路由,这只是为了看着清晰,你用不用{}包裹功能上没什么区别。
如果在一个路由下面有很多比如/shop/login,shop/index,或者shop/user等等,这时候就添加分组
func main() {
	r := gin.Default()
	userGroup := r.Group("/user")
	{
		userGroup.GET("/index", func(c *gin.Context) {...})      //user/index
		userGroup.GET("/login", func(c *gin.Context) {...})      //user/login
		userGroup.POST("/login", func(c *gin.Context) {...})

	}
	shopGroup := r.Group("/shop")
	{
		shopGroup.GET("/index", func(c *gin.Context) {...})
		shopGroup.GET("/cart", func(c *gin.Context) {...})
		shopGroup.POST("/checkout", func(c *gin.Context) {...})
	}
	r.Run()
}
路由组支持嵌套
shopGroup := r.Group("/shop")
	{
		shopGroup.GET("/index", func(c *gin.Context) {...})
		shopGroup.GET("/cart", func(c *gin.Context) {...})
		shopGroup.POST("/checkout", func(c *gin.Context) {...})
		// 嵌套路由组
		xx := shopGroup.Group("xx")
		xx.GET("/oo", func(c *gin.Context) {...})
	}
通常我们将路由分组用在划分业务逻辑或划分API版本时。Gin框架中的路由使用的是httprouter这个库。
其基本原理就是构造一个路由地址的前缀树。
中间件
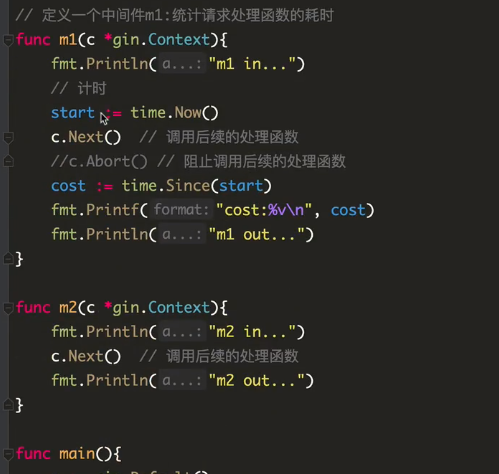
Gin框架允许开发者在处理请求的过程中,加入用户自己的钩子(Hook)函数。这个钩子函数就叫中间件,中间件适合处理一些公共的业务逻辑,比如登录认证、权限校验、数据分页、记录日志、耗时统计等。
定义中间件
Gin中的中间件必须是一个gin.HandlerFunc类型。例如我们像下面的代码一样定义一个统计请求耗时的中间件
// StatCost 是一个统计耗时请求耗时的中间件
func StatCost() gin.HandlerFunc {
	return func(c *gin.Context) {
		start := time.Now()
		c.Set("name", "小王子") // 可以通过c.Set在请求上下文中设置值,后续的处理函数能够取到该值
		  c.Next()                  // 调用该请求的剩余处理程序
		/ 不调用该请求的剩余处理程序
		// c.Abort()
		// 计算耗时
		cost := time.Since(start)
		log.Println(cost)
	}
}
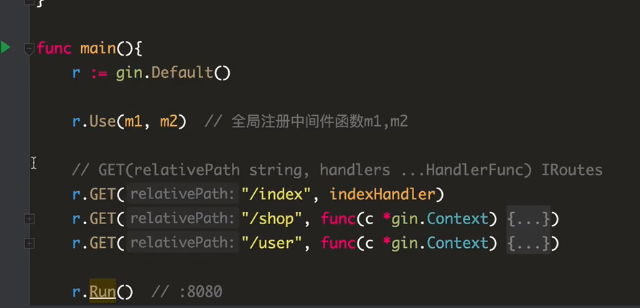
全局路由注册

上图仅仅是一个函数


为某个路有单独的注册
// 给/test2路由单独注册中间件(可注册多个)
	r.GET("/test2", m1, func(c *gin.Context) {
		name := c.MustGet("name").(string) // 从上下文取值
		log.Println(name)
		c.JSON(http.StatusOK, gin.H{
			"message": "Hello world!",
		})
	})
为路由组注册中间件
shopGroup := r.Group("/shop")
shopGroup.Use(m1)
{
    shopGroup.GET("/index", func(c *gin.Context) {...})
    ...
}
或者
shopGroup := r.Group("/shop", m1)
{
    shopGroup.GET("/index", func(c *gin.Context) {...})
    ...
}
gin默认中间件
gin.Default()默认使用了Logger和Recovery中间件,其中:
Logger中间件将日志写入gin.DefaultWriter,即使配置了GIN_MODE=release。
Recovery中间件会recover任何panic。如果有panic的话,会写入500响应码。
如果不想使用上面两个默认的中间件,可以使用gin.New()新建一个没有任何默认中间件的路由。
gin中间件中使用goroutine
当在中间件或handler中启动新的goroutine时,不能使用原始的上下文(c *gin.Context),必须使用其只读副本(c.Copy())。
运行多个端口服务
package main

import (
	"log"
	"net/http"
	"time"

	"github.com/gin-gonic/gin"
	"golang.org/x/sync/errgroup"
)

var (
	g errgroup.Group
)

func router01() http.Handler {
	e := gin.New()
	e.Use(gin.Recovery())
	e.GET("/", func(c *gin.Context) {
		c.JSON(
			http.StatusOK,
			gin.H{
				"code":  http.StatusOK,
				"error": "Welcome server 01",
			},
		)
	})

	return e
}

func router02() http.Handler {
	e := gin.New()
	e.Use(gin.Recovery())
	e.GET("/", func(c *gin.Context) {
		c.JSON(
			http.StatusOK,
			gin.H{
				"code":  http.StatusOK,
				"error": "Welcome server 02",
			},
		)
	})

	return e
}

func main() {
	server01 := &http.Server{
		Addr:         ":8080",
		Handler:      router01(),
		ReadTimeout:  5 * time.Second,
		WriteTimeout: 10 * time.Second,
	}

	server02 := &http.Server{
		Addr:         ":8081",
		Handler:      router02(),
		ReadTimeout:  5 * time.Second,
		WriteTimeout: 10 * time.Second,
	}
   // 借助errgroup.Group或者自行开启两个goroutine分别启动两个服务
	g.Go(func() error {
		return server01.ListenAndServe()
	})

	g.Go(func() error {
		return server02.ListenAndServe()
	})

	if err := g.Wait(); err != nil {
		log.Fatal(err)
	}
}

