【redis】-- springboot集成redis及使用
springboot自动配置的redis并不是特别好用,所以需要我们使用原生的jedis,
1、添加依赖
2、在application文件中配置
# Redis服务器地址
redis.host=
# Redis服务器连接端口
redis.port=6379
# 连接超时时间(毫秒)
redis.timeout=3000
# Redis服务器连接密码(默认为空)
redis.password=123456
# 连接池最大连接数(使用负值表示没有限制)
redis.poolMaxTotal=10
# 连接池中的最大空闲连接
redis.poolMaxldle=10
# 连接池中的最小空闲连接
#redis.poolMinldle=10
# 连接池最大阻塞等待时间(使用负值表示没有限制)
redis.poolMaxWait=-1
3、新建redis包,新建redisConfig类
本类的作用:加载application中的配置信息
@Component
@ConfigurationProperties(prefix="redis")
public class RedisConfig {
    private String host;
    private int port;
    private int timeout;//秒
    private String password;
    private int poolMaxTotal;
    private int poolMaxIdle;
    private int poolMaxWait;//秒
    public String getHost() {
        return host;
    }
    public void setHost(String host) {
        this.host = host;
    }
    public int getPort() {
        return port;
    }
    public void setPort(int port) {
        this.port = port;
    }
    public int getTimeout() {
        return timeout;
    }
    public void setTimeout(int timeout) {
        this.timeout = timeout;
    }
    public String getPassword() {
        return password;
    }
    public void setPassword(String password) {
        this.password = password;
    }
    public int getPoolMaxTotal() {
        return poolMaxTotal;
    }
    public void setPoolMaxTotal(int poolMaxTotal) {
        this.poolMaxTotal = poolMaxTotal;
    }
    public int getPoolMaxIdle() {
        return poolMaxIdle;
    }
    public void setPoolMaxIdle(int poolMaxIdle) {
        this.poolMaxIdle = poolMaxIdle;
    }
    public int getPoolMaxWait() {
        return poolMaxWait;
    }
    public void setPoolMaxWait(int poolMaxWait) {
        this.poolMaxWait = poolMaxWait;
    }
}
@ConfigurationProperties(prefix="redis")的作用:
系统启动时,通过该注解将配置文件中以redis开头的配置加载到bean对象中来。
4、新建redisPoolFactory.
@Service
public class RedisPoolFactory {

    @Autowired
    RedisConfig redisConfig;

    @Bean
    public JedisPool JedisPoolFactory() {
        JedisPoolConfig poolConfig = new JedisPoolConfig();
        poolConfig.setMaxIdle(redisConfig.getPoolMaxIdle());
        poolConfig.setMaxTotal(redisConfig.getPoolMaxTotal());
        poolConfig.setMaxWaitMillis(redisConfig.getPoolMaxWait() * 1000);
        //可以有多种构造方法,通过自定义的配置来选择
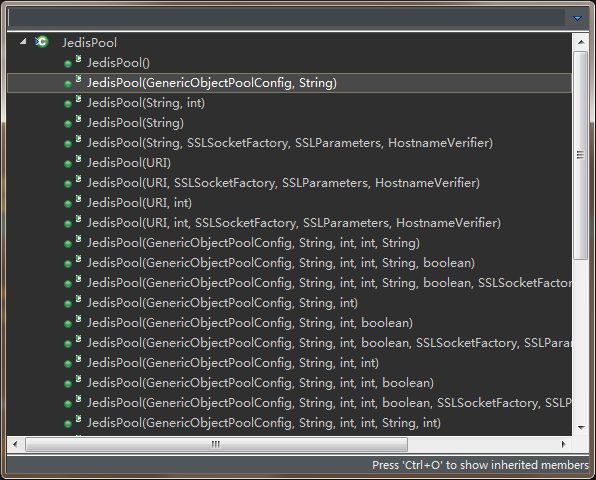
        JedisPool jp = new JedisPool(poolConfig, redisConfig.getHost(), redisConfig.getPort(),
                redisConfig.getTimeout()*1000, redisConfig.getPassword(), 0);
        return jp;
    }

}
进入到JedisPool类中可以发现,该类只存在构造方法,用户可以根据业务需要调用想要的构造方法完成自定义的配置。

5、新建前缀类
在我们学习使用redis时,经常给存放的键取名为key1、key2这类完全没有含义的名称。如果是多人开发很难保证你使用的键不会被其他的覆盖掉,所以有必要给所有的键根据业务模块加上前缀。
那为什么不直接加上前缀,而是麻烦的使用一个类来实现呢?1、方便管理,所有的前缀都在一个包中。2、添加过期时间的功能。可自定义各个模块各类型的键的过期时间。
为了看起来统一规范,我们使用接口->抽象类->实现类这样的通用模板来实现加前缀的功能。
前缀接口:
public interface KeyPrefix {

    public int expireSeconds();

    public String getPrefix();

}
抽象类:
public abstract class BasePrefix implements KeyPrefix{

    //过期时间
    private int expireSeconds;
    //前缀
    private String prefix;

    public BasePrefix(String prefix) {//0代表永不过期
        this(0, prefix);
    }

    public BasePrefix( int expireSeconds, String prefix) {
        this.expireSeconds = expireSeconds;
        this.prefix = prefix;
    }

    public int expireSeconds() {//默认0代表永不过期
        return expireSeconds;
    }

    public String getPrefix() {
        String className = getClass().getSimpleName();
        return className+":" + prefix;
    }

}
user实现类:
public class UserKey extends BasePrefix{

    private UserKey(String prefix) {
        super(prefix);
    }
    public static UserKey getById = new UserKey("id");
    public static UserKey getByName = new UserKey("name");
}
这里过期时间使用默认值0。
具体如何设置过期时间,下面会有应用。
6、新建redisService
@Service
public class RedisService {

    @Autowired
    JedisPool jedisPool;

    /**
     * 获取当个对象
     * */
    public <T> T get(KeyPrefix prefix, String key,  Class<T> clazz) {
         Jedis jedis = null;
         try {
             jedis =  jedisPool.getResource();
             //生成真正的key
             String realKey  = prefix.getPrefix() + key;
             String  str = jedis.get(realKey);
             //默认返回的是String类型,需要将其转成T类型
             T t =  stringToBean(str, clazz);
             return t;
         }finally {
              returnToPool(jedis);
         }
    }

    /**
     * 设置对象
     * */
    public <T> boolean set(KeyPrefix prefix, String key,  T value) {
         Jedis jedis = null;
         try {
             jedis =  jedisPool.getResource();
             //redis需要的是String类型,所以这里需要转换成String
             String str = beanToString(value);
             if(str == null || str.length() <= 0) {
                 return false;
             }
            //生成真正的key
             String realKey  = prefix.getPrefix() + key;
             int seconds =  prefix.expireSeconds();
             //判断是否需要设置过期时间,0表示永久存储
             if(seconds <= 0) {
                 jedis.set(realKey, str);
             }else {
                 jedis.setex(realKey, seconds, str);
             }
             return true;
         }finally {
              returnToPool(jedis);
         }
    }

    /**
     * 判断key是否存在
     * */
    public <T> boolean exists(KeyPrefix prefix, String key) {
         Jedis jedis = null;
         try {
             jedis =  jedisPool.getResource();
            //生成真正的key
             String realKey  = prefix.getPrefix() + key;
            return  jedis.exists(realKey);
         }finally {
              returnToPool(jedis);
         }
    }

    /**
     * 增加值
     * */
    public <T> Long incr(KeyPrefix prefix, String key) {
         Jedis jedis = null;
         try {
             jedis =  jedisPool.getResource();
            //生成真正的key
             String realKey  = prefix.getPrefix() + key;
            return  jedis.incr(realKey);
         }finally {
              returnToPool(jedis);
         }
    }

    /**
     * 减少值
     * */
    public <T> Long decr(KeyPrefix prefix, String key) {
         Jedis jedis = null;
         try {
             jedis =  jedisPool.getResource();
            //生成真正的key
             String realKey  = prefix.getPrefix() + key;
            return  jedis.decr(realKey);
         }finally {
              returnToPool(jedis);
         }
    }

    //简单演示,可根据具体需求优化
    private <T> String beanToString(T value) {
        if(value == null) {
            return null;
        }
        Class<?> clazz = value.getClass();
        if(clazz == int.class || clazz == Integer.class) {
             return ""+value;
        }else if(clazz == String.class) {
             return (String)value;
        }else if(clazz == long.class || clazz == Long.class) {
            return ""+value;
        }else {
            return JSON.toJSONString(value);
        }
    }

    //简单演示,可根据具体需求优化
    @SuppressWarnings("unchecked")
    private <T> T stringToBean(String str, Class<T> clazz) {
        if(str == null || str.length() <= 0 || clazz == null) {
             return null;
        }
        if(clazz == int.class || clazz == Integer.class) {
             return (T)Integer.valueOf(str);
        }else if(clazz == String.class) {
             return (T)str;
        }else if(clazz == long.class || clazz == Long.class) {
            return  (T)Long.valueOf(str);
        }else {
            return JSON.toJavaObject(JSON.parseObject(str), clazz);
        }
    }

    private void returnToPool(Jedis jedis) {
         if(jedis != null) {
             jedis.close();
         }
    }

}
7、使用redis
@ResponseBody
    @GetMapping("/redis/set")
    public Result<Boolean> redis1(){
        User user=new User();
        user.setId(11);
        user.setUser_name("lhb");
        redisService.set(UserKey.getById, "1", user);
        return Result.success(true);
    }

    @ResponseBody
    @GetMapping("/redis/get")
    public Result<User> redis2(){
        User user = redisService.get(UserKey.getById, "1",User.class);
        return Result.success(user);
    }


注意:要确保你的redis支持远程连接


