OpenVINO Model Server的服务化部署——上(OpenVINO™ Model Server Quickstart)
本文在腾讯云上使用CentOS8进行相关操作 (我买到了99元包年的腾讯云,做实验是比较划算的)。
OpenVINO Model Server这个docker还比较新,目前不足200的总下载量,和它的定位不符合。
官方文档应该是有错误的,而且有 一些地方没有展开说明,我在本文中进行补充。
Note: OVMS has been tested on CentOS and Ubuntu. Publically released docker images are based on CentOS.**
=======================================================================================================
Step 1: Prepare Docker
To see if you have Docker already installed and ready to use, test the installation:
If you see a test image and an informational message, Docker is ready to use. Go to download and build the OpenVINO Model Server. If you don't see the test image and message:
Continue to Step 2 to download and build the OpenVINO Model Server.

Step 2: Download and Build the OpenVINO Model Server
- Download the Docker* image that contains the OpenVINO Model Server. This image is available from DockerHub:
     docker pull openvino
     /model_server
     :latest
or build the docker image openvino/model_server:latest with a command:
Note: URL to OpenVINO Toolkit package can be received after registration on OpenVINO™ Toolkit website

Step 3: Download a Model
Download the model components to the model directory. Example command using curl:
     curl
     --create
     -dirs https
     :
     /
     /download.
     01.org
     /opencv
     /
     2020
     /openvinotoolkit
     /
     2020.
     4
     /open_model_zoo
     /models_bin
     /
     3
     /face
     -detection
     -retail
     -
     0004
     /FP32
     /face
     -detection
     -retail
     -
     0004.xml https
     :
     /
     /download.
     01.org
     /opencv
     /
     2020
     /openvinotoolkit
     /
     2020.
     4
     /open_model_zoo
     /models_bin
     /
     3
     /face
     -detection
     -retail
     -
     0004
     /FP32
     /face
     -detection
     -retail
     -
     0004.bin
     -o model
     /face
     -detection
     -retail
     -
     0004.xml
     -o model
     /face
     -detection
     -retail
     -
     0004.bin

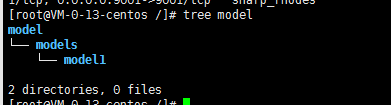
特别注意,这里的文件需要组织结构 ,比如我们下载了bin+xml,需要 按照以下模式存放
     tree models
     /

models
     /

├── model1

│   ├──
     1

│   │   ├── ir_model.bin

│   │   └── ir_model.xml

│   └──
     2

│       ├── ir_model.bin

│       └── ir_model.xml

└── model2

    └──
     1

        ├── ir_model.bin

        ├── ir_model.xml

        └── mapping_config.json
本文采用的方法是直接在/ 下创建 model,而后级联创建models和model1,将bin+xml放到mode1下面,后面的命令行都是在这个基础上编写的。你需要根据实际情况修改使用。
Step 4: Start the Model Server Container(这个地方原文档可能有错)
在前面已经组织的文件结构基础上,使用
docker run -v /models:/models:ro -p 9000:9000 openvino/model_server:latest --model_path /models/model1 --model_name face-detection --port 9000 --log_level DEBUG --shape auto
更为正式的说法应该是
docker run -d -v <folder_with_downloaded_model_in_a_defined_structur>:/models:ro  -p 9000:9000 openvino/model_server:latest \
--model_path /models/face-detection --model_name face-detection --port 9000 --log_level DEBUG --shape auto
此外可以参考docker上的文档
docker run --rm -d -v /models/:/opt/ml:ro -p 9001:9001 -p 8001:8001 openvino/model_server:latest --model_path /opt/ml/model1 --model_name my_model --port 9001 --rest_port 8001
Step 5: Download the Example Client Components
Model scripts are available to provide an easy way to access the Model Server. This example uses a face detection script and uses curl to download components.
- Use this command to download all necessary components:
     curl https://raw.githubusercontent.com
     /openvinotoolkit
     /model_server
     /master
     /example_client
     /client_utils.py
     -o client_utils.py
     https://
     raw.githubusercontent.com
     /
     openvinotoolkit
     /
     model_server
     /
     master
     /
     example_client
     /
     face_detection.py
     -
     o face_detection.py
     https://
     raw.githubusercontent.com
     /
     openvinotoolkit
     /
     model_server
     /
     master
     /
     example_client
     /
     client_requirements.txt
     -
     o client_requirements.txt
For more information:

这几个因为连到了github上,所以可能需要重复下载。
Step 6: Download Data for Inference
- Download example images for inference. This example uses a file named people1.jpeg.
- Put the image in a folder by itself. The script runs inference on all images in the folder.
      curl
      --create
      -dirs https
      :
      /
      /raw.githubusercontent.com
      /openvinotoolkit
      /model_server
      /master
      /example_client
      /images
      /people
      /people1.jpeg
      -o images
      /people1.jpeg

Step 7: Run Inference
       pip install
      --upgrade tensorflow
       sudo yum install libSM
      -
      1.
      2.
      3
      -
      1.el8.x86_64
      --setopt
      =protected_multilib
      =
      false
Go to the folder in which you put the client script.
Install the dependencies:
      pip install
      -r client_requirements.txt
- Create a folder in which inference results will be put:
mkdir results
- Run the client script:
      python face_detection.py
      --batch_size
      1
      --width
      600
      --height
      400
      --input_images_dir images
      --output_dir results

Step 8: Review the Results
In the results folder, look for an image that contains the inference results. The result is the modified input image with bounding boxes indicating detected faces.

       import numpy as np
       def print_statistics(processing_times, batch_size)
       :
       print(
       '\nprocessing time for all iterations')
       print(
       'average time: {:.2f} ms; average speed: {:.2f} fps'

          .format(
       round(np.average(processing_times),
       2),
       round(
       1000
       * batch_size
       / np.average(processing_times),
       2)))
       print(
       'median time: {:.2f} ms; median speed: {:.2f} fps'

          .format(
       round(np.median(processing_times),
       2),
       round(
       1000
       * batch_size
       / np.median(processing_times),
       2)))
       print(
       'max time: {:.2f} ms; min speed: {:.2f} fps'.format(
       round(np.
       max(processing_times),
       2),
       round(
       1000
       * batch_size
       / np.
       max(processing_times),
       2)))
       print(
       'min time: {:.2f} ms; max speed: {:.2f} fps'.format(
       round(np.
       min(processing_times),
       2),
       round(
       1000
       * batch_size
       / np.
       min(processing_times),
       2)))
       print(
       'time percentile 90: {:.2f} ms; speed percentile 90: {:.2f} fps'.format(
       round(np.percentile(processing_times,
       90),
       2),
       round(
       1000
       * batch_size
       / np.percentile(processing_times,
       90),
       2)

))
       print(
       'time percentile 50: {:.2f} ms; speed percentile 50: {:.2f} fps'.format(
       round(np.percentile(processing_times,
       50),
       2),
       round(
       1000
       * batch_size
       / np.percentile(processing_times,
       50),
       2)))
       print(
       'time standard deviation: {:.2f}'.format(
       round(np.std(processing_times),
       2)))
       print(
       'time variance: {:.2f}'.format(
       round(np.var(processing_times),
       2)))
       #
       # Copyright (c) 2019-2020 Intel Corporation
       #
       # Licensed under the Apache License, Version 2.0 (the "License");
       # you may not use this file except in compliance with the License.
       # You may obtain a copy of the License at
       #
       #      http://www.apache.org/licenses/LICENSE-2.0
       #
       # Unless required by applicable law or agreed to in writing, software
       # distributed under the License is distributed on an "AS IS" BASIS,
       # WITHOUT WARRANTIES OR CONDITIONS OF ANY KIND, either express or implied.
       # See the License for the specific language governing permissions and
       # limitations under the License.
       #
       import argparse
       import cv2
       import datetime
       import grpc
       import numpy as np
       import
       os
       from tensorflow
       import make_tensor_proto, make_ndarray
       from tensorflow_serving.apis
       import predict_pb2
       from tensorflow_serving.apis
       import prediction_service_pb2_grpc
       from client_utils
       import print_statistics
       def load_image(file_path)
       :

    img
       = cv2.imread(file_path)
       # BGR color format, shape HWC

    img
       = cv2.resize(img, (args[
       'width'], args[
       'height']))

    img
       = img.transpose(
       2,
       0,
       1).reshape(
       1,
       3,args[
       'height'],args[
       'width'])
       # change shape to NCHW
       return img

parser
       = argparse.ArgumentParser(description
       =
       'Demo for object detection requests via TFS gRPC API.'
       'analyses input images and saveswith with detected objects.'
       'it relies on model given as parameter...')

parser.add_argument(
       '--model_name', required
       =
       False, help
       =
       'Name of the model to be used', default
       =
       "face-detection")

parser.add_argument(
       '--input_images_dir', required
       =
       False, help
       =
       'Directory with input images', default
       =
       "images/people")

parser.add_argument(
       '--output_dir', required
       =
       False, help
       =
       'Directory for staring images with detection results', default
       =
       "results")

parser.add_argument(
       '--batch_size', required
       =
       False, help
       =
       'How many images should be grouped in one batch', default
       =
       1,
       type
       =
       int)

parser.add_argument(
       '--width', required
       =
       False, help
       =
       'How the input image width should be resized in pixels', default
       =
       1200,
       type
       =
       int)

parser.add_argument(
       '--height', required
       =
       False, help
       =
       'How the input image width should be resized in pixels', default
       =
       800,
       type
       =
       int)

parser.add_argument(
       '--grpc_address',required
       =
       False, default
       =
       'localhost',  help
       =
       'Specify url to grpc service. default:localhost')

parser.add_argument(
       '--grpc_port',required
       =
       False, default
       =
       9000, help
       =
       'Specify port to grpc service. default: 9000')

args
       =
       vars(parser.parse_args())

channel
       = grpc.insecure_channel(
       "{}:{}".format(args[
       'grpc_address'],args[
       'grpc_port']))

stub
       = prediction_service_pb2_grpc.PredictionServiceStub(channel)

files
       =
       os.listdir(args[
       'input_images_dir'])

batch_size
       = args[
       'batch_size']

model_name
       = args[
       'model_name']
       print(
       "Running "
       +model_name
       +
       " on files:"
       +
       str(files))

imgs
       = np.zeros((
       0,
       3,args[
       'height'],args[
       'width']), np.dtype(
       '<f'))
       for i
       in files
       :

    img
       = load_image(
       os.path.join(args[
       'input_images_dir'], i))

    imgs
       = np.append(imgs, img, axis
       =
       0)
       # contains all imported images
       print(
       'Start processing {} iterations with batch size {}'.format(
       len(files)
       //batch_size , batch_size))

iteration
       =
       0

processing_times
       = np.zeros((
       0),
       int)
       for x
       in
       range(
       0, imgs.shape[
       0]
       - batch_size
       +
       1, batch_size)
       :

    iteration
       +=
       1

    request
       = predict_pb2.PredictRequest()

    request.model_spec.name
       = model_name

    img
       = imgs[x
       :(x
       + batch_size)]
       print(
       "\nRequest shape", img.shape)

    request.inputs[
       "data"].CopyFrom(make_tensor_proto(img, shape
       =(img.shape)))

    start_time
       = datetime.datetime.now()

    result
       = stub.Predict(request,
       10.
       0)
       # result includes a dictionary with all model outputs

    end_time
       = datetime.datetime.now()

    duration
       = (end_time
       - start_time).total_seconds()
       *
       1000

    processing_times
       = np.append(processing_times,np.
       array([
       int(duration)]))

    output
       = make_ndarray(result.outputs[
       "detection_out"])
       print(
       "Response shape", output.shape)
       for y
       in
       range(
       0,img.shape[
       0])
       :
       # iterate over responses from all images in the batch

        img_out
       = img[y,
       :,
       :,
       :]
       print(
       "image in batch item",y,
       ", output shape",img_out.shape)

        img_out
       = img_out.transpose(
       1,
       2,
       0)
       for i
       in
       range(
       0,
       200
       *batch_size
       -
       1)
       :
       # there is returned 200 detections for each image in the batch

            detection
       = output[
       :,
       :,i,
       :]
       # each detection has shape 1,1,7 where last dimension represent:
       # image_id - ID of the image in the batch
       # label - predicted class ID
       # conf - confidence for the predicted class
       # (x_min, y_min) - coordinates of the top left bounding box corner
       #(x_max, y_max) - coordinates of the bottom right bounding box corner.
       if detection[
       0,
       0,
       2]
       >
       0.
       5
       and
       int(detection[
       0,
       0,
       0])
       == y
       :
       # ignore detections for image_id != y and confidence <0.5
       print(
       "detection", i , detection)

                x_min
       =
       int(detection[
       0,
       0,
       3]
       * args[
       'width'])

                y_min
       =
       int(detection[
       0,
       0,
       4]
       * args[
       'height'])

                x_max
       =
       int(detection[
       0,
       0,
       5]
       * args[
       'width'])

                y_max
       =
       int(detection[
       0,
       0,
       6]
       * args[
       'height'])
       # box coordinates are proportional to the image size
       print(
       "x_min", x_min)
       print(
       "y_min", y_min)
       print(
       "x_max", x_max)
       print(
       "y_max", y_max)

                img_out
       = cv2.rectangle(cv2.UMat(img_out),(x_min,y_min),(x_max,y_max),(
       0,
       0,
       255),
       1)
       # draw each detected box on the input image

        output_path
       =
       os.path.join(args[
       'output_dir'],model_name
       +
       "_"
       +
       str(iteration)
       +
       "_"
       +
       str(y)
       +
       '.jpg')
       print(
       "saving result to", output_path)

        result_flag
       = cv2.imwrite(output_path,img_out)
       print(
       "write success = ", result_flag)
       print(
       'Iteration {}; Processing time: {:.2f} ms; speed {:.2f} fps'

          .format(iteration,
       round(np.average(duration),
       2),
       round(
       1000
       * batch_size
       / np.average(duration),
       2)

                                                                                  ))

print_statistics(processing_times, batch_size)


 浙公网安备 33010602011771号