

zabbix-server新增zabbix-agent
zabbix监控系统搭建好了之后,就需要为各种角色host加入进来,现在新增一台zabbix-agent:
1.在172.16.23.128上安装zabbix-agent,zabbix-server:172.16.23.131
# rpm -Uvh http://repo.zabbix.com/zabbix/3.4/rhel/7/x86_64/zabbix-release-3.4-2.el7.noarch.rpm
# cd /etc/yum.repos.d/
# mv epel.repo epel.repo.bak
# yum install zabbix zabbix-agent -y
# mv epel.repo.bak epel.repo
安装完成agent端程序之后,现在做一些简单配置:
# sed -i 's/Server=127.0.0.1/Server=172.16.23.131/g' /etc/zabbix/zabbix_agentd.conf
# sed -i 's/ServerActive=127.0.0.1/ServerActive=172.16.23.131/g' /etc/zabbix/zabbix_agentd.conf
Hostname=172.16.23.128
然后开启服务,并检查日志是否报错:
# systemctl start zabbix-agent
# systemctl status zabbix-agent
# tail -f /var/log/zabbix/zabbix_agentd.log
[root@master zabbix_agentd.d]# tail -f /var/log/zabbix/zabbix_agentd.log
  7681:20181209:123239.539 IPv6 support:          YES
  7681:20181209:123239.539 TLS support:           YES
  7681:20181209:123239.539 **************************
  7681:20181209:123239.539 using configuration file: /etc/zabbix/zabbix_agentd.conf
  7681:20181209:123239.540 agent #0 started [main process]
  7682:20181209:123239.540 agent #1 started [collector]
  7683:20181209:123239.540 agent #2 started [listener #1]
  7684:20181209:123239.541 agent #3 started [listener #2]
  7686:20181209:123239.542 agent #5 started [active checks #1]
  7685:20181209:123239.543 agent #4 started [listener #3]
然后配置zabbix的web页面:
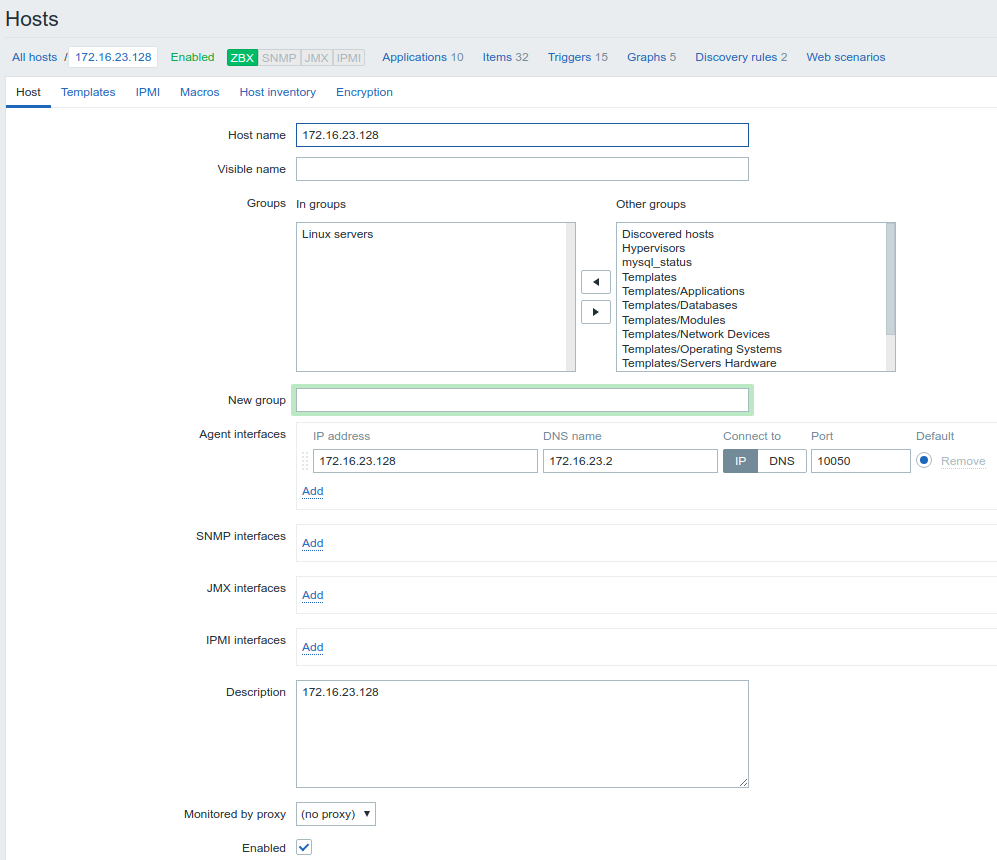
注意:这里的hostname一定要和zabbix-agent端配置文件的hostname一致,不然会报错如下:
[root@master zabbix_agentd.d]# tail -f /var/log/zabbix/zabbix_agentd.log
  7644:20181209:122919.996 TLS support:           YES
  7644:20181209:122919.996 **************************
  7644:20181209:122919.996 using configuration file: /etc/zabbix/zabbix_agentd.conf
  7644:20181209:122919.997 agent #0 started [main process]
  7645:20181209:122919.997 agent #1 started [collector]
  7646:20181209:122919.998 agent #2 started [listener #1]
  7648:20181209:122919.999 agent #4 started [listener #3]
  7647:20181209:122919.999 agent #3 started [listener #2]
  7649:20181209:122920.000 agent #5 started [active checks #1]
  7649:20181209:122920.007 no active checks on server [172.16.23.131:10051]: host [master] not found
  7649:20181209:123120.077 no active checks on server [172.16.23.131:10051]: host [master] not found
当只添加了host而没有添加template,那么日志并不会报错,但是web页面那里的agent不会变绿:

上面是添加template之后的,所以agent变为了绿色
zabbix-agent:172.16.23.128 zabbix-server:172.16.23.131
现在在agent端配置自定义item:
/etc/zabbix/zabbix_agentd.d/userparameter_script.conf
[root@master zabbix_agentd.d]# cat userparameter_script.conf
UserParameter=getupload,/etc/zabbix/getupload.py
配置文件确保这里是打开的:Include=/etc/zabbix/zabbix_agentd.d/*.conf,/etc/zabbix/getupload.py该脚本必须有执行权限
[root@master zabbix_agentd.d]# cat /etc/zabbix/getupload.py
#!/usr/bin/env python
def getload():
    with open("/proc/loadavg", "r") as f:
        con2 = f.read().split()
    f.close()
    return con2


print(getload()[0])
agent配置完成后重启zabbix-agent服务:systemctl restart zabbix-agent
然后在zabbix-server端手动获取该值:
[root@zabbix-server zabbix_agentd.d]# zabbix_get -s 172.16.23.128  -k getupload
0.00
上面-s 后面接上zabbix-agent的ip,如果agent在server上就和server ip一致,-k后面接命名的item

 浙公网安备 33010602011771号