使用 webpack 搭建 React 项目
简评:相信很多开发者在入门 react 的时候都是使用 create-react-app 或 react-slingshot 这些脚手架来快速创建应用,当有特殊需求,需要修改 eject 出来的 webpack 配置文件时,面对各种配置项不知如何下手,本文会介绍如何使用 webpack 手动搭建一个 react 项目。
新建工程
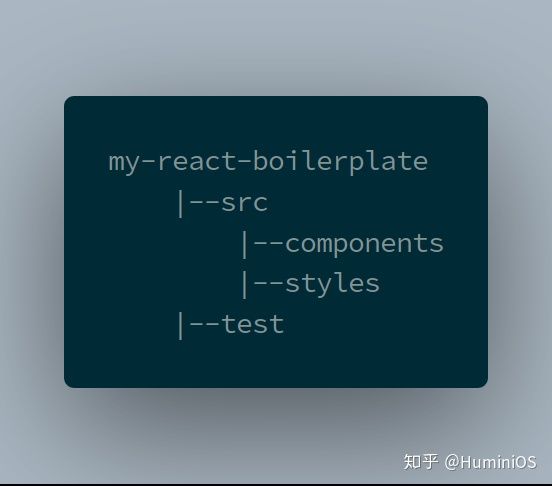
1.先新建一个 demo 项目,项目目录结构为:

2.在工程根目录新建 index.html 文件
<!DOCTYPE html>
<html lang="en">
<head>
  <meta charset="UTF-8">
  <meta name="viewport" content="width=device-width, initial-scale=1.0">
  <meta http-equiv="X-UA-Compatible" content="ie=edge">
  <title>My React Boilerplate</title>
</head>
<body>
  <div id="app"></div>
</body>
</html>
3.安装 react react-dom 依赖:
npm i react react-dom
4.创建应用 /src/components/App.js
import React, { Component } from 'react'

class App extends Component {
  render() {
    return (
      <div>
        <h1>Welcome to My Starter App</h1>
      </div>
    )
  }
}

export default App
5.创建 /src/index.js
import React from 'react'
import ReactDOM from 'react-dom'
import App from './components/App'

import './styles/style.sass'

ReactDOM.render(
  <App />,
  document.getElementById('app')
)
以上就是我们的 demo 工程。如果我们通过 react-create-app 上面的代码已经可以正常运行了,但是现在的代码没有进行任何的处理无法直接在浏览器中运行。
我们需要将 jsx 和 ES6 代码转换成浏览器中可运行的代码。
Babel
Babel 就是为了处理上面的问题,我们可以使用 JavaScript 最新的语法特性,然后使用 babel 插件对代码进行转换以达到最大的兼容性。首先安装相关依赖:
npm i babel-cli babel-core babel-preset-env babel-preset-react babel-preset-stage-2--save-dev
然后在工程跟目录创建一个 .babelrc 配置文件,内容为:
{
    "presets": ["env", "react", "stage-2"]
}
参数说明:
- env:表示包含 babel-preset-es2015,babel-preset-es2016和babel-preset-es2017,意味着我们可以编写 ES6,ES7,和 ES8 的代码。
- react:这个选项指明处理 React 的相关不能,不如 JSX。
- stage-2:运行我们使用当前处于阶段 2 或更高阶段的 javascript 功能更多信息可以参考 TC39。
测试
刚才已经创建了 App.js 的 React 组件,并且安装配置了 babel,为了代码的健壮性我们再添加测试环境这里使用 Jest 和 Enzyme。
1.安装依赖:
npm i jest enzyme enzyme-adapter-react-16 react-test-renderer --save-dev
2.然后创建 /test/enzyme.setup.js 文件,添加如下代码:
import Enzyme from 'enzyme'
import Adapter from 'enzyme-adapter-react-16'

Enzyme.configure({
    adapter: new Adapter()
})
3.在 package.json 中添加 jest 功能字段:
{
...,
"jest": {
    "setupTestFrameworkScriptFile": "./test/enzyme.setup.js"
  },
...
}
4.编写测试代码:
创建 /test/App.test.js 文件,为 App 组件编写测试代码:
import App from '../src/components/App'
import React from 'react'
import { shallow } from 'enzyme'

describe('App', () => {
  test('should match snapshot', () => {
    const wrapper = shallow(<App />)

    expect(wrapper.find('h1').text()).toBe('Welcome to My Starter App')
    expect(wrapper).toMatchSnapshot
  })
})
当执行 jest ./test 来启动测试代码。
为了方便可以将他添加到 package.json 中:
{
  ...,
  "scripts": {
    "test": "jest ./test"
  }
}
Webpack
webpack 可以将我们工程代码打包到一个文件中,比如我们有很多个 js 代码相互依赖,打包的时候会将这些 js 文件合并成一个文件,还可以使用插件来预处理和处理最终生成的代码。
1.安装 webpack 依赖:
npm i webpack --save-dev
webpack 运行的时候回自动找到项目根目录的 webpack.config.js 文件,所以我们可以先创建这个文件,并加入如下代码。
const path = require('path')

module.exports = {
  entry: {
    main: './src/index.js'
  },
  output: {
    filename: '[name].[hash].js',
    path: path.resolve('./dist'),
  }
}
entry 指明入口文件,webpack 会从这个文件开始连接所有的依赖。 output 指明打包后的文件存放的位置。
Webpack loaders
loaders 可以让 webpack 处理很多不同格式的文件(例如:图片、CSS 、 JSX ...),
这里我们没有用到图片和 CSS 资源,只需要处理 ES6 和 JSX,只需要 babel-loader。
1.安装 babel-loader:
npm i babel-loader --save-dev
然后在 webpack.config.js 文件中添加打包规则添加后代码如下:
const path = require('path')

module.exports = {
  entry: {
    main: './src/index.js'
  },
  output: {
    filename: '[name].[hash].js',
    path: path.resolve('./dist'),
  },
  module: {
    rules: [
      {
        test: /\.js$/,
        exclude: ['node_modules'],
        use: [{ loader: 'babel-loader' }],
      }
    ]
}
2.如果需要使用 Sass 和 SCSS,我们需要其他的 loader。
npm i node-sass sass-loader style-loader css-loader --save-dev
然后在 webpack.config.js 中添加 sass 和 scss 文件的转换规则,最终代码如下:
const path = require('path')

module.exports = {
  entry: {
    main: './src/index.js'
  },
  output: {
    filename: '[name].[hash].js',
    path: path.resolve('./dist'),
  },
  module: {
    rules: [
      {
        test: /\.js$/,
        exclude: ['node_modules'],
        use: [{ loader: 'babel-loader' }],
      },
      {
        test: /\.s(a|c)ss$/,
        use: [{
          loader: 'style-loader'
        }, {
          loader: 'css-loader'
        }, {
          loader: 'sass-loader'
        }],
       }
    ]
}
现在可以在工程中使用 Sass 了,创建 /src/styles/style.sass 文件,并添加如下代码:
body
  font-family: 'Segoe UI', Tahoma, Geneva, Verdana, sans-serif
  color: white
  background: black
然后在 index.js 带人 style.sass:
import React from 'react'
import ReactDOM from 'react-dom'
import App from './components/App'

import './styles/style.sass'

ReactDOM.render(
  <App />,
  document.getElementById('app')
3.现在有一个需求,我们需要将打包后的 js 文件自动导入到 html 文件中,我们可以使用 html-webpack-plugin 自动完成这部分内容。
安装 html-webpack-plugin:
npm i html-webpack-plugin --save-dev
然后在 webpack.config.js 中导入这个插件:
const CleanWebpackPlugin = require('clean-webpack-plugin')
const path = require('path')

module.exports = {
  entry: {
    main: './src/index.js'
  },
  output: {
    filename: '[name].[hash].js',
    path: path.resolve('./dist'),
  },
  module: {
    rules: [
      {
        test: /\.js$/,
        exclude: ['node_modules'],
        use: [{ loader: 'babel-loader' }],
      },
      {
        test: /\.s(a|c)ss$/,
        use: [{
          loader: 'style-loader'
        }, {
          loader: 'css-loader'
        }, {
          loader: 'sass-loader'
        }],
   	  }
    ]
  },
  plugins: [
    new HtmlWebPackPlugin({
      template: 'index.html'
    })
  ]
}
当每次 build 的时候的时候会在 dist 目录中生成打包后的文件,我们需要打包时清除这些内容可以使用 clean-webpack-plugin 插件:
npm i clean-webpack-plugin --save-dev
在 webpack.config.js 中添加 clean-webpack-plugin:
const CleanWebpackPlugin = require('clean-webpack-plugin')
const HtmlWebPackPlugin = require('html-webpack-plugin')
const path = require('path')

module.exports = {
  entry: {
    main: './src/index.js'
  },
  output: {
    filename: '[name].[hash].js',
    path: path.resolve('./dist'),
  },
  module: {
    rules: [
      {
        test: /\.js$/,
        exclude: ['node_modules'],
        use: [{ loader: 'babel-loader' }],
      },
      {
        test: /\.s(a|c)ss$/,
        use: [{
          loader: 'style-loader'
        }, {
          loader: 'css-loader'
        }, {
          loader: 'sass-loader'
        }],
   	  }
    ]
  },
  plugins: [
    new HtmlWebPackPlugin({
      template: 'index.html'
    }),
    new CleanWebpackPlugin(['dist']),
  ]
}
所有的 plugin 和 loader 已经加载完了,为了方便我们开发,还需要 webpack 开发服务器,这样我们就可以实时查看代码修改的效果了。
npm i webpack-cli webpack-dev-server --save-dev
在 webpack.config.js 中添加 devServer 字段:
const CleanWebpackPlugin = require('clean-webpack-plugin')
const HtmlWebPackPlugin = require('html-webpack-plugin')
const path = require('path')

module.exports = {
  entry: {
    main: './src/index.js'
  },
  output: {
    filename: '[name].[hash].js',
    path: path.resolve('./dist'),
  },
  module: {
    rules: [
      {
        test: /\.js$/,
        exclude: ['node_modules'],
        use: [{ loader: 'babel-loader' }],
      },
      {
        test: /\.s(a|c)ss$/,
        use: [{
          loader: 'style-loader'
        }, {
          loader: 'css-loader'
        }, {
          loader: 'sass-loader'
        }],
   	  }
    ]
  },
  plugins: [
    new HtmlWebPackPlugin({
      template: 'index.html'
    }),
    new CleanWebpackPlugin(['dist']),
  ],
  devServer: {
    host: 'localhost',
    port: 3000,
    open: true
  }
}
为了方便运行,可以将 webpack-dev-server 命令添加到 package.json 中:
{
  ...
  "scripts": {
    "start": "webpack-dev-server",
    "test": "jest ./test"
  },
}
现在只需要 npm start 就可以查看 demo 的运行效果,到这里 react webpack 项目开发环境已经算是搭建完成。
但是这个配置没有对生产环境做区分,也就是说生产环境的代码和开发环境代码一样,但实际开发中往往需要对生产环境代码做优化比如(压缩 js代码,修改变量名和方法名),在开发环境中为了编译调试又不希望优化这部分内容。我们可以将两种环境区分开来。
这个时候有可以用到这个插件 webpack-merge:
npm i webpack-merge --save-dev
现在我们可以将原来的 webpack 配置文件分离成三个文件,
webpack.common.js 存放公共配置项:
const CleanWebpackPlugin = require('clean-webpack-plugin')
const HtmlWebPackPlugin = require('html-webpack-plugin')
const path = require('path')

module.exports = {
  entry: {
    main: './src/index.js'
  },
  output: {
    filename: '[name].[hash].js',
    path: path.resolve('./dist'),
  },
  module: {
    rules: [
      {
        test: /\.js$/,
        exclude: ['node_modules'],
        use: [{ loader: 'babel-loader' }],
      },
      {
        test: /\.s(a|c)ss$/,
        use: [{
          loader: 'style-loader'
        }, {
          loader: 'css-loader'
        }, {
          loader: 'sass-loader'
        }],
   	  }
    ]
  },
  plugins: [
    new HtmlWebPackPlugin({
      template: 'index.html'
    }),
    new CleanWebpackPlugin(['dist']),
  ]
}
webpack.dev.js 在通用配置项基础上添加开发环境配置项:
const merge = require('webpack-merge');
const common = require('./webpack.common.js');

module.exports = merge(common, {
  mode: 'development',
  devServer: {
    host: 'localhost',
    port: 3000,
    open: true
  }
})
webpack.prod.js 在通用配置项基础上中添加生成环境配置项:
const merge = require('webpack-merge');
const common = require('./webpack.common.js');

module.exports = merge(common, {
  mode: 'production',
})
最后在 package.json 中添加生产环境打包脚本:
{
  ...
  "scripts": {
    "build": "webpack --config webpack.prod.js",
    "start": "webpack-dev-server --config webpack.dev.js",
    "test": "jest ./test"
  },
}


 浙公网安备 33010602011771号