
Spring Boot配置方式
Spring提供了xml、注解、Java配置、groovy配置实现Bean的创建和注入。
配置元数据
无论xml配置、注解配置还是Java配置,都被称为配置元数据,所谓元数据即描述数据的数据。元数据本身不具备任何可执行的能力,只能通过外界代码对这些元数据进行解析后进行一些有意义操作。Spring容器解析这些配置元数据进行Bean初始化、配置和管理依赖。
准备工作
本文代码测试均在《Spring Boot应用连接数据库MySQL》基础上开发。在com.neon.apple包下,建立一个名为service。然后建立功能类TestService ,使用TestService 的功能类UseTestService,Java配置类JavaConfig,XML配置类XMLConfig。在src/main/resources下建立application-bean.xml。
xml配置
在Spring 1.x时代,使用Spring开发满眼都是xml配置的Bean。Spring IoC有个非常核心的概念bean。由Spring容器来负责Bean的实例化,装配和管理。xml用来描述Bean的配置关系,Spring从XML配置文件中读取任何类型的元数据并自动转换成相应的Java代码。使用XML来配置Bean失去编译时的类型安全检查,同时大量的XML配置使得整个项目变得更加复杂。
下面简单介绍xml配置的使用。
1、编写功能类的Bean
package com.neon.apple.service;


public class TestService {


    public TestService(){

        System.out.println("TestService.TestService()");

    }


    public void SayHello(){

        System.out.println("Hello World!");

    }

}
2、使用功能类的Bean
package com.neon.apple.service;


public class UseTestService {

    TestService testService;


    public UseTestService(TestService testService){

        System.out.println("UseTestService.UseTestService()");

        this.testService = testService;

        this.testService.SayHello();

        System.out.println(this.testService.getName());

     }

}
3、编辑XML文件application-bean.xml
编辑src/main/resources下的application-bean.xml,装配TestService Bean,通过属性注入法设置类的属性值,通过构造方法注入TestService Bean装配UseTestService。
<?xml version="1.0" encoding="UTF-8"?>

<beans xmlns="http://www.springframework.org/schema/beans"

 xmlns:xsi="http://www.w3.org/2001/XMLSchema-instance" xmlns:context="http://www.springframework.org/schema/context"

 xmlns:tx="http://www.springframework.org/schema/tx"

 xsi:schemaLocation="http://www.springframework.org/schema/beans
http://www.springframework.org/schema/beans/spring-beans-2.5.xsd

 http://www.springframework.org/schema/context http://www.springframework.org/schema/context/spring-context-2.5.xsd

 http://www.springframework.org/schema/tx http://www.springframework.org/schema/tx/spring-tx-2.5.xsd">


 <!-- 通过属性注入(setter方法) -->

 <bean name="TestService" class="com.neon.apple.service.TestService">

  <property name="id" value="1"></property>

  <property name="name" value="张三"></property>

 </bean>


 <!-- 通过构造方法注入 -->

 <bean name="UseTestService" class="com.neon.apple.service.UseTestService" autowire="byName">

  <constructor-arg ref = "TestService"></constructor-arg>

 </bean>


</beans>
4、注入配置文件application-bean.xml
编写类XMLConfig ,确保application-bean.xml能被Spring Boot可以扫描到。
package com.neon.apple.service;


import org.springframework.context.annotation.Configuration;

import org.springframework.context.annotation.ImportResource;


@Configuration

@ImportResource(locations={"classpath:application-bean.xml"})

public class XMLConfig {


}
5、运行
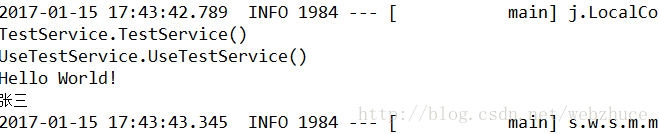
注解配置
在Spring 2.x时代,随着JDK 1.5带来的注解支持,Spring提供了声明Bean的注解(如@Service、@Component)大大减少了配置量。Spring使用注解来描述Bean的配置与采用XML相比,因类注释是在一个类源代码中,可以获得类型安全检查的好处,可以良好地支持重构。
1、编写功能类的Bean
使用@Service注解声明当前TestService类时Spring管理的一个Bean。
package com.neon.apple.service;


import org.springframework.stereotype.Service;


@Service

public class TestService {


    public TestService(){

        System.out.println("TestService.TestService()");

    }


    public void SayHello(){

        System.out.println("Hello World!");

    }

}
代码解释:
使用@Service注解声明当前TestService类是Spring 管理的一个Bean,其中,使用@Component、@Controller等是等效。
2、使用功能类的Bean
使用@Autowired将TestService的实体Bean注入到UseTestService中,让UserTestService具备FunctionService的功能。
package com.neon.apple.service;


import org.springframework.beans.factory.annotation.Autowired;

import org.springframework.stereotype.Service;


@Service

public class UseTestService {

    @Autowired

    TestService testService;


    public UseTestService(TestService testService){

         System.out.println("UseTestService.UseTestService()")
;

         testService.SayHello();

    }

}
代码解释:
使用@Autowired将TestService的实体Bean注入UseTestService中,让UseTestService具备TestService的功能。
3、运行
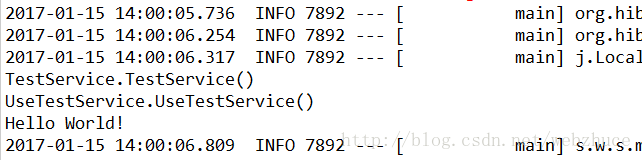
Java配置
从Spring 3.x开始,Spring提供了Java配置的能力。Java配置是Spring4.x推荐的配置方式,可以完全替代xml配置;Java配置也是Spring Boot推荐的配置方式。
Java配置是通过@Configuration和@Bean来实现的。
1、@Configuration声明当前类是一个配置类,相当于一个Spring配置的xml文件
2、@Bean注解在方法上,声明当前方法的返回值为一个Bean。
1、编写功能类的Bean
没有@Service注解用来声明Bean。
package com.neon.apple.service;

public class TestService {


    public TestService(){

        System.out.println("TestService.TestService()");

    }


    public void SayHello(){

        System.out.println("Hello World!");

    }

}
2、使用功能类的Bean
没有@Service注解用来声明Bean,没有@Autowired注解将TestService的实体Bean注入到UseTestService中,让UserTestService具备FunctionService的功能。
package com.neon.apple.service;
public class UseTestService {
TestService testService;
public UseTestService(TestService testService){
System.out.println("UseTestService.UseTestService()");
this.testService = testService;
this.testService.SayHello();
}
}
3、配置类
编辑配置类JavaConfig 。
package com.neon.apple.service;
import org.springframework.context.annotation.Bean;
import org.springframework.context.annotation.Configuration;
@Configuration
public class JavaConfig {
@Bean
public TestService TestService(){
return new TestService();
}
@Bean
public UseTestService UseTestService(){
return new UseTestService(TestService());
}
// @Bean
// public UseTestService UseTestService(TestService testService ){
// return new UseTestService(testService);
// }
}
代码解释:
1、@Configuration注解表明JavaConfig类是一个配置类,这意味着这个类里可能有零个或多个@Bean注解。
2、@Bean注解声明当前TestService的返回值是一个Bean,Bean的名称是方法名。
3、注入TestService的Bean时直接调用TestService()。
4、另外一种注入的方式,直接将TestService作为参数给UseTestService(),这也是Spring容器提供的极好的功能。在Spring容器中,只要存在某个Bean,就可以在另一个Bean的声明方法的参数中写入。
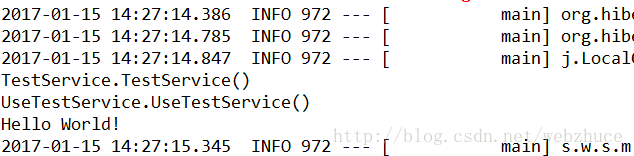
4、运行
![这里写图片描述]()
总结
何时使用Java配置或者注解配置?主要原则是:全局配置使用Java配置(如数据库相关配置、MVC相关配置),业务Bean的配置使用注解配置。

 浙公网安备 33010602011771号