Consul之:key/value存储
key/value作用
- 动态修改配置文件
- 支持服务协同
- 建立leader选举
- 提供服务发现
- 集成健康检查
除了提供服务发现和综合健康检查,Consul还提供了一个易于使用的键/值存储。这可以用来保存动态配置,协助服务协调,建立领导人选举,并启用其他开发人员可以想构建的任何其他内容。
有两种方法可以使用:通过HTTP API和通过CLI API。
一、使用CLI API操作key/value
1、consul kv get 查询
D:\soft\worksoft\consul_1.0.6_windows_amd64>consul kv get redis/config/minconns
Error! No key exists at: redis/config/minconns
你将看到没有结果返回,由于KV存储中没有该键返回了一个错误,接下来我们将插入或”put”一个值到KV存储中。
2、consul kv put增加key/value
D:\soft\worksoft\consul_1.0.6_windows_amd64>consul kv put redis/config/minconns 1
Success! Data written to: redis/config/minconns
现在再次查询该键你将看到如下结果:
D:\soft\worksoft\consul_1.0.6_windows_amd64>consul kv get redis/config/minconns
1
Consul保留额外的元数据在该字段,你可以使用-detailed标志检索详细信息:
D:\soft\worksoft\consul_1.0.6_windows_amd64>consul kv get -detailed redis/config/minconns
CreateIndex      74
Flags            0
Key              redis/config/minconns
LockIndex        0
ModifyIndex      74
Session          -
Value            1
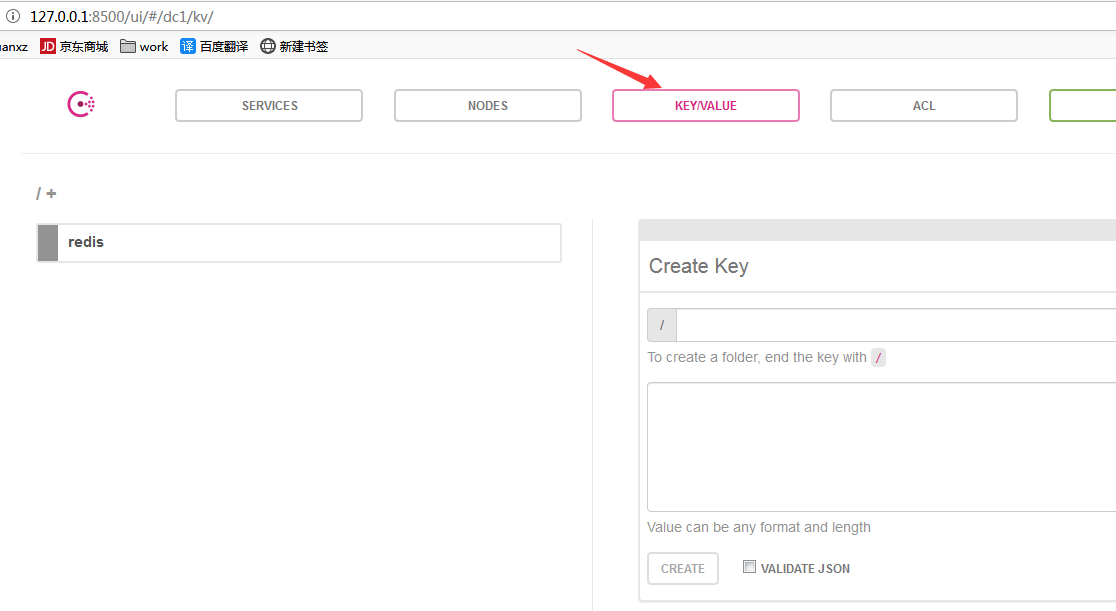
在web UI上可以看到用CLI API创建的key

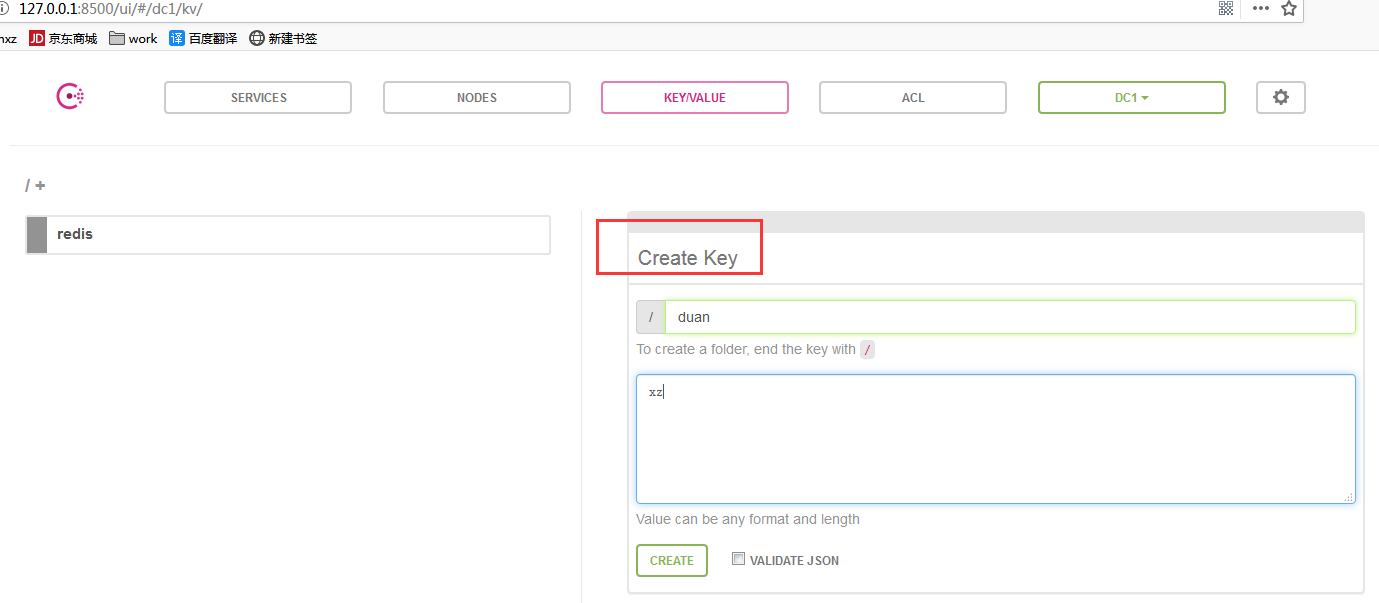
在web UI上创建一个“duan”的key:

再通过CLI API查询结果:

设置值的时候,还可以使用-flags标志
- -flags=<uint>
Unsigned integer value to assign to this key-value pair. This value
is not read by Consul, so clients can use this value however makes sense
for their use case. The default value is 0 (no flags).
flags用来做客户端自定义标志,consul并不使用它,你可以在你自己的程序中随便定义
D:\soft\worksoft\consul_1.0.6_windows_amd64>consul kv put -flags=42 redis/config/users/admin abcd1234
Success! Data written to: redis/config/users/admin
设置flag值为42,想设置成什么就设置成什么.所有的键都支持设置一个64位的整型值。
3、consul kv get -recurse 列表查询
使用-recurse选项可以列出KV存储中所有keys,返回的结果将按照字母排序。
D:\soft\worksoft\consul_1.0.6_windows_amd64>consul kv get -recurse
redis/config/minconns:1
redis/config/users/admin:abcd1234
4、consul kv delete删除
使用delete命令删除KV存储中指定的key。
D:\soft\worksoft\consul_1.0.6_windows_amd64>consul kv delete redis/config/minconns
Success! Deleted key: redis/config/minconns
还可以使用recurse选项递归选项删除含某个前缀的所有keys:
D:\soft\worksoft\consul_1.0.6_windows_amd64>consul kv delete -recurse redis
Success! Deleted keys with prefix: redis
如果要更新一个存在键的值,可以put一个新值在同样的路径上。
D:\soft\worksoft\consul_1.0.6_windows_amd64>consul kv put foo bar Success! Data written to: fooD:\soft\worksoft\consul_1.0.6_windows_amd64>consul kv get foo
barD:\soft\worksoft\consul_1.0.6_windows_amd64>consul kv put foo zip
Success! Data written to: foo
Consul可以使用Check_And_Set提供原子键更新操作。执行CAS操作时需指定-cas标志。至于什么是CAS,请自行百度吧
- -modify-index=<uint>
Unsigned integer representing the ModifyIndex of the key. This is used in combination with the -cas flag.
首先查询foo这个key的详细信息
D:\soft\worksoft\consul_1.0.6_windows_amd64>consul kv get -detailed foo
CreateIndex      131
Flags            0
Key              foo
LockIndex        0
ModifyIndex      133
Session          -
Value            zip
看到foo的索引编号ModifyIndex是133。然后使用CAS操作的方式来修改它
D:\soft\worksoft\consul_1.0.6_windows_amd64>consul kv put -cas -modify-index=133 foo bar
Success! Data written to: foo
修改成功,再查询
D:\soft\worksoft\consul_1.0.6_windows_amd64>consul kv get -detailed foo
CreateIndex      131
Flags            0
Key              foo
LockIndex        0
ModifyIndex      141
Session          -
Value            bar
ModifyIndex变成141了。依然使用上面那个修改命令试试
D:\soft\worksoft\consul_1.0.6_windows_amd64>consul kv put -cas -modify-index=133 foo bar
Error! Did not write to foo: CAS failed
失败了。原因是第一次CAS操作成功,因为ModifyIndex的值是141,我们输入的也是-modify-index=133。
第二次操作失败,ModifyIndex已经变成141了,我们还用-modify-index=133,Check_And_SetS中的Check这步就失败了,不会再Set了。
二、使用http API操作key/value
2.1、查看全部key/value http://127.0.0.1:8500/v1/kv/?recurse

说明:
- 使用?recurse参数来指定查看多个KV
- 没有值--404
2.2、添加key/value

说明:flags--用于为任意一个KV添加一个有意义的metadata。
注意:上边的这个就是有问题的,一定要注意是flags而非flag。
2.3、查看单个key/value

说明:value是test的base64编码(使用base64编码是为了允许非UTF-8的字符)
2.4、修改key/value

cas的值如果与ModifyIndex相等,则修改成功,若不相等,则修改失败。
2.5、删除key/value
2.5.1、删除单一KV

2.5.2、删除一定范围的KV(指定前缀范围内的KV)

说明:
- 指定删除的KV的K的前缀(zjg)
- 多个操作一定要有?recurse参数
三、使用Consul 的key/value存储替换config server
由于consul自带kv存储,完全可以取代config server。
步骤如下:
一、先添加jar依赖
//compile 'org.springframework.cloud:spring-cloud-starter-config'
compile 'org.springframework.cloud:spring-cloud-starter-consul-config'
之前config server的依赖去掉,换成consul-config的依赖即可。
二、修改bootstrap.yml文件
 1 spring:
 2   ...
 3   cloud:
 4     consul:
 5       host: 127.0.0.1
 6       port: 8500
 7       discovery:
 8         tags: version=1.0,author=yjmyzz
 9         healthCheckPath: /info.json
10         healthCheckInterval: 5s
11         instanceId: ${spring.application.name}:${spring.cloud.client.ipAddress}
12         enabled: true
13       config:
14         enabled: true
15         format: YAML
16         prefix: config
17         defaultContext: application
18         profileSeparator: ','
19         data-key: data
20 #    config:
21 #      label: dev
22 #      discovery:
23 #        enabled: true
24 #        service-id: my-config-server
25 #      fail-fast: true
26 #      retry:
27 #        max-interval: 1500
28 #        max-attempts: 5
29 #        multiplier: 1.2
关键是13-19行,解释一下:
15行 format:YAML 表示consul中的key-value中的value内容,采用YAML格式
16行 prefix: config 表示consul用于存储配置的文件夹根目录名为config
17行 defaultContext: application 表示配置文件对应的应用名称(eg: 你的服务如果打算取名为myApp,则这里的application就要换成myApp)
18行 profileSeparator: ',' 表示如果有多个profile(eg: 开发环境dev,测试环境test...) ,则key名中的profile与defaultContext之间,用什么分隔符来表示(这里有点费解,后面还会详细解释)
19行 data-key: data 表示最后一层节点的key值名称,一般默认为data
三、consul中创建kv配置节点

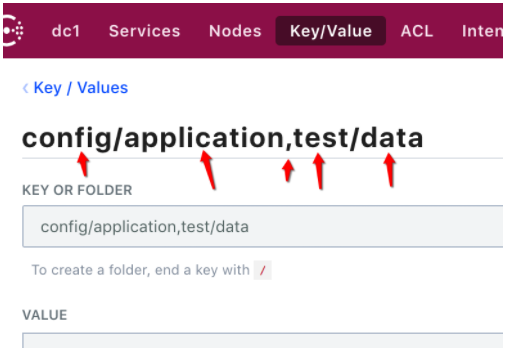
很多文章,包括官方文档这一步都讲得不明不白,关键是 节点名称的命名规则,要与bootstrap.yml中的配置一样,比如我们要创建一个test环境的配置,key名可以取为:
config/application,test/data
这里每一个部分,都要与上一步bootstrap.yml中的一致,上图中5个剪头所指,大家结合上一步中15-19行的解释体会一下。
然后Value值的部分,把配置内容按yml格式填进去就行:

tips: 平时开发时,一般使用consul dev模式,开发模式下kv存储不会持久化存储,全在内存中(重启consul就丢了!),所以一般建议yml配置文件内容,在项目中单独存一个文件,启动调试时,直接把配置文件内容贴到Value框里即可。
好了,现在你可以试着启动下,顺利的话,应该就可以了,是不是很简单,关键还省掉了config server的部署,帮公司省了机器,别忘了让领导给你加绩效哦^_^
如果希望用代码的方式来读/写 KV存储,可以用下面的方式:
读:
curl http://localhost:8500/v1/kv/config/application,dev/data?raw=true
原文地址:https://www.cnblogs.com/duanxz/p/9660766.html


 浙公网安备 33010602011771号