
IDEA项目搭建六——使用Eureka和Ribbon进行项目服务化
一、Eureka的作用
这里先简单说明使用eureka进行业务层隔离,实现项目服务化也可以理解为微服务,我一直崇尚先实现代码再学习理论,先简单上手进行操作,eureka使用分为三块,1是服务注册中心,2是服务生产模块,3是服务消费模块

关系调用说明:
- 服务生产者启动时,向服务注册中心注册自己提供的服务
- 服务消费者启动时,在服务注册中心订阅自己所需要的服务
- 注册中心返回服务提供者的地址信息给消费者
- 消费者从提供者中调用服务
Eureka包含了Server端和Client端组件。
Server端是服务注册中心,用于提供服务的注册与发现。Eureka支持高可用的配置,当集群中有分片出现故障时,Eureka就会转入自动保护模式,它允许分片故障期间继续提供服务的发现和注册,当故障分片恢复正常时,集群中其他分片会把他们的状态再次同步回来。
Client端组件包含服务消费者与服务生产者。在应用程序运行时,Eureka服务生产者会向注册中心注册自身提供的服务并每30s发送心跳来更新它的服务租约,当一段时间生产者没有向服务中心续租将会被移出服务提供注册表。同时也可以从服务端查询当前注册的服务信息并把他们缓存到本地并周期性的刷新服务状态。
二、搭建eurkea服务注册中心
新建Project或者Module,选择Maven结构

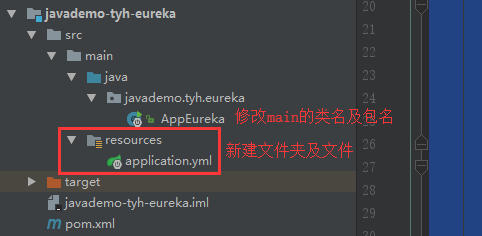
简单看一下我的模块结构
1、修改pom.xml文件,增加springboot和springcloud的配置,由于使用的最新的spring boot所以spring cloud也是使用最新版本,注意这里的version是Finchley.RELEASE

<dependencyManagement>
        <dependencies>
            <dependency>
                <groupId>org.springframework.boot</groupId>
                <artifactId>spring-boot-dependencies</artifactId>
                <version>2.0.3.RELEASE</version>
                <type>pom</type>
                <scope>import</scope>
            </dependency>
            <dependency>
                <groupId>org.springframework.cloud</groupId>
                <artifactId>spring-cloud-dependencies</artifactId>
                <version>Finchley.RELEASE</version>
                <type>pom</type>
                <scope>import</scope>
            </dependency>
        </dependencies>
    </dependencyManagement>
    <dependencies>
        <dependency>
            <groupId>org.springframework.cloud</groupId>
            <artifactId>spring-cloud-starter-netflix-eureka-server</artifactId>
        </dependency>
    </dependencies>
<build>
    <plugins>
            <plugin>
                <groupId>org.springframework.boot</groupId>
                <artifactId>spring-boot-maven-plugin</artifactId>
            </plugin>
        </plugins>
    </build>
2、新建resources文件夹并在File -> Project Structure 中设置为Resources格式,并增加application.yml格式文件,也可用properties格式
spring: application: #Eureka服务注册中心名称 name: javademo-tyh-eureka-serverserver:
#服务注册中心端口号
port: 11000eureka:
instance:
#服务注册中心主机名
hostname: localhostclient:
#是否向服务注册中心注册自己
register-with-eureka: false
#是否检索服务
fetch-registry: false
#服务注册中心的地址
service-url:
defaultZone: http://${eureka.instance.hostname}😒{server.port}/eureka/
3、在main方法的类中增加@EnableEurekaServer注解来标明是服务注册中心,从main方法中写spring boot的运行代码
import org.springframework.boot.SpringApplication; import org.springframework.boot.autoconfigure.SpringBootApplication; import org.springframework.cloud.netflix.eureka.server.EnableEurekaServer;@EnableEurekaServer
@SpringBootApplication
public class AppEureka
{
public static void main( String[] args ) {
SpringApplication.run(AppEureka.class, args);
}
}
OK,现在eurkea的服务注册中心就配置完毕了,从main这里启动一下,浏览器中访问http://localhost:11000就能看到运行状态界面了,如果端口号冲突自己修改一下即可
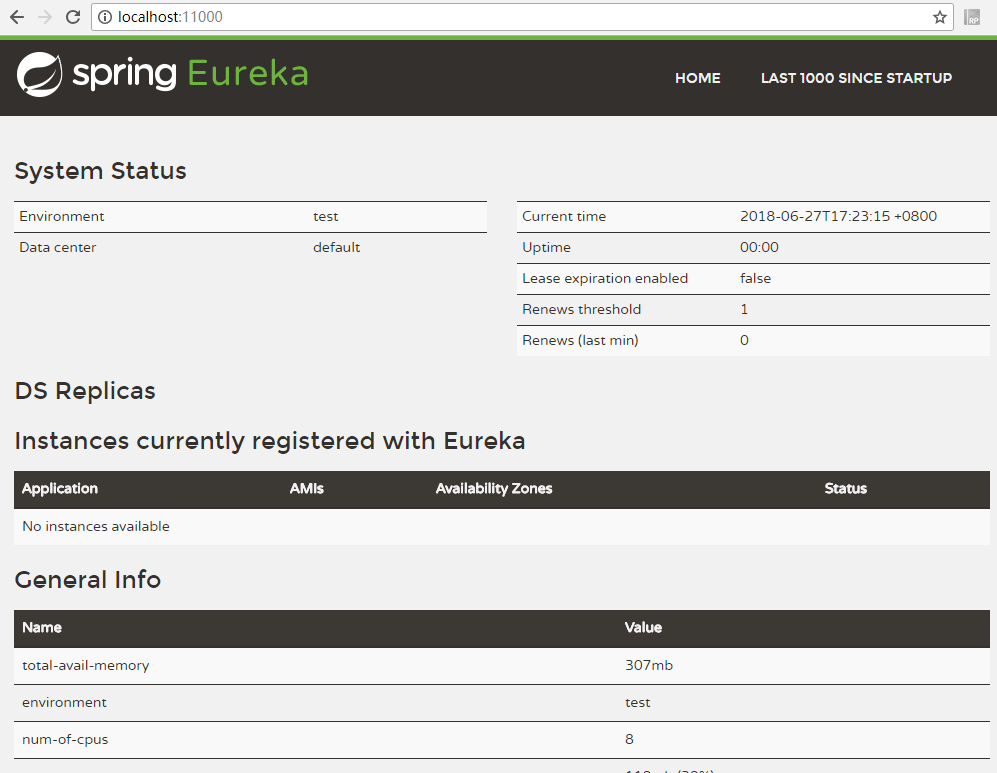
现在可以在"Instances currently registered with Eureka"中看到没有任何服务注册进来。
三、搭建服务生产模块
新建Module,选择Maven的QuickStart模板当作服务生产者,先看我的目录结构,没有用的文件我都打了马赛克了

1、修改pom.xml文件,增加spring boot和spring cloud节点,注意在dependencies的cloud节点下增加了exclusions节点指明与注册中心的通信协议,否则可能无法注册服务
<dependencyManagement> <dependencies> <dependency> <!-- Import dependency management from Spring Boot --> <groupId>org.springframework.boot</groupId> <artifactId>spring-boot-dependencies</artifactId> <version>2.0.3.RELEASE</version> <type>pom</type> <scope>import</scope> </dependency> <dependency> <groupId>org.springframework.cloud</groupId> <artifactId>spring-cloud-dependencies</artifactId> <version>Finchley.RELEASE</version> <type>pom</type> <scope>import</scope> </dependency> </dependencies> </dependencyManagement><span style="color: #0000ff;"><</span><span style="color: #800000;">dependencies</span><span style="color: #0000ff;">></span> <span style="color: #0000ff;"><</span><span style="color: #800000;">dependency</span><span style="color: #0000ff;">></span> <span style="color: #0000ff;"><</span><span style="color: #800000;">groupId</span><span style="color: #0000ff;">></span>org.springframework.boot<span style="color: #0000ff;"></</span><span style="color: #800000;">groupId</span><span style="color: #0000ff;">></span> <span style="color: #0000ff;"><</span><span style="color: #800000;">artifactId</span><span style="color: #0000ff;">></span>spring-boot-starter-web<span style="color: #0000ff;"></</span><span style="color: #800000;">artifactId</span><span style="color: #0000ff;">></span> <span style="color: #0000ff;"></</span><span style="color: #800000;">dependency</span><span style="color: #0000ff;">></span> <span style="color: #0000ff;"><</span><span style="color: #800000;">dependency</span><span style="color: #0000ff;">></span> <span style="color: #0000ff;"><</span><span style="color: #800000;">groupId</span><span style="color: #0000ff;">></span>org.springframework.cloud<span style="color: #0000ff;"></</span><span style="color: #800000;">groupId</span><span style="color: #0000ff;">></span> <span style="color: #0000ff;"><</span><span style="color: #800000;">artifactId</span><span style="color: #0000ff;">></span>spring-cloud-starter-netflix-eureka-client<span style="color: #0000ff;"></</span><span style="color: #800000;">artifactId</span><span style="color: #0000ff;">></span> <span style="color: #008000;"><!--</span><span style="color: #008000;"> 设置与注册中心的通信协议,否则有可能提示错误“拒绝注册服务” </span><span style="color: #008000;">--></span> <span style="color: #0000ff;"><</span><span style="color: #800000;">exclusions</span><span style="color: #0000ff;">></span> <span style="color: #0000ff;"><</span><span style="color: #800000;">exclusion</span><span style="color: #0000ff;">></span> <span style="color: #0000ff;"><</span><span style="color: #800000;">groupId</span><span style="color: #0000ff;">></span>com.sun.jersey<span style="color: #0000ff;"></</span><span style="color: #800000;">groupId</span><span style="color: #0000ff;">></span> <span style="color: #0000ff;"><</span><span style="color: #800000;">artifactId</span><span style="color: #0000ff;">></span>jersey-client<span style="color: #0000ff;"></</span><span style="color: #800000;">artifactId</span><span style="color: #0000ff;">></span> <span style="color: #0000ff;"></</span><span style="color: #800000;">exclusion</span><span style="color: #0000ff;">></span> <span style="color: #0000ff;"><</span><span style="color: #800000;">exclusion</span><span style="color: #0000ff;">></span> <span style="color: #0000ff;"><</span><span style="color: #800000;">groupId</span><span style="color: #0000ff;">></span>com.sun.jersey<span style="color: #0000ff;"></</span><span style="color: #800000;">groupId</span><span style="color: #0000ff;">></span> <span style="color: #0000ff;"><</span><span style="color: #800000;">artifactId</span><span style="color: #0000ff;">></span>jersey-core<span style="color: #0000ff;"></</span><span style="color: #800000;">artifactId</span><span style="color: #0000ff;">></span> <span style="color: #0000ff;"></</span><span style="color: #800000;">exclusion</span><span style="color: #0000ff;">></span> <span style="color: #0000ff;"><</span><span style="color: #800000;">exclusion</span><span style="color: #0000ff;">></span> <span style="color: #0000ff;"><</span><span style="color: #800000;">groupId</span><span style="color: #0000ff;">></span>com.sun.jersey.contribs<span style="color: #0000ff;"></</span><span style="color: #800000;">groupId</span><span style="color: #0000ff;">></span> <span style="color: #0000ff;"><</span><span style="color: #800000;">artifactId</span><span style="color: #0000ff;">></span>jersey-apache-client4<span style="color: #0000ff;"></</span><span style="color: #800000;">artifactId</span><span style="color: #0000ff;">></span> <span style="color: #0000ff;"></</span><span style="color: #800000;">exclusion</span><span style="color: #0000ff;">></span> <span style="color: #0000ff;"></</span><span style="color: #800000;">exclusions</span><span style="color: #0000ff;">></span> <span style="color: #0000ff;"></</span><span style="color: #800000;">dependency</span><span style="color: #0000ff;">></span> <span style="color: #0000ff;"></</span><span style="color: #800000;">dependencies</span><span style="color: #0000ff;">></span></pre>
2、新建resources文件夹并在File -> Project Structure 中设置为Resources格式,并增加application.yml格式文件
#设置提供的服务名
spring:
  application:
    name: javademo-tyh-service-base
#服务注册中心地址(刚刚搭建的Eureka Server的地址)
eureka:
  client:
    service-url:
      defaultZone: http://localhost:11000/eureka
#设置自己启动的端口
server:
  port: 12000
3、在main方法的类中增加@EnableEurekaClient注解来标明是服务客户端,从main方法中写spring boot的运行代码
import org.springframework.boot.SpringApplication; import org.springframework.boot.autoconfigure.SpringBootApplication; import org.springframework.cloud.netflix.eureka.EnableEurekaClient;@EnableEurekaClient
@SpringBootApplication
public class AppServiceBase
{
public static void main( String[] args )
{
SpringApplication.run(AppServiceBase.class,args);
}
}
4、编写各自提供服务的Controller和Action,新建一个controller文件夹,建立UserController类,编写服务方法,重要的是增加一个private DiscoveryClient对象来自动注入服务方法,自己新建一个Model模块存储实体
import javademo.tyh.model.base.UserModelEx; import org.springframework.beans.factory.annotation.Autowired; import org.springframework.cloud.client.discovery.DiscoveryClient; import org.springframework.stereotype.Controller; import org.springframework.web.bind.annotation.RequestMapping; import org.springframework.web.bind.annotation.ResponseBody;import java.time.LocalDateTime;
import java.util.ArrayList;
import java.util.List;@Controller
@RequestMapping("/user")
public class UserController {@Autowired </span><span style="color: #0000ff;">private</span><span style="color: #000000;"> DiscoveryClient client; @ResponseBody @RequestMapping(</span>"/list"<span style="color: #000000;">) </span><span style="color: #0000ff;">public</span> List<UserModelEx><span style="color: #000000;"> list() { UserModelEx modelEx </span>= <span style="color: #0000ff;">new</span><span style="color: #000000;"> UserModelEx(); modelEx.setId(</span>100<span style="color: #000000;">); modelEx.setUsername(</span>"taiyonghai"<span style="color: #000000;">); modelEx.setPassword(</span>"111111"<span style="color: #000000;">); modelEx.setSex(</span>1<span style="color: #000000;">); modelEx.setSexString(</span>"男"<span style="color: #000000;">); modelEx.setAge(</span>30<span style="color: #000000;">); modelEx.setCreateTime(LocalDateTime.now()); List</span><UserModelEx> list = <span style="color: #0000ff;">new</span> ArrayList<><span style="color: #000000;">(); list.add(modelEx); </span><span style="color: #0000ff;">return</span><span style="color: #000000;"> list; } @ResponseBody @RequestMapping(</span>"/get"<span style="color: #000000;">) </span><span style="color: #0000ff;">public</span> UserModelEx get( <span style="color: #0000ff;">int</span><span style="color: #000000;"> id ) { System.out.println(</span>"接收参数:" +<span style="color: #000000;"> id); UserModelEx modelEx </span>= <span style="color: #0000ff;">new</span><span style="color: #000000;"> UserModelEx(); modelEx.setId(id); modelEx.setUsername(</span>"taiyonghai"<span style="color: #000000;">); modelEx.setPassword(</span>"111111"<span style="color: #000000;">); modelEx.setSex(</span>1<span style="color: #000000;">); modelEx.setSexString(</span>"男"<span style="color: #000000;">); modelEx.setAge(</span>30<span style="color: #000000;">); </span><span style="color: #0000ff;">return</span><span style="color: #000000;"> modelEx; }}
OK,现在一个服务生产者就搭建完毕,我们先启动eurkea服务注册中心http://localhost:11000,再启动服务生产者http://localhost:12000如果端口被占用自行更换

可以看到我们刚刚搭建的服务已经被注册进来了,下面直接访问刚刚提供服务的action看看响应结果http://localhost:12000/user/list,有数据生产者搭建完毕。

四、搭建服务消费模块
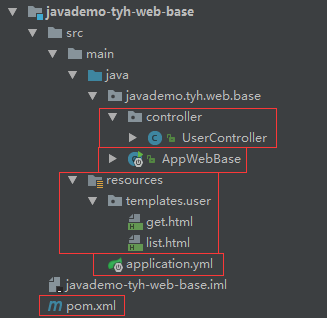
新建Module,选择Maven的QuickStart模板当作服务消费者,先看我的目录结构
1、修改pom.xml文件,增加spring boot和spring cloud节点,由于eureka很大程度上都跟spring boot有关系,所以基本每个端都需要配spring boot,消费者这边使用Ribbon进行客户端负载均衡
<dependencyManagement> <dependencies> <dependency> <groupId>org.springframework.boot</groupId> <artifactId>spring-boot-dependencies</artifactId> <version>2.0.3.RELEASE</version> <type>pom</type> <scope>import</scope> </dependency> <dependency> <groupId>org.springframework.cloud</groupId> <artifactId>spring-cloud-dependencies</artifactId> <version>Finchley.RELEASE</version> <type>pom</type> <scope>import</scope> </dependency> </dependencies> </dependencyManagement> <dependencies> <!-- import spring cloud eureka --> <dependency> <groupId>org.springframework.cloud</groupId> <artifactId>spring-cloud-starter-netflix-eureka-client</artifactId> </dependency> <dependency> <groupId>org.springframework.cloud</groupId> <artifactId>spring-cloud-starter-netflix-ribbon</artifactId> </dependency> <!-- import spring boot --> <dependency> <groupId>org.springframework.boot</groupId> <artifactId>spring-boot-starter-thymeleaf</artifactId> </dependency> <dependency> <groupId>org.springframework.boot</groupId> <artifactId>spring-boot-starter-web</artifactId> </dependency> </dependencies><span style="color: #0000ff;"><</span><span style="color: #800000;">build</span><span style="color: #0000ff;">></span> <span style="color: #0000ff;"><</span><span style="color: #800000;">plugins</span><span style="color: #0000ff;">></span> <span style="color: #0000ff;"><</span><span style="color: #800000;">plugin</span><span style="color: #0000ff;">></span> <span style="color: #0000ff;"><</span><span style="color: #800000;">groupId</span><span style="color: #0000ff;">></span>org.springframework.boot<span style="color: #0000ff;"></</span><span style="color: #800000;">groupId</span><span style="color: #0000ff;">></span> <span style="color: #0000ff;"><</span><span style="color: #800000;">artifactId</span><span style="color: #0000ff;">></span>spring-boot-maven-plugin<span style="color: #0000ff;"></</span><span style="color: #800000;">artifactId</span><span style="color: #0000ff;">></span> <span style="color: #0000ff;"></</span><span style="color: #800000;">plugin</span><span style="color: #0000ff;">></span> <span style="color: #0000ff;"></</span><span style="color: #800000;">plugins</span><span style="color: #0000ff;">></span> <span style="color: #0000ff;"></</span><span style="color: #800000;">build</span><span style="color: #0000ff;">></span></pre>
2、新建resources文件夹并在File -> Project Structure 中设置为Resources格式,并增加application.yml格式文件
#设置自己的程序名称
spring:
  application:
    name: javademo-tyh-web-base
  #thymeleaf 配置
  thymeleaf:
    encoding: UTF-8
    prefix: classpath:/templates
    cache: false
#服务注册中心地址(刚刚搭建的Eureka Server的地址)
eureka:
  client:
    #是否向服务中心注册自己
    register-with-eureka: false
    #设置eureka服务中心的地址
    service-url:
      defaultZone: http://localhost:11000/eureka
#设置自己启动的端口
server:
  port: 13000
3、在main方法的类中增加@EnableDiscoveryClient注解来标明是服务客户端,从main方法中写spring boot的运行代码
import org.springframework.boot.SpringApplication; import org.springframework.boot.autoconfigure.EnableAutoConfiguration; import org.springframework.boot.autoconfigure.SpringBootApplication; import org.springframework.cloud.client.discovery.EnableDiscoveryClient; import org.springframework.cloud.client.loadbalancer.LoadBalanced; import org.springframework.context.annotation.Bean; import org.springframework.web.client.RestTemplate;@SpringBootApplication
@EnableDiscoveryClient
@EnableAutoConfiguration
public class AppWebBase
{
public static void main( String[] args )
{
SpringApplication.run(AppWebBase.class, args);
}@Bean @LoadBalanced </span><span style="color: #008000;">//</span><span style="color: #008000;">客户端负载均衡</span> <span style="color: #0000ff;">public</span><span style="color: #000000;"> RestTemplate restTemplate(){ </span><span style="color: #0000ff;">return</span> <span style="color: #0000ff;">new</span><span style="color: #000000;"> RestTemplate(); }}
4、编写消费者的Controller和Action,新建一个controller文件夹,建立UserController类,编写服务方法,重要的是增加一个private RestTemplate对象来调用服务生产者
import javademo.tyh.model.base.UserModelEx; import org.springframework.beans.factory.annotation.Autowired; import org.springframework.core.ParameterizedTypeReference; import org.springframework.http.HttpEntity; import org.springframework.http.HttpMethod; import org.springframework.http.ResponseEntity; import org.springframework.stereotype.Controller; import org.springframework.ui.Model; import org.springframework.util.LinkedMultiValueMap; import org.springframework.util.MultiValueMap; import org.springframework.web.bind.annotation.RequestMapping; import org.springframework.web.client.RestTemplate; import java.util.List;@RequestMapping("/user")
@Controller
public class UserController {</span><span style="color: #008000;">//</span><span style="color: #008000;">自动获取RestTemplate</span>@Autowired
private RestTemplate restTemplate;@RequestMapping(</span>"/list"<span style="color: #000000;">) </span><span style="color: #0000ff;">public</span><span style="color: #000000;"> String list( Model model ) { </span><span style="color: #008000;">//</span><span style="color: #008000;">泛型集合先指定内部对象类型</span> ParameterizedTypeReference<List<UserModelEx>> paramType = <span style="color: #0000ff;">new</span> ParameterizedTypeReference<List<UserModelEx>><span style="color: #000000;">() {}; </span><span style="color: #008000;">//</span><span style="color: #008000;">由于没有请求参数,所以直接RestTemplate.exchange()调取接口,使用ResponseEntity获取响应对象 </span><span style="color: #008000;">//</span><span style="color: #008000;">第一个参数是服务名称及服务地址</span> ResponseEntity<List<UserModelEx>> responseEntity = restTemplate.exchange("http://javademo-tyh-service-base/user/list", HttpMethod.POST, <span style="color: #0000ff;">null</span><span style="color: #000000;">, paramType); </span><span style="color: #008000;">//</span><span style="color: #008000;">ResponseEntity指明了泛型数据,所以直接调用getBody()方法会自动序列化为此对象</span> List<UserModelEx> list =<span style="color: #000000;"> responseEntity.getBody(); model.addAttribute(</span>"models"<span style="color: #000000;">, list); </span><span style="color: #0000ff;">return</span> "/user/list"<span style="color: #000000;">; } @RequestMapping(</span>"/get"<span style="color: #000000;">) </span><span style="color: #0000ff;">public</span><span style="color: #000000;"> String get(Model model) { </span><span style="color: #008000;">//</span><span style="color: #008000;">服务接口请求参数对象,并填充参数</span> MultiValueMap<String, String> params = <span style="color: #0000ff;">new</span> LinkedMultiValueMap<><span style="color: #000000;">(); params.add(</span>"id", "555"<span style="color: #000000;">); </span><span style="color: #008000;">//</span><span style="color: #008000;">声明请求实体HttpEntity,并填入请求参数</span> HttpEntity<MultiValueMap<String, String>> requestEntity = <span style="color: #0000ff;">new</span> HttpEntity<>(params, <span style="color: #0000ff;">null</span><span style="color: #000000;">); </span><span style="color: #008000;">//</span><span style="color: #008000;">由于返回对象不是泛型,所以也不需要先获取内部类型,直接调用并传递请求对象 </span><span style="color: #008000;">//</span><span style="color: #008000;">第一个参数是服务名称及服务地址</span> ResponseEntity<UserModelEx> responseEntity = restTemplate.exchange("http://javademo-tyh-service-base/user/get", HttpMethod.POST, requestEntity, UserModelEx.<span style="color: #0000ff;">class</span><span style="color: #000000;">); </span><span style="color: #008000;">//</span><span style="color: #008000;">自动序列化返回对象</span> UserModelEx modelEx =<span style="color: #000000;"> responseEntity.getBody(); model.addAttribute(</span>"modelEx"<span style="color: #000000;">, modelEx); </span><span style="color: #0000ff;">return</span> "/user/get"<span style="color: #000000;">; }}
5、建立对应action的页面,并把获取到的内容渲染到页面中,在resources下建立templates/user文件夹,创建list页面填入以下内容
<!DOCTYPE html>
<html xmlns:th="http://www.thymeleaf.org">
<head>
    <meta charset="UTF-8">
    <title>Title</title>
</head>
<body>
<h1>this is /user/list</h1>
<table border="1px">
    <tr th:each="item : ${models}">
        <td th:text="${item.Id}">id</td>
        <td th:text="${item.Username}">username</td>
        <td th:text="${item.Password}">password</td>
        <td th:text="${item.Sex}">sex</td>
        <td th:text="${item.Age}">age</td>
        <td th:text="${item.CreateTime}">createtime</td>
    </tr>
</table>
</body>
</html>
OK,现在一个服务消费者就搭建完毕,可以运行打开浏览器http://localhost:13000/user/list来查看是否调用成功
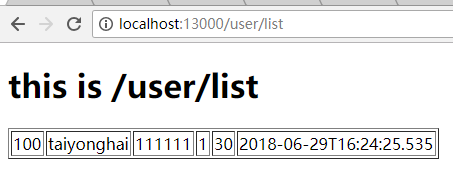
到此整个Eurkea的服务注册中心、服务生产者、服务消费者都搭建完毕,后面再根据文档查看详细的高可用配置等,加深一下对该技术的了解。
原文地址:https://www.cnblogs.com/taiyonghai/p/9235344.html

 浙公网安备 33010602011771号